| Author |
|
ACthunder 
Silver Level

Joined: 07 Oct 2009
Location: Wentzville, MO
Points: 79
|
 Post Options Post Options
") Thanks(0) Thanks(0)
 Quote Quote  Reply Reply
 Topic: AC D17 Series 1 hydraulic pump removal inspection Topic: AC D17 Series 1 hydraulic pump removal inspection
Posted: 31 Jan 2019 at 10:53pm |
I am trying to fix the constant slow sagging of the implement (usually brush hog/plow/disc). I have replaced the seals in the lifting arm ram and the hydraulic hose going from the transport valve to the ram a few years ago.
I am looking for advise on whether I it would be worth dropping the pump out of my D17 to try to identify if I should replace anything. I have never done this I don't know what to look for or inspect. Also would I need any new seals? (besides the bottom cover plate) I have heard the hold position valve may be to blame, but what do I look for? Would this require special tools? Is there like a kit or something? Thanks, Matt from Missouri
|
 |
|
Sponsored Links
|
|
|
DiyDave
Orange Level Access


Joined: 11 Sep 2009
Location: Gambrills, MD
Points: 54052
|
Post Options
Thanks(0)
Quote Reply
Posted: 01 Feb 2019 at 4:52am |
Removal of the pump takes no special tools, and is pretty much about a 1/2 hr job. I'd see to getting the seals, prior to its removal. You might wanna call Brenda at Sandy Lake, and see what parts are involved, and if a kit is available... 
|
|
MACK
Orange Level
Joined: 17 Nov 2009
Points: 7664
|
Post Options
Thanks(0)
Quote Reply
Posted: 01 Feb 2019 at 7:01am |
|
Idem #20 and ball is your problem. While it is apart, replace all orings and #9 and #24 springs. MACK
|
|
wfmurray
Orange Level
Joined: 13 Sep 2009
Location: Bostic NC
Points: 1225
|
Post Options
Thanks(0)
Quote Reply
Posted: 01 Feb 2019 at 7:12am |
|
Never worked on one like yours but on my B it was relief valve leaking .If the seat where ball sets gets rounded it will leak.Needs to be a almost square corner.Took mine to machine shop and took ten thousands off seat and now holds good. Looks like Mack pointed out the parts.
|
|
MACK
Orange Level
Joined: 17 Nov 2009
Points: 7664
|
Post Options
Thanks(0)
Quote Reply
Posted: 01 Feb 2019 at 7:21am |
|
The pump in your picture is a series 111 which is a little different than yours. MACK
|
|
DrAllis
Orange Level Access
Joined: 12 Sep 2009
Points: 21836
|
Post Options
Thanks(0)
Quote Reply
Posted: 01 Feb 2019 at 8:01pm |
|
There are two of #22 o-rings that should also be replaced while into the pump. Either of these leaking would cause settling over time. Be sure to get the two tapered head screws that secure the hold valve to the pump TIGHT.
|
|
ACthunder
Silver Level
Joined: 07 Oct 2009
Location: Wentzville, MO
Points: 79
|
Post Options
Thanks(0)
Quote Reply
Posted: 04 Feb 2019 at 1:40pm |
Could anyone post a pic or a link to the Hydraulic pump exploded parts view for the one I have in my Series 1 D17?
I also contacted Brenda at Sandy Lake and she was very helpful in ordering the parts you guys suggested.
Thanks,
|
|
Jim.ME
Orange Level
Joined: 19 Nov 2016
Location: Maine
Points: 962
|
Post Options
Thanks(0)
Quote Reply
Posted: 04 Feb 2019 at 4:59pm |
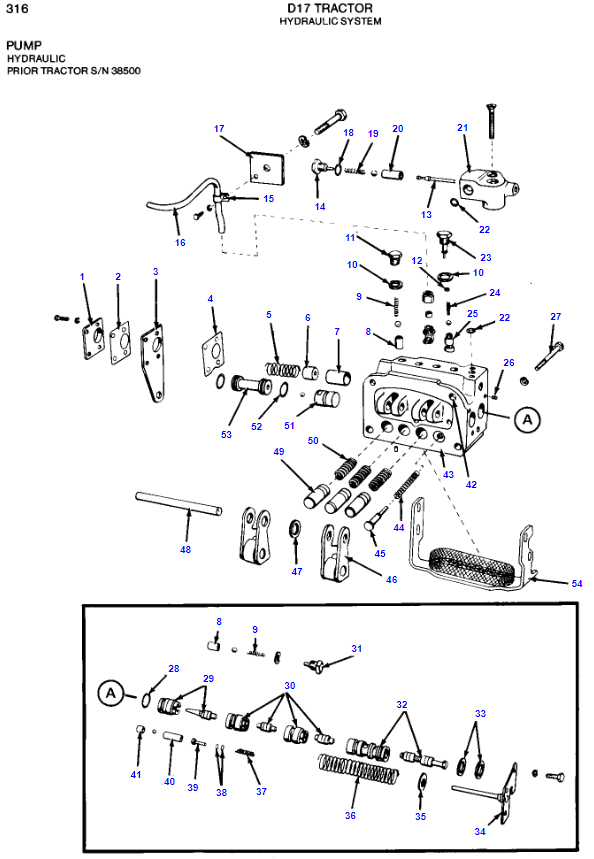
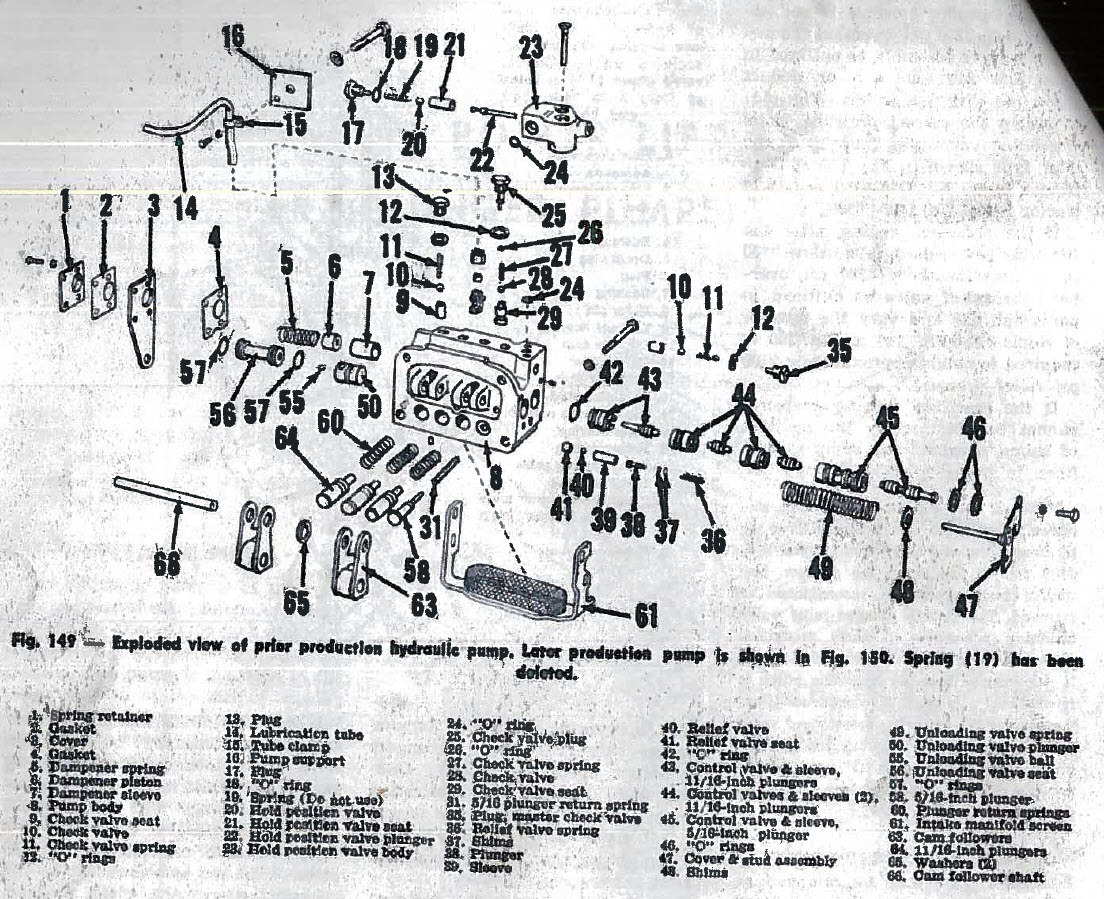
The D17 Series 1, 2, and 3 are in the same parts book. You posted the exploded view of the pump for D17 tractors prior to serial number 38500. What is your serial number? If it is 38500 or after the exploded view of that pump is in the parts book as well. Here is the link to the AGCO Parts Books. http://www.agcopartsbooks.com/partsbooksn/login.aspx?region=northamerica Sign in as a guest user and search D17 and you can choose the catalog for all but Series IV. The exploded parts views of the pumps are in it. There is detailed information about the pumps in the service manual, is that what you are looking for?. You can get to AGCO's Bookstore here: AGCO Publications. You can purchase printed, disc/usb, or download a service manual. Or have Brenda get you one with the parts.
|
|
ACthunder
Silver Level
Joined: 07 Oct 2009
Location: Wentzville, MO
Points: 79
|
Post Options
Thanks(0)
Quote Reply
Posted: 19 Feb 2019 at 3:59pm |
Here is a pic from my shop manual of the early type hydraulic pump for reference
|
|
ACthunder
Silver Level
Joined: 07 Oct 2009
Location: Wentzville, MO
Points: 79
|
Post Options
Thanks(0)
Quote Reply
Posted: 19 Feb 2019 at 4:48pm |
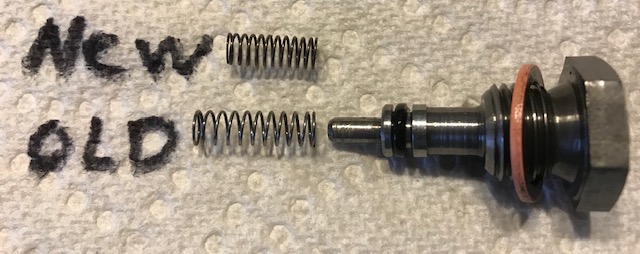
Hey guys, I ordered #24 (spring) which came with the ball for the
check valve from the AGCO dealer. But
what they sent me are a little different in size than what came out of my unit: Original ball: 0.250” dia New ball (70915903): 0.21875” dia
Original Spring:
New Spring (70233106): spring is about .25” shorter
What would you guys do?
Thanks,
Edited by ACthunder - 21 Feb 2019 at 7:53am
|
|
MACK
Orange Level
Joined: 17 Nov 2009
Points: 7664
|
Post Options
Thanks(0)
Quote Reply
Posted: 19 Feb 2019 at 9:56pm |
|
What was wrong with #24 &25 ? MACK
|
|
ACthunder
Silver Level
Joined: 07 Oct 2009
Location: Wentzville, MO
Points: 79
|
Post Options
Thanks(0)
Quote Reply
Posted: 20 Feb 2019 at 7:39am |
Nothing that I know of (although I don't have a presure gauge to accuratly test the system) I am just trying to fix the issue of every 5-10 min bump up he implement when I I brush hogging and stuff.
Above you stated earlier to replace spring #24 and they just sold me the ball also.
So far I have replaced: #20 and ball (#19 spring wasn't there which in my shop manual states to take out if it is there) 2x of #22 They sold me 4x #9's with 4x balls, I have replaced 3x each but I don't really know where the last set goes.
You had stated earlier "All seals", I haven't ordered anything else but would you suggest: #12, #52(2x), #33(2x), would I need #2 or #4?
Thanks
Edited by ACthunder - 20 Feb 2019 at 1:15pm
|
|
ACthunder
Silver Level
Joined: 07 Oct 2009
Location: Wentzville, MO
Points: 79
|
Post Options
Thanks(0)
Quote Reply
Posted: 20 Feb 2019 at 7:50am |
Here is a pic of the old and new #24 check valve spring.
|
|
MACK
Orange Level
Joined: 17 Nov 2009
Points: 7664
|
Post Options
Thanks(0)
Quote Reply
Posted: 21 Feb 2019 at 7:57am |
|
Yes, # 20 was the leak down problem. While it is down, springs # 9 and 24 should be replaced do to ware. Orings 33 and 22 should be replaced. Replace 2 # 52. In your last picture, new spring looks right, that oring should be replaced. Some pumps use 4 of # 9 others use 3 of # 9 and one of #24. 12-52-33 yes.
Hope this helps and I have not confused you. Be glad to help with any thing else. MACK
|
|
ACthunder
Silver Level
Joined: 07 Oct 2009
Location: Wentzville, MO
Points: 79
|
Post Options
Thanks(0)
Quote Reply
Posted: 22 Feb 2019 at 10:05am |
Mack,
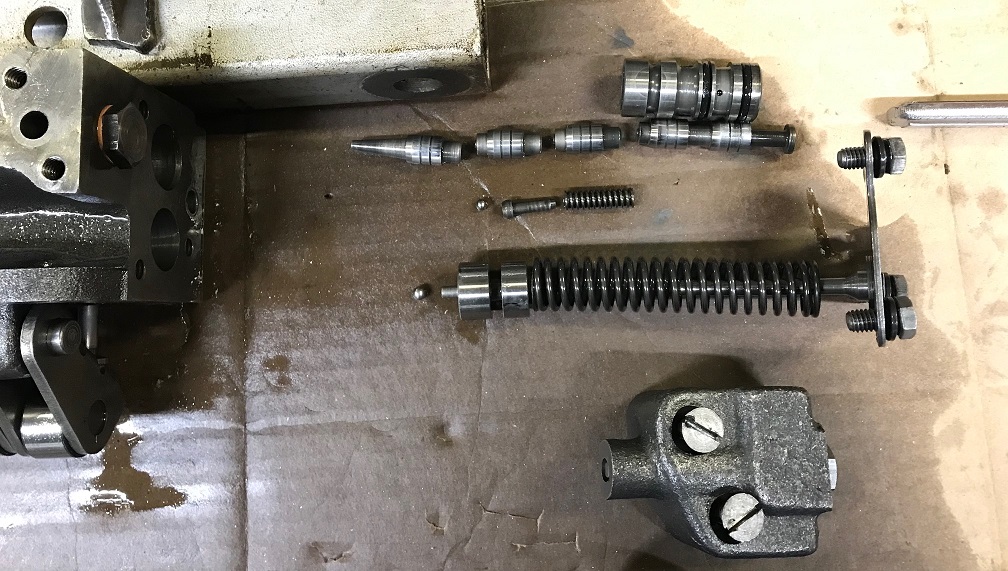
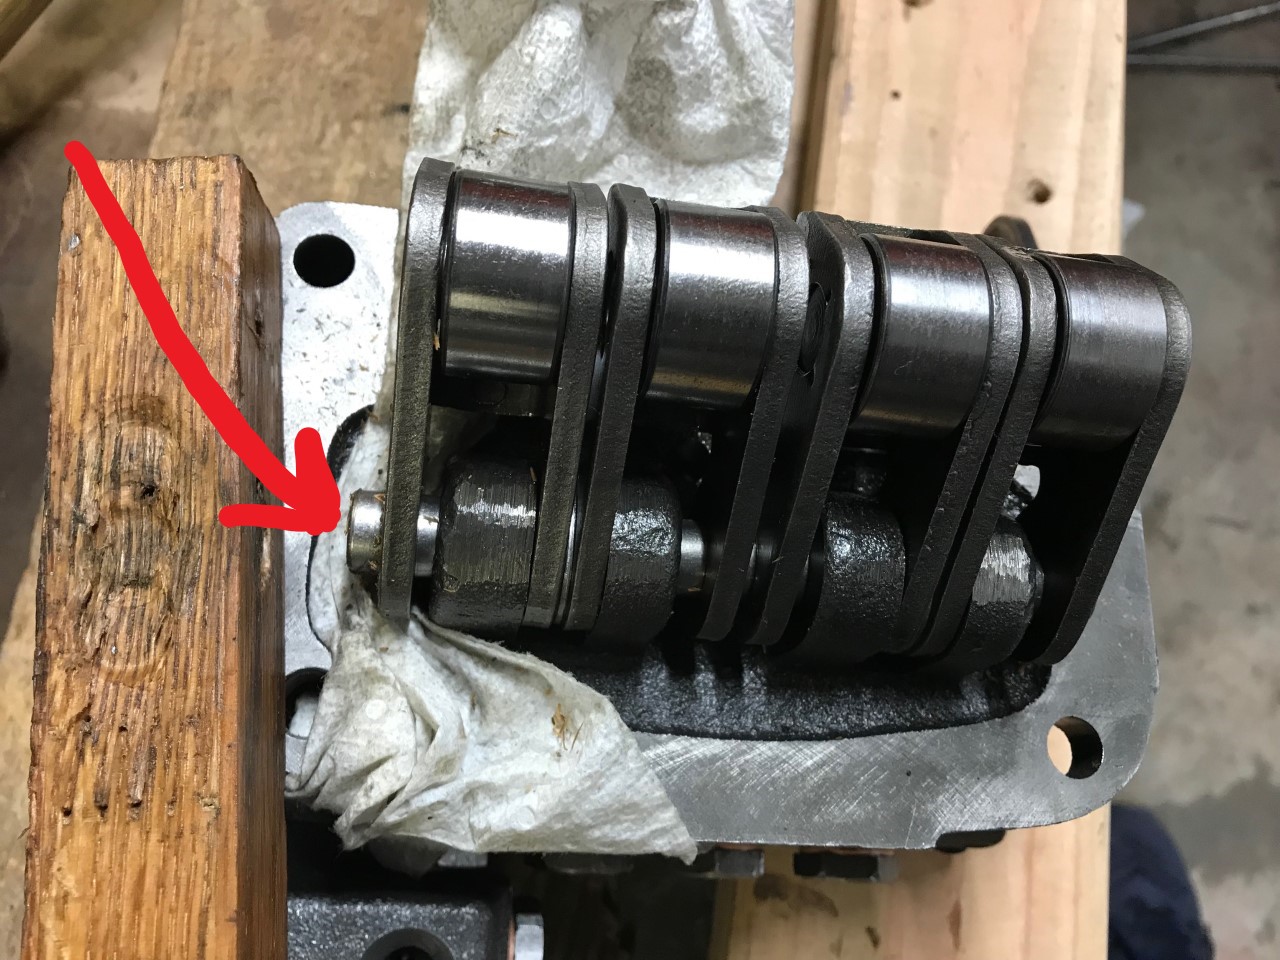
Question on where the unloading valve plunger ball goes. I think it supposed to reside centered where that protrusion is on the unloading valve plunger? But it also does fit it the hole I am pointing to in the picture so I am not 100% sure. Thanks,
Edited by ACthunder - 22 Feb 2019 at 12:19pm
|
|
MACK
Orange Level
Joined: 17 Nov 2009
Points: 7664
|
Post Options
Thanks(0)
Quote Reply
Posted: 22 Feb 2019 at 9:57pm |
|
It goes on the point of valve. MACK
|
|
ACthunder
Silver Level
Joined: 07 Oct 2009
Location: Wentzville, MO
Points: 79
|
Post Options
Thanks(0)
Quote Reply
Posted: 03 Mar 2019 at 1:38pm |
Is there a trick to getting the pin out to get the cam followers and pump plungers out? I was going to replace the plunger return springs... I have been tapping it with a 3 lb sledge (with wood block between) while pushing the cams/plungers up and down with one hand to take the pressure off the pin I am trying to remove. Can't get it to move either way.
|
|
MACK
Orange Level
Joined: 17 Nov 2009
Points: 7664
|
Post Options
Thanks(0)
Quote Reply
Posted: 03 Mar 2019 at 9:30pm |
|
Use a hammer and soft punch. The shaft is so hard you won't hurt it. A hard punch against a hard shaft could flake off causing danger to you. MACK
|
|


 Topic Options