| Author |
 Topic Search Topic Search  Topic Options Topic Options
|
Mikez 
Orange Level Access


Joined: 16 Jan 2013
Location: Usa
Points: 8918
|
 Post Options Post Options
") Thanks(0) Thanks(0)
 Quote Quote  Reply Reply
 Posted: 16 Apr 2017 at 7:03pm Posted: 16 Apr 2017 at 7:03pm |
|
Just make sure when your working on it up in the air you put some sort of block or jack stand so no accidents happen
|
 |
|
Sponsored Links
|
|
|
Clay
Orange Level

Joined: 11 Sep 2009
Location: Udall, Kansas
Points: 10408
|
Post Options
Thanks(0)
Quote Reply
Posted: 16 Apr 2017 at 7:22pm |
|
I have a seventy series 4 bottom plow but it is a snap couple and non steerable tail wheel.
|
|
DennisA (IL)
Orange Level
Joined: 11 Sep 2009
Location: Ridott IL.
Points: 2077
|
Post Options
Thanks(0)
Quote Reply
Posted: 16 Apr 2017 at 7:26pm |
|
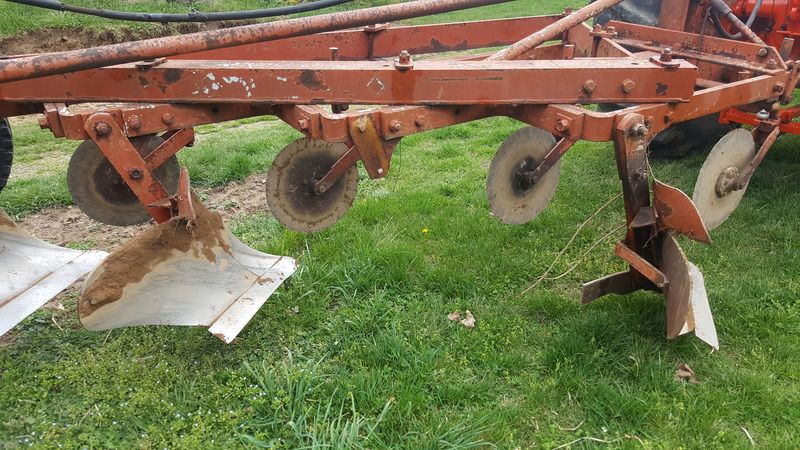
That is with out a doubt a series 70 plow with the vertical pivot hitch. On this plow you don't use the top link. The place that looks like where you attach the top link is not for the top link. It's for a part called a trunnion (part #70340818). You can use the plow without the trunnion with no ill affects. The plow should dig down until the gauge wheel stops it. If it don't then the shares need to be replaced. Before you replace the shares made sure that the pivot points on the plow do indeed pivot.
Edited by DennisA (IL) - 16 Apr 2017 at 7:47pm
|
|
Thanks & God Bless
Dennis
|
|
Gerald J.
Orange Level
Joined: 12 Sep 2009
Location: Hamilton Co, IA
Points: 5636
|
Post Options
Thanks(0)
Quote Reply
Posted: 16 Apr 2017 at 7:29pm |
|
I see the bolts in the frame cross bars, that makes it 70 or 80. The difference between 70 and 80 is that the 70 came with shear bolt plow shanks and the 80 came with spring trip plow shanks. There were kits for replacing the 60 and 70 shanks with spring trip. 60s didn't have any bolts in the cross bars so were fixed width.
I covered those details in AC Plows Parts 101 over in the knowledge forum. Definitely worth reading for such details.
The gauge and rear lift wheels look big. In the plow frames parts book I see 9", 13", 14" and 15" wheels and tires used without explanation of why the different sizes. A gauge wheel or lift wheel too large can prevent that end of the plow going into the ground deep enough to be level.
There should be part numbers stamped in the plow frame parts that could also be used to identify the frame from the plow frames book referenced in the AC Plow Parts 101 over in the Knowledge Forum.
Gerald J.
|
|
Mikez
Orange Level Access
Joined: 16 Jan 2013
Location: Usa
Points: 8918
|
Post Options
Thanks(0)
Quote Reply
Posted: 16 Apr 2017 at 7:34pm |
|
Gerald dont you still have to get some part numbers off ether moldboard, shine, or share to identify what no. bottom it is for replacement parts
|
|
DennisA (IL)
Orange Level
Joined: 11 Sep 2009
Location: Ridott IL.
Points: 2077
|
Post Options
Thanks(0)
Quote Reply
Posted: 16 Apr 2017 at 7:38pm |
 Mikez wrote: Mikez wrote:
Gerald dont you still have to get some part numbers off ether moldboard, shine, or share to identify what no. bottom it is for replacement parts |
Yes, Allis had many bottoms that could be used on the same frames.
|
|
Thanks & God Bless
Dennis
|
|
Mikez
Orange Level Access
Joined: 16 Jan 2013
Location: Usa
Points: 8918
|
Post Options
Thanks(0)
Quote Reply
Posted: 16 Apr 2017 at 7:47pm |
|
I thought so just didn't want to put my foot in mouth lol and say the wrong thing. Thanks
|
|
old farmer
Silver Level Access


Joined: 12 Oct 2011
Location: Sturgis, Mich
Points: 341
|
Post Options
Thanks(0)
Quote Reply
Posted: 16 Apr 2017 at 8:16pm |
|
It looks to me like the gage set to close to the ground which hold plow up on rear. We always had the gage set to not touch the ground until we had set the plow to good UNTIL the final adjustmens made always worked at the dealership.
|
|
DennisA (IL)
Orange Level
Joined: 11 Sep 2009
Location: Ridott IL.
Points: 2077
|
Post Options
Thanks(0)
Quote Reply
Posted: 16 Apr 2017 at 9:01pm |
old farmer wrote:
It looks to me like the gage set to close to the ground which hold plow up on rear. We always had the gage set to not touch the ground until we had set the plow to good UNTIL the final adjustmens made always worked at the dealership. |
Looks like the tail wheel is sitting on the lower ground then the gauge wheel.
|
|
Thanks & God Bless
Dennis
|
|
old farmer
Silver Level Access
Joined: 12 Oct 2011
Location: Sturgis, Mich
Points: 341
|
Post Options
Thanks(0)
Quote Reply
Posted: 16 Apr 2017 at 9:08pm |
|
You need to have gage wheel reference to plow bottoms not tail wheel.
|
|
Tbone95
Orange Level Access
Joined: 31 Aug 2012
Location: Michigan
Points: 12420
|
Post Options
Thanks(0)
Quote Reply
Posted: 17 Apr 2017 at 6:38am |
old farmer wrote:
It looks to me like the gage set to close to the ground which hold plow up on rear. We always had the gage set to not touch the ground until we had set the plow to good UNTIL the final adjustmens made always worked at the dealership. |
If you read his OP, he states the gauge wheel does not touch the ground.
|
|
Charlie175
Orange Level
Joined: 11 Sep 2009
Location: Shenandoah, VA
Points: 6369
|
Post Options
Thanks(0)
Quote Reply
Posted: 17 Apr 2017 at 7:01am |
You are correct, the gauge wheel did not contact the ground much of the time. I tried adjusting the lift arms, setting the tiller to float and neutral, it just didn't make a difference. The ram is only a single direction unit (1 hose) so it doesn't have the 2 hoses to be able to lift it off the ground.
|
|
Charlie
'48 B, '51 CA, '56 WD45 '61 D17, '63 D12, '65 D10 , '68 One-Ninety XTD
|
|
Charlie175
Orange Level
Joined: 11 Sep 2009
Location: Shenandoah, VA
Points: 6369
|
Post Options
Thanks(0)
Quote Reply
Posted: 17 Apr 2017 at 7:07am |
The Joys of rusty bolts! Caught a rock...
|
|
Charlie
'48 B, '51 CA, '56 WD45 '61 D17, '63 D12, '65 D10 , '68 One-Ninety XTD
|
|
Gerald J.
Orange Level
Joined: 12 Sep 2009
Location: Hamilton Co, IA
Points: 5636
|
Post Options
Thanks(0)
Quote Reply
Posted: 17 Apr 2017 at 10:44am |
|
The part numbers on the frame will only identify the frame, not the bottoms. To identify the bottoms part numbers have to come from frog, moldboard, shin, or share. Landsides were almost universal as were coulters.
I believe that when ordering a plow that there were at least three orders made to AC by the dealer. One for the frame, one for the hitch, and one for the bottoms. That there were no typical setups in the AC sales catalog. And then the dealer received three kits that the dealer assembled. But maybe each bottom came as a separate kit.
Gerald J.
|
|
AC720Man
Orange Level
Joined: 10 Oct 2016
Location: Shenandoah, Va
Points: 5474
|
Post Options
Thanks(0)
Quote Reply
Posted: 17 Apr 2017 at 9:11pm |
|
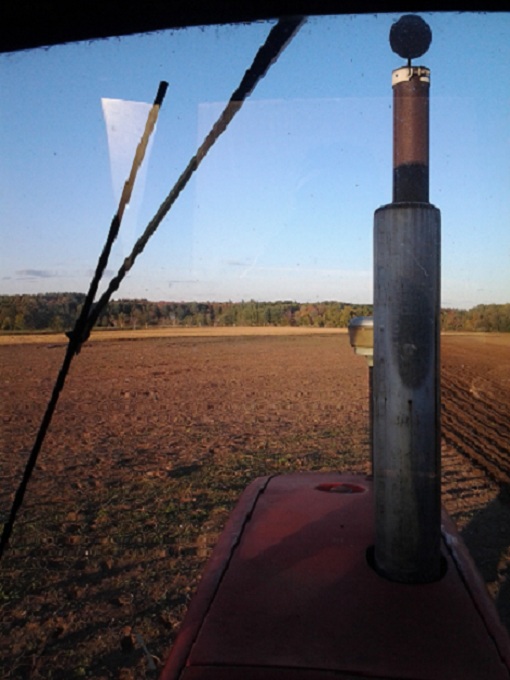
Thanks Gerald, I will check out the plow 101 info. I still could not locate any numbers on the frame but will check the back of the shares when I get a chance to take 1 off. Neat plow, it got the job done, just need to figure out the rear. The way I look at it, the trailing wheel goes to the same depth that the rear plow cut. As it sits now, all bottoms flat on the ground, the trailing wheel is against the stop which means it will not go deeper than the rear plow. The guage wheel is approximatly 10" off the ground. The picture is decieving, but I measured it with a tape when on level ground. Therefore I came up with the plow should run 10" deep. ??
|
|
1968 B-208, 1976 720 (2 of them)Danco brush hog, single bottom plow,52" snow thrower, belly mower,rear tine tiller, rear blade, front blade, 57"sickle bar,1983 917 hydro, 1968 7hp sno-bee, 1968 190XTD
|
|
Tbone95
Orange Level Access
Joined: 31 Aug 2012
Location: Michigan
Points: 12420
|
Post Options
Thanks(0)
Quote Reply
Posted: 18 Apr 2017 at 6:55am |
|
So....can the stop on the trailing wheel be adjusted? A little goes a long way. And again, the gauge wheel does not set depth, it shows you when you're at depth. Solve the mystery of the plow depth adjustment, then position your gauge wheel so that it "shows you" when you're at depth. You should be able to plow correctly with the gauge wheel completely removed.
|
|
DennisA (IL)
Orange Level
Joined: 11 Sep 2009
Location: Ridott IL.
Points: 2077
|
Post Options
Thanks(0)
Quote Reply
Posted: 18 Apr 2017 at 8:03am |
AC720Man wrote:
the trailing wheel is against the stop which means it will not go deeper than the rear plow. |
Sorry that I didn't notice the extra stop on the tail wheel. I have been searching for this part in the parts book. I could not find it at all in any of the tail wheel assy. The assy's don't even show the hole where it's mounted. This would cause me to believe that it's not a factory part and someone added it. If it were my plow I would take it out and use the gauge wheel. Then you will have full control of depth and relieve the pressure off the pivot assy.
|
|
Thanks & God Bless
Dennis
|
|
Tbone95
Orange Level Access
Joined: 31 Aug 2012
Location: Michigan
Points: 12420
|
Post Options
Thanks(0)
Quote Reply
Posted: 18 Apr 2017 at 8:11am |
|
Dennis, without a doubt you know more about this plow than I do. In a sense, we are on the same page with our advice, removing or adjusting the stop so the back of the plow can drop.
All the plows I have pulled that were equipped with gauge wheels, the gauge wheel mounting is quite "loose". Not worn out, but made that way. Between the time the gauge wheel starts to roll, and the time the slack would be taken up, there could be 2-3 inches in depth back there. This is just my experience. Also, all the tail wheels I have used, have a stop adjustment....and the tail wheel has a slight steer in it to help align the plow. So why would you want to take the weight off of it?
|
|
JoeO(CMO)
Orange Level

Joined: 11 Sep 2009
Location: Cent Missouri
Points: 2696
|
Post Options
Thanks(0)
Quote Reply
Posted: 18 Apr 2017 at 8:25am |
|
On some semi-mount plows you will see a top link bracket. This is used for the weight transfer for the particular tractor pulling it.
I have an Oliver Semi Mount and in the manual is a pic of an Oliver with top link attached describing this setup.
All tractors do not use trailing arms to sense load.
MF is another one that used the top link for this purpose.
This plow simply could have been used by another brand tractor.
This plow DEFINITLY needs new shares! The landslide shown needs to be replaced also when trying to clean up the furrow.
New shares should be installed FIRST or you will possibly be returning the adjustments back to where you started after shares are replaced.
When you get shares and if there is a choice, go for the heavy duty, they were thicker at the point. I had on to go down under like a stubbed toe, and it messed up the plowing job as you could go to the spot where contact was made. There used to be special shear bolts also that helps to keep the plow frame from twisting over time.
BTDT many times
Edited by JoeO(CMO) - 18 Apr 2017 at 8:47am
|
|
|
|
DennisA (IL)
Orange Level
Joined: 11 Sep 2009
Location: Ridott IL.
Points: 2077
|
Post Options
Thanks(0)
Quote Reply
Posted: 18 Apr 2017 at 8:49am |
This is really fun for me because all of your plows had a stop on the tail wheel and none of my plow ever had a stop on them, so this is every interesting. All of my semi-mounted plows use the gauge wheel to set the depth. This can be a little tedious because of the tire compression, but once set it stays set. As for taking off the stop, I am concerned that the casting may not be strong enough to support the weight of the plow, ground flowing over the moldboard and the force of the plow being pulled down by the shares.
|
|
Thanks & God Bless
Dennis
|
|
Gerald J.
Orange Level
Joined: 12 Sep 2009
Location: Hamilton Co, IA
Points: 5636
|
Post Options
Thanks(0)
Quote Reply
Posted: 18 Apr 2017 at 9:03am |
|
I'd wish for a double acting cylinder and hydraulics for the rear wheel. On my gas 4020 there is about 350 psi minimum with a single acting cylinder, far too much to allow manually closing a cylinder for hooking it to an implement. Could be a limiting factor in lifting the rear wheel to let the plow go in the ground.
The rear wheel rides in the furrow left by the rear bottom when plowing. When lifting the plow it takes two operations, lifting the front with the tractor hitch and lifting the rear with the rear wheel. When the front hitch pivots the link bar on top turns the rear wheel so the plow can turn in a short space. And it takes two operations to put the plow in the ground, lower the front with the tractor hitch and lower the rear by lifting the rear wheel.
When finishing the last furrows in the middle of my field with my semi mounted 2000 monoframe, I held the rear bottom shallow with the rear wheel so as to not leave a big ridge, or I lifted the front with the tractor hitch to make the front plow shallow while the rear did full depth, depending on the direction with respect to the last furrows that sometimes overlapped from opposite directions.
Gerald J.
|
|
Tbone95
Orange Level Access
Joined: 31 Aug 2012
Location: Michigan
Points: 12420
|
Post Options
Thanks(0)
Quote Reply
Posted: 18 Apr 2017 at 9:10am |
|
Dennis, yes, it is fun and interesting to hear all the differences in plows and in people's experiences. As for concern about the casting strength.....well.....I don't know about this plow. But one of the plows I have pulled over the years was not equipped with a gauge wheel, ever, and I pulled it for decades with no trouble, holding the tail end up with the wheel.
Gerald, I agree with most of what you just said, except two things. #1, he says it is hitting the stop on the tail wheel. So it literally can't go down any farther regardless of pressure. #2 I'm not so confident in, but he says he has tried it in float, and in neutral, and no difference. Wouldn't float defeat the issue you are concerned about?
The way you describe doing dead furrow passes is exactly how I do it, just depends on the direction and where the tractor is tracking.
|
|
AC720Man
Orange Level
Joined: 10 Oct 2016
Location: Shenandoah, Va
Points: 5474
|
Post Options
Thanks(0)
Quote Reply
Posted: 18 Apr 2017 at 7:53pm |
|
Thats interesting Dennis that the stop doesn"t appear in the parts book. It looks factory and even has a blind nut that a adjusting bolt would go in so it could be adjusted. The adjusting bolt has been removed to get maximum depth I suppose. The second picture shows it resting againt the stop. Looks like new shares are needed to further diagnose my issue. That may be all I need to do. Will be this fall till I plow again unless I get some extra time to take the shares off ahead of time. All the bolts holding the plow shanks on need to be replaced. When #2 broke it took 2 hours to get the broken bolts out. Rusted in like you wouldn't believe. Between heat and 3 broken drill bits they finally came out, but only because I drilled most of the bolt out before I could drive it out. I put grade 8 up top and grade 5 for the shear bolt. Also put never seize on the bolts to make future replacement easier. Mikez may have a book for it I hope.
|
|
1968 B-208, 1976 720 (2 of them)Danco brush hog, single bottom plow,52" snow thrower, belly mower,rear tine tiller, rear blade, front blade, 57"sickle bar,1983 917 hydro, 1968 7hp sno-bee, 1968 190XTD
|
|
AC720Man
Orange Level
Joined: 10 Oct 2016
Location: Shenandoah, Va
Points: 5474
|
Post Options
Thanks(0)
Quote Reply
Posted: 18 Apr 2017 at 8:04pm |
Gerald, you are correct in the lifting and lowering operation. The origional hydaulic lift came with the plow and it is a single hose attachment. The hose burst so i recently took it off to get a repalcement. Lift only, no down pressure. My guess is this weighs 1,200-1,500 lbs. With good shares and plenty of weight it should work fine. It was lifting Gary's 180 rear tires off the ground at times when he was loading it on my trailer with his loader. 
|
|
1968 B-208, 1976 720 (2 of them)Danco brush hog, single bottom plow,52" snow thrower, belly mower,rear tine tiller, rear blade, front blade, 57"sickle bar,1983 917 hydro, 1968 7hp sno-bee, 1968 190XTD
|
|
Tbone95
Orange Level Access
Joined: 31 Aug 2012
Location: Michigan
Points: 12420
|
Post Options
Thanks(0)
Quote Reply
Posted: 19 Apr 2017 at 6:37am |
|
As I beat the dead horse one more time.....how are new shares going to go deeper than a dead stop holding it up? Not that new shares are ever a bad thing, but I just don't see it. If the plow is skidding, not penetrating sod, riding high not on the stop, yep new shares needed. How will new shares go deeper than a dead stop?
|
|
DennisA (IL)
Orange Level
Joined: 11 Sep 2009
Location: Ridott IL.
Points: 2077
|
Post Options
Thanks(0)
Quote Reply
Posted: 19 Apr 2017 at 8:37am |
|
I wouldn't put new shares on.
If the plow is digging down to the depth you want then new share are not needed.
|
|
Thanks & God Bless
Dennis
|
|
AC720Man
Orange Level
Joined: 10 Oct 2016
Location: Shenandoah, Va
Points: 5474
|
Post Options
Thanks(0)
Quote Reply
Posted: 19 Apr 2017 at 8:09pm |
|
That's what we are trying to figure out. The trailing wheel is behind the rear plow, so it should ride as deep as the rear plow goes. It would help to see the setup of the plow in a manual which is what I trying to find now. It was mentioned earlier about the rotation of the hitch needs to be to the left as the tractor sits in the previous furrow to make the plow level again. Without the book, my thinking from previous post is you would go into the field with the plow being level side to side. The next round, as you pull into the furrow, get off the tractor and rotate the hitch with the adjuster to regain plow level. Then you are set to plow the rest of the field. My dads Oliver 3 bottom has this built in to the 3 point hitch, as both sides have a crook or bend where the arms attach which rotates the plow to the left making it level when you pull into the furrow on round 2. Makes sense to me but what do I know. This one has thrown me for a loop. I am gathering info to solve the puzzle. I may be way off with that conclusion.
|
|
1968 B-208, 1976 720 (2 of them)Danco brush hog, single bottom plow,52" snow thrower, belly mower,rear tine tiller, rear blade, front blade, 57"sickle bar,1983 917 hydro, 1968 7hp sno-bee, 1968 190XTD
|
|
Mikez
Orange Level Access
Joined: 16 Jan 2013
Location: Usa
Points: 8918
|
Post Options
Thanks(0)
Quote Reply
Posted: 19 Apr 2017 at 8:54pm |
|
The book I have shows that plow with snap coupler hitch on it. Looks just like it and the bracket is where the beaming screw goes into.
|
|
AC720Man
Orange Level
Joined: 10 Oct 2016
Location: Shenandoah, Va
Points: 5474
|
Post Options
Thanks(0)
Quote Reply
Posted: 20 Apr 2017 at 5:35am |
|
Guess it wouldn't matter if the the book is snap coupler. Does it show the screw jack that rotates the plow left to right? Not sure what bracket your talking about? Where the plow would rotate?
|
|
1968 B-208, 1976 720 (2 of them)Danco brush hog, single bottom plow,52" snow thrower, belly mower,rear tine tiller, rear blade, front blade, 57"sickle bar,1983 917 hydro, 1968 7hp sno-bee, 1968 190XTD
|
|
Mikez
Orange Level Access
Joined: 16 Jan 2013
Location: Usa
Points: 8918
|
Post Options
Thanks(0)
Quote Reply
Posted: 20 Apr 2017 at 8:25pm |
|
Not really. Think what your referring to is the winging link. After you make a path and you have a furrow and its at the depth you like stop while plowing with plows in ground and the right tire in furrow. You want the your plow frame level with ground.
|
|