| Author |
 Topic Search Topic Search  Topic Options Topic Options
|
Rick of HopeIN 
Orange Level

Joined: 11 Sep 2009
Location: Hope, Indiana
Points: 1329
|
 Post Options Post Options
") Thanks(0) Thanks(0)
 Quote Quote  Reply Reply
 Topic: 37 WC engine front cover seal Topic: 37 WC engine front cover seal
Posted: 01 Feb 2020 at 5:05pm |
|
I was putting front cover on WC engine, following the process in the 201 rebuild thread on the Knowledge Base side. I am having trouble with the front seal that came in my kit so thought I would ask if I am doing something wrong.
My crank seal looks just like the one shown and came with the gasket set. It has the felt section and the garter spring lip seal inside that.
I measured ID and it looks to be about 1/16 too tight. If I put a speedy sleeve over the crank grooves it would be even worse. When I try to get in place it just catches the lip and rolls out the garter spring. I added a bit more generous chamfer on the crank but still no help. The felt section also seems too tight to last.
The seal kit also has a modern style seal but the OD is too big for this cover, but the ID looked correct and it slipped right on.
This cover only had the original felt seal with a metal housing to keep it in place, it was all in pieces and probably just slowed down the drip a little bit.
Seems like somewhere I had seen a recommendation to buy two lip seals and install both of them since the old felt seal area has plenty of room. When I measure it appeared to be a 2" bore with 1.5" shaft nose. I suspect I could find a seal easy enough, if that is better way to go.
|
|
1951 B, 1937 WC, 1957 D14, -- Thanks and God Bless
|
 |
|
Sponsored Links
|
|
|
JoeM(GA)
Orange Level
Joined: 12 Sep 2009
Location: Cumming,GA
Points: 4940
|
Post Options
Thanks(0)
Quote Reply
Posted: 01 Feb 2020 at 7:41pm |
AGCO shows the seal to be #79001545 which crosses in NAPA to a NOS 14857 at O'reilly it's a NAT 290319 both show measurements of 1.500 X 2.010 X 0.187 Inch
|
|
Allis Express North Georgia
41 WC,48 UC Cane,7-G's,
Ford 345C TLB
|
|
Rick of HopeIN
Orange Level
Joined: 11 Sep 2009
Location: Hope, Indiana
Points: 1329
|
Post Options
Thanks(0)
Quote Reply
Posted: 01 Feb 2020 at 7:55pm |
yea sounds right. My SKF book shows 14857 is a simple lip seal. They list the spring loaded version as 14855, or 14858 with extra lip to outside to help exclude dust. I suspect the gasket kit I have covers a lot of engines. So far it seems to have the main seals and gaskets I need. Thanks 
|
|
1951 B, 1937 WC, 1957 D14, -- Thanks and God Bless
|
|
Rick of HopeIN
Orange Level
Joined: 11 Sep 2009
Location: Hope, Indiana
Points: 1329
|
Post Options
Thanks(0)
Quote Reply
Posted: 02 Feb 2020 at 1:10pm |
|
was out working on it today again. I was going to use the undersize seal to center the cover for me then replace with the correct seal but as it turned out the OD was over size also so it would not have worked. I was able to center it pretty good checking with a drill bit all around, will recheck before I install the new style seal.
My AC service manuals for the engine include the later ones that went from WC thru WD45, an older one (pdf file) that was after the styled WC/WF/RC came out and a IT manual that covers most everything up to WD45. Somethings they don't line up.
Between them and 201 build in the Knowledge Base, and few old things I have bookmarked over the years I usually get by.
Always interesting.
Every once in a while I actually get something right. Yesterday I welded up the hole on the little throttle lever and drilled a new one, then replaced a worn out bushing for same lever. That long throttle rod on the old style tractors really beat things up.
|
|
1951 B, 1937 WC, 1957 D14, -- Thanks and God Bless
|
|
Sugarmaker
Orange Level

Joined: 12 Jul 2013
Location: Albion PA
Points: 8661
|
Post Options
Thanks(0)
Quote Reply
Posted: 02 Feb 2020 at 2:03pm |
Rick, Sounds like your getting it! If you are inclined post some pictures of your project too. I like to get those old linkages refurbed too! They can get wallowed out real bad. Regards, Chris
|
|
D17 1958 (NFE), WD45 1954 (NFE), WD 1952 (NFE), WD 1950 (WFE), Allis F-40 forklift, Allis CA, Allis D14, Ford Jubilee, Many IH Cub Cadets, 32 Ford Dump, 65 Comet, 66 F100.
|
|
Rick of HopeIN
Orange Level
Joined: 11 Sep 2009
Location: Hope, Indiana
Points: 1329
|
Post Options
Thanks(0)
Quote Reply
Posted: 20 Mar 2020 at 7:16pm |
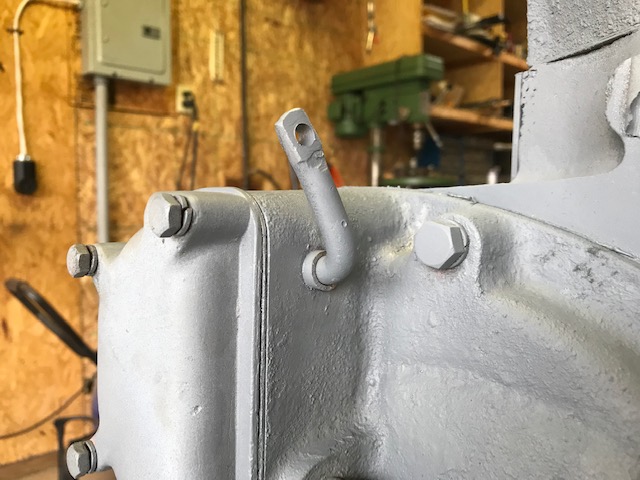
I finally got some pics to show the front cover. I ended up using SKF 14555 seal and a speedi sleeve to cover the old oil grooves. Those sleeves are expensive but when I did my B without one it drips.
One comment on the speedi sleeve install. It was in trouble becuase I had already pushed into the place I thought it needed to be under the seal but later realized I had stopped to short and already had broken away the part of the sleeve that is used to push it on. Luckily I had been going thru the front end the same day, I found the heavy, precision washers for the front hub seals were a perfect fit over the crankshaft nose and I was able to push it on further using that washer and my usual piece of PVC pipe.
I added picture of the governor lever after I welded it shut and re drilled the hole. IF you look close you can also see the bushing I pushed in. Amazingly, this cover had been drilled and bushed and the old bushing had just worn thru before it damaged the bore.
Edited by Rick of HopeIN - 21 Mar 2020 at 9:36am
|
|
1951 B, 1937 WC, 1957 D14, -- Thanks and God Bless
|
|
Sugarmaker
Orange Level
Joined: 12 Jul 2013
Location: Albion PA
Points: 8661
|
Post Options
Thanks(0)
Quote Reply
Posted: 21 Mar 2020 at 8:28am |
Rick, Thanks for the update. Good fixes getting things like the joints and bushings tightened up. Regards, Chris
|
|
D17 1958 (NFE), WD45 1954 (NFE), WD 1952 (NFE), WD 1950 (WFE), Allis F-40 forklift, Allis CA, Allis D14, Ford Jubilee, Many IH Cub Cadets, 32 Ford Dump, 65 Comet, 66 F100.
|
|