| Author |
 Topic Search Topic Search  Topic Options Topic Options
|
mrtractor 
Bronze Level

Joined: 16 Sep 2015
Location: St. Paul, MN
Points: 37
|
 Post Options Post Options
") Thanks(0) Thanks(0)
 Quote Quote  Reply Reply
 Posted: 27 Sep 2015 at 10:39pm Posted: 27 Sep 2015 at 10:39pm |
Here's another update along with a ton of pictures (kind of an inventory), hopefully you can tell me if I'm missing anything and what you think of the general condition of it.
I picked up a two foot long 1 1/4" steel bar to bang on the sleeves/pistons, it definitely made a difference. I hammered all the sleeves out and then hammered the pistons out of the sleeves so that I could get to the connecting rods. I also removed the camshaft and power-washed the block.
The previous owner marked 2 caps and 1 rod, upon closer inspection though, the original owner marked all the caps and rods with a chisel, very nice of him!
I'm going to call up a machine shop this week and see what it would cost to get the block/head cleaned/machined/line bored and check out the cam/crank to see if they need any work. I'm not really sure what I should have them do, I'm just going off your suggestions.
I'm thinking about purchasing the major overhaul kit on YT, I checked out the parts dealers in the parts link at the top of this forum but it didn't look like any of them had any kits with the valves/springs/etc, it looks like I need them as well. I'll call them up (or any other place you guys recommend) and get a quote before I pull the trigger.
I know absolutely nothing when it comes to telling if something is good or bad by looking at it because this is the first time I've seen most of these components and I have no reference for what a good one looks like.
|
 |
|
Sponsored Links
|
|
|
Redwood
Orange Level

Joined: 16 Jan 2012
Location: Ontario
Points: 631
|
Post Options
Thanks(0)
Quote Reply
Posted: 28 Sep 2015 at 4:12am |
|
The wire at the end labeled "not sure what this is"
is a hose clamp.
Edited by Redwood - 28 Sep 2015 at 4:13am
|
|
Dick L
Orange Level

Joined: 12 Sep 2009
Location: Edon Ohio
Points: 5093
|
Post Options
Thanks(0)
Quote Reply
Posted: 28 Sep 2015 at 6:52am |
|
Very good pictures. I would not worry about new valve springs. I have tested over a hundred valve springs for these engines and have only found a couple that could not be used. In testing I do 50 to 75 at a time. Most test at the proper pressure, those that don't are only slightly below and would not make a difference with this slow of a high RPM.
|
|
StanInLowerAL
Orange Level
Joined: 13 Sep 2009
Location: South Alabama
Points: 222
|
Post Options
Thanks(0)
Quote Reply
Posted: 28 Sep 2015 at 12:06pm |
|
I have an extra "B" & "C" service manual. I sent you a PM if you are interested. Stan
|
|
mrtractor
Bronze Level
Joined: 16 Sep 2015
Location: St. Paul, MN
Points: 37
|
Post Options
Thanks(0)
Quote Reply
Posted: 28 Sep 2015 at 12:39pm |
I definitely am, it would be very helpful, I've sent my info.
Thanks!
|
|
StanInLowerAL
Orange Level
Joined: 13 Sep 2009
Location: South Alabama
Points: 222
|
Post Options
Thanks(0)
Quote Reply
Posted: 28 Sep 2015 at 12:41pm |
|
|
|
StanInLowerAL
Orange Level
Joined: 13 Sep 2009
Location: South Alabama
Points: 222
|
Post Options
Thanks(0)
Quote Reply
Posted: 28 Sep 2015 at 12:44pm |
|
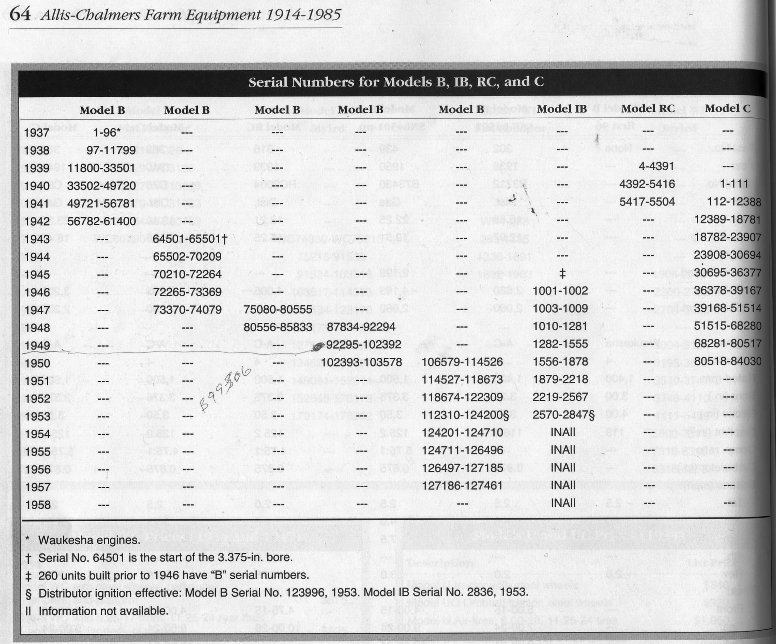
The production info is from NORM SWINFORD'S book HISTORY OF ALLIS CHALMERS FARM EQUIPMENT 1914-1985. Maybe this will be helpful. Stan
|
|
StanInLowerAL
Orange Level
Joined: 13 Sep 2009
Location: South Alabama
Points: 222
|
Post Options
Thanks(0)
Quote Reply
Posted: 28 Sep 2015 at 12:46pm |
|
OK, I'll get it to you when I get your information. Stan
|
|
MrHDC
Orange Level

Joined: 14 Mar 2015
Location: Wichita, KS
Points: 254
|
Post Options
Thanks(0)
Quote Reply
Posted: 28 Sep 2015 at 12:57pm |
To answer your question "Is this hole supposed to be here?". The answer is Yes. Hervey 
|
|
mrtractor
Bronze Level
Joined: 16 Sep 2015
Location: St. Paul, MN
Points: 37
|
Post Options
Thanks(0)
Quote Reply
Posted: 01 Oct 2015 at 10:15pm |
I talked to a machine shop up here in MN and they said they are pretty busy (like months). They referred me to another place that I need to call tomorrow when the right guy is in. I also asked them what it would take to get it done right and they said around $1000 depending on what I want done.
I bought the DVD on how to rebuild the B, C, and CA engine from J&D productions, it was helpful but they didn't go much into what should be done at the machine shop.
With the pictures I've posted and knowing that I'm going to replace the pistons, sleeves, gaskets, bearings, etc with a rebuild kit, what do you think I should have done at the machine shop? Do I just bring them the entire engine and have them tell me what I need? Unfortunately, I don't know anything about rebuilding engines so I don't want them to have me do stuff that I don't need or that is easy enough for me to do it myself.
Here's what I'm thinking so far:
Hot tank block/head Regrind crank/cam Line bore Should I have them lap the valves or should I do that myself? Anything else?
Thanks again guys!
Edited by mrtractor - 01 Oct 2015 at 10:16pm
|
|
MrHDC
Orange Level
Joined: 14 Mar 2015
Location: Wichita, KS
Points: 254
|
Post Options
Thanks(0)
Quote Reply
Posted: 01 Oct 2015 at 11:10pm |
|
I would replace the core plugs in the head while I had it off.
Hervey
|
|
MrHDC
Orange Level
Joined: 14 Mar 2015
Location: Wichita, KS
Points: 254
|
Post Options
Thanks(0)
Quote Reply
Posted: 01 Oct 2015 at 11:26pm |
|
I have the video from J&D Productions and it was very helpful. I do believe he installed the vanes in the oil pump backwards though. If you look at the way the pump rotates and the AGCO parts diagram of the pump I'll think you'll see the vanes go in the other way. I installed new vanes from Sandy Creek and have good oil pressure.
Hervey
|
|
wbecker
Orange Level
Joined: 29 Oct 2009
Location: STL
Points: 837
|
Post Options
Thanks(0)
Quote Reply
Posted: 02 Oct 2015 at 3:51pm |
|
The rods should be reworked.
Line bore, have it checked, does not always need to be done.
Valve seats will need to be ground. Valves should be ground, then lapped.
Have the head milled.
The cam could be polished if not pitted.
Lifters checked to see if they need reconditioning.
|
|
Allis B, IB, Low B, G, D10, JD M, 8KCAB, C152
|
|
mrtractor
Bronze Level
Joined: 16 Sep 2015
Location: St. Paul, MN
Points: 37
|
Post Options
Thanks(0)
Quote Reply
Posted: 05 Nov 2015 at 7:58pm |
I brought the block, head, crank, cam and flywheel ring gear to a machine shop in northern Wisconsin, here is what I'm having him do:
Hot tanked Magnafluxed Reground Crank to .020 Line bored Put on the new flywheel ring gear (it had some eaten up teeth on it). Grind and lap the new valves I purchased.
I called him 2 days ago and he said the block is done but he said he thinks theres a crank in the head.. I told him that I wanted him to magnaflux them before I bought the parts but he told me to go ahead and order the parts last week. I'm running up there this weekend and he said worse case he'll send me home with the block and he might have a head.
What if there is a crack in the head? Any worries if there is?
|
|
wbecker
Orange Level
Joined: 29 Oct 2009
Location: STL
Points: 837
|
Post Options
Thanks(0)
Quote Reply
Posted: 05 Nov 2015 at 9:34pm |
|
Should be easy to find a head for a B or C. There is one on eBay
http://www.ebay.com/itm/Allis-Chalmers-B-IB-C-Tractor-AC-engine-motor-gas-cylinder-head-/321901719203?hash=item4af2d66ea3:g:olYAAOSwKIpV~q0B
You could make an offer on that one, or call around to local tractor salvage yards.
|
|
Allis B, IB, Low B, G, D10, JD M, 8KCAB, C152
|
|
Orange Tractors
Silver Level

Joined: 13 Sep 2009
Location: Butler, MO
Points: 172
|
Post Options
Thanks(0)
Quote Reply
Posted: 05 Nov 2015 at 11:26pm |
|
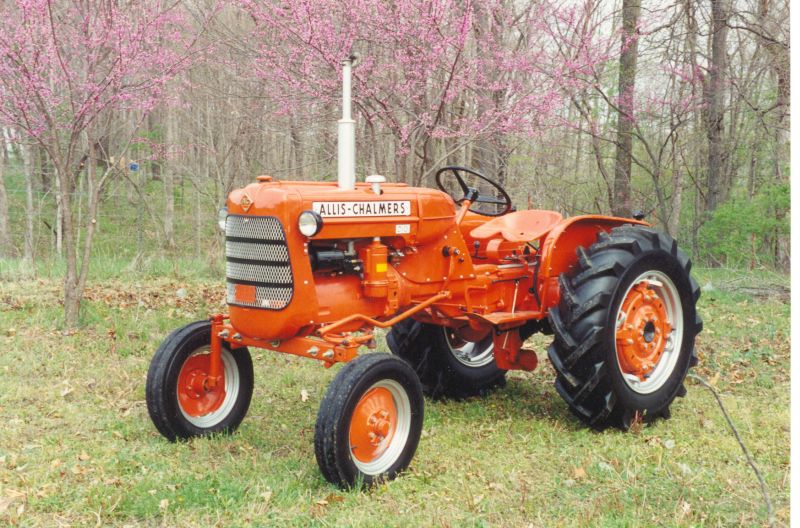
For $700 I think you did okay. If you put $1,000 in the rebuild, you will have a lawnmower that will outlast anything made today. The tractor looks pretty straight, it already has turf tires, so you won't tear up your yard, just watch the low hanging limbs.
I mowed my yard for years with a Kubota L175 (at least its orange) with a Woods belly mower.
Do it right the first time, nothing is worse than redoing a job while thinking "I knew I should have spent the extra fifty dollars."
I watch these threads to for ideas, I need to rebuild my WD that Grandpa bought new for Dad when he was ten.
Robert
|
|
mrtractor
Bronze Level
Joined: 16 Sep 2015
Location: St. Paul, MN
Points: 37
|
Post Options
Thanks(0)
Quote Reply
Posted: 12 Nov 2015 at 7:37am |
I picked up the block, he still has the head, luckily he said that the head is NOT cracked and that it was just a casting mark, he pressure tested it and it was good, that's a relief!
He didn't machine the block surface where the head attaches, he said I can just go over it with a flat file to remove the high points and the gasket will seal it up tight. Is this ok to do or does it need to be machined? He seemed really knowledgable so I kind of trust him but I'd rather have a second opinion from you folks.
I'll start rebuilding the block in a week or two after I order a bunch of parts and I'll pick up the head during gun deer season. I can't wait, I should have it running before the new year!
I think I'm just going to wait until spring/summer before I tear it down again and blast/repaint it.
|
|
wbecker
Orange Level
Joined: 29 Oct 2009
Location: STL
Points: 837
|
Post Options
Thanks(0)
Quote Reply
Posted: 12 Nov 2015 at 7:50am |
|
You likely don't need to do anything with the block. But it wouldn't hurt to use a very large single cut Mill Bastard file on it. If you do, you need to be sure to get all the fine fillings cleaned off so they don't get in the engine.
|
|
Allis B, IB, Low B, G, D10, JD M, 8KCAB, C152
|
|
CTuckerNWIL
Orange Level

Joined: 11 Sep 2009
Location: NW Illinois
Points: 22825
|
Post Options
Thanks(0)
Quote Reply
Posted: 12 Nov 2015 at 1:23pm |
|
You can't machine the deck of the block without re-cutting the counter bores for the sleeves. Sleves MUST protrude from the top 3 or 4 thousandths to seal the cylinder to the head.
|
|
|
|
mrtractor
Bronze Level
Joined: 16 Sep 2015
Location: St. Paul, MN
Points: 37
|
Post Options
Thanks(0)
Quote Reply
Posted: 13 Nov 2015 at 3:17pm |
That's good to hear, thanks guys! I picked up a nice set of files since he said I should (and I love buying more tools):
http://www.grobetusa.com/9-piece-file-set-with-handles-item-32-4809/
What is the best way to clean all the filings off?
Also, I noticed this brass piece was in the bottom of the torque tube (where the engine connects to the back part). What do you think it's from??? I'm assuming I'll need a new one of whatever it is:
You can see where I found it here:
Thanks again, more updates to come with better pictures since I got a better camera.
|
|
Hubnut
Orange Level

Joined: 30 Jul 2014
Location: Gainesville, FL
Points: 1817
|
Post Options
Thanks(0)
Quote Reply
Posted: 13 Nov 2015 at 3:34pm |
|
That is the pilot bushing.
|
|
Dick L
Orange Level
Joined: 12 Sep 2009
Location: Edon Ohio
Points: 5093
|
Post Options
Thanks(0)
Quote Reply
Posted: 13 Nov 2015 at 4:09pm |
 CTuckerNWIL wrote: CTuckerNWIL wrote:
You can't machine the deck of the block without re-cutting the counter bores for the sleeves. Sleves MUST protrude from the top 3 or 4 thousandths to seal the cylinder to the head. |
I had the block of my pulling C decked with the sleeves cemented at the bottom. No problem with blowing head gaskets with a 4 inch stroke and .150 off the head. To deck the head .002 and not cut the counter bore could cause a problem with to much protruding when putting the sleeves back in. I am not sure how high the sleeves can be without causing a problem. It would probly depend on the head gasket. Many cast auto blocks without sleeves that are smooth from the factories.
|
|
Dick L
Orange Level
Joined: 12 Sep 2009
Location: Edon Ohio
Points: 5093
|
Post Options
Thanks(0)
Quote Reply
Posted: 13 Nov 2015 at 4:16pm |
|
the way I was taught to make sure all grinding dust was off a magnetic chuck on a surface grinder was with my bare hand and never a rag. However wiping the top of the block with a clean rag would work fine.
|
|
Sugarmaker
Orange Level

Joined: 12 Jul 2013
Location: Albion PA
Points: 8661
|
Post Options
Thanks(0)
Quote Reply
Posted: 13 Nov 2015 at 4:34pm |
|
And yes you will need a new one:)
Lots of good pictures. Looks like you may have enough parts to put a tractor together. Take your time on the engine rebuild and ask a lot of questions. There are a lot of little things that need to happen to get the build correct and I am not a expert by any means.
Should be a real nice project.
Regards,
Chris
|
|
D17 1958 (NFE), WD45 1954 (NFE), WD 1952 (NFE), WD 1950 (WFE), Allis F-40 forklift, Allis CA, Allis D14, Ford Jubilee, Many IH Cub Cadets, 32 Ford Dump, 65 Comet, 66 F100.
|
|
wbecker
Orange Level
Joined: 29 Oct 2009
Location: STL
Points: 837
|
Post Options
Thanks(0)
Quote Reply
Posted: 13 Nov 2015 at 6:10pm |
|
If you use the Mill file on the deck of the block, just pull it down the length of the surface, one way then the other, with the file 90 deg to the length of the surface.
|
|
Allis B, IB, Low B, G, D10, JD M, 8KCAB, C152
|
|
mrtractor
Bronze Level
Joined: 16 Sep 2015
Location: St. Paul, MN
Points: 37
|
Post Options
Thanks(0)
Quote Reply
Posted: 13 Nov 2015 at 6:25pm |
Any ideas where I can find a pilot bushing? I searched online and didn't find anything.
One hiccup is that when I picked the block up the deck has two 1/16" to 1/32" deep gashes that run right across the cylinder like so:
They are a little thinner than that but I wanted you to be able to see the location of them, that's as best as I can remember, I'll grab an actual picture tomorrow.
I called him up and told him that those were not in there (and I have pictures) before I brought it to him and he said he'd make it right whether it was machining it or whatever. He originally said they won't cause any problems but I'm not sure what to do.
Now I'm wondering what can actually be done if those sleeves have to fit just right?
It's always something, isn't it? Oh well.
|
|
Hubnut
Orange Level
Joined: 30 Jul 2014
Location: Gainesville, FL
Points: 1817
|
Post Options
Thanks(0)
Quote Reply
Posted: 13 Nov 2015 at 7:34pm |
|
You can find the pilot bushing at many of the vendors that support this site. If you are going to get a new clutch, many times the new pilot bushing will come with the new clutch and throwout bearing.
|
|
MrHDC
Orange Level
Joined: 14 Mar 2015
Location: Wichita, KS
Points: 254
|
Post Options
Thanks(0)
Quote Reply
Posted: 13 Nov 2015 at 7:55pm |
|
I got a new pilot bushing from AGCO. If no AGCO you can measure the ID/OD and order an Oilite bushing. Probably folks on here that already have the measurements and a good website to order.
There's a wick in the crank that lubricates the bushing. With an Oilite bushing you can plug where the wick is and eliminate that pesky leak. Again folks on here have done it lots of times and have used different stuff as plugs.
Hervey
|
|
mrtractor
Bronze Level
Joined: 16 Sep 2015
Location: St. Paul, MN
Points: 37
|
Post Options
Thanks(0)
Quote Reply
Posted: 14 Nov 2015 at 4:56pm |
Ok, they're not quite as bad as I remember, should I be concerned about these or just use it?
|
|
CTuckerNWIL
Orange Level
Joined: 11 Sep 2009
Location: NW Illinois
Points: 22825
|
Post Options
Thanks(0)
Quote Reply
Posted: 16 Nov 2015 at 12:19pm |
|
Those little scratches in the deck won't hurt a thing.
|
|
|
|