| Author |
 Topic Search Topic Search  Topic Options Topic Options
|
ekjdm14 
Orange Level Access

Joined: 20 Aug 2024
Location: Manchester UK
Points: 744
|
 Post Options Post Options
") Thanks(0) Thanks(0)
 Quote Quote  Reply Reply
 Posted: 02 Feb 2025 at 8:49am Posted: 02 Feb 2025 at 8:49am |
 wjohn wrote: wjohn wrote:
PaulB wrote:
I've torn down many "K" serial number engines that had dished and mostly cast iron pistons. You can't say anything for certain, unless you've seen it all. I've done probably 100s of BE/CE engines and I'll bet there are still some things I haven't seen yet. |
I didn't even know Allis made a B with a Zenith carb specifically set up for burning alcohol until a few months ago, as one example - not that I have torn apart anywhere near the number of tractors you and some other guys have, but there are lots of neat little things I will probably never see in person on these tractors. |
Just reading back through the thread & thinking on some things, how was the alcohol carb set up? Any photographs?
Also would be interested if anyone has photos of the manifold/carb setup on an original K suffix machine. The way mine is set up I don't believe it could be original because there's no vaporiser assembly & even if it could run Kero' through the carb it's surely need a WIDELY adjustable main jet.
And that's the other thing, the carburetor on the tractor has a fixed main jet with just a bung where the adjusting screw would be found. Will try and pull the number off the carb shortly but I seem to recall it does come back as one originally fitted according to the manual I have.
Cheers, Dan
|
 |
|
Sponsored Links
|
|
|
ekjdm14
Orange Level Access
Joined: 20 Aug 2024
Location: Manchester UK
Points: 744
|
Post Options
Thanks(0)
Quote Reply
Posted: 02 Feb 2025 at 9:49am |
steve(ill) wrote:
how you gunna bent that angle iron into a circle ?? angle iron dont BENT real good ! |
Slice n dice it... Will probably slice it every 6" or so & fill in the gaps after forming. It don't need to be perfectly round IMO, just needs to hold the tire from blowing off at 15psi & the angle should do that.
Probably would be a much better, more elegant solution to find a couple of scrap smaller wheels & use bits of those but I'm drawing a blank on those (locally) so far. Kicking myself a bit now as the fella who sold me the tractor did offer an old Fordson front wheel in with the pile but I declined as I thought it might be the missing piece to another project round there.
|
|
ekjdm14
Orange Level Access
Joined: 20 Aug 2024
Location: Manchester UK
Points: 744
|
Post Options
Thanks(0)
Quote Reply
Posted: 17 Feb 2025 at 12:54pm |
OK well, finding decent "parts" rim candidates locally has (unsurprisingly) proven fruitless, so I've finally grabbed up some angle. Not done much else aside from the left brake recently although I did clean up the main fuel tank & braze up a crack & couple small pinholes on the underside so that's nearly ready to wash out and ought to hold fuel better than the little half gallon starting tank.
Just waiting on a pipe plug to fill the original outlet (it has a petcock already on an extra fitting that was brazed in for some reason years ago). If it holds fuel though I'll likely buy one of the cheap aftermarket petcock/sediment bowl assemblies as they just look way nicer & function far better for the purposes of running crusty old tanks. Oh, and finalised the alternator mounting too so I can run the electric fan & add in an electric water pump in the near future if thermosiphon won't cut it. (Holds below boiling at fast idle, but might need more flow when it gets under load.)
Will grab more photos or videos as things progress, but we're getting to the stage where she'll be able to run/drive for longer than a few minutes at a time.  |
|
steve(ill)
Orange Level Access

Joined: 11 Sep 2009
Location: illinois
Points: 85698
|
Post Options
Thanks(1)
Quote Reply
Posted: 17 Feb 2025 at 1:35pm |
|
sediment bowl works OK... but a small inline filter off a lawn mower does a great job.
|
|
Like them all, but love the "B"s.
|
|
ekjdm14
Orange Level Access
Joined: 20 Aug 2024
Location: Manchester UK
Points: 744
|
Post Options
Thanks(0)
Quote Reply
Posted: 17 Feb 2025 at 3:02pm |
Oh yeah, should have mentioned I'm 100% intending to use a lawn mower type screen filter too. Just would like the sediment bowl as an extra layer of protection to help catch the big chunks so I'm not replacing the filter every 5 minutes.
Depending on how much crud comes out/how often I plug the sediment bowl inlet I may also add in an inch or so of plastic airline as a standpipe in the inlet to the bowl so I'm drawing fuel slightly higher up. I've flushed the tank out as much as I can with some waste diesel fuel but there's bound to be plenty of residue still.
Cheers, Dan
EDIT- while I'm here & thinking of it, what size compression nuts are the head/governor oil lines? Mine came without any of the original but I have some copper line that may be good, just need to confirm the thread sizes.
Edited by ekjdm14 - 17 Feb 2025 at 3:05pm
|
|
steve(ill)
Orange Level Access
Joined: 11 Sep 2009
Location: illinois
Points: 85698
|
Post Options
Thanks(1)
Quote Reply
Posted: 17 Feb 2025 at 6:06pm |
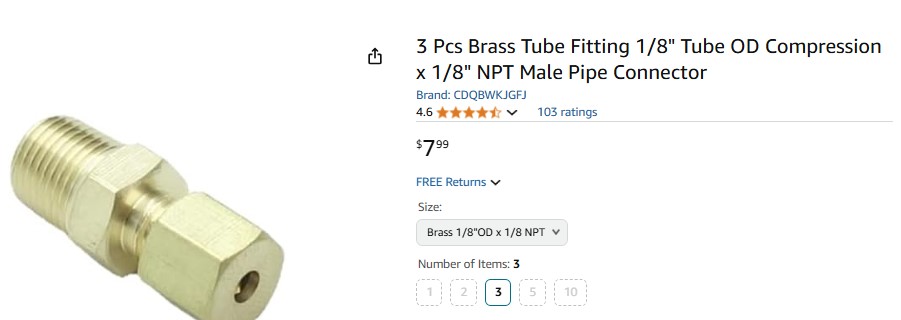
on the external oil lines... the line is .125 or 1/8 inch OD... The NUT is .375 or takes a 3/8 inch wrench ........ the FITTING into the block appears to be a 1/8 inch pipe thread.
something like this...
Edited by steve(ill) - 17 Feb 2025 at 6:12pm
|
|
Like them all, but love the "B"s.
|
|
ekjdm14
Orange Level Access
Joined: 20 Aug 2024
Location: Manchester UK
Points: 744
|
Post Options
Thanks(0)
Quote Reply
Posted: 18 Feb 2025 at 5:08am |
Brilliant thanks Steve. Will get the calipers on the line I have & see if it's correct (it's off an old refrigerator, looks to be about 1/8 or 3/32), else will just have to buy some as I don't like the pvc pipe solution I'm currently running.
Thank you.
|
|
steve(ill)
Orange Level Access
Joined: 11 Sep 2009
Location: illinois
Points: 85698
|
Post Options
Thanks(0)
Quote Reply
Posted: 18 Feb 2025 at 7:59am |
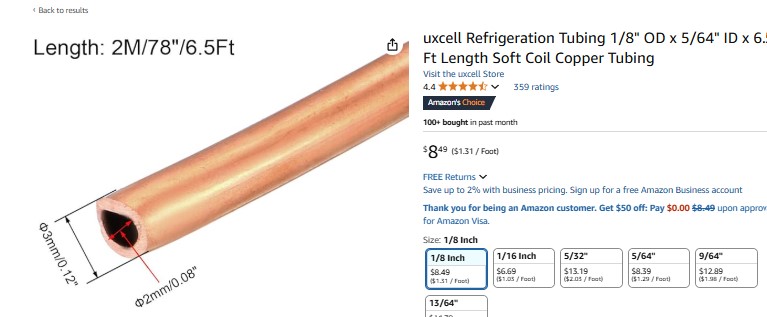
YEP... hard to believe a tube that small is doing much good... but it only takes a drip- drip to keep an oil film on everything... This is flexible refregeration tubing-- on Amazon.... i think it is actually METRIC... so it MAY BE a few thousands less than 1/8 inch
|
|
Like them all, but love the "B"s.
|
|
wjohn
Orange Level

Joined: 19 Jan 2010
Location: KS
Points: 2160
|
Post Options
Thanks(0)
Quote Reply
Posted: 18 Feb 2025 at 12:17pm |
It's pretty amazing how long these old tractor engines (not just AC) would run for with not great lubricants and cared for by guys who may have never even owned something with an internal combustion engine before.
Can't wait to see where this tractor ends up when you're done with it!
|
|
1939 B, 1940 B, 1941 WC, 1951 WD, 1952 CA, 1956 WD-45
|
|
ekjdm14
Orange Level Access
Joined: 20 Aug 2024
Location: Manchester UK
Points: 744
|
Post Options
Thanks(0)
Quote Reply
Posted: 18 Feb 2025 at 3:16pm |
It is surprising how well they do, especially with no pressure feed to the big end bearings. I think it's the simplicity & relatively loose tolerances in them that helps them last though, they can go on & on with major issues but still run like a top (like my main bearings as an example, they're well worn & the end float is probably over .050 but still quiet & oil pressure hovers over the R on NORMAL at low idle.)
Really should think about finding a set of shells now she's coming together more, wouldn't be a great day to get her all fettled up & then spin a bearing!
Rear wheel is more or less together now, looks a bit like a bead lock rim from one of them "cool" Jeeps but it'll hold the tire in place at least. Fingers crossed will get a moment to mount it all back up tomorrow, fire her up & see how the alternator does with running the fan.
|
|
DiyDave
Orange Level Access

Joined: 11 Sep 2009
Location: Gambrills, MD
Points: 53315
|
Post Options
Thanks(0)
Quote Reply
Posted: 18 Feb 2025 at 6:44pm |
I know your penchant for self repairs... 
Ever thought of using some newspaper to shim the mains, plastigage to check the clearance?
Be careful of the newspaper you use, though! (for the Punch line, PM me...  ) |
|
Source: Babylon Bee. Sponsored by BRAWNDO, its got what you need!
|
|
ekjdm14
Orange Level Access
Joined: 20 Aug 2024
Location: Manchester UK
Points: 744
|
Post Options
Thanks(0)
Quote Reply
Posted: 19 Feb 2025 at 2:03pm |
Ha, would have sorted something by now but they don't make leather belts like they used to!
Got the tire mounted up & holding air for now, didn't end up starting the engine today as I'd rather wait for the sediment bowl and run off the big tank than filling up the starting tank again. Spent the rest of the afternoon tidying up some bits, making a battery holder & adding some wiring/ignition switch. She's coming together slowly  |
|
ekjdm14
Orange Level Access
Joined: 20 Aug 2024
Location: Manchester UK
Points: 744
|
Post Options
Thanks(0)
Quote Reply
Posted: 20 Feb 2025 at 7:48am |
Chinese sediment bowl and electric water pump arrived today. Typically, the glass bowl came pre-chipped around the rim so will never seal. Hopefully get a replacement through ebay seller as they seem pretty decent, but for now will have to draw fuel from the "secondary" tap someone brazed in years ago. Everything happens for a reason I guess, the China bowl can just serve as a pipe plug for the moment! Probably leak anyhow as I managed to lose the ptfe tape which I put up "safe" for just this job!
Damn weather keeping me indoors now though, nearly 60 degrees with a warm Southerly wind but keeps dumping the sort of fine rain that you don't really notice until you're already soaked. May try and play with the water pump at some point since it don't matter if that gets wet!
|
|
ekjdm14
Orange Level Access
Joined: 20 Aug 2024
Location: Manchester UK
Points: 744
|
Post Options
Thanks(1)
Quote Reply
Posted: 21 Feb 2025 at 1:33pm |
Tiny bit of progress today, got the electric water pump installed (VW auxiliary water pump, £14 off ebay) & tied the wiring for that into the electric fan. Adjusted the valve clearances as they'd closed up since getting running & gave it a short test fire.
Water pump seems to be doing as good a job as could be wished of it, hoping to get a better run of it tomorrow to see that she stays cool.
|
|
ekjdm14
Orange Level Access
Joined: 20 Aug 2024
Location: Manchester UK
Points: 744
|
Post Options
Thanks(0)
Quote Reply
Posted: 21 hours 48 minutes ago at 11:07am |
Not updated this thread for a while but there is progress (forward AND backward, sadly but still better overall than we were!)
The numbers quoted there tell me that the carb I'm running is most likely the 61 AJ 7 designated unit (so standard US market fare, cast iron not the 24T2 alu' one on English B's) and the jetting/choke are set up as per the gasoline models so that's a good start.
Where I left off on another thread (because I'm messy) is I'd diagnosed the carb as having issues with the original gaskets no longer sealing properly, big surprise there, not! Also managed to break the emulsion tube (main discharge jet) in half by overtightening it during a brainfart moment.
Anyways, carb kit arrived and I rebuilt the carb with the emulsion tube soldered together & she ran the best she's ever ran. So much so that I decided it's time she did something worthwhile at last other than sitting in the front yard looking cool
So, she was duly loaded up and taken out to a patch of land we're working to do some hauling wood, scraping overgrowth off of paths & other general duties that were otherwise beating seven bells out of a pair of old lawn tractors.
She ran great for a good couple of hours, electric water pump and fan keeping things cool under load & all the hackery is hanging together pretty good. Had a couple of snags like the valve cover gasket came out of place and made a smoke show on the manifold (at least show's she's oiling through the homebrew rocker setup decently!) and the tires are definitely not long for this world since the "good" side now has a huge split with broken cords pushing out so had to drop the pressure to a couple psi to avoid any explosive inner tube hernia situation.
Main issue now though, is the damned emulsion tube repair failed again. I can't get it to tighten enough to seal on it's washer, so a replacement is needed. The emulsion tube I need is marked 45-2 if anyone has one they'd sell? If I had a lathe I'd make myself a replacement just to keep it "on theme"!
Will place a wanted ad in the appropriate forum as postage isn't likely to be so stupid for such a small item, hopefully don't have too many messages from new members whose "friend" just happens to have what I need in a good conditions if I'd just email them at randomscammer@email.bum
All for now folks, she's getting there bit by bit!
Edited by ekjdm14 - 21 hours 46 minutes ago at 11:09am
|
|
Stuck Farmer
|
|
steve(ill)
Orange Level Access
Joined: 11 Sep 2009
Location: illinois
Points: 85698
|
Post Options
Thanks(1)
Quote Reply
Posted: 18 hours 47 minutes ago at 2:08pm |
How come every time i read one of your posts i think of Johnny Cash and his 55-56-57 Caddy ??
------- Now, up to now my plan went all right 'Til we tried to put it all together one night
And that's when we noticed that something was definitely wrong The transmission was a '53
And the motor turned out to be a '73
And when we tried to put in the bolts all the holes were gone So we drilled it out so that it would fit
And with a little bit of help with an adapter kit
We had that engine runnin' just like a song
Now the headlight' was another sight
We had two on the left and one on the right
But when we pulled out the switch all three of 'em come on
Edited by steve(ill) - 18 hours 46 minutes ago at 2:09pm
|
|
Like them all, but love the "B"s.
|
|
DiyDave
Orange Level Access
Joined: 11 Sep 2009
Location: Gambrills, MD
Points: 53315
|
Post Options
Thanks(1)
Quote Reply
Posted: 16 hours 18 minutes ago at 4:37pm |
Did I hear a request?
Edited by DiyDave - 16 hours 18 minutes ago at 4:37pm
|
|
Source: Babylon Bee. Sponsored by BRAWNDO, its got what you need!
|
|