HD19, sitting to long...
Printed From: Unofficial Allis
Category: Allis Chalmers
Forum Name: Construction and other equipment
Forum Description: everything else with orange (or yellow) paint
URL: https://www.allischalmers.com/forum/forum_posts.asp?TID=210829
Printed Date: 17 Sep 2026 at 1:38pm
Software Version: Web Wiz Forums 11.10 - http://www.webwizforums.com
Topic: HD19, sitting to long...
Posted By: JC-WI
Subject: HD19, sitting to long...
Date Posted: 20 Apr 2026 at 7:14am
|
Hi fellas, Got an old HD19 that was loaned out for clearing an area for a house, some 25 years ago or more, then the fellow used it to digs some ponds and ran it off the sprocket. Worse part nobody tried to get the track back on right away, specially the barrower. Now the said barrower is selling his house and property and leaving for an Island in the pacific. Great, Not. 25+ years has not done it good where it sat. Lender was busy trying to get it started and not getting it going So I went over and assisted them on my crawler to get it smoking again, three fuel injectors stuck, had to remove rockers over those and did get the injectors loosened up. started winging it over and smoke rolling put cover back on and then gave her another spin... and smoke rolling again and told nephew to give it some ether and it woke right up and smoked the everything up... everything was going pretty good, engine started getting back to what it use to sound like despite the smoke coming out from exhaust seals. Yea, then we had fire on the ground, dry leaves and old dead grass lit up, hollered 'FIRE" and nephew stomped the fire out. Now leary of opening the throttle up to get torque converter to lock up, I shifted it into gear and applied the clutch, drive shaft just stops barely loading the engine. Tried the brakes, dang, they are stuck, more than likely so are the brake bands too. With it sitting nose down some and track clean off the sprocket, and the blade being cable, can't lift front endup to block it, and can't seem to declutch the right track to spin the left sprocket... and not daring to start another fire... there it sits. Oh yea, besides track worn out, theres no bearings left in front idler. I remember when I bought the old girl that idler needed help but now it is far worse, need to do something like maybe drive white oak blocking into hub temporarily or get idler out and get some better/new bearing in there and shaft too. Old Allis Chalmers HD19 parts book says, front idler bearings cone Part number 051630, cup 051630, shaft 051621 gasket 034043 boot 051629 follower assembly 051959 ring seal seal kit 076354 gasket seal ring 051622 guard assembly 051620 Anyone have cross reference numbers to those bearing parts and shaft? 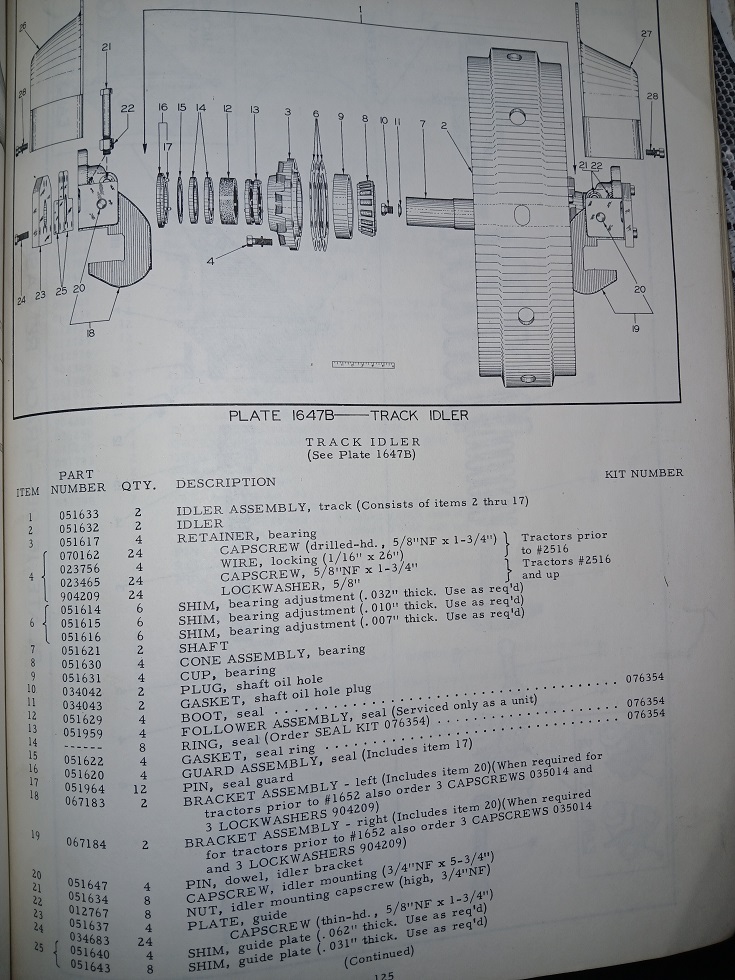 Couple pics of the old HD19 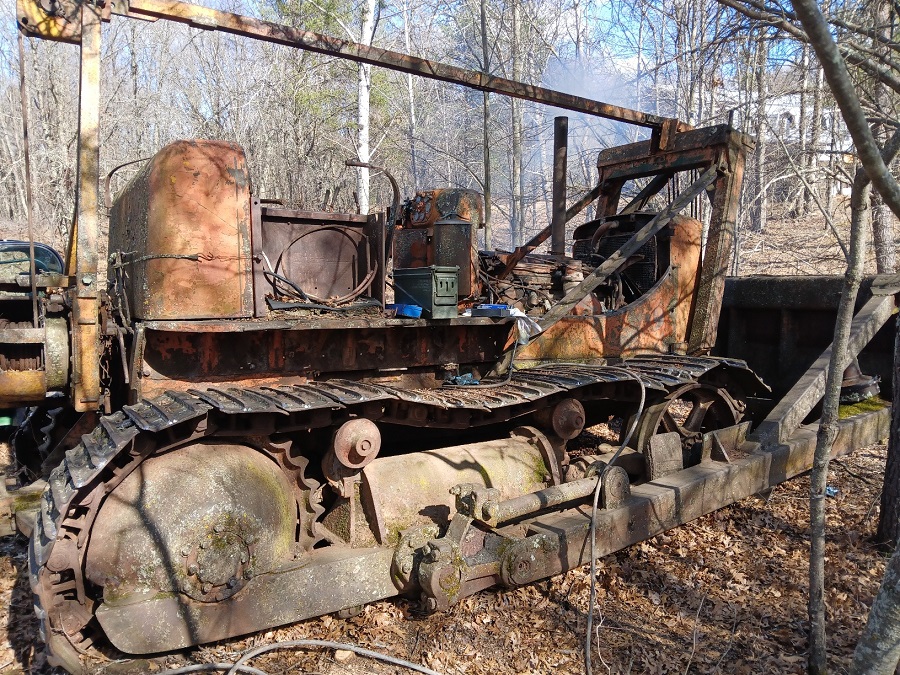 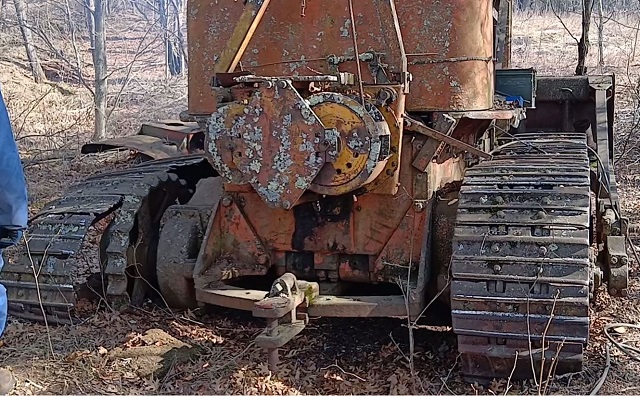 ------------- He who says there is no evil has already deceived himself The truth is the truth, sugar coated or not. Trawler II says, "Remember that." |
Replies:
Posted By: JC-WI
Date Posted: 20 Apr 2026 at 7:23am
|
Is there an easy way to get it back on? Anybody got a few tricks that they use to do it? Here is another view of it, right side track is in far better shape than this left one is. 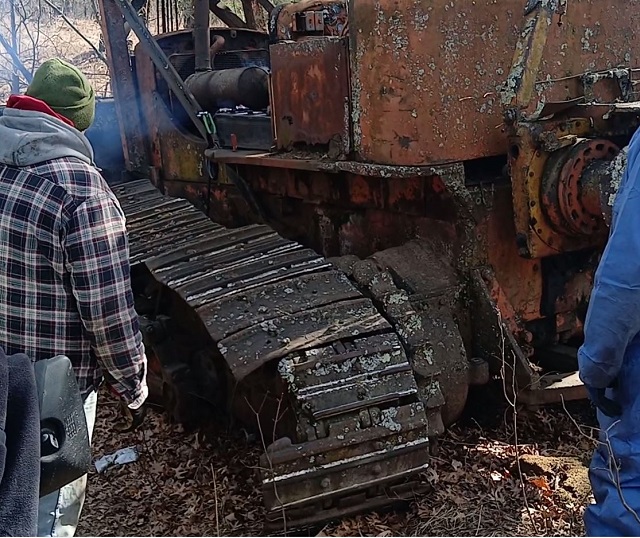 ------------- He who says there is no evil has already deceived himself The truth is the truth, sugar coated or not. Trawler II says, "Remember that." |
Posted By: Les Kerf
Date Posted: 20 Apr 2026 at 10:24am
Short answer: Nope  Back when I was a lad I was helping my Dad do some logging with his old worn-out D2 Cat; I wasn't paying attention and got on a short stump which popped the track off the rear. I then proceeded to knock the track off the idler as well  I hiked back out to the landing to get some tools, and my Dad came along to help. When we arrived at the scene of the crime, my Dad (a WW2 combat veteran) said, "Well, at least there's no one shooting at us". He meant it too. Best wishes on your project
 |
 JC-WI wrote:
Posted By: Ray54
Date Posted: 20 Apr 2026 at 10:48am
 Say no when friends want to use your equipment. Say no when friends want to use your equipment. Then you just have yourself to be mad at. Then you just have yourself to be mad at.I know some times you just cannot say no. The only trick I know is being very much aware of tracks and stopping way before your as much off as this one is, looking and most times backing up to get it back where it belongs. The rest is just a lot of work. Jacks and blocks. Get both front and back up. Then big pry bars and cable come alongs to work track back on. I suppose today with excavators being common and most everywhere (but in my equipment inventory). One would do a lot lifting, pushing, and pulling with less effort than jacks and come alongs. I would start by putting it back on the sprocket first. Then pull slack to the front. Probable have to back the track adjuster off. Pry onto idle, tighten track and drive it away.
 Good luck getting it running. Good luck getting it running. |
Posted By: gemdozer
Date Posted: 20 Apr 2026 at 1:59pm
| The track should be on sprocket before the idler and go in reverse and the track should go on idler and am checking tomorrow if am still the boot and ring seal |
Posted By: wjohn
Date Posted: 20 Apr 2026 at 7:04pm
Oh man... I'm laughing, but not sure if I should be. I am going to have to remember that. Perspective is everything! ------------- 1939 B, 1940 B, 1941 WC, 1951 WD, 1952 CA, 1956 WD-45 |
Posted By: Ian Beale
Date Posted: 21 Apr 2026 at 4:04am
|
I knew a bloke who was a Rat of Tobruk and had been involved with Bren Carrier operations there. One comment was that nothing speeded up your handling of track problems like having to repair in no-man's-land For those not familiar with them - "Bren gun carrier; fast, furious and lots of help " http://www.diggerhistory.info/pages-armour/allied/bren_carrier.htm" rel="nofollow - http://www.diggerhistory.info/pages-armour/allied/bren_carrier.htm
|
Posted By: Les Kerf
Date Posted: 21 Apr 2026 at 9:53am
Oh, I can laugh about it now!
|
Posted By: gemdozer
Date Posted: 21 Apr 2026 at 11:28am
| I have some new boots 051629-some newsprings assambly 051959-some new rings seal 076354-some new gaskets ring seal - 051622 |
Posted By: JC-WI
Date Posted: 21 Apr 2026 at 11:50am
|
Yea, no ducking for bullets here, just gotta watch for fires with this critter. No vid of that. Quick vid of HD19 3/4 walk around. http://youtube.com/watch?v=e2U40-qOeKM" rel="nofollow - http://youtube.com/watch?v=e2U40-qOeKM Next short vid is trying to see if we can get it to move, hand clutch not snapping over, eventually it did, brakes are froze, steering system seems to work but pull both levers and apply hand clutch, the drive shaft stops turning from the torque converter. http://youtube.com/watch?v=qXu3csedk04" rel="nofollow - http://youtube.com/watch?v=qXu3csedk04 Working on return fuel lines, originals hoses, they seem to leak for some reason. Fittings are different than today's standard so, I am working on them to put new hoses on to the old fittings. See how that will turn out. ------------- He who says there is no evil has already deceived himself The truth is the truth, sugar coated or not. Trawler II says, "Remember that." |
Posted By: JC-WI
Date Posted: 23 Apr 2026 at 11:14pm
|
Okay, got the old fittings retro-fitted with longer nipples to put new hoses on. Dug out the old hose and swedged out the crimping collars, then bought some nipples that didn't quite slide on the center tube so put them in a vise and pressed the nipples on 3/4 of the way and then worked (twisted) them back off. Brake kleened both pieces and then lightly soldered the nipple threads and then soldered the coupler filling the crimp base, then put the nipple on and tapped it till it seated then took the heat off of it. Think it should hold for a few more years now. LOL  While looking to see if the restrictor (Part number 043952) for
the fuel pressure gauge was open, found rust and dust blowing out of the
joining connection between the nut and restrictor. So cleaned that up
and soldered the fitting on solid. To check it, I put some penetrate
around and it didn't make any bubbles and put some on the gauge side
fitting and put air to it and had small little bubbles for awhile and
then stopped making bubbles... removed the air nozzle and was watching
and after several moments, the restrictor made more bubbles and then
quit??? Weird. Did it several times and each was the same. Is there some kind of diaphragm inside this restrictor assembly that pushes air against the fuel pressure gauge assembly??? Or does it actually flow fuel through and into the gauge? The
restrictor sure had some tiny holes, one on the inlet side, and one on
the gauge side, and neither one was connected to the other.  Thanks for looking. ------------- He who says there is no evil has already deceived himself The truth is the truth, sugar coated or not. Trawler II says, "Remember that." |
Posted By: JC-WI
Date Posted: 04 May 2026 at 12:32am
|
Was out to the 19 today and put on the new lines and fired it up. Took several minutes to get fuel pressure needle to move and made it to about 15 pounds. Upon engagement of clutch in first and reverse gear, it just grunted the engine a little bit. Pulled throttle down to wide open and pressure dropped to 10 pounds, but eventually came back to about 15-16 pound area... and then started losing fluid out of rear seal so shut it down. Started removing floor plate over brakes, The last bolt holding seat and plate was rusted tight and shed it's rust scale to the point the 3/4 socket spun on it and the 11/16 socket would not go on. Took battery boxes off, they are pretty bad rusted condition, twisted off the underside hold down bolts. Could get to the last floor plate bolt, but it still refuses to come loose after pounding and beating on the head.. probably due to the battery had frozen over the years and let the acid out and ate into the bolt area. Called it quits for lack of light. Tomorrow, hope to get brake bands broke loose, at least I think that is part of the problem for stopping the out-put shaft from torque convertor when engaging clutch. Did take a pic of serial number, Shows it as a 1949 model.  ------------- He who says there is no evil has already deceived himself The truth is the truth, sugar coated or not. Trawler II says, "Remember that." |
Posted By: Les Kerf
Date Posted: 05 May 2026 at 12:34pm
|
Your persistence is commendable! |
Posted By: JC-WI
Date Posted: 05 May 2026 at 7:57pm
|
Was out to it yesterday, brake peddles were stuck. Drove brake rod pins out and started pounding, prying, beating on brake levers and soaking the shafts and they eventually started to have a little wiggle and then stuck an 18" Crescent on the end of the brake peddle levers and kept wiggling and soaking till they swung free. Left was easier since it was held by one shaft and had a grease fitting on it. The right had two hangers and did not see any grease fitting for them, and took a lot more penetrate and time to get that one to swing free. Put the pins back in and the right brake functioned, but the left had to take cover off and got in there and pound on the brake band and loosen the adjusters and remove the pin from the actuator arm. Used angle grinder to remove cotter key ends and used a block of wood against compartment housing and a crowbar between the wood block and pin and then a long punch and hammered on clevis until the pin came out. Pin still had the bushing on it from the clevis. With the pin out and adjusters backed off got brake band loose all the way around. Took a look at end of clutch plate in there and they were dry rusty... Wondered if they were loose or not. Took the grease gun and greased the zerks that were located on left dash panel, lines went to clutch and front and rear bearing areas of torque converter. Fired up the old Detroit and it came to life sounding good to the ears and fuel pressure came up to about 22 pounds and I engaged the clutch and it went to Zero but moments later were at 15 pounds. Then engaged transmission and it tried to move forward and backward and was actually wanting to go, but only moved it a little bit because did not want it getting off the track any worse. Then tried the steering clutches... Right one didn't let go, just sucked the brake down to stalling the drive shaft, Left brake was not pinned back together yet, but sprocket would spin when hand clutch was engaged while holding down the steering clutch. With that, I decided it was time to try the LeTourneau double drum cable winch, which only one drum is currently used. I do not like the looks of the old rusty cable which has wires poking out of it's structure. But wanted the to see if the blade would raise. after several times of bumping the control lever, it finally started lifting and raised the blade up. Good and it held too. Shut the crawler off and the torque converter started dripping out of rear seal. Grabbed the grease-gun and pumped in a bunch of grease and turned the shaft and it seemed to stop. Tried get shut-off valve to turn again, (didn't succeed the time before) rapped and tapped on it to no avail, finally quit on it again. Now question is, fuel tank has fuel in it, and the shut off valve is stuck tight in the on position. How do you get them loose after 40 years or more? Without breaking anything or having fuel spill? I have had some shut offs that turned like they were used yesterday, some you could be 'bumped' on the bottom end of stem and then they turned, but this one is enclosed on the bottom so can't 'bump' it to loosen. It has the cover on top with stem coming through and under it has a spring to push on the seals which are compressed pretty flat now against the inner part of the valve. Probably have to drain the tank or disconnect valve as fast as possible and cap or plug the line to work on shut-off valve. Took the pin home to clean it up and get bushing off, it was on pretty
tight, even used heat on it. It eventually came, after lot more soaking
and pounding on the steel bushing while rolling it on a solid bar of
steel. BUT... bigger problems are, Getting track back on and getting steering clutches to disengage. Haven't figured out how to get that track on easily yet. My current thought is to set up several points of blocks or cribbing and get about 4 20 ton jacks and jack the one side up enough to slide the track back under the rail rollers and somehow get chain back over rear sprocket... about 48,000 pounds or 24 tons and lifting one side would be closer to 12-14 tons of weight, 4 jacks should work. Or call in a big Huey to give it a lift? Ok, nuff of this for now. Les, some times it amounts to being to stubborn to quit. ------------- He who says there is no evil has already deceived himself The truth is the truth, sugar coated or not. Trawler II says, "Remember that." |
Posted By: Les Kerf
Date Posted: 06 May 2026 at 9:09am
May I suggest holding it up with a chain so as to not have to worry about it later?
I'm not sure if even the CH53D models I worked on during my Marine Corps days would lift that, perhaps the new CH53E model would do?
Keep up the good work and thanks for the updates
|
Posted By: Les Kerf
Date Posted: 07 May 2026 at 9:45am
One method is to apply a vacuum to the tank which will prevent spillage. I have done this several times, the last time was on my Son-in-law's HD5G fuel tank on which we had to replace the shutoff valve. I have only done this using a standard shop vacuum, but I believe it could be done using engine vacuum from a suitable gasoline vehicle engine sorta like when we need to run the milker bucket on our Surge brand milking machine. With the shop vacuum I just connected the vacuum hose to the filler opening and sealed it with a generous amount of duct tape and had my Grandson hold it to keep it in place. We literally lost only a few drops of fuel. I have also observed this being done on a large hydraulic tank in a sawmill where I was employed. Your mileage may vary
|
Posted By: JC-WI
Date Posted: 08 May 2026 at 1:56pm
|
Had not thought of using vacuum on the tank, that would work... It's just not close to electricity at this time... yet. Don't know exactly when will get back to it again. ------------- He who says there is no evil has already deceived himself The truth is the truth, sugar coated or not. Trawler II says, "Remember that." |
Posted By: Les Kerf
Date Posted: 09 May 2026 at 10:15am
A portable generator if available would solve that
|
Posted By: JC-WI
Date Posted: 11 May 2026 at 3:55am
|
Update- Spent 3 hours Saturday and got HD19 moved about 25 feet from the nose down slope it was in to a little more friendlier ground to work on getting the track on. Track was on the front idler to start with, but with the track off the rear sprocket, and truck rollers not on the chain, it led to a track getting up against dozer frame at the front, and track chain on the top side of rear sprocket. Today with railroad ties and 20 ton bottle jacks, we jacked the left side back end up and shoved a tie under the front left side and jacked it up until track could slide under idler wheel. Then worked to get track on rear sprocket all the way with a bobcat, then pushed top and bottom to line up with rollers. That didn't work to well near the idler wheel, we had to pull track forward the best we could to start getting it over the edge of the idler. We had come-alongs and chain binders pulling on the track forward and upward using the dozer blade and front frame to anchor into. Idler wheel has no bearings left in it so that was pried back as far as we could get it... there was enough slack in the end to finally allow track to go over the two center ribs... Funnier part was, while pushing on the bottom, the idler shifted and part of the top side decided to allow the chain to start coming off on the inside and had nephew push on idler with the bobcat to get it aligned with the chain and suddenly it all seemed to jump and chain was finally on idler. We then aligned the track chain to the lower rollers and took out rear jack and held the front up enough to rest idler in a mid position. Then we cut 1 1/2 - 2 inch wide 10" long strips of wood and sledge them into the hub of the roller got 4 of them in and the forth was hard to get in so we didn't drive any more in though I had figured there should have been 8 or 9 if the sides had been cut for going around the 3" shaft and inside the circumference of the idler's 6" hub. We fired the Detroit up and backed it up to more level ground and found the right clutch does work, but need to stand on the brake to get it to let go. The left brake stops the torque converter at full throttle with left clutch pulled. With the wood strips in the hub, the idler wheel stays pretty straight, even when turning. But it moves now, that's the good part. Now to find a ride home for it. Here are some more pics of the pretty ugly old dozer, What can you expect when your almost 80 years old... This was Saturday at 3pm.  and at 6pm, moved about 25 feet and got track on sprocket at top... Doesn't look much better. arrgh  And Sunday at 7:30 track on and sitting on level ground.  ------------- He who says there is no evil has already deceived himself The truth is the truth, sugar coated or not. Trawler II says, "Remember that." |
Posted By: Les Kerf
Date Posted: 11 May 2026 at 7:43am
Wow!  |
Posted By: wjohn
Date Posted: 11 May 2026 at 10:28pm
|
That looks like solid progress! ------------- 1939 B, 1940 B, 1941 WC, 1951 WD, 1952 CA, 1956 WD-45 |
Posted By: JC-WI
Date Posted: 24 May 2026 at 5:50pm
|
I am back with more news on getting HD19 home. Friday nephew and I went up to the old dozer and fired it up. Left clutch still stuck so walked it out with just the right clutch working. And that seemed to get stiffer as we went. http://youtu.be/58AQQuC5NQM%20" rel="nofollow - http://youtu.be/58AQQuC5NQM Was a light rain but wanted it out by the road so when trucker came, he
could just back in and detach and then back dozer on lowboy. That was
the plan. http://youtu.be/L5wlXP8xd_M%20" rel="nofollow - http://youtu.be/L5wlXP8xd_M Sorry, I didn't get a vid of loading, though I asked an observer if he would send me what he took. Remains to be seen if I will get that vid.... or not. A lady came out from other side of road and asked what we were doing. Told her we were moving that old crawler and it was going to get loud and smoky for awhile... 9 AM, trucker came with lowboy and backed it in scraping the pavement with the belly of trailer. He positioned the trailer and dropped it and moved up. We fired up the dozer and noise and smoke followed and lady disappeared, think she went back in to her house. Backed the dozer onto trailer with just a few slight corrections in one shot, tied it down while trucker hooked back up. Vid 3 was as he was leaving, scraping the pavement as he was turning onto the road. He said he felt it. http://youtu.be/s_-ZB9oFOx4%20" rel="nofollow - http://youtu.be/s_-ZB9oFOx4 Plan was coming together very nicely, one escort in front with flashers and two following behind... Got to my place and he swung wide and then had to back up just enough to keep his front tired on driveway and keep the trailer wheels on driveway too. Got detached and tie downs off the dozer, winged it over and raised the blade to where I thought I would not scuff the ground. Came to the ramps and a slight tip and the blade dug in a little, stopped and raised the blade and drove forward to semi-tractor. backed up with right steering clutch pulled and standing on brake and finally it started turning before I got to the trailer, then went forward and out of way of the truck and trailer. Trucker got hooked up backed up across the road and he was gone and it wasn't 10:30 yet. after everybody had left, I drove the dozer to where it was getting parked for now and then got 4 railroad ties and laid them down and backed up on them and set a tie under the blade for now, should have laid 8 ties on this ground. .. and it wasn't even noon yet. Sure like when plans work out. Now I need to get that front idler wheel assembly fixed and get clutches to work and get better fuel pressure to get that 30-50 pounds for the torque convertor, and possibly get some seals fixed so it doesn't leak . Here it is sitting now, track doesn't look to bad in this pic.  Wish it were that good. Wish it were that good.  ------------- He who says there is no evil has already deceived himself The truth is the truth, sugar coated or not. Trawler II says, "Remember that." |
Posted By: wjohn
Date Posted: 24 May 2026 at 8:02pm
|
Awesome!! ------------- 1939 B, 1940 B, 1941 WC, 1951 WD, 1952 CA, 1956 WD-45 |
Posted By: Les Kerf
Date Posted: 25 May 2026 at 7:40am
| ^^Ditto!^^ |
Posted By: JC-WI
Date Posted: 25 May 2026 at 8:54am
|
Gemdozer
Gemdozer, from what I can see in parts book is the seal kit 076354 contains Items; 12 - 051629 - boot seal, 14 - ------ - ring seal, 15 - 051622 - gasket. Still need item 13 - 051959 - spring assembly (which you have), and items 16 - 051620 - Guard assembly seal (contains item 17) 17 - 051964 - pin - seal guard So two kits of seal kit 076354, two spring assemblies 051959, two guard assemblies 051620 would be all the seals I need for one front Idler, correct? Gemdozer, do you also have the the 051620 guard assemblies? Would be nice if I could find a better 051621 shaft and couple 051617 bearing retainers As mentioned before, probably weld this one up and turn it down or find a 3" shaft and turn it down. Wonder what grade of steel the shaft was made from? I have new bearing cup and cones for the idler wheel, now to get slack adjusters freed up and loosened to get assembly out to work on it.  ------------- He who says there is no evil has already deceived himself The truth is the truth, sugar coated or not. Trawler II says, "Remember that." |
Posted By: JC-WI
Date Posted: 25 May 2026 at 5:02pm
|
Just for a little entertainment...wish I had a vid of this but I didn't think of it, but when the trucker was getting ready to leave, he started backing up across the road into the opposite driveway, a car started coming our way from a quarter mile away stop sign intersection... and he kept coming and got himself up really near the trailer before he decided to stop... Trucker by that time had the truck out on the road and turning with his right had wheel out on the edge of the shoulder... The driver of the little black suv car decided with about 5 feet of clearance decided finally that he had snuck into a spot that wasn't a good place to be and he backed up ... and the long lowboy trailer just seemed like it kept coming out and out and the suv driver backed up more and more and musta backed up 50 feet before he decided maybe the back end of the low boy would finally miss him. By that time the trucker decided that it was time to get rolling. Driver then went past with kind of a disgusted look. We waved cordially to them as they passed. Getting it moved had to be done. Thanks fellas for the kudos. ------------- He who says there is no evil has already deceived himself The truth is the truth, sugar coated or not. Trawler II says, "Remember that." |
Posted By: gemdozer
Date Posted: 25 May 2026 at 5:05pm
| I have some new boot seals,some spring assambly,some gaskets seal,some rings seal but missing the other parts |
Posted By: JC-WI
Date Posted: 23 Jun 2026 at 12:05am
|
Finely got to looking at the wobbly front track support roller this evening, thought it would not be to bad.... and it's worse than that. AARGH! They say a picture is worth a thousand words... Two words come to mind, ... "It's JUNK"!!!  Might have to find a used assembly or take some right sized oil drilling pipe and cut some collars off to weld onto the rollers. Don't know how deep through the support got worn into, or if the shaft is any good either. Seals are probably totally shot. Thought about just putting some round chunks of steel in the casting and then have the shaft go through that and squirt grease in every little while to keep it lubricated. Track chain, - new they measured 9", this rail measure out to 9 1/4 inches app. center to center of pins, this crawler has pin and bushing wear, a few are starting to crack. I have an extra track, maybe should check that one to see what the distance between pins is. That track has an actual single grouser bar instead of the two extra bars as somebody had welded onto this crawler, making them look like street pads. Sure doesn't scuff the ground up as much as the tall grouser does when turning. Thats the news on the HD19 for now. jc ------------- He who says there is no evil has already deceived himself The truth is the truth, sugar coated or not. Trawler II says, "Remember that." |
Posted By: Les Kerf
Date Posted: 23 Jun 2026 at 11:41am
For limited usage that would work just fine. Thanks for the update
|
Posted By: Ian Beale
Date Posted: 23 Jun 2026 at 6:05pm
| Remember KOO's "oak top skid" for a thought |
Posted By: JC-WI
Date Posted: 25 Jun 2026 at 3:31am
|
Ian Beale, Haven't kept track of KoO for a number of years. He was quite the card over on RedPower and teasing the about 'Duals Rule' with a young fellow there. and "cheeze whiz" was the greatest... LOL And then the thread of the sinking of the RD6 Cat that was hauling freight from Lynn Lake to Brochet Manitoba. http://www.kingofobsolete.ca/sterling_SUNKEN_CAT_WEBPAGE.htm" rel="nofollow - http://www.kingofobsolete.ca/sterling_SUNKEN_CAT_WEBPAGE.htm Sure was hoping they could have found and salvaged the old crawler while the last man driving it was still alive. Would have been awesome. KoO has couple Cats that were sunk and got them back up to being used again. Pic below of the oak skid track carrier is on his D6 'Hood" crawler. It shouldn't be to hard to make something like that to support the rail. Guess the biggest thing for the HD19 is to get the front idler assembly repaired and the slack adjusters working again and tighten the assembly up and get the slack out of the chain. and maybe find a whole top roller assemblyin good shape. 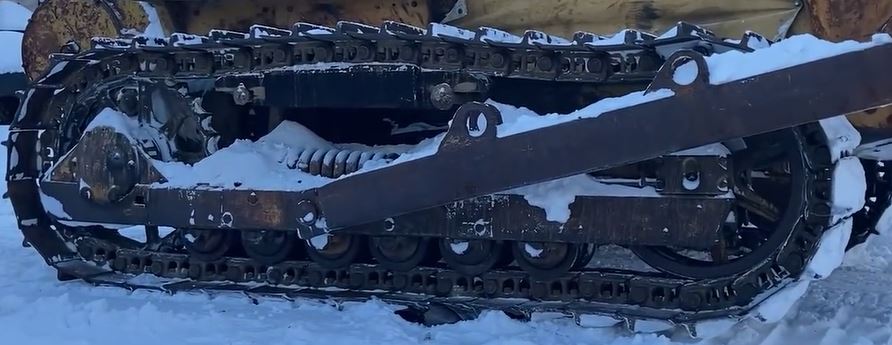 ------------- He who says there is no evil has already deceived himself The truth is the truth, sugar coated or not. Trawler II says, "Remember that." |
Posted By: Les Kerf
Date Posted: 25 Jun 2026 at 9:44am
I had never heard of KoO so I followed the link, he is indeed quite the character! I especially like his starter modification for un-sticking engines  |