| Author |
 Topic Search Topic Search  Topic Options Topic Options
|
ssccrab 
Bronze Level


Joined: 12 Jan 2020
Location: KCK
Points: 52
|
 Post Options Post Options
") Thanks(0) Thanks(0)
 Quote Quote  Reply Reply
 Topic: WD45 Bucket & Misc. Questions Topic: WD45 Bucket & Misc. Questions
Posted: 12 Jan 2020 at 6:42pm |
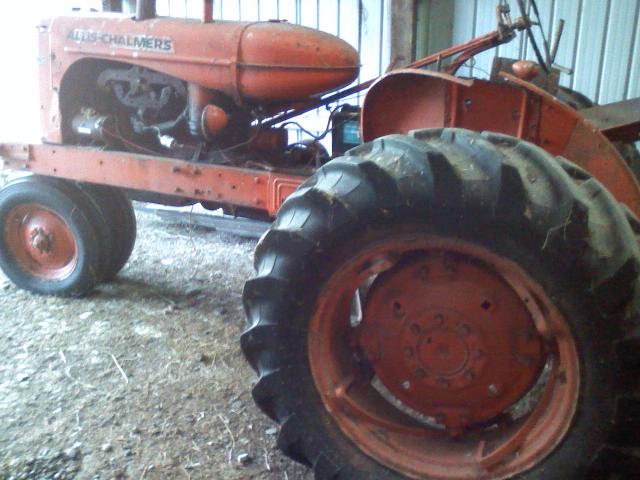
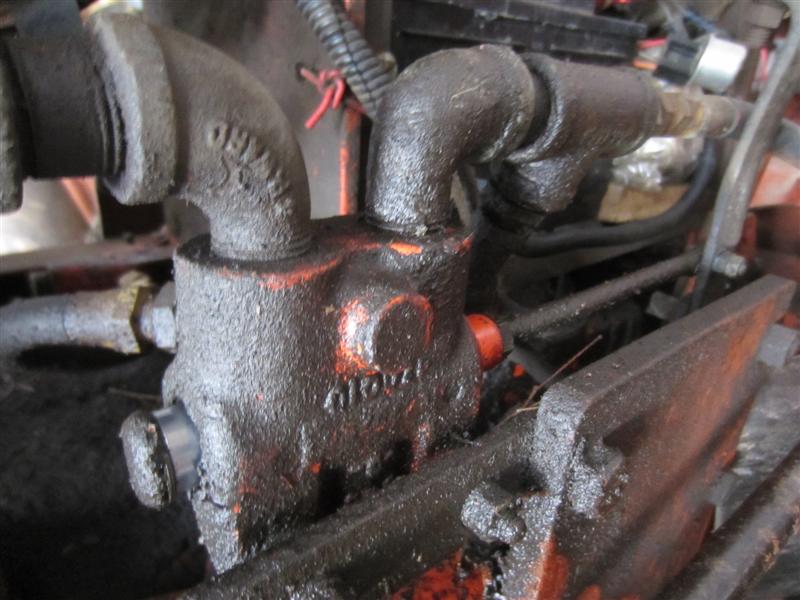
Hello to you all. New to the site. I recently purchased a 1955 WD45 with a 3-point and loader. The loader is a New Idea 501, serial 01989. I'm restoring the engine currently, as it became seized sometime within the last 5 years. I'm wondering if anyone can direct me on how to go about using this loader. I don't see any obvious levers anywhere that would be used for up/down. Below are pictures of the loader, where it's plumbed into the hydraulics, and looking at tractor controls. One of my pics here has a red circle around a knob next to the steering column that can be pulled in or out, and I have no idea what it's for. Looks like it's connected to something somewhere down close to the hydraulics. I've never driven one of these, but I'm looking forward to restoring it. Any and all info in appreciated. Thanks!!  
Edited by ssccrab - 12 Jan 2020 at 6:45pm
|
 |
|
Sponsored Links
|
|
|
Boss Man
Orange Level

Joined: 03 Mar 2018
Location: Greenleaf, WI
Points: 617
|
Post Options
Thanks(0)
Quote Reply
Posted: 12 Jan 2020 at 7:44pm |
|
One lever up by the steering wheel is throttle the other runs your hydraulics. You pull the lever on the right arm to dump the bucket then lower to the ground to reset it.
|
|
Brian G. NY
Orange Level

Joined: 12 Sep 2009
Location: 12194
Points: 2259
|
Post Options
Thanks(0)
Quote Reply
Posted: 12 Jan 2020 at 7:51pm |
The lever you have circled in red controls the PTO and has nothing to do with the hydraulics. You will have to follow the hydraulic hoses to figure out how the loader operates. It appears that it is simply controlled by the lever on the LH side of the steering wheel; the one that mirrors the throttle lever on the RH side of the wheel.
|
|
LeonR2013
Orange Level

Joined: 01 Jan 2013
Location: Fulton, Mo
Points: 3500
|
Post Options
Thanks(0)
Quote Reply
Posted: 12 Jan 2020 at 8:16pm |
|
Have one just like it on my 45 and it's a pretty strong unit. I couldn't see the bucket release in the picture but it will be there because you can see the latch pin in the front above the bucket. because of the hydraulics it has it's limitations but is still useful. Some have added a second pump on the front of the engine and with extra cylinders made it more user friendly. Never done it myself so you can directions from someone on here on how to do it. Leon
|
|
Sugarmaker
Orange Level
Joined: 12 Jul 2013
Location: Albion PA
Points: 8486
|
Post Options
Thanks(0)
Quote Reply
Posted: 12 Jan 2020 at 8:23pm |
ssccrab, Welcome! You have a solid tractor The guys have given you good directions on the use of the hydraulic controls and bucket operation. I used one very similar every year to clean out a barn. Removing that loader might make it a whole bunch easier to work on the engine. Are you pulling the engine? I like the 45's! Does it have power steering? Regards, Chris
|
|
D17 1958 (NFE), WD45 1954 (NFE), WD 1952 (NFE), WD 1950 (WFE), Allis F-40 forklift, Allis CA, Allis D14, Ford Jubilee, Many IH Cub Cadets, 32 Ford Dump, 65 Comet.
|
|
ssccrab
Bronze Level
Joined: 12 Jan 2020
Location: KCK
Points: 52
|
Post Options
Thanks(0)
Quote Reply
Posted: 12 Jan 2020 at 8:42pm |
Thanks for the helpful replies, everyone! Chris, yes it does have power steering. Another reason I wanted it. I won't be pulling the engine completely, but so far I have removed the oil pan, belts, and cylinder head, which is soaking in my electrolysis tank. It was severely neglected. I had to unbolt the loader from the front half of the frame and lower it to get the oil pan down.
On the hydraulics, I guess I'm not understanding how the 3-point is to operate separately from the loader. Doesn't the LH control lever also raise/lower the 3-point?
|
|
MACK
Orange Level
Joined: 17 Nov 2009
Points: 7664
|
Post Options
Thanks(1)
Quote Reply
Posted: 12 Jan 2020 at 8:43pm |
|
The knob in first picture shuts the loader off to where you can use arms on back.
. MACK
|
|
ssccrab
Bronze Level
Joined: 12 Jan 2020
Location: KCK
Points: 52
|
Post Options
Thanks(0)
Quote Reply
Posted: 12 Jan 2020 at 9:05pm |
|
Oohh, got it. So with that valve open, does that shut off the rear, or are both operating at the same time? Seems like it would be easier to just replace that with a ball valve for on/off operation.
|
|
Sugarmaker
Orange Level
Joined: 12 Jul 2013
Location: Albion PA
Points: 8486
|
Post Options
Thanks(0)
Quote Reply
Posted: 12 Jan 2020 at 9:12pm |
My gut feel is that the lift arms on the rear will go up and down with the loader. Mack and lots of other folks are way better than me on hydraulics. Its not easy to do a engine overhaul in frame. If you can do it I would suggest pulling the engine and getting it on a stand. Take my word for it. After doing this last 45 engine and listening to the recommendations it was way easier and I think I got a much better finished engine! Power steering! Awesome! Way better than that Armstrong steering system we used when we had the loader on the 1955 WD45. Electrolysis too! Great process to help clean things up. It has some disadvantages as it is only a line of site process. its not like a hot tank cleaning, but still a good process. Regards, Chris
|
|
D17 1958 (NFE), WD45 1954 (NFE), WD 1952 (NFE), WD 1950 (WFE), Allis F-40 forklift, Allis CA, Allis D14, Ford Jubilee, Many IH Cub Cadets, 32 Ford Dump, 65 Comet.
|
|
ssccrab
Bronze Level
Joined: 12 Jan 2020
Location: KCK
Points: 52
|
Post Options
Thanks(0)
Quote Reply
Posted: 12 Jan 2020 at 9:33pm |
|
That's what I had thought, too. I figured if I had a mower attached to the back, I could lift the front off the ground a bit, shut it off, and use the lever to control just the back. Ideally I'd like to plumb a rear shut off as well, and maybe get the shut-offs up on the steering column a bit closer to the seat? Lots of dreams for this thing, lol. I don't currently have a stand, but will get one soon. I agree it's a far better experience to do it out of frame. Yes, so far I've gotten parts cleaned with it and it's done a very good job! Have never hot tanked though. Is it more thorough? I'll post more pics of the going-on's as well.
|
|
MACK
Orange Level
Joined: 17 Nov 2009
Points: 7664
|
Post Options
Thanks(0)
Quote Reply
Posted: 12 Jan 2020 at 9:34pm |
|
By looks of pluming, with valve open, both would work. With valve closed, only rear would work. MACK
|
|
Sugarmaker
Orange Level
Joined: 12 Jul 2013
Location: Albion PA
Points: 8486
|
Post Options
Thanks(0)
Quote Reply
Posted: 12 Jan 2020 at 10:17pm |
ssccrab, Hot tanking will get the internal passages much better than the E tank process. Check with your local engine shop. You might want to have the head and block hot tanked and checked for cracks too. I have done a lot of E tank work.
Regards, Chris
|
|
D17 1958 (NFE), WD45 1954 (NFE), WD 1952 (NFE), WD 1950 (WFE), Allis F-40 forklift, Allis CA, Allis D14, Ford Jubilee, Many IH Cub Cadets, 32 Ford Dump, 65 Comet.
|
|
ssccrab
Bronze Level
Joined: 12 Jan 2020
Location: KCK
Points: 52
|
Post Options
Thanks(0)
Quote Reply
Posted: 13 Jan 2020 at 8:48am |
 MACK wrote: MACK wrote:
By looks of pluming, with valve open, both would work. With valve closed, only rear would work. MACK |
Thank you for this, Mack. I appreciate your clarification!
|
|
ssccrab
Bronze Level
Joined: 12 Jan 2020
Location: KCK
Points: 52
|
Post Options
Thanks(0)
Quote Reply
Posted: 13 Jan 2020 at 8:49am |
Sugarmaker wrote:
ssccrab,Hot tanking will get the internal passages much better than the E tank process. Check with your local engine shop. You might want to have the head and block hot tanked and checked for cracks too. I have done a lot of E tank work.
Regards, Chris |
Looks like hot tanking is rather easy to DIY as well. I may go ahead and give that a shot, too.
|
|
Sugarmaker
Orange Level
Joined: 12 Jul 2013
Location: Albion PA
Points: 8486
|
Post Options
Thanks(0)
Quote Reply
Posted: 13 Jan 2020 at 8:54am |
ssccrab, Post some information on hot tanking DIY. I thought this generally was a caustic type dip/soak? I think in the old days a product called oakite was used in solution to clean rusty parts? I may not have that correct? I guess I will have to do some research.
I think you said restoration on this 45 project. What are your plans? It has a lot of the same issues and patina of tractors that I bring home too. They are a work horse of a tractor. May not be the most for creature comforts. And if your left leg and arm are 4 inches longer than your right, you will feel at home on it!:)
Regards, Chris
Edited by Sugarmaker - 13 Jan 2020 at 9:00am
|
|
D17 1958 (NFE), WD45 1954 (NFE), WD 1952 (NFE), WD 1950 (WFE), Allis F-40 forklift, Allis CA, Allis D14, Ford Jubilee, Many IH Cub Cadets, 32 Ford Dump, 65 Comet.
|
|
mdm1
Orange Level

Joined: 12 Sep 2009
Location: Onalaska, WI
Points: 2677
|
Post Options
Thanks(0)
Quote Reply
Posted: 13 Jan 2020 at 8:54am |
The hydraulics will raise the rear first then the loader. I put a valve on mine so I could isolate the rear from the loader. Makes it a little easier. Here is a pic of the valve mounted on the fender. If you get a valve make sure it is a high pressure valve. 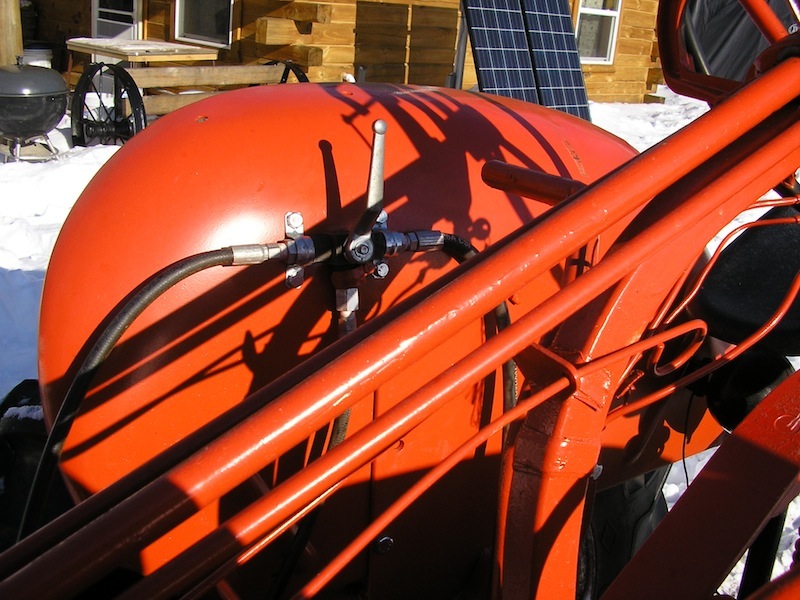
|
|
Everything is impossible until someone does it! WD45-trip loader 1947 c w/woods belly mower, 1939 B, #3 sickle mower 1944 B, 2 1948 G's. Misc other equipment that my wife calls JUNK!
|
|
Brian G. NY
Orange Level
Joined: 12 Sep 2009
Location: 12194
Points: 2259
|
Post Options
Thanks(0)
Quote Reply
Posted: 13 Jan 2020 at 9:51am |
I also installed a diverter valve on my WD. In the forward position, the loader operates and the rear lift arms stay wherever they were when the valve was switched. In the rear position, the loader stays wherever it was and the rear arms operate as normal. This works out great as I always leave my back blade on which enables me to do clean up work when using the loader and provides lots of ballast when using the loader. These diverter valves say they are limited to 2,500 PSI but I've had mine on the WD for years without a problem. I installed a lever reachable from the seat which makes it more convenient like mdm1's valve.
Edited by Brian G. NY - 13 Jan 2020 at 9:54am
|
|
Ted J
Orange Level

Joined: 05 Jul 2010
Location: La Crosse, WI
Points: 18943
|
Post Options
Thanks(0)
Quote Reply
Posted: 13 Jan 2020 at 11:26am |
|
Be DANG CAREFUL when you're working with hydraulics!!!!!!!! There was a thread on here about what can happen if a hose or fitting breaks and you get injected with hyd oil. It's some BAD stuff. So I don't think I'd want any hoses or fittings close to me that might snap at any given moment.
Yes, you got a good grasp of how the system works. It really is simple. I put ball valves in mine and I like em a lot better than turning one like that all the way in or out. Make darn sure you have a valve or hoses that are HIGH pressure, in excess of 4000 lbs.
|
|
"Allis-Express"
19?? WC / 1941 C / 1952 CA / 1956 WD45 / 1957 WD45 / 1958 D-17
|
|
ssccrab
Bronze Level
Joined: 12 Jan 2020
Location: KCK
Points: 52
|
Post Options
Thanks(0)
Quote Reply
Posted: 13 Jan 2020 at 6:57pm |
Sugarmaker wrote:
ssccrab,Post some information on hot tanking DIY.
And if your left leg and arm are 4 inches longer than your right, you will feel at home on it!:)
Regards, Chris
|
Haha, I'm sure I will! Far as restoration goes, I'd like to paint it, for sure, and metal dents are close to zero. The sheet metal is in great condition.
From what I've seen, it's mostly just a gallon of what ever industrial de-greaser you choose (simple green, purple power.) Pair that with a metal trash can about 3/4 full or more of water. Place that on something to where you can get a flame or other heat source up under it. It has to get hot enough to reach a rolling boil. Dip your part into the tank and let it boil anywhere from a few hours to over night. The next time you pull it out, everything except for the bare metal is sludge.
Edited by ssccrab - 13 Jan 2020 at 7:05pm
|
|
ssccrab
Bronze Level
Joined: 12 Jan 2020
Location: KCK
Points: 52
|
Post Options
Thanks(0)
Quote Reply
Posted: 13 Jan 2020 at 7:00pm |
Ted J wrote:
Be DANG CAREFUL when you're working with hydraulics!!!!!!!! There was a thread on here about what can happen if a hose or fitting breaks and you get injected with hyd oil. It's some BAD stuff. So I don't think I'd want any hoses or fittings close to me that might snap at any given moment.
Yes, you got a good grasp of how the system works. It really is simple. I put ball valves in mine and I like em a lot better than turning one like that all the way in or out. Make darn sure you have a valve or hoses that are HIGH pressure, in excess of 4000 lbs.
|
Yessir, thank you for the advice! Looking online now for a 1/4" high pressure ball valve. Lots are available at around 7-8,000 PSI
|
|
ssccrab
Bronze Level
Joined: 12 Jan 2020
Location: KCK
Points: 52
|
Post Options
Thanks(0)
Quote Reply
Posted: 13 Jan 2020 at 7:01pm |
Brian G. NY wrote:
I also installed a diverter valve on my WD.
|
Where did you purchase your diverter valve?
|
|
ssccrab
Bronze Level
Joined: 12 Jan 2020
Location: KCK
Points: 52
|
Post Options
Thanks(0)
Quote Reply
Posted: 13 Jan 2020 at 7:02pm |
mdm1 wrote:
The hydraulics will raise the rear first then the loader. I put a valve on mine so I could isolate the rear from the loader. Makes it a little easier. Here is a pic of the valve mounted on the fender. If you get a valve make sure it is a high pressure valve. |
This is very cool. Exactly the sort of setup I've envisioned having.
|
|
ssccrab
Bronze Level
Joined: 12 Jan 2020
Location: KCK
Points: 52
|
Post Options
Thanks(0)
Quote Reply
Posted: 14 Jan 2020 at 5:47pm |
Hey fellas'. Thought I'd post an update on the engine cleaning process so far. I've had the cylinder head sitting in my "Mach 1" version electrolysis tank, which was the biggest storage tub I could find at Wal Mart, filled with about 40 gallons of water & 1.5 cups of washing soda. Threw in some positive anodes (spare angle iron laying around the shop) and dunked the head. Three days later & I'm astonished at the results. Pics are below to see for yourself! I have a "Mach 2" version electrolysis tank now; 35 or so gallon trash can, 8 pieces of rebar from Home Depot (1/2" x 4') all welded together. This makes it so much easier to use my overhead electric winch to dunk it in. Check it out!
|
|
Sugarmaker
Orange Level
Joined: 12 Jul 2013
Location: Albion PA
Points: 8486
|
Post Options
Thanks(0)
Quote Reply
Posted: 14 Jan 2020 at 6:22pm |
ssccarb, Yes its not like sand blasting or other aggressive mechanical cleaning methods, but I like it I like the idea of using the lift to dunk the heavy items. I also like the idea it works around the clock unattended. If you get real creative you can insert rods into the blind areas to clean the inside of cavities too. I did a gas tank once., the inside and the outside at the same time with a suspended anode down in the tank. (insulated so as not to touch tank) When I am cleaning parts I have trouble keeping up with them coming out of the tank.
Head looks much better. I like your welded rebar annode system too!
I believe there is a down side and you may need to do more research on this? The process can cause hydrogen embritilement. I do not know the extent or much about this. Some folks don't do bolts, it might affect your valve springs???
Here is a example of some Allis parts Before and after E tank.
Regards, Chris
Edited by Sugarmaker - 14 Jan 2020 at 6:33pm
|
|
D17 1958 (NFE), WD45 1954 (NFE), WD 1952 (NFE), WD 1950 (WFE), Allis F-40 forklift, Allis CA, Allis D14, Ford Jubilee, Many IH Cub Cadets, 32 Ford Dump, 65 Comet.
|
|
Brian G. NY
Orange Level
Joined: 12 Sep 2009
Location: 12194
Points: 2259
|
Post Options
Thanks(0)
Quote Reply
Posted: 14 Jan 2020 at 8:13pm |
[/QUOTE]
Where did you purchase your diverter valve? [/QUOTE]
________________________________________________________________
I bought it years ago at Central Tractor who was bought out by Tractor Supply.
I bought a couple more of them when they had their "going out of business" sale because they were marked down to half price.
Sorta like the woman who goes to a sale and buys something, not because she needs it, but because "it was such a deal she couldn't pass it up".
I hesitate to sell them now to anyone who has an A-C tractor with the old "high pressure, low volume" hydraulic system after the postings about the "perceived" hazzard.
However, a "diverter" valve of some kind is the best way to go for the reasons mentioned in my original post.
|
|
DiyDave
Orange Level Access

Joined: 11 Sep 2009
Location: Gambrills, MD
Points: 54068
|
Post Options
Thanks(0)
Quote Reply
Posted: 14 Jan 2020 at 8:24pm |
For the diverter valve, try Surpluscenter.com, out of Lincoln NE... 
|
|
Source: Babylon Bee. Sponsored by BRAWNDO, its got what you need!
|
|
ssccrab
Bronze Level
Joined: 12 Jan 2020
Location: KCK
Points: 52
|
Post Options
Thanks(0)
Quote Reply
Posted: 14 Apr 2020 at 9:38pm |
|
So after having driven it quite a bit recently and replacing all of the hydraulic hoses, I've been wondering more about hydraulic controls. Is there any way to use something like a one or two spool control valve with a couple of spring levers with this system? I understand most modern valves have an in and out, where as the WD45 is mostly one way. Thanks!
|
|


