| Author |
 Topic Search Topic Search  Topic Options Topic Options
|
Duane Becker 
Bronze Level

Joined: 29 Apr 2018
Location: Elk, Washington
Points: 15
|
 Post Options Post Options
") Thanks(0) Thanks(0)
 Quote Quote  Reply Reply
 Topic: Help with WD45 diff tranny gasket replace Topic: Help with WD45 diff tranny gasket replace
Posted: 21 Jul 2018 at 9:31am |
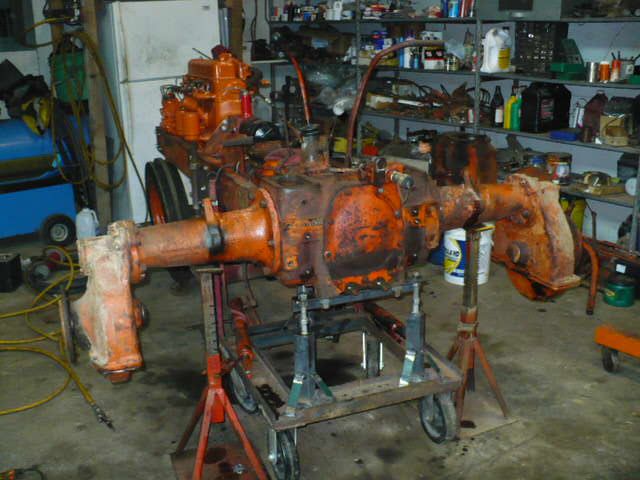
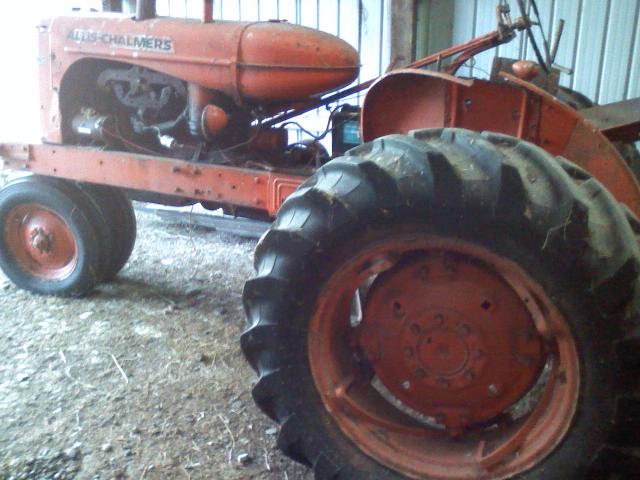
I have a 1955 wd45 with a gear oil leak at the differential and trany. I have decided to pull the diff and trany apart and replace the gasket. I have removed the back tires, the drawbar, battery and box, disconnected the brake lines, hand clutch and various other small items that would prohibit the separation-haven't disconnected the steering wheel mount, but it looks as if I need to as well. My questions are: What is the best way to pull the diff and trany apart. I would like to attack it from the back end-diff end. If I pull the two apart, I assume there will be a shaft, will anything be falling off the shaft as I'm pulling it out? I have a cherry picker, jack stands and a knowledgeable helper-I'm not that mechanical. Any suggestions and help would be appreciated.
|
 |
|
Sponsored Links
|
|
|
MACK
Orange Level

Joined: 17 Nov 2009
Points: 7664
|
Post Options
Thanks(0)
Quote Reply
Posted: 21 Jul 2018 at 10:41pm |
|
I would put the back tires back on, support front part with a good stand then role the back end away with a floor jack under it. MACK
|
|
Don(MO)
Orange Level
Joined: 12 Sep 2009
Location: Bates City MO.
Points: 6862
|
Post Options
Thanks(0)
Quote Reply
Posted: 22 Jul 2018 at 9:44am |
Like Mack said put the wheels back on or build a roller stand like this.
|
|
3 WD45's with power steering,G,D15 fork lift,D19, W-Speed Patrol, "A" Gleaner with a 330 corn head,"66" combine,roto-baler, and lots of Snap Coupler implements to make them work for their keep.
|
|
Duane Becker
Bronze Level
Joined: 29 Apr 2018
Location: Elk, Washington
Points: 15
|
Post Options
Thanks(0)
Quote Reply
Posted: 22 Jul 2018 at 6:41pm |
|
Thanks guys for the post and pixs! This will help. This coming Friday will be another work day. I'll keep you updated.
|
|
Don(MO)
Orange Level
Joined: 12 Sep 2009
Location: Bates City MO.
Points: 6862
|
Post Options
Thanks(0)
Quote Reply
Posted: 22 Jul 2018 at 7:10pm |
|
I forgot to say, keep the hand clutch engaged so the disks don't fall down and watch the trans input shaft stays in the front of trans as you roll them apart.
Edited by Don(MO) - 22 Jul 2018 at 7:10pm
|
|
3 WD45's with power steering,G,D15 fork lift,D19, W-Speed Patrol, "A" Gleaner with a 330 corn head,"66" combine,roto-baler, and lots of Snap Coupler implements to make them work for their keep.
|
|
Duane Becker
Bronze Level
Joined: 29 Apr 2018
Location: Elk, Washington
Points: 15
|
Post Options
Thanks(0)
Quote Reply
Posted: 22 Jul 2018 at 10:16pm |
|
Thanks Don, I probably would have left the hand clutch disengaged! I'll make sure it in.
|
|
Duane Becker
Bronze Level
Joined: 29 Apr 2018
Location: Elk, Washington
Points: 15
|
Post Options
Thanks(0)
Quote Reply
Posted: 03 Aug 2018 at 6:17pm |
|
Just finished up on the gasket replace. Everything work good and the differential rolled pretty easy away from the transmission. Forgot to take the two bottom bolts out of the transmission at first, but discovered them shortly after. Rolled it out cleaned up the two services good and then applied the new gasket. Went back together ok. Had to keep adjusting the height of the differential, but it when in after a few minutes. Good learning experience for me. Thanks to all who posted and especially to Don for his expertise and advice.
|
|
Don(MO)
Orange Level
Joined: 12 Sep 2009
Location: Bates City MO.
Points: 6862
|
Post Options
Thanks(0)
Quote Reply
Posted: 04 Aug 2018 at 7:08am |
|
I hope the phone call helped.
|
|
3 WD45's with power steering,G,D15 fork lift,D19, W-Speed Patrol, "A" Gleaner with a 330 corn head,"66" combine,roto-baler, and lots of Snap Coupler implements to make them work for their keep.
|
|
Duane Becker
Bronze Level
Joined: 29 Apr 2018
Location: Elk, Washington
Points: 15
|
Post Options
Thanks(0)
Quote Reply
Posted: 04 Aug 2018 at 9:32am |
I've also got a gear oil leak on the PTO, not at where it bolts to the block, but where the PTO shaft connects-for quick reference here is AGCO parts diagram:
Leak is coming from the #2 Case in the diagram. My wd45 is a 1955 s/n 208883, and AGCO diagram mentions #3 oil gasket replaced slim after s/n 24082. So would I need that gasket replaced, along with the oil seal #1-or just the gasket? Or anything else? Is this an easy swap out gasket and seal project? Thanks!
|
|
Duane Becker
Bronze Level
Joined: 29 Apr 2018
Location: Elk, Washington
Points: 15
|
Post Options
Thanks(0)
Quote Reply
Posted: 04 Aug 2018 at 11:00am |
|
I just checked that link to AGCO may not work, but its under the Drive Train Power Unit 240 page that I'm referring too...
|
|
Don(MO)
Orange Level
Joined: 12 Sep 2009
Location: Bates City MO.
Points: 6862
|
Post Options
Thanks(0)
Quote Reply
Posted: 05 Aug 2018 at 6:41am |
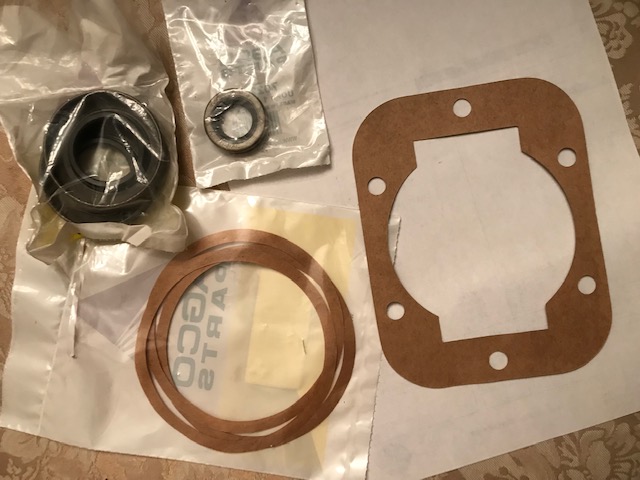
Here's the parts list from AGCO, one 70227237 gasket, two 70224779 seals, (Yes you need two of them to replace the one old one for the box out put shaft seal) I always get three of 70224655 gaskets (you might not need all three but get them just in case you do) one 70224642 seal this sela is for the shifter shaft, (change it to)
Edited by Don(MO) - 05 Aug 2018 at 6:43am
|
|
3 WD45's with power steering,G,D15 fork lift,D19, W-Speed Patrol, "A" Gleaner with a 330 corn head,"66" combine,roto-baler, and lots of Snap Coupler implements to make them work for their keep.
|
|
Duane Becker
Bronze Level
Joined: 29 Apr 2018
Location: Elk, Washington
Points: 15
|
Post Options
Thanks(0)
Quote Reply
Posted: 05 Aug 2018 at 9:00am |
|
Thanks Don, I'll order all three gaskets tomorrow morning...
|
|
Duane Becker
Bronze Level
Joined: 29 Apr 2018
Location: Elk, Washington
Points: 15
|
Post Options
Thanks(0)
Quote Reply
Posted: 08 Aug 2018 at 2:23pm |
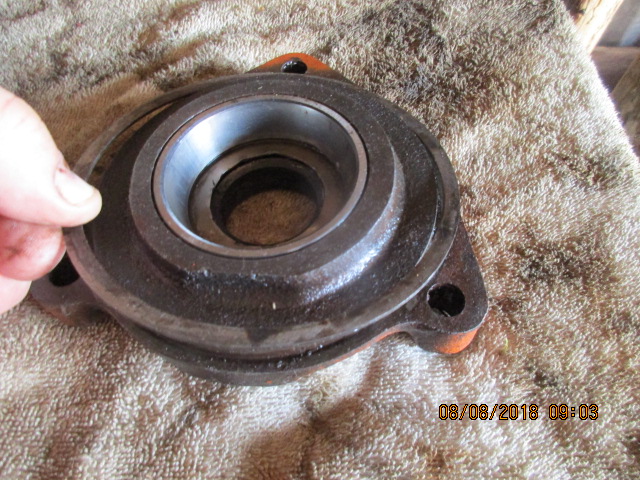
Don has helped me with this in a previous post above, and others are welcome to jump in here. I have a gear oil leak on my pto. Its not where it connects to the block, but rather at the area where the pto shaft comes out to the back of the tractor. The pixs show the pto case that I removed from the tractor. It leaks behind this case. Notice mine has a steel shim. Looks like it leaks at the shim and not the cup and cone bearing Agco Part numbers 3 and 4. Don you gave me the gaskets and items in the post above. Looking at the pix here and my description, do you still think I need the gaskets you mentioned? Should I replace that metal shim with a regular gasket?
Edited by Duane Becker - 08 Aug 2018 at 4:37pm
|
|
Allis dave
Orange Level
Joined: 10 May 2012
Location: Northern IN
Points: 3047
|
Post Options
Thanks(0)
Quote Reply
Posted: 08 Aug 2018 at 3:03pm |
|
You need the shims to get your bearing tolerance correct. I figure out the correct number of shims then lightly coat each side of each shim with some #2 permatex. So far mine hasn't leaked in 6 years.
Edited by Allis dave - 08 Aug 2018 at 3:04pm
|
|
DrAllis
Orange Level Access
Joined: 12 Sep 2009
Points: 21897
|
Post Options
Thanks(0)
Quote Reply
Posted: 08 Aug 2018 at 3:07pm |
|
A-C used a thin .005" ?? paper gasket between each and every metal shim so oil didn't drip from the PTO box. There is no other way to seal that output bearing cover. If you don't have a paper gasket, any kind of RTV or Permatex will do, but remember, you are setting your rolling torque on your PTO output bearings.
|
|
Duane Becker
Bronze Level
Joined: 29 Apr 2018
Location: Elk, Washington
Points: 15
|
Post Options
Thanks(0)
Quote Reply
Posted: 08 Aug 2018 at 4:30pm |
|
Thanks for the reply, after closer inspection, and looking at the parts diagram, looks like there is an oil seal at the very front, you can see it in the pix. Probably should replace that too?
|
|
Duane Becker
Bronze Level
Joined: 29 Apr 2018
Location: Elk, Washington
Points: 15
|
Post Options
Thanks(0)
Quote Reply
Posted: 08 Aug 2018 at 4:35pm |
Sorry forgot to include pix: 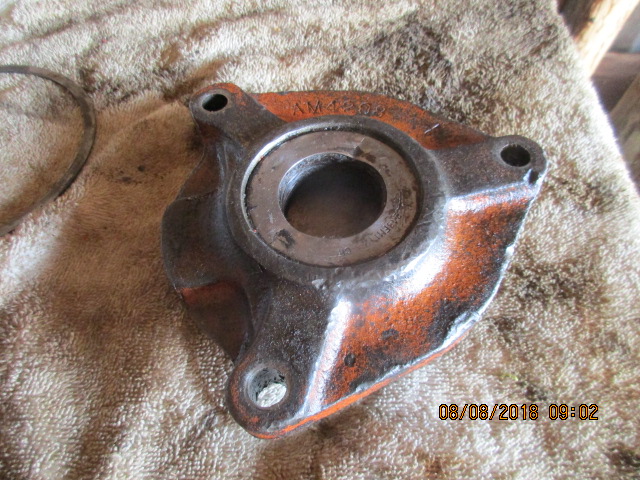
|
|
Allis dave
Orange Level
Joined: 10 May 2012
Location: Northern IN
Points: 3047
|
Post Options
Thanks(0)
Quote Reply
Posted: 09 Aug 2018 at 6:57am |
|
You should replace now or you could take everything apart again and replace it later. I vote now.
|
|
Don(MO)
Orange Level
Joined: 12 Sep 2009
Location: Bates City MO.
Points: 6862
|
Post Options
Thanks(0)
Quote Reply
Posted: 09 Aug 2018 at 9:08am |
|
Call me before you do more work on it.
|
|
3 WD45's with power steering,G,D15 fork lift,D19, W-Speed Patrol, "A" Gleaner with a 330 corn head,"66" combine,roto-baler, and lots of Snap Coupler implements to make them work for their keep.
|
|
ruwetyet
Bronze Level

Joined: 01 Mar 2019
Location: Sophia, NC
Points: 3
|
Post Options
Thanks(0)
Quote Reply
Posted: 01 Mar 2019 at 7:34pm |
I'm in the middle of tearing my PTO down for fluid leaks. There are 2
metal shims. Just to confirm, I should put a paper gasket between
each? And can I reuse the same shims provided they are in good
condition?
Lastly, can someone explain the significance of these shims and how to determine the actual spacing necessary?
This is my first tractor, want to take care of it. WD45 Gas
Thanks!
|
|
SteveM C/IL
Orange Level Access
Joined: 12 Sep 2009
Location: Shelbyville IL
Points: 8628
|
Post Options
Thanks(1)
Quote Reply
Posted: 01 Mar 2019 at 8:21pm |
|
Shims set bearing clearance.You don't want any play and also not too tight. I would say a slight drag when turning by hand would be about all you want.
|
|
TimCNY
Orange Level
Joined: 15 Apr 2014
Location: Upstate NY
Points: 1551
|
Post Options
Thanks(0)
Quote Reply
Posted: 02 Mar 2019 at 11:37am |
|
Metal shims are no longer available, so take very good care of them. The paper gaskets/shims (P/N 70224655) are available at Sandy Lake Implement, $4.08 each. I'm just doing mine now, too. Mine has 4 metal shims, so it needs 5 paper to "sandwich" them. I just use Permatex Copper spray, seems to have the least affect on thickness, and it was recommended by Bill at SLI.
At first I thought I only had 2 metal shims, then they separated into 3, then 4 lol... so be careful. Fragile/delicate parts.
|
|
ruwetyet
Bronze Level
Joined: 01 Mar 2019
Location: Sophia, NC
Points: 3
|
Post Options
Thanks(0)
Quote Reply
Posted: 03 Mar 2019 at 7:12pm |
Thank you guys for the guidance and information.
After further inspection, I did have 3 shims and carefully separated them. I'm soaking them now so the old paper between them comes off easier. North Central AG has gaskets for $3.07, Gearbox Gasket for $2.60, Output Shaft Seal for $11.60, and Shifter Seal for 16.60. Hope to get them on the phone tomorrow and order.
I do have 1 challenge ahead: the hole in the output shaft for the shear pin has mushroomed out and evidently wallowed out the ID of the extension shaft creating an undercut making it impossible to separate the two. I don't want to pry too hard and break the cover, so i think I will have to dremmell the mushroomed area to allow clearance. It's tight, but I don't see ant other options.
|
|
Sugarmaker
Orange Level
Joined: 12 Jul 2013
Location: Albion PA
Points: 8517
|
Post Options
Thanks(0)
Quote Reply
Posted: 03 Mar 2019 at 8:02pm |
ruweyet, I had same issue and had to pry the collar off of the shaft. Found a better output shaft in a parts WD. They were very tight! You guys are right into these old WD's ! Great! Regards, Chris
|
|
D17 1958 (NFE), WD45 1954 (NFE), WD 1952 (NFE), WD 1950 (WFE), Allis F-40 forklift, Allis CA, Allis D14, Ford Jubilee, Many IH Cub Cadets, 32 Ford Dump, 65 Comet.
|
|
ruwetyet
Bronze Level
Joined: 01 Mar 2019
Location: Sophia, NC
Points: 3
|
Post Options
Thanks(0)
Quote Reply
Posted: 08 Mar 2019 at 5:53pm |
The goodies have arrived! Those gaskets between the shims sure are thin. I have talked myself into a sand blast cabinet. Wire brushing is for the birds!!
|
|