| Author |
 Topic Search Topic Search  Topic Options Topic Options
|
darrel in ND 
Orange Level


Joined: 22 Nov 2009
Location: Hebron, ND
Points: 8727
|
 Post Options Post Options
") Thanks(0) Thanks(0)
 Quote Quote  Reply Reply
 Topic: Progress is starting on my HD5G Topic: Progress is starting on my HD5G
Posted: 29 Mar 2015 at 9:09pm |
|
Well, it's a project that has been calling my name for almost 4 years now, and finally I have it in the shop. It's the steering clutch project on my HD5G. Hit a little snag where the service manual says to insert a 5/16 NC bolt through the pipe plug hole in the side of the housing to push out a brake band pin. I can't seem to find any threaded hole to thread the bolt into. Any one ever have this problem? Thanks, Darrel
|
 |
|
Sponsored Links
|
|
|
AC Mel
Orange Level Access
Joined: 23 Jan 2010
Location: N.Ca.
Points: 1186
|
Post Options
Thanks(0)
Quote Reply
Posted: 29 Mar 2015 at 10:20pm |
|
Darrel, make sure you loosen the brake bands first and shake that stuff around. It needs to be loose to slide up in the slot where you can reach them with a bolt. I use a piece of all thread most times. Use a drop cord light in the housing and maybe a flashlight to look in the pipe plug holes. (trust me it's in there)
|
|
jorstad brothers
Orange Level

Joined: 10 Jun 2010
Location: tioga nd
Points: 473
|
Post Options
Thanks(0)
Quote Reply
Posted: 29 Mar 2015 at 10:55pm |
|
darrel when your done i have a old hd7 that needs clutches. never seam to get around to doing it. and you will be all practiced up.
|
|
remember plunder than burn
|
|
donoman
Silver Level

Joined: 18 Feb 2015
Location: New Zealand
Points: 117
|
Post Options
Thanks(0)
Quote Reply
Posted: 30 Mar 2015 at 12:55am |
As AC Mel says loosen the brake bands, then if you can't get the pipe plugs out, using visegrips and with a bent punch or something similar push the pin in the opposite direction and it will with a lot of wriggling come out. I have replaced the 4" Linings on my 6G(25013) many times , once you have got them out, cut the lower brake band near the loops that go thru the bottom pin and join as in Cat brake bands. by doing this you can get the wide brake bands to fit with out pulling the clutches out or maybe removing the cross hydraulic pipes. PS I blew a bottom lift ram hose yesterday.....not easy
|
|
Dozer
Orange Level
Joined: 16 Aug 2011
Location: SW New York
Points: 689
|
Post Options
Thanks(0)
Quote Reply
Posted: 30 Mar 2015 at 6:58am |
|
When I replaced the steering clutches on my HD6G I could not find the tapped hole in the brake band pin because there wasn't any. On one project a previous owner put the pin in backwards. Another steering clutch repair the previous owner replaced the pin with one that was not tapped.
I posted "steering clutches again" 15 October, 2013 where I made a small hydraulic cylinder to push the pin out. You can find it with a google search. I remove the upper section of the brake band in order to remove the clutch pack.
Another forum post "what is the tensile strength of a mouse nest" 19 Aug, 2012
I like hydraulic cylinders for working on steering clutches.
|
|
darrel in ND
Orange Level
Joined: 22 Nov 2009
Location: Hebron, ND
Points: 8727
|
Post Options
Thanks(0)
Quote Reply
Posted: 30 Mar 2015 at 7:06am |
 jorstad brothers wrote: jorstad brothers wrote:
darrel when your done i have a old hd7 that needs clutches. never seam to get around to doing it. and you will be all practiced up. |
Do you need a 7 for parts? I've got one that an epic failure a few years ago, and could now be a parts machine. Would have lots of under carriage parts, tracks, not sureif the engine would still be good or not. Darrel
|
|
darrel in ND
Orange Level
Joined: 22 Nov 2009
Location: Hebron, ND
Points: 8727
|
Post Options
Thanks(0)
Quote Reply
Posted: 30 Mar 2015 at 7:10am |
|
OK, thanks guys. I may have been over-thinking this. I thought the 5/16 NC bolt was to be used like a "pusher bolt." Guess really the way it works, is you thread the bolt into the end of the pin, and then use it to pull out the pin? Darrel
|
|
ac_sd
Silver Level
Joined: 23 Apr 2011
Points: 194
|
Post Options
Thanks(0)
Quote Reply
Posted: 30 Mar 2015 at 6:28pm |
|
If you have trouble lining up the threaded pin in the brake bands, try depressing the brake pedal just a little and it should allow whatever threaded stock you are using to slide right in the final drive housing in alignment with the brake pin.
|
|
Coke-in-MN
Orange Level Access
Joined: 12 Sep 2009
Location: Afton MN
Points: 42015
|
Post Options
Thanks(0)
Quote Reply
Posted: 30 Mar 2015 at 6:39pm |
Yep you have the idea now - use a piece of threaded rod and make a slide hammer type puller to help remove the pin. the brake band needs to be loose and able to be moved or worked to help get pins out . I made new pins from SS as old ones seemed to be rusty as well as buggered up from previous repairs by someone .
|
|
Life lesson: If you’re being chased by a lion, you’re on a horse, to the left of you is a giraffe and on the right is a unicorn, what do you do? You stop drinking and get off the carousel.
|
|
darrel in ND
Orange Level
Joined: 22 Nov 2009
Location: Hebron, ND
Points: 8727
|
Post Options
Thanks(0)
Quote Reply
Posted: 02 Apr 2015 at 8:47am |
|
Well, son and I are making some headway. Just getting an hour or two in on it every now and then. We are just a couple bolts away from lifting the steering clutch assemblies out. The gear (ratcheting) wrench was a great invention for this project! Some of the bolts were rusty, and I fear, very close to having the head round off instead of turn out. But so far, they've all came out. Been using my deutz 5215 with creeper gear to move the machine to turn the clutches to access the bolts. Before this goes back together, every bolt hole is going to get a thread chaser ran in and out of it, they will be sprayed out with brake cleaner and air pressure, and all new bolts will be used with a liberal coating of anti-seize. Before I started this project, I had it in my mind that it was going to be kept "low budget", and was going to re-use the fiber discs, buff the steel plates, and slap er back together, but then I get to looking at the "general gear" web site and see all the stuff that is available new, and In get a very strong desire to go with new "semi-metallic" discs, put in new steel plates, new brake bands, and other goodies, so that it is done right. But then when I add up the cost, and I talk myself into a circle, and start thinking the cheap-skate route again. Guess that once I get the clutch assemblies out and torn apart, I'll know more. Later, Darrel
|
|
Coke-in-MN
Orange Level Access
Joined: 12 Sep 2009
Location: Afton MN
Points: 42015
|
Post Options
Thanks(0)
Quote Reply
Posted: 02 Apr 2015 at 8:55am |
Check for HD11 parts to rebuild the steering clutches - same size just more of them in the 11. Look for used parts IF you decide to go with the metallic ones. The fibers unless worn bad will last another 50 years if the teeth are not broken off . Watch the bolt lengths so as nothing is put in wrong place . I found jacking machine up so track clears ground then using a come along to advance the track worked well to access the bolts on clutch packs.
|
|
Life lesson: If you’re being chased by a lion, you’re on a horse, to the left of you is a giraffe and on the right is a unicorn, what do you do? You stop drinking and get off the carousel.
|
|
darrel in ND
Orange Level
Joined: 22 Nov 2009
Location: Hebron, ND
Points: 8727
|
Post Options
Thanks(0)
Quote Reply
Posted: 02 Apr 2015 at 6:46pm |
|
Also, I have to add, that I am in the need for the left hand side steering clutch cover for this unit. If anyone has an extra one laying around that they would like to sell, either post here or PM me, Thanks, Darrel
|
|
AC Mel
Orange Level Access
Joined: 23 Jan 2010
Location: N.Ca.
Points: 1186
|
Post Options
Thanks(0)
Quote Reply
Posted: 02 Apr 2015 at 8:13pm |
|
Darrel, don't get wild and buy anything yet! My question for the forum members is (as Coke mentioned there the same size as 11s) Can you use discs and plates from a oil bath steering clutch for a dry type steering clutch? (might have that cover you're looking for too)
|
|
darrel in ND
Orange Level
Joined: 22 Nov 2009
Location: Hebron, ND
Points: 8727
|
Post Options
Thanks(0)
Quote Reply
Posted: 02 Apr 2015 at 8:48pm |
|
Mel,what are you thinking in regards to using oil bath components in a dry situation? Are you thinking that they'd be fine in the dry situation, or are you thinking fill the cavities with oil and have wet disc clutches? And if you have a cover, I'd be interested in buying it. I need the little cover that goes on the main cover over the brake band adjusting bolt also. Thanks, Darrel
|
|
donoman
Silver Level
Joined: 18 Feb 2015
Location: New Zealand
Points: 117
|
Post Options
Thanks(0)
Quote Reply
Posted: 02 Apr 2015 at 10:35pm |
|
I have used wet plates in my HD6G, they came out of a slipping wet clutch pack. I picked the best to get the correct stack height, I put one extra steel and the clutch works perfectly and is currently in use.
|
|
Dozer
Orange Level
Joined: 16 Aug 2011
Location: SW New York
Points: 689
|
Post Options
Thanks(0)
Quote Reply
Posted: 03 Apr 2015 at 8:07am |
|
The same frictions and steels are on the HD7G. The wet clutches have stronger springs and different throwout bearing mechanism. Do not put oil in the clutch compartment of a machine that had dry clutches.
|
|
Lee Bradley
Bronze Level


Joined: 13 Oct 2009
Location: Kingston, WA
Points: 120
|
Post Options
Thanks(0)
Quote Reply
Posted: 03 Apr 2015 at 11:15am |
|
I have had problems using anti-seize in this use; it will dry out and let water into the threads. I prefer Locktite 242 low strength it seals the threads and the bolts can still be removed easily.
|
|
darrel in ND
Orange Level
Joined: 22 Nov 2009
Location: Hebron, ND
Points: 8727
|
Post Options
Thanks(0)
Quote Reply
Posted: 03 Apr 2015 at 11:31am |
|
Good to know that, Lee. Thanks. Well, we ran into another snag. When trying to pull the steering clutch assemblies, they come up a ways, and then bind up tight. I would say that they are above the position where they would be at when bolted in place, but not by too much. About flush with the top of the main housing is where they won't go any farther. We are exerting a fair amount of pressure on them with the cherry picker. I have been wriggling them, and prying them side-to-side the whole while that Wyatt is slowly jacking with the cherry picker. There seems to be sufficient gap on each side of them. It is more like they are getting wedged in rather than hitting a dead stop. Not sure what the next step may be. Any ideas? Thanks, Darrel
|
|
Dozer
Orange Level
Joined: 16 Aug 2011
Location: SW New York
Points: 689
|
Post Options
Thanks(0)
Quote Reply
Posted: 03 Apr 2015 at 11:55am |
Make sure the throughout bearing is fully retracted. The clutch pack needs to be pushed into the drum. you need 1/8 inch clearance on each side. When the clutch pack is rusted it is difficult to move the clutch pack into the drum. I use small hydraulic cylinders with my portapower. 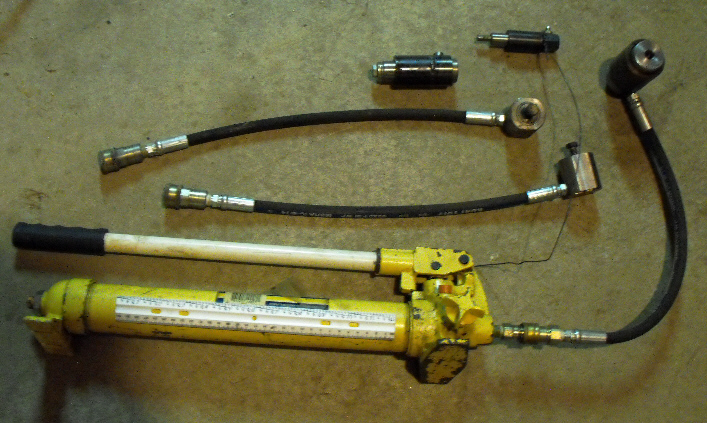
|
|
darrel in ND
Orange Level
Joined: 22 Nov 2009
Location: Hebron, ND
Points: 8727
|
Post Options
Thanks(0)
Quote Reply
Posted: 03 Apr 2015 at 11:39pm |
|
Working on the right clutch pack, and it is putting up one heck of a fight. I have it to where the top of the brake drum is an inch or two above the main housing, so by all rights, it should have clear sailing. but it seems to be wedged in tight at that point. That throw out bearing is rusted up enough that it ain't goin nowhere very fast, but I really think that there should be enough clearance on both sides without it having to move. And the clutch plates seem to be contained within the width of the brake drum.......so I don't really know what I am hanging up on. I've rocked that thing from side to side and front to back with bars, all the while having significant up pressure on it countless times. That is how I got it to where it is now, but seems to have reached its limit. What next? Darrel
|
|
Dozer
Orange Level
Joined: 16 Aug 2011
Location: SW New York
Points: 689
|
Post Options
Thanks(0)
Quote Reply
Posted: 04 Apr 2015 at 7:07am |
|
That is where it hangs up. Your choice is to pull really hard and risk damage or to push the clutch pack into the drum further. If you choose the pull really hard method try putting some sheet metal on each side of the drum assembly to minimize damage. This is a common problem.
|
|
AC Mel
Orange Level Access
Joined: 23 Jan 2010
Location: N.Ca.
Points: 1186
|
Post Options
Thanks(0)
Quote Reply
Posted: 04 Apr 2015 at 11:06am |
Darrel, Is this the cover you're talking about? The little cover or the big cover? Either, or there both available. The other thing I was looking for was some backup on the disc plates. I was sure that we had used the oil bath discs in a dry clutch application some years ago. Peter and George both provided that info that they works ok. (and yes DON'T try to put oil in the dry steering clutch compartment. ) So when you guys get done wrestling with that thing and get it apart, see what you need we might have it. We have some steering clutch plates and discs from several HD11Bs that would work. The other thing I was looking for was some backup on the disc plates. I was sure that we had used the oil bath discs in a dry clutch application some years ago. Peter and George both provided that info that they works ok. (and yes DON'T try to put oil in the dry steering clutch compartment. ) So when you guys get done wrestling with that thing and get it apart, see what you need we might have it. We have some steering clutch plates and discs from several HD11Bs that would work.
|
|
darrel in ND
Orange Level
Joined: 22 Nov 2009
Location: Hebron, ND
Points: 8727
|
Post Options
Thanks(0)
Quote Reply
Posted: 04 Apr 2015 at 7:25pm |
|
Mel, I need both covers. And if I ever get the clutches out, I'll asses them and see what I need, Thanks, Darrel
|
|
JohnCO
Orange Level

Joined: 11 Sep 2009
Location: Niwot Colo
Points: 8992
|
Post Options
Thanks(0)
Quote Reply
Posted: 05 Apr 2015 at 12:37am |
|
Darrel, it's times like this that you wish you could get your hands on the engineer who designed the #&^@ thing!
|
|
"If at first you don't succeed, get a bigger hammer"
Allis Express participant
|
|
darrel in ND
Orange Level
Joined: 22 Nov 2009
Location: Hebron, ND
Points: 8727
|
Post Options
Thanks(0)
Quote Reply
Posted: 06 Apr 2015 at 7:46am |
|
Dozer, you always wanted to come to ND, didn't you? There is a project here that is calling your name. Darrel
|
|
darrel in ND
Orange Level
Joined: 22 Nov 2009
Location: Hebron, ND
Points: 8727
|
Post Options
Thanks(0)
Quote Reply
Posted: 06 Apr 2015 at 2:24pm |
|
This thing is going to drive me to drinking. Was working on it for a couple hours this morning when I should be doing other stuff. I think that putting a stick of dynamite under that clutch pack would probably be my best option. I had clearance enough to get a piece of 16 guage metal down in on each side of the clutch pack, so I did, and even greased very liberally, the sides of the metal against the clutch packs. Thought maybe it would slide up out of there then. No luck. I don't have the little cylinders for my porta power, like dozer shows, but I have used a very large bar to try and pry the clutch pack farther into the drum, but it won't budge. I think it is bottomed out already. I can't get the throw out bearing to move any at all. I guess I am a little confused as to why it wedges in there after it gets part way out, because isn't everything parallel? And the way things look, the left side is going to be worse than the right side that I am working on now. I may have to invest in the little cylinders, because on the left side, I can definitly see that the clutch packs need to go into the drum farther. And with the little cylinders on the porta power, do you just push against the inside wall of the clutch compartment? Where to go from here? Thanks, Darrel
|
|
Gargoyle
Silver Level
Joined: 29 Aug 2013
Location: Missouri
Points: 186
|
Post Options
Thanks(0)
Quote Reply
Posted: 06 Apr 2015 at 6:40pm |
|
Someone earlier in this thread noted that the HD5 clutches are the same as the HD11. I had my 11E clutches out a year ago, so I might have some insight, if anyone can confirm that the 11E clutch chamber opening and throw out bearing are the same. Anyone know?
If not, my painfully-learned lessons won't be of much help.
|
|
Dozer
Orange Level
Joined: 16 Aug 2011
Location: SW New York
Points: 689
|
Post Options
Thanks(0)
Quote Reply
Posted: 07 Apr 2015 at 7:27am |
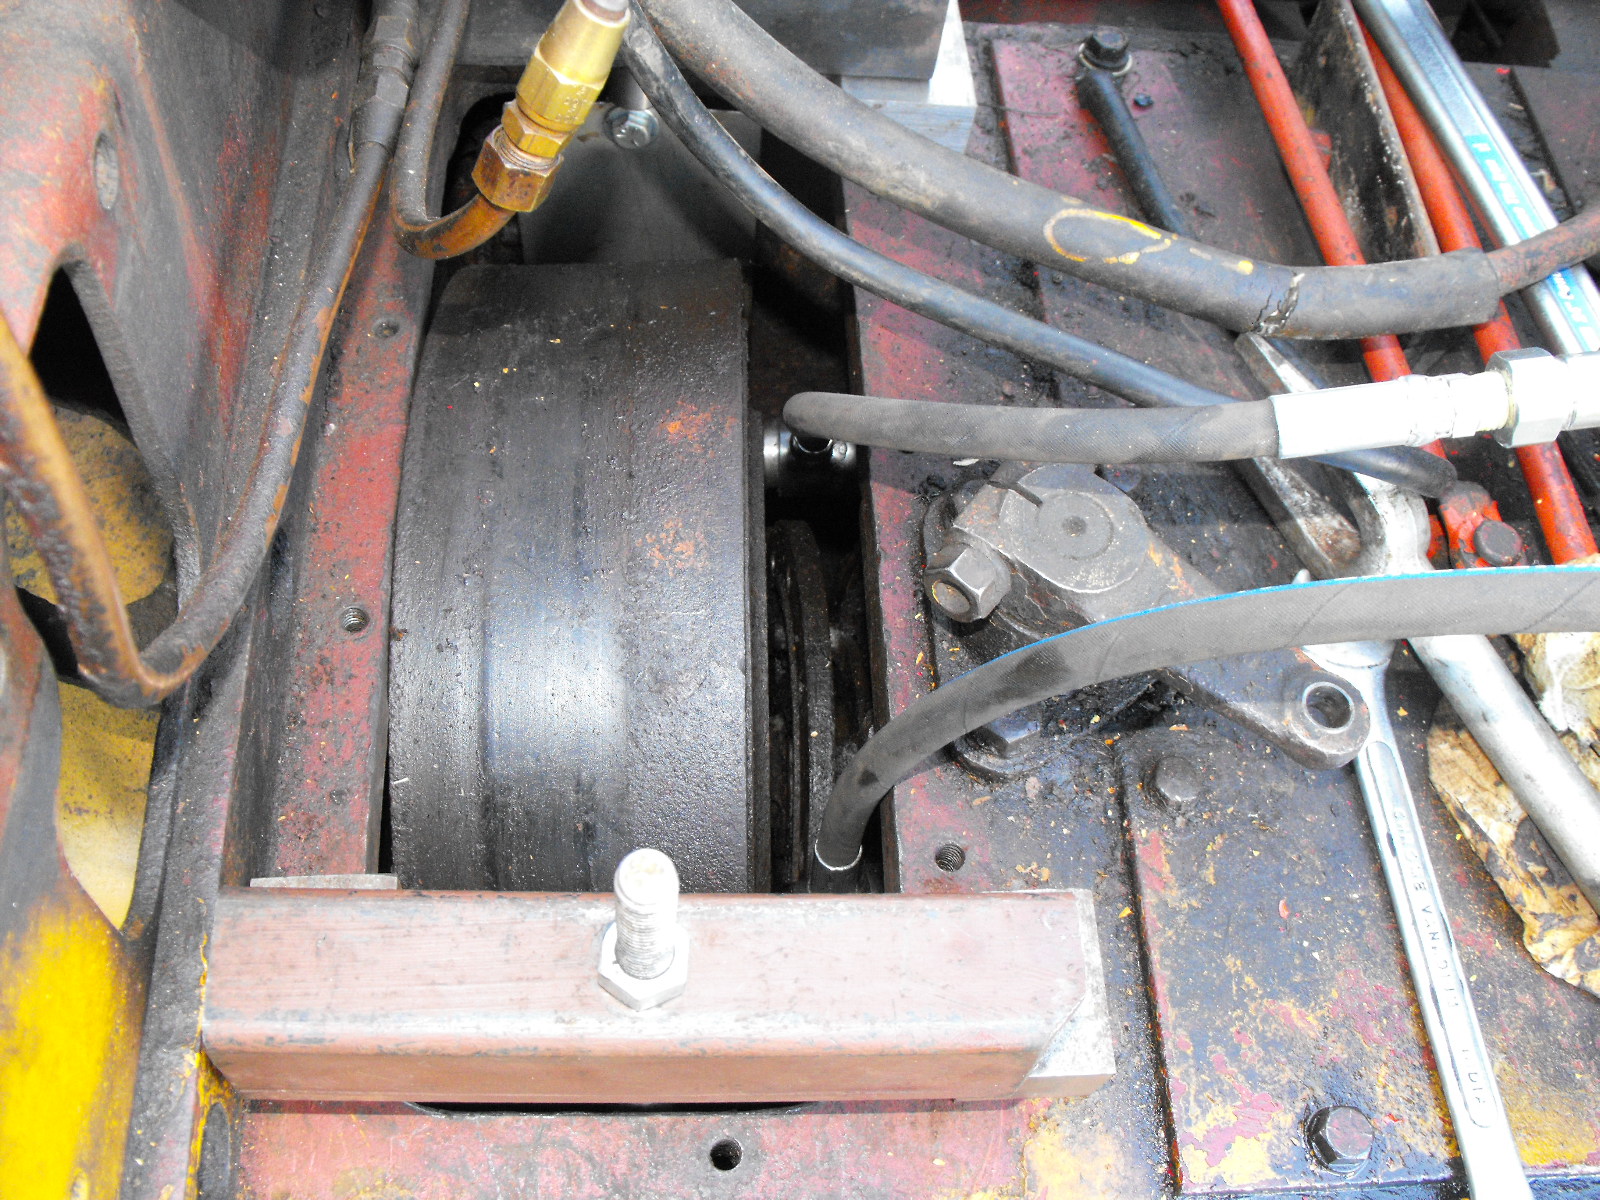 Note the amount of clearance. This was not enough. I was able to get the top of the drum above the cavity opening and it was still stuck. When I pushed with my hydraulic cylinders I tilted the clutchpack in the drum. Parts of the clutchpack moved into the drum more than others. I rotated the assembly finding a spot where I was able to lift the drum the most. Then I got brutal.  My engine crane was unable to lift the assembly further so I used a hydraulic cylinder with the crane. It came out a little at a time. I was unable to find any shiny metal to indicate exactly where it was hanging up. This was my most difficult steering clutch repair. Hope this helps.
|
|
darrel in ND
Orange Level
Joined: 22 Nov 2009
Location: Hebron, ND
Points: 8727
|
Post Options
Thanks(0)
Quote Reply
Posted: 07 Apr 2015 at 9:25am |
|
OK Dozer, it does appear that I am somewhat thinking on the same lines as you. I been thinking about setting up a system of lifting it out close to what you have there, just that I plan on using some hydraulic bottle jacks. I might get some time to mess with it today. I'll let you know tonite if I got it out. If you don't hear from me, I am probably at the bar! Darrel
|
|
treedog62
Bronze Level
Joined: 09 Jul 2016
Location: monroeville oh
Points: 26
|
Post Options
Thanks(0)
Quote Reply
Posted: 13 Jul 2016 at 6:11am |
|
hey Darrel I have a hd-5 just wondering what the rod is for going into the trans on the rite side sitting on seat!! that thing is loose seems to be in the tranny! is that for a pto or whats it for . thxs carson jones
|
|


