Request Advice Installing New D17 Manifold
Printed From: Unofficial Allis
Category: Allis Chalmers
Forum Name: Farm Equipment
Forum Description: everything about Allis-Chalmers farm equipment
URL: https://www.allischalmers.com/forum/forum_posts.asp?TID=211370
Printed Date: 18 Sep 2026 at 8:14am
Software Version: Web Wiz Forums 11.10 - http://www.webwizforums.com
Topic: Request Advice Installing New D17 Manifold
Posted By: Oldwrench
Subject: Request Advice Installing New D17 Manifold
Date Posted: 15 Jun 2026 at 4:43pm
|
I had replaced the manifold on my D17 IV probably 5-6 years ago. At the time, the old one was severely rusted and unusable, so I bought a new one, American made it said. I was careful installing it, with clean surfaces, and I used some copper coat on the gaskets. Anyways, it started leaking on the two center exhaust ports last year, and I finally got around to putting it in the shop. When I pulled the manifold, the two center round ports were in very rough shape on the manifold, and not the greatest on the head itself. It is almost as though the metal gaskets just welded themselves to the manifold, and somewhat to the head. I gave up trying to clean up the manifold ports, and ordered another one. I figured a machine shop would cost more than the ~ $200 for a new one, plus I need the tractor back in service and don't have a local shop to work with. The ports on the head I think I have pretty well cleaned up using a wire brush and fine sandpaper, but they are still a little pitted. I think with more work they will smooth out. I know I ran it longer than I should have with the two center exhaust gaskets leaking. I'm just wondering how best to prevent this again on the new manifold. Are gaskets today just junk, and don't hold up? I had used copper coat, just because it seemed like a good idea, but perhaps they hold up better just dry? The intake and the outer two ports are all in perfect shape. It is the center two round ones giving me trouble. I never checked the last manifold for flatness, but short of sending it out to a machine shop, I can only check it with a decent straight edge for obvious warping, which I will do when it arrives. Anyone with advice on how to get this new manifold to last more than a few years?
|
Replies:
Posted By: WF owner
Date Posted: 15 Jun 2026 at 8:03pm
| Off hand, I don't remember the torque on them, but I know it's very easy to break off one of the end bolt holes. What I do remember is to keep retightening it after every use until the bolts don't move anymore. If you only torque them a couple times, you are eventually have leaks. |
Posted By: DrAllis
Date Posted: 15 Jun 2026 at 8:42pm
|
Damage/pitting to the head isn't good and will shorten your gasket life. I have been preaching for years that the manifold nuts must be retorqued (35 - 40 ft lbs) when COLD probably 5 or 6 times to get the gaskets to crush into shape. So, if you used the tractor 5 or 6 days in a row, every morning while COLD the nuts need to be retorqued. Also, start with light tightening of the two END nuts to "square" the manifold to the cylinder head and then alternate with the other four nuts while working up to whatever the proper torque is. Gaskets need to be DRY !! Clean off the side of the cylinder head pits clean and smear some high temp gold color RTV on those pits and then assemble the manifold so the metal gasket holders seal against this RTV. Again, gaskets dry and multiple retorqued many times when COLD. *** The torque spec of 35 - 40 ft lbs is for a healthy manifold. Be cautious if the manifold is badly pitted or thin on the ends as you might break off an ear.
|
Posted By: Oldwrench
Date Posted: 16 Jun 2026 at 7:06am
|
Thanks for the advice. I was definitely negligent on not re-torquing enough on the old manifold, and will re-torque this new one frequently when cold after a short heat cycle, and keep at it until they don't move anymore. I'm not finding a torque spec for the manifold bolts, but will keep searching. I did find a spec of 30-35 ft lbs for a WD. I plan to use anti-seize on the nuts, so that spec might be a little high for a lubricated nut. I would think just a common sense "pretty darn tight" spec with a regular length wrench would be enough, or should I keep digging to find an exact spec and use a torque wrench?
|
Posted By: Oldwrench
Date Posted: 16 Jun 2026 at 7:11am
| Doc, sorry I forgot you gave the torque spec in your replay. So I will use a 35-40 ft lb spec, and will use a torque wrench. If using anti-seize on the nuts, should I reduce that torque a bit? I see recommendations of ~ 30% reduction for a lubricated bolt, so my range would be ~ 25-28 ft lbs? |
Posted By: PaulB
Date Posted: 16 Jun 2026 at 11:17am
|
Do as you wish, with asbestos is no longer used anywhere, i get very good service by putting hi temp RTV around all the port hole then installing the manifold. I have never had a problem doing this. In a pinch when I needed to get something up and running quickly, I've used RTV without a gasket and it will hold up just fine. Probably the one use where I praise RTV. ------------- If it was fun to pull in LOW gear, I could have a John Deere. Real pullers don't have speed limits. If you can't make it GO... make it SHINY |
Posted By: Les Kerf
Date Posted: 16 Jun 2026 at 6:27pm
I have wondered about that; Ford built gazillions of engines with no exhaust manifold gaskets and they held up pretty well
|
 PaulB wrote:
Posted By: PaulB
Date Posted: 16 Jun 2026 at 6:44pm
|
[/QUOTE] I have wondered about that; Ford built gazillions of engines with no exhaust manifold gaskets and they held up pretty well [/QUOTE]
FORD was just cheap ------------- If it was fun to pull in LOW gear, I could have a John Deere. Real pullers don't have speed limits. If you can't make it GO... make it SHINY |
Posted By: Oldwrench
Date Posted: 17 Jun 2026 at 3:51pm
|
The new manifold will be in tomorrow, and I've been cleaning things up, using various grades of Scotchbrite type pads on a drill. I'm not done yet, but here is a picture of the ports. It is cleaning up better than I thought. Some of what I thought were pits were leftover gasket welded to the head. There are some pits though. I have little faith in the gaskets that will come with the manifold, if they are some unbranded Chinese junk. But there isn't a lot of choice on the gasket set, and even if I got one from NAPA they probably all come from overseas. Anyways, I'm planning to follow Doc's advice and "go dry", unless everyone thinks the pitting is too deep. The intake ports are in great shape, and polished up nicely. Opinions? 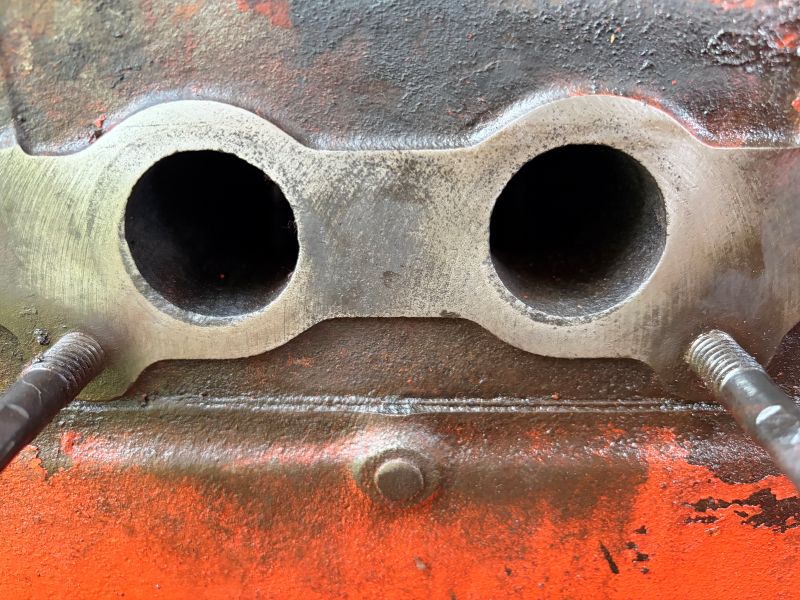 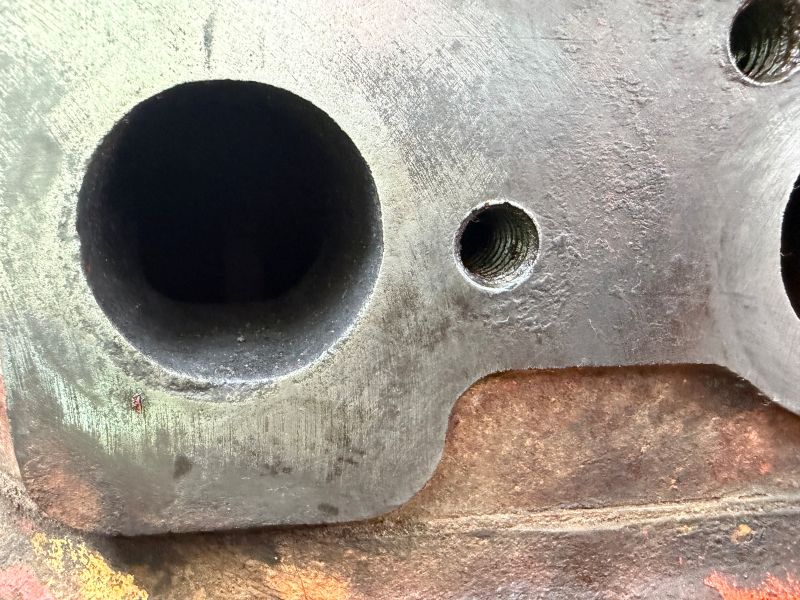 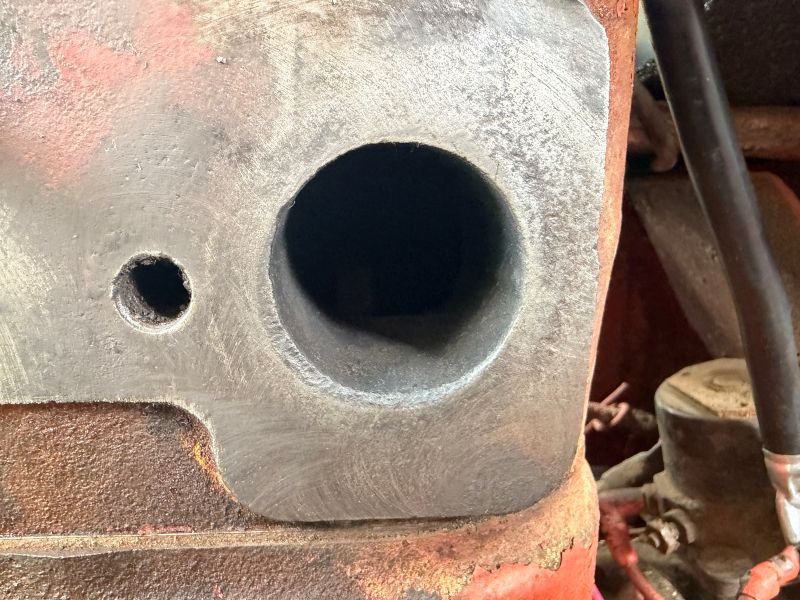 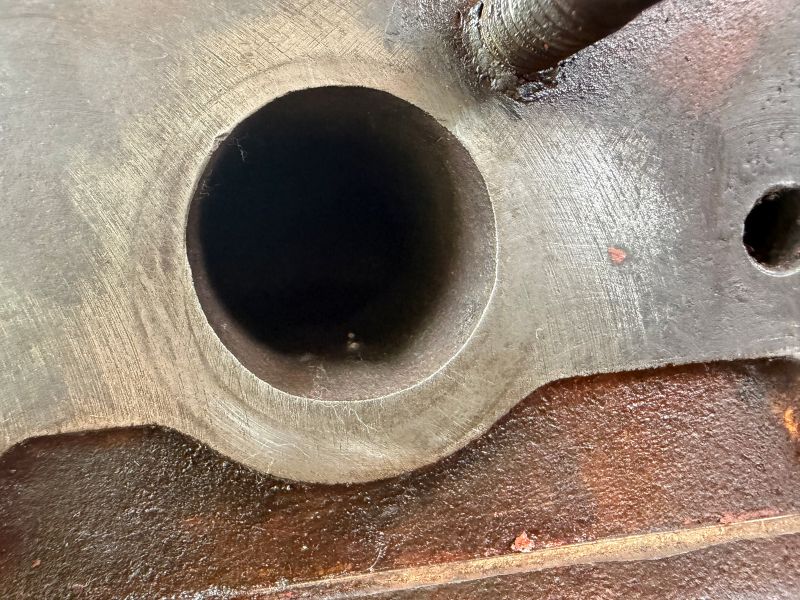 |
Posted By: VaAllis1990
Date Posted: 17 Jun 2026 at 7:31pm
| Every one I do I coat the manifold surface as well as the head surface of the gaskets with high temp copper rtv. Never had one leak yet |
Posted By: Oldwrench
Date Posted: 20 Jun 2026 at 2:57pm
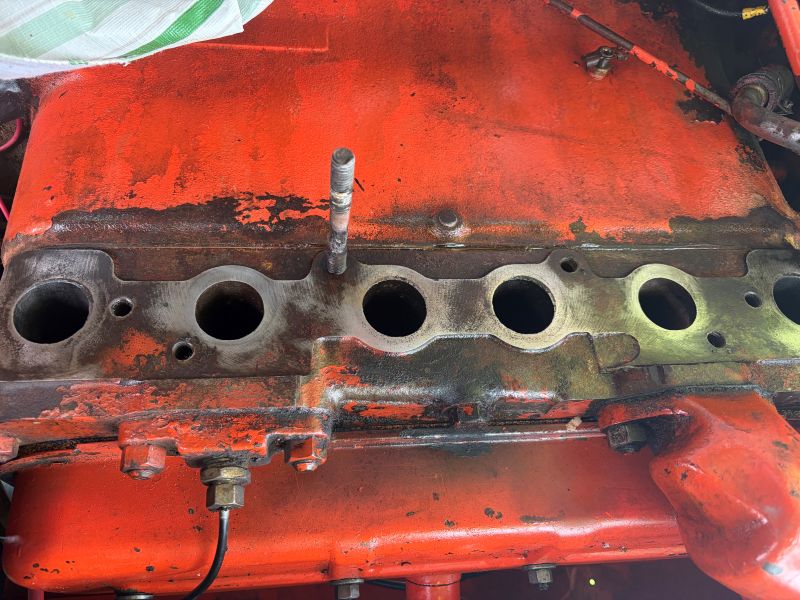 Of course, installing the new manifold was going way too easily. I had installed new studs with the previous manifold, so they are only a few years old. I had installed them with Permatex 2. The old manifold said made in USA. The new one is made in Taiwan. It is about a 1/2" thicker than the old one, and the old studs are just a bit too short, so I have to install the new studs I ordered with the new manifold. Well, of course 3 came out easy, 2 were difficult but yielded once I explained to them that they had to move. The last one is no go. With major vice grip force and heating with MAP gas cycles, and penetrating oil over a few days, I have gotten this one to move a bit. I can get an 1/8 of a turn on it back and forth, but that's it. I'm limited with the leverage I have with the vice grips, and they slip and just eat up the stud. The force needed is well beyond double nutting or anything. So close, but so far! Of course, installing the new manifold was going way too easily. I had installed new studs with the previous manifold, so they are only a few years old. I had installed them with Permatex 2. The old manifold said made in USA. The new one is made in Taiwan. It is about a 1/2" thicker than the old one, and the old studs are just a bit too short, so I have to install the new studs I ordered with the new manifold. Well, of course 3 came out easy, 2 were difficult but yielded once I explained to them that they had to move. The last one is no go. With major vice grip force and heating with MAP gas cycles, and penetrating oil over a few days, I have gotten this one to move a bit. I can get an 1/8 of a turn on it back and forth, but that's it. I'm limited with the leverage I have with the vice grips, and they slip and just eat up the stud. The force needed is well beyond double nutting or anything. So close, but so far! I have no intention of damaging the head or having the stud snap off flush. I've been cautious so far in applying heat. However, I am starting to consider cutting the stud off about 3" out, and welding a nut to it. Of course, there is no guarantee the stud still won't snap off, but at least I would have some control over moving it back and forth a little, and along with oil, perhaps I can coax it that way. Another option might be to cut the stud, and weld a new one of the correct length to the stud. I would have to position the weld so it is in the free space between the head and back of the manifold before it enters the hole. If I'm super careful with the welding, I'm assuming that much heat won't damage the head or the head gasket? I'm being a little overly cautious. I just wish the little critter would back out, then I could finish the project. Any ideas or suggestions on how to get this stud out are welcomed.
|
Posted By: DiyDave
Date Posted: 20 Jun 2026 at 3:23pm
|
Question, how much of that stud is still inside? Take one of the other studs you removed, and hold it beside the holdout... ------------- Source: Babylon Bee. Sponsored by BRAWNDO, its got what you need! |
Posted By: Oldwrench
Date Posted: 20 Jun 2026 at 4:37pm
| There isn't very much inside. By the threads on the other studs, I would say maybe 1/2" or a little more. I'm surprised it is giving me such a fight. I had installed it with Permatex 2 to seal it, and it is only a few years old. The other studs weren't particularly rusty or anything. |
Posted By: Les Kerf
Date Posted: 20 Jun 2026 at 9:12pm
I would cut it off at about 1/2" above the head, place a 1/2" nut over it and weld the dickens out of it. Then as soon as it cooled a bit (not TOO cool) I would spray it with PB Blaster and use a long handled box end wrench to turn it back and forth, spraying it liberally (you know, the way the gummint spends your tax dollars) all the while with PB Blaster. The heat followed by rapid cooling will shrink the stud and help loosen it.
|
Posted By: DrAllis
Date Posted: 20 Jun 2026 at 10:14pm
| There are times when the 1/2" air impact wrench can really be your friend. This might be one of those times. I would screw on a steel nut as far as the threads of the stud will allow. Then, weld up the threads so the nut cannot back off. With penetrating oil and maybe some heat, carefully use a 1/2" impact wrench while turning down the power and throttling the trigger to work the stud out of the head. It's a 7/16" stud and it can take quite a bit of easy hammering. |
Posted By: DiyDave
Date Posted: 21 Jun 2026 at 4:04am
Heat with your choice of weapon, and as it cools, stick a bees wax candle against the stud. Something about how bees wax wicks its way into threads makes it the better choice... Have done the impact trick, too. hit it both directions, to get the stud moving... ------------- Source: Babylon Bee. Sponsored by BRAWNDO, its got what you need! |
Posted By: Oldwrench
Date Posted: 21 Jun 2026 at 4:20pm
|
What a pain the neck this project has been. I planned it would be a few hours to pull the old manifold and put the new one on with fresh gaskets. Anyways, I welded a nut onto the end of the offending stud. I used a 1/2" impact wrench with 100 lbs of air. Back and forth, no movement, until finally the stud snapped in the middle. I decided not to chance welding another nut on and having it snap off flush, which I figured would really ruin my day. I cut the stud at the end of the threads coming out of the head, and used a 7/16" coupling nut, along with a lock nut. I cut and threaded one of the new studs for the correct length. Overall, I lucked out that there was enough of the old stud to work from. Odd, that I had replaced all six studs only a few years ago, and all had Permatex on them to prevent leakage. I have no idea why this one decided to fasten itself to the head like that. I am following Doc's advice and installing the gaskets dry. They came into the world dry, and dry they will go out when their time comes. I think the port surfaces cleaned up nicely and should seal. I bought the manifold from DJ's, but it looks like many vendors are selling the same unit. It is Taiwanese. I have a question though. The metal gasket set has two fiber gaskets each. I am not sure why there would be double gaskets. I have everything ready to button up, but decided to wait until I find out if I should use the double gaskets, or just single? I have it in place with just a single fiber gasket, but I will check around as to why they supplied two. Another odd thing about this manifold is the vacuum port on the left side. I thought it would be some kind of pipe thread. However, it turned out to be a regular 3/8" fine thread. The threads were rough, and I had to chase them several times and then plugged it with a regular short bolt with some sealant. Anyway, almost there. I'll torque it up once I'm sure of the gaskets to use. So much for a 2 hour afternoon job. 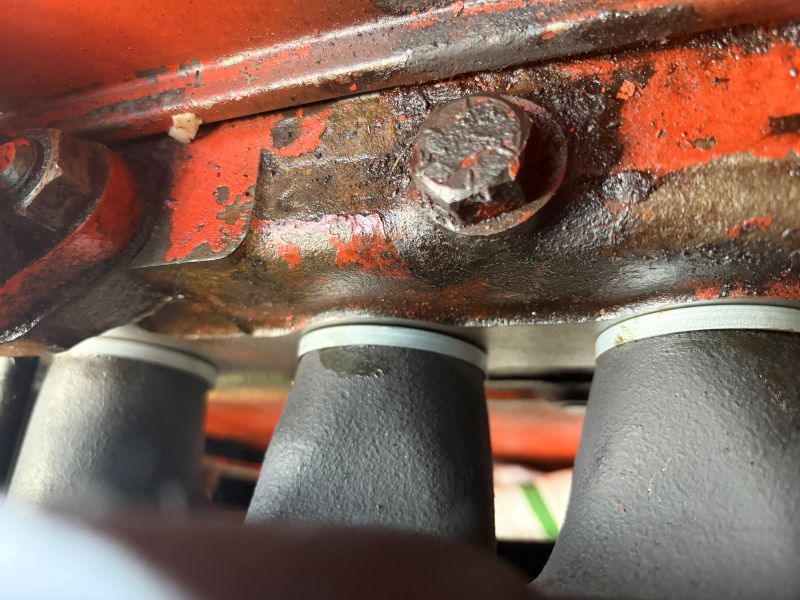 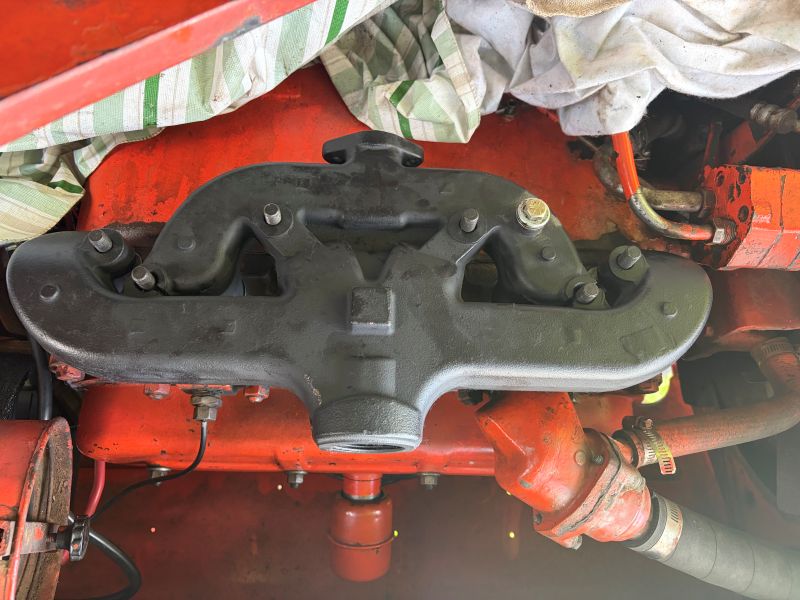 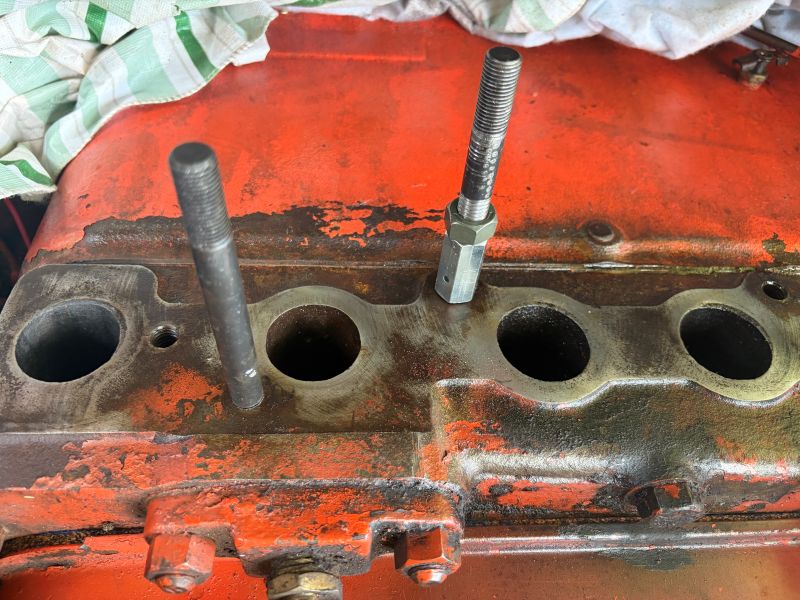 |
Posted By: HudCo
Date Posted: 21 Jun 2026 at 5:03pm
| i use two if they are all thier probley not so critacal with new surfaces the major deal is to retorque after each heat cycle while stil hot until they stay tight even if its four or five times |
Posted By: PaulB
Date Posted: 21 Jun 2026 at 5:09pm
|
With the gaskets no longer having asbestos in the fiber gaskets and you put them on dry, you already have the fibers you'll need for next time. ------------- If it was fun to pull in LOW gear, I could have a John Deere. Real pullers don't have speed limits. If you can't make it GO... make it SHINY |
Posted By: DrAllis
Date Posted: 21 Jun 2026 at 8:48pm
| I wonder if the gasket kit also fits a D-19 ?? A D-19 would require the two special "end" gaskets and 7 round gaskets. A WC or WD manifold require 6 round gaskets total. A WD-45 and D-17 require 4 round and two of the special end gaskets. |
Posted By: HudCo
Date Posted: 21 Jun 2026 at 10:47pm
| the last several kits that i have bought have just exactly two gaskets for each metal piece but they also are alot thinner than the ones that i used to get aleast it seems like that to me |
Posted By: Alex09(WI)
Date Posted: 25 Jun 2026 at 1:28am
|
The aftermarket gaskets are half as thick as the OEM Allis ones, my guess is they send 2 to compensate for the difference. ------------- www.awtractor.com A&W TRACTOR 920-598-1287 KEEPING ALLIS-CHALMERS IN THE FIELDS THROUGH THE 21ST CENTURY |
Posted By: DrAllis
Date Posted: 25 Jun 2026 at 6:19am
| Wouldn't ya think a set of printed instructions would be included.......?? |
Posted By: 8070nc
Date Posted: 25 Jun 2026 at 7:28am
|
I am a maintainense contractor for a company that runs a rendering plant. Theres a lot of expensive electrical equipment in there of course. A 200 hp inverter comes with no paperwork at all. You have to print it off the internet. If there was a extended internet outage the whole country would shut down. Too much dependence on complex systems for my taste ------------- 1984 80780 1957 D14 DES 300 with 25000 engine 616 tractor |
Posted By: DrAllis
Date Posted: 25 Jun 2026 at 7:48am
| It's being said that there "double" the gasket count. So, are the end gaskets round?? like the other six middle location gaskets ?? or are they the special end gaskets and if so, are they doubled up in quantity also ???????????? |
Posted By: Oldwrench
Date Posted: 25 Jun 2026 at 11:20am
|
No one could give me a straight answer on why there are double gaskets. 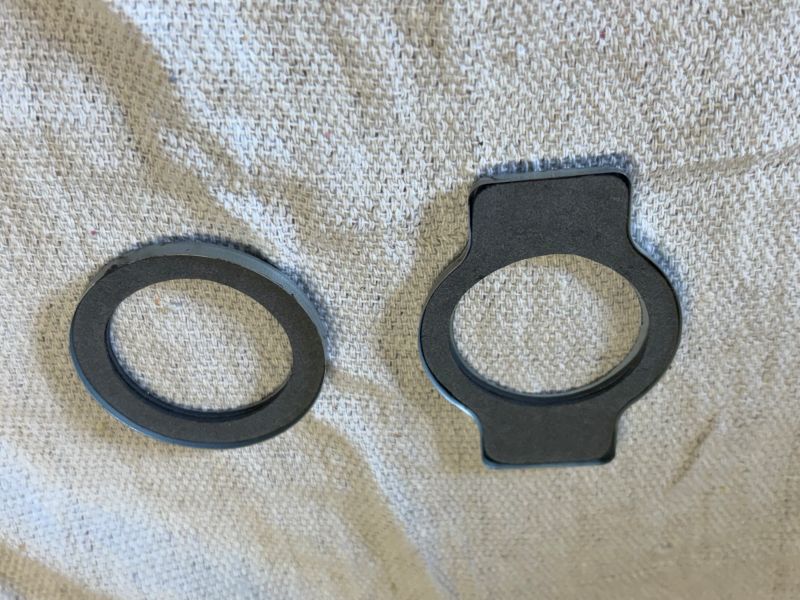 With double gaskets, the metal cup is almost full. I couldn't see any compelling reason to have such a thick gasket, and figured it would only be easier to blow out over time. Plus, for a dry installation, the metal cups wouldn't stay on the stubs of the manifold ports, so it was difficult to hold them and push the manifold on at the same time. The single gaskets in the cups seemed more normal, so that is the way I went. 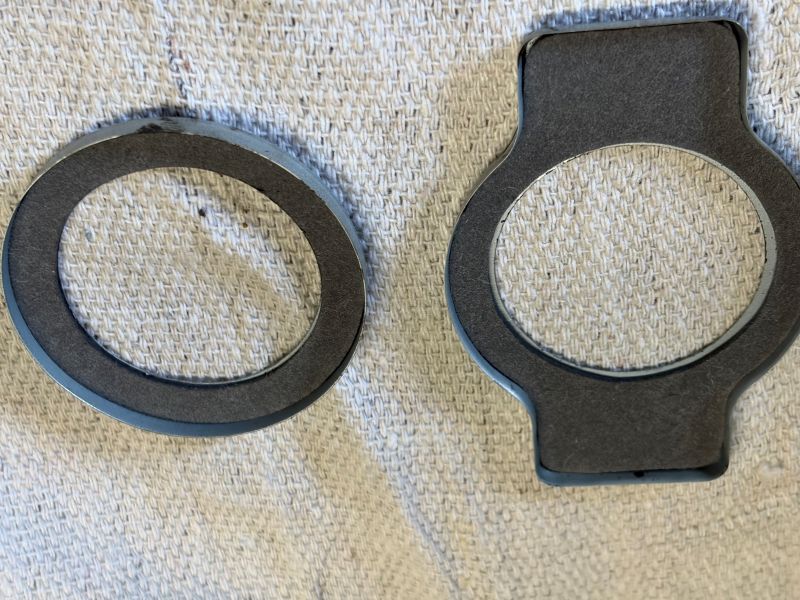 I am amazed at how long it has taken to bed everything in. Doc and everyone's advice was spot on in terms of re-torquing when cold after a heat cycle. I think I have re-torqued at least 5 times now, and it is finally starting to not require much when I re-torque the nuts. I'm amazed at how much it has moved after the initial torqueing. The first couple of times, some of the nuts almost felt loose when I torqued them again. The new studs have a fine thread on the manifold side. Also, I used anti-seize on the nuts. Doc recommended 40 ft lbs. I always see a recommendation of about a 30% reduction for lubricated nuts, or 28 ft lbs. Given the fine threads, and not wanting to snap the ears off of the ends, I settled on 24 ft lbs as a reasonable torque. That seems plenty tight for this setup. I'm going to continue to re-torque it as long as I have to, until it finally settles in for good. I imagine thicker double gaskets would have taken even longer to settle in. One other thing I did was buy a new muffler, even though my old Nelson muffler was in good condition. I bought the Nelson muffle several years ago when they had a run available re-making for a while. The problem was, the Nelson had a 2" inlet and a 1 1/2" outlet. It always seemed like an odd setup, and I assumed it created some backpressure, and maybe contributed to continually blowing the exhaust gaskets. The new muffler (a Stanley unfortunately), but at least has a 2" inlet and outlet, so I'm guessing it will be freer flowing, even if it sounds lousy. 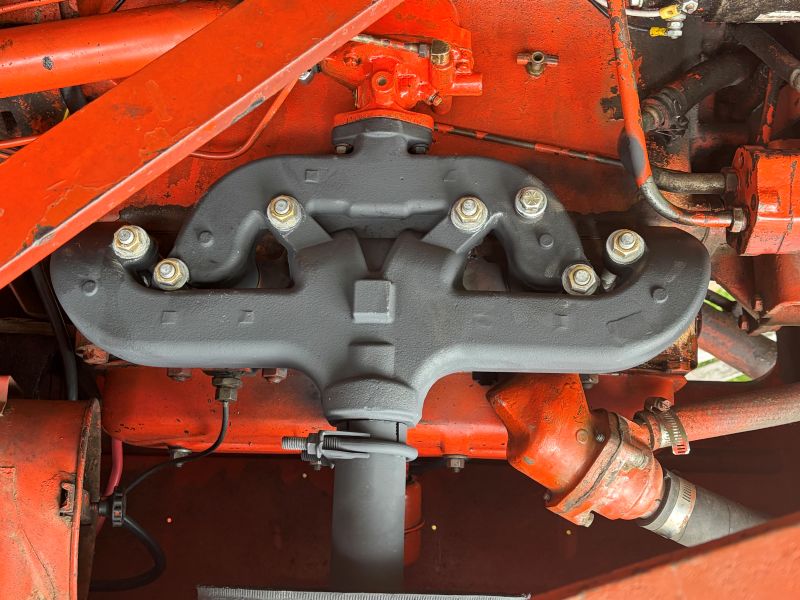 My quick 2 hour job is finally almost done, 2 or 3 weeks later. Anyway, she runs like a top and sounds a lot better. |
Posted By: DrAllis
Date Posted: 25 Jun 2026 at 11:40am
| So, knowing what you do now, is it any wonder the gaskets fail when they aren't retorqued cold several times ?? Even one cold retorque would be better than none. |
Posted By: Oldwrench
Date Posted: 25 Jun 2026 at 4:52pm
|
I've learned me lesson on multiple re-torquings. I feel like I should write in on a blackboard 100 times. I wonder where all the movement is coming from? The gaskets were about 0.050" thick. I would think they would compress pretty fully on the initial tightening. But I had some fairly loose nuts even on the third or fourth tightening. I don't think the studs were stretching. Anyway, interesting. Which brings up another mystery to me. I have never bought a new tractor from a dealer in my life, but if I did, would it be part of routine service to be re-tightening exhaust manifolds on a new machine? Or for that matter, heads? If not, what did the factory do differently to not make it necessary? I have bought a new car, and I know for sure the dealer didn't re-torque any manifolds on it during its first oil change. That said, I don't have a lot of confidence in the gaskets I bought, although they are the only ones available. They look just like regular gaskets to me. In fact, the carburetor gasket in the kit is made from the same material. If they fail, it won't be for lack of torque on the manifold bolts.
|
Posted By: DrAllis
Date Posted: 25 Jun 2026 at 5:00pm
| It's something we never really worried about until about 35+ years ago when asbestos was outlawed. |
Posted By: Les Kerf
Date Posted: 25 Jun 2026 at 6:02pm
|
The CA we acquired last year had no manifold gasket on it, only the telltale remnants of blue RTV. It seemed to be sealed just fine, the only reason we removed it was because the outlet was so corroded that it wouldn't hold a muffler. Forum member PaulB reports having success with that method, I may well try it myself sometime.
|
Posted By: DrAllis
Date Posted: 26 Jun 2026 at 8:12am
| I sure wouldn't use blue RTV. I believe the gold color is the highest temp type. |
Posted By: Les Kerf
Date Posted: 26 Jun 2026 at 2:03pm
Yup. And make sure the surfaces are flat
|
Posted By: Oldwrench
Date Posted: 08 Jul 2026 at 5:27pm
| Just as a follow up, torquing the manifold nuts did finally settle down after about 6 cycles of heating/cooling. I had extra gaskets, since I bought 2 sets. For fun, I heated one with a propane torch - not a direct flame, just some decent heat. It flamed, became brittle and disintegrated almost immediately. The material looked to be the same as the carburetor gasket, and to me looks and feels like regular gasket material. So I have zero confidence that these gaskets will hold up for any length of time. I couldn't find any alternate gaskets anywhere. They are encased by the steel cups, so that may help. We'll see. Anyways, with anti-seize on the brass nuts, I don't expect any trouble if the gaskets fail and I need to install new ones. Maybe I should keep an eye out for a thin sheet of kevlar or asbestos and cut my own! |
Posted By: DrAllis
Date Posted: 08 Jul 2026 at 6:07pm
| I've thought about making a copper gasket to fit inside the metal holders. |
Posted By: 8070nc
Date Posted: 08 Jul 2026 at 6:21pm
|
Doc im glad you said that. I did that on a perkins in a 706 forklift. Its got precombustion chambers with caps outside the head. One had blown out the gasket and whooever had it before me didnt fix it and it wore the surface on the cap. I got a piece of .050 thick copper and made a gasket. It had enough squish that it fixed it ------------- 1984 80780 1957 D14 DES 300 with 25000 engine 616 tractor |
Posted By: Alex09(WI)
Date Posted: 08 Jul 2026 at 7:28pm
LOL See my reply above! Definitely recommend a thin bead of highest temp orange/red/gold rtv in between each layer of the "sandwich" and on the manifold and cylinder head. This will hold the gaskets in place on assembly and fill in the minuscule imperfections in the steel surfaces. Retorque until the nuts hold the torque is the most important part and leads to premature failure of the gaskets if not done!! The OEM thicker "exhaust type" gaskets are available at A&W Tractor and are more expensive. ------------- www.awtractor.com A&W TRACTOR 920-598-1287 KEEPING ALLIS-CHALMERS IN THE FIELDS THROUGH THE 21ST CENTURY |
Posted By: Oldwrench
Date Posted: 09 Jul 2026 at 7:18am
|
Alex, in hindsight I should have contacted you to see if better gaskets were available, since you always seem to have NOS or higher quality items available. In the middle of a project I just wanted to get done though, I went ahead with what I had. Given the junky material, I didn't see how doubling the gaskets would add any strength. I like Doc's idea of copper gaskets. Now that I'm looking around, it would be fairly easy to find simple copper sealing washers with dimensions fitting the manifold ports. The front and rear ports would be a bit more difficult. A custom copper gasket would seem feasible ( https://coppergaskets.us/shop" rel="nofollow - https://coppergaskets.us/shop ), but not sure of the cost for a one-off. Anyway, I'll let everyone know how these gaskets last - hopefully at least several years.
|
Posted By: Clay
Date Posted: 09 Jul 2026 at 7:33am
| A "no-blow exhaust gasket" used on an aircraft engine is something I have though about. |
Posted By: Allis dave
Date Posted: 09 Jul 2026 at 10:18am
| I ouwldn't worry too much. If the head of manifold are true they should seal up and stay a long time. There have been a lot of WD, WD45's and D17's put together with these new gaskets. |