CA no oil pressure!
Printed From: Unofficial Allis
Category: Allis Chalmers
Forum Name: Farm Equipment
Forum Description: everything about Allis-Chalmers farm equipment
URL: https://www.allischalmers.com/forum/forum_posts.asp?TID=190381
Printed Date: 25 Aug 2025 at 10:15pm
Software Version: Web Wiz Forums 11.10 - http://www.webwizforums.com
Topic: CA no oil pressure!
Posted By: 84 prospector
Subject: CA no oil pressure!
Date Posted: 30 Aug 2022 at 9:14pm
| Hi I just joined this forum because I have been working on an AC. This tractor has been sitting for at least 15 years. I rebuilt the carburetor and rebuilt the distributor and now the tractor is running and starts great and fast. I looked at the gauge though and the pressure gauge doesn’t move. So I took the gauge off the tee and there was oil in the tee, but I decided to pour some down the tee to top it off to try and prime the pump. I started it with the gauge off and the elbow fitting off and it will push oil out of the top of the tee when I start it but after 3 or 4 seconds it will stop pushing oil out. What should be my next step to get some pressure? |
Replies:
Posted By: Dakota Dave
Date Posted: 30 Aug 2022 at 10:36pm
| Take off the fitting going into the back of the block use a pressure oil can an pump it full of heavy oil put the fitting back on if you leave it off it'll never prime. Start it back up if you don't get pressure in 10 seconds do it again. If you don't get pressure now pull the engine take the pump off look and see if the drive pin is still in the back of the cam. Pack it full of light grease. Check the pickup tube for cracks. It dosent take much to crack it when the engine was apart. A tiny crack and it'll suck air instead of oil. |
Posted By: steve(ill)
Date Posted: 30 Aug 2022 at 10:51pm
|
you changed the old oil ? ...... Or it looks real good and is FULL ? Is there a name on the oil filter ?... Remove it and look at the center steel tube that goes up the middle... has a small hole at the top ... tube is in place ? ------------- Like them all, but love the "B"s. |
Posted By: 84 prospector
Date Posted: 30 Aug 2022 at 10:52pm
| Is this fitting you are talking about the tee that comes out of the block, up to the gauge or down a tube to the oil filter housing? Should I use 20 50 oil or gear oil to pack down there? Thanks for the help! |
Posted By: 84 prospector
Date Posted: 30 Aug 2022 at 10:57pm
| The oil looks good and is full. I have not changed the oil yet, I need to weld a nut on the filter to get it off it is stuck pretty well. |
Posted By: DiyDave
Date Posted: 31 Aug 2022 at 4:28am
Drop the pan and inspect the oil pickup pipe and screen... ------------- Source: Babylon Bee. Sponsored by BRAWNDO, its got what you need! |
Posted By: steve(ill)
Date Posted: 31 Aug 2022 at 7:24am
|
this is the fiilter.... the blue circle is the location of the pump inside the bell housing on the end of the cam shaft.... the yellow arrow is the TEE that comes out of the top of the pump and has a steel curved line to the bottom of the filter... take that line off and pump oil down the tube into the TEE, down into the pump... 10w-30 oil is fine... 20w50 is a little thick unless it is plenty warm ambient outside. I have never had to weld a nut on the filter... just a big strap wrench should take if off.... The tube in the BOTTOM of the filter is the inlet... After the filter is off, you will see a 1/4 inch TUBE up the center of the filter with a small 1/8 inch hole on the top... that is how the oil gets into the filter and then drains to sump... If the tube is gone, or hole is way big, then too much oil goes into the filter and pressure is lost. this is a BYPASS FILTER.. it filters oil and dumps to sump.. It does NOT filter the oil going to the engine / bearings. 
------------- Like them all, but love the "B"s. |
Posted By: steve(ill)
Date Posted: 31 Aug 2022 at 7:29am
|
as DAVE mentioned, the pump sucks up oil thru a tube/ screen in the bottom of the oil pan.. If you get the oil filter off and prime the pump and still have no pressure, you might try to remove the oil pan and inspect the suction screen... Before doing that, drain the oil and see if there is any CRUD in the bottom.. Sometimes a drain and new oil will help.
------------- Like them all, but love the "B"s. |
Posted By: 84 prospector
Date Posted: 31 Aug 2022 at 9:22am
| I’m sure there’s sludge in the pan from how long it has been sitting. I will drain the oil and remove the pan and make sure everything is clean if i can get my hands on the right oil filter today. |
Posted By: Dick L
Date Posted: 31 Aug 2022 at 11:14am
|
You can prime the pump by removing the filter and poring oil down the tube in the filter cup. Any spilled oil runs into the pan. Most of the time the filter is just hand tight.
I have a sticky M
|
Posted By: 84 prospector
Date Posted: 31 Aug 2022 at 11:30am
| This filter has been on there for a long time and I tried taking off by hand but it’s stuck on there. I will use a band wrench and if that don’t work I will weld a nut on the top. Should a 3 3/4 band wrench work? |
Posted By: Dick L
Date Posted: 31 Aug 2022 at 11:51am
|
I don't have that kind of care of an old oil filter. I drive a large screwdriver thru it and break it loose. Never thought of saving and old dirty filter. Being 84 might give me a different perspective.
If you want to check the oil flow you can crank the engine over with the filter off to see oil flow up thru the tube. The gage could have a plug in it fro setting.
|
Posted By: TomC
Date Posted: 31 Aug 2022 at 12:02pm
| Cut yourself a strip of sandpaper that just goes around the filter,sand side on the filter,put your filter wrench over the sandpaper, get sandpaper and wrench as close to the threads as possible. |
Posted By: Tbone95
Date Posted: 31 Aug 2022 at 1:57pm
10-4 on the screwdriver. Made that work, except that 1 time it didn't! Started reefing on the screwdriver, eventually the metal of the filter gave way, and we opened that filter just like used a can opener!!!
 At that point, yer really screwed, you HAVE to do something, as the vehicle can't be ran at all now. Ended up with a massive Channellock set of pliers on it at the base, squeezing like crazy, and it finally cracked loose. Crazy. At that point, yer really screwed, you HAVE to do something, as the vehicle can't be ran at all now. Ended up with a massive Channellock set of pliers on it at the base, squeezing like crazy, and it finally cracked loose. Crazy. |
Posted By: sparky
Date Posted: 31 Aug 2022 at 2:11pm
|
When you use the screwdriver filter wrench be careful not to ruin the stand pipe. ------------- It's the color tractor my grandpa had! |
Posted By: Les Kerf
Date Posted: 31 Aug 2022 at 2:24pm
X2 Yup. That stand pipe is right there where the screwdriver would pass through, you have a fair chance of causing some damage to it. |
Posted By: steve(ill)
Date Posted: 31 Aug 2022 at 2:35pm
|
There is no need to use a screw driver unless you bought an old tractor / truck and the original owner put it in with a breaker bar !!.... Filters that i have put on, i can take off with an 8 inch long filter wrench.. The tractor only puts out about 15 psi max.. You might only have 10 psi on an old motor.. You dont have a lot of flow either... If your careful taking the filter off, you can check the tube and crank to check flow, then reinstall the OLD FILTER.. It really dont do much anyway since it is a BYPASS... you can install NEW at a later date when you do the oil. ------------- Like them all, but love the "B"s. |
Posted By: 84 prospector
Date Posted: 31 Aug 2022 at 5:39pm
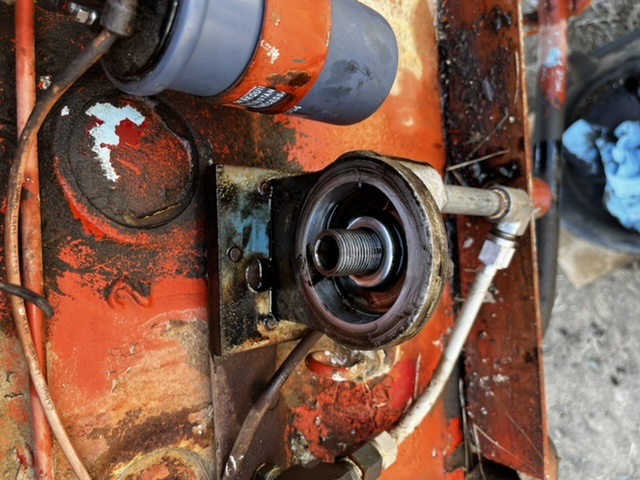
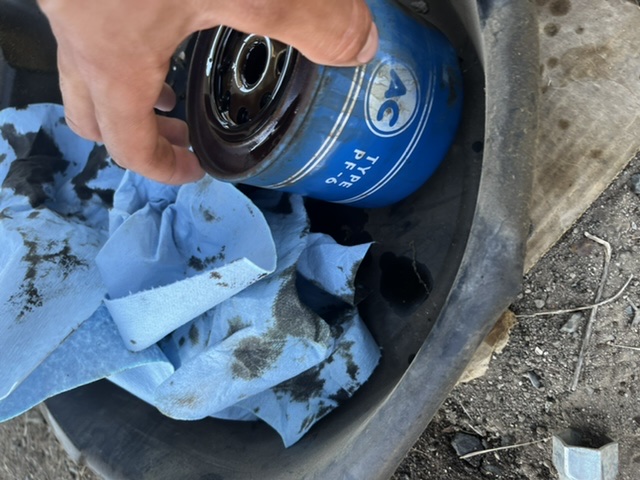
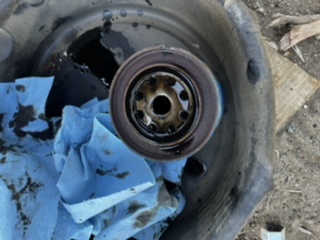
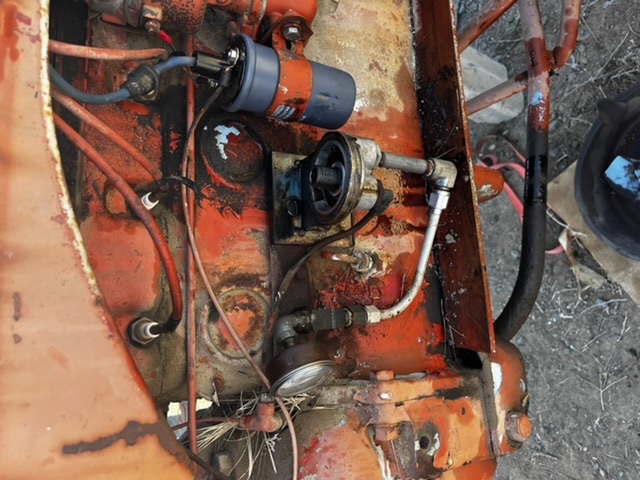
| I got a bypass filter, so I went to take the old filter off and it’s a regular filter on the inside like a car. The base plate is like a car too and doesn’t have a tube it had a ac pf6 filter on it. I would put pictures of the filter and base but I don’t know how |
Posted By: 84 prospector
Date Posted: 31 Aug 2022 at 5:52pm
| It’s like a normal filter and the threads are in the middle like a regular filter on a car or truck, and there wasn’t much oil in it when I took it off |
Posted By: 84 prospector
Date Posted: 31 Aug 2022 at 6:04pm
|
Posted By: 84 prospector
Date Posted: 31 Aug 2022 at 6:05pm
|
Posted By: 84 prospector
Date Posted: 31 Aug 2022 at 6:54pm
| I can’t even find one of these pf6 filters is there any cross references? |
Posted By: 84 prospector
Date Posted: 31 Aug 2022 at 8:32pm
| I poured oil down the center of where the filter screws on until it was full and filled the tee up and started it and it was steadily streaming oil out of the filter base and didn’t stop like it did on the tee. |
Posted By: sparky
Date Posted: 31 Aug 2022 at 8:33pm
|
Someone really cobbled that up. You need to get the correct filter housing,gasket, lines, standpipe and filter and I think then you’ll be back in business. ------------- It's the color tractor my grandpa had! |
Posted By: 84 prospector
Date Posted: 31 Aug 2022 at 8:38pm
| Is that filter system the reason it doesn’t have pressure? |
Posted By: sparky
Date Posted: 31 Aug 2022 at 8:46pm
|
Putting it back original is where I’d start to find oil pressure. ------------- It's the color tractor my grandpa had! |
Posted By: steve(ill)
Date Posted: 31 Aug 2022 at 8:58pm
|
Yes, that is your problem.... The factory TEE above the bell housing has a tube running to the filter... the OUTLET of your filter goes to the GAUGE and where else ? I can not tell what the steel pipe / tee / gauge are all connected to. Lets look at how the system works... The pump pushes oil down a hollow cam shaft. The Shaft has holes it it and oil is sprayed at the piston / rods / bearings for lube...... about 85% of the oil goes down the hollow cam shaft.... About 15% of the oil comes out of the top TEE on the bell housing and goes to the filter... The original filter cleans that 15%, then DUMPS the oil back to sump thru a hole in the block ( about 1/2 inch diameter), behind the filter..... You have an automotive filter that cleans the oil, then "normally" sends the oil to the bearings... Where does the OUTLET of your filter go ??? Look at my photo below.. Right now, you can take the steel tube running from the TEE to the filter inlet and remove it... Put the gauge on the end of the line so you can see the pressure INSIDE THE PUMP AND CAM SHAFT... You dont need to DUMP OIL BACK TO SUMP thru the filter... You can run without the filter for now. Prove the system works, then you can buy the plate that bolts to the motor that has the correct filter mount ... and a new filter... and you will be OK long term..... Just FORGET the filter for now and see what you have.. If the auto motive filter OUTLET pipe is dumping back to sump thru the block, then just remove the filter outlet steel pipe and PLUG IT and reinstall the filter.. You dont want oil going THRU that filter..  ------------- Like them all, but love the "B"s. |
Posted By: steve(ill)
Date Posted: 31 Aug 2022 at 9:00pm
|
again, the big question right now is where does the OIL OUT of the filter ( that 1/4 inch steel pipe) where does it go ( besides the gauge).... is it dumping back to sump thru the 1/2 inch hole in the side of the block ???? Thats where ALL of your oil is going. ------------- Like them all, but love the "B"s. |
Posted By: steve(ill)
Date Posted: 31 Aug 2022 at 9:07pm
I looked on e-bay for "allis oil filter housing" and came up with this.. It mounts to the engine block with two bolts and the oil drains into the block thru the center hole... The guy wants $90. ........ dont think i would pay that.. Again, you can run quite some time with NO FILTER... just plug the line.... see if you have pressure from the pump to gauge. ------------- Like them all, but love the "B"s. |
Posted By: 84 prospector
Date Posted: 31 Aug 2022 at 9:39pm
| So just to be clear I can’t use the filter setup that is on it? Is the system now going to be starving it of oil? I am new to this type of oil system and know nothing of it |
Posted By: 84 prospector
Date Posted: 31 Aug 2022 at 10:14pm
| The tee that the gauge is connected to and the line coming from the filter on it is in a port on the side of the block. Where does the oil actually come out of the block from? The small tee with the small line that is connected to the filter? Or from the bigger tee on the side with the gauge and the bigger line? |
Posted By: steve(ill)
Date Posted: 31 Aug 2022 at 10:23pm
|
Look at my picture... the oil comes from the bell housing TEE into the bottom of the filter... about 15% of the oil is DUMPED TO SUMP thru that 1/2 inch hole in the side of the block.... You are dumping WAY TOO MUCH Oil back to the sump with that wrong filter.. Plug the BIG STEEL PIPE out of the filter and put the gauge there... Eliminate the line INTO THE BLOCK... Or just put the gauge on the curved steel tube going INTO the filter, and eliminate the filter / STEEL PIPE drain and all.  ------------- Like them all, but love the "B"s. |
Posted By: steve(ill)
Date Posted: 31 Aug 2022 at 10:27pm
|
So just to be clear I can’t use the filter setup that is on it? Is the system now going to be starving it of oil? Yes, that filter is 100% of your problem. ------------- Like them all, but love the "B"s. |
Posted By: 84 prospector
Date Posted: 31 Aug 2022 at 10:31pm
| Ok now that makes sense, it’s just pushing All the oil straight through that filter because it’s not a bypass and back into the block. It will be safe to run it for a few days with the small oil line going to the filter blocked off with the gauge? |
Posted By: 84 prospector
Date Posted: 31 Aug 2022 at 10:41pm
| Does that hole in the side of the block that the oil is returning through just go straight to the pan? |
Posted By: steve(ill)
Date Posted: 31 Aug 2022 at 10:44pm
|
Yes... you can basically run FOREVER without the filter... There are a lot of smaller gasoline engines that never had oil filters.. Would be a good idea to put NEW OIL in it, ( in the near future).. that is CLEAN and does not need a filter. The hole in the block just drains into the pan..( there is a little puddle / dam inside that forms overflow into the pan).... There should be a tapped hole on each side of it.. Just bolt a small sheet metal plate over the hole.... Even a piece of duct tape might be OK for a test.
------------- Like them all, but love the "B"s. |
Posted By: 84 prospector
Date Posted: 31 Aug 2022 at 11:06pm
| Ok I will try that tomorrow. Do they make filters that can screw on it that would have enough restriction? |
Posted By: Les Kerf
Date Posted: 01 Sep 2022 at 6:37am
|
You can use this filter setup if you put in a restriction ahead of the filter. I would suggest an orifice no bigger than 1/16" to start with. |
Posted By: Tbone95
Date Posted: 01 Sep 2022 at 6:41am
 But that sucker fought tooth and nail! But that sucker fought tooth and nail!
|
Posted By: steve(ill)
Date Posted: 01 Sep 2022 at 7:05am
|
as Les said, you need to restrict the oil flow thru the filter so that only 15% of the total goes that way.. The ORIGINAL filter does that internally with its cotton construction..An auto filter has NO RESTRICTION so it wall pass MAX FLOW... An aftermarket filter could work if you had an orifice... If your restricting 10%- 15%- 20%... its not that important.. The idea is to maintain PRESSURE on the gauge and still have EXTRA oil that you can run thru the filter... You could use a needle valve and only crack it a turn open, then lock in place.... But if you want a clean, more original look ... go with the factory filter. ------------- Like them all, but love the "B"s. |
Posted By: PaulB
Date Posted: 01 Sep 2022 at 7:13am
|
Truthfully $90 for the oil filter base, gauge, filter, oil line and all the fittings is not far off from what it should be. I regularly get $50 just for a good base with the filter tube in it. I have plenty of them available. New FRAM 159 filters are going for close to $20 anywhere. The oil line is unique to the Allis Chalmers BE/CE and not available anywhere except for used or maybe NOS. A new aftermarket gauge will cost more than $30 and good used OEM one will fetch $25 easily. ------------- If it was fun to pull in LOW gear, I could have a John Deere. Real pullers don't have speed limits. If you can't make it GO... make it SHINY |
Posted By: Dick L
Date Posted: 01 Sep 2022 at 4:03pm
| Let me look around. I would bet my price would be quite a bit lower than you will find anywhere else.. You would need to buy a new filter if you decide to try my deals. |
Posted By: steve(ill)
Date Posted: 01 Sep 2022 at 4:14pm
|
needs a little cleanup and a new filter... ------------- Like them all, but love the "B"s. |
Posted By: 84 prospector
Date Posted: 01 Sep 2022 at 4:20pm
| For now could I pack cotton swabs or something in the middle of the filter to restrict the flow? |
Posted By: steve(ill)
Date Posted: 01 Sep 2022 at 4:25pm
|
No... you would have no idea what amount to use... if you insist on using the auto type filter, plug up a fitting and drill a 1/16 - 1/8 inch hole in it........ Or use a valve like the fuel pet cock and restrict the flow ........... Personally i would SCRAP the auto filter and use NOTHING if i was not going to install the original. Did you cap the drain line and rerun the pressure test ???
------------- Like them all, but love the "B"s. |
Posted By: 84 prospector
Date Posted: 01 Sep 2022 at 4:28pm
| No I haven’t been home yet, few hours I’ll try that. |
Posted By: Tbone95
Date Posted: 01 Sep 2022 at 6:48pm
Start with the 1/16. You can make a 1/16 hole 1/8, but not the other way. 1/8 will flow basically 4x the flow as 1/16, which in your case you’re trying to restrict that flow. |
Posted By: 84 prospector
Date Posted: 01 Sep 2022 at 7:39pm
I bypassed the filter and have good pressure.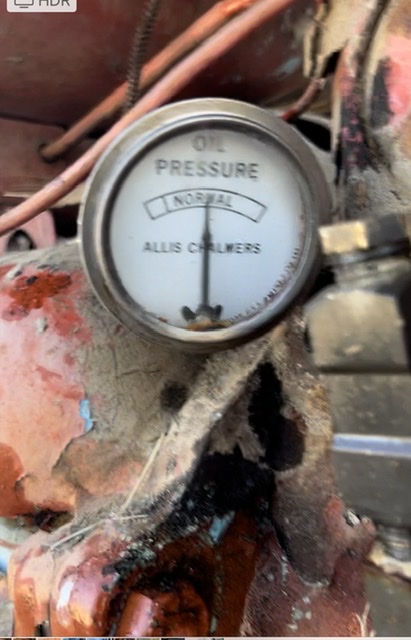
|
Posted By: 84 prospector
Date Posted: 01 Sep 2022 at 7:41pm
| Should I be ok to run it like this for a few weeks until I can get a correct housing or do something about this filter system that is on it? |
Posted By: steve(ill)
Date Posted: 01 Sep 2022 at 8:23pm
|
Change the oil out first chance you get and you would be good for YEARS... The filter system is nice to have, but not a necessity..... Normally the pressure is around the O or R with good viscosity oil and cool temps.. As it warms up it might drop a little.. Right now you are in GREAT SHAPE !!! ------------- Like them all, but love the "B"s. |
Posted By: 84 prospector
Date Posted: 01 Sep 2022 at 9:03pm
I changed the oil and it still has good pressure. It smokes very bad but it’s clearing up more as it runs. I filled the radiator and there’s a bunch of gummy oily stuff in it so I’m going to have to flush it out, not a big deal. I tested the voltage and it is not charging it’s staying around 6.3/6.2 volts. a terminal on the voltage regular is not hooked up but I’m not sure what each terminal does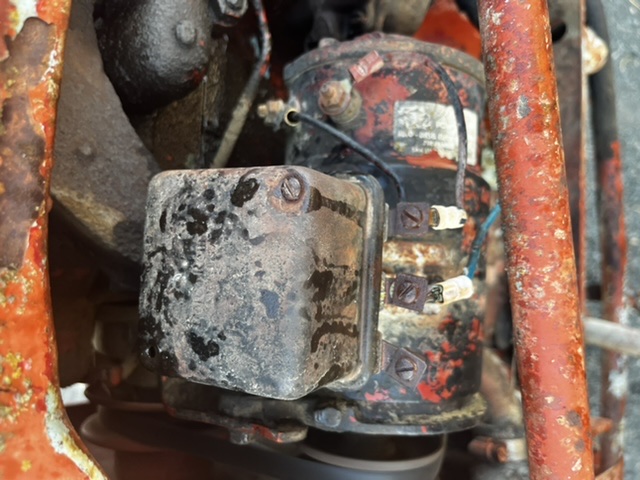
|
Posted By: steve(ill)
Date Posted: 01 Sep 2022 at 9:10pm
|
voltage regulators look something like this... Clean the terminals and maybe you can see a letter on each. Probably in this order anyway. while running, if you GROUND the "F" terminal , you should see higher voltage at the "A" or "GEN" terminal .........if the regulator is working, you will see the charge at the "Bat" terminal also. the system can be NEGATIVE or POSITIVE GROUND... From the Factory it was 6 v POSITIVE GROUND.
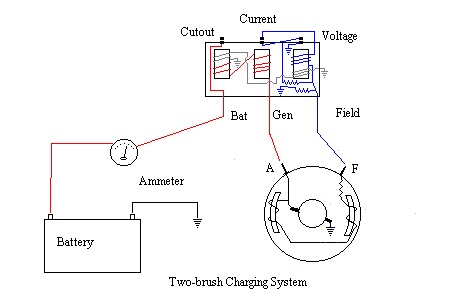 ------------- Like them all, but love the "B"s. |
Posted By: steve(ill)
Date Posted: 01 Sep 2022 at 9:14pm
|
generators fall in the same catagory as filters (for NECESSITY.)... Many old tractors with bad generators just charge the battery with a shop charger once a week... Generator is used to adjust fan belt only. ............ thats a possibility for now. ------------- Like them all, but love the "B"s. |
Posted By: 84 prospector
Date Posted: 01 Sep 2022 at 10:16pm
| Smoke is almost gone now, every once and a while it will miss and smoke. Drives pretty well, more oily gummy stuff in the radiator started coming flowing to the top so the radiator is going to need a very good flush. Is there anything else I should flush it with besides water to help clean it? |
Posted By: steve(ill)
Date Posted: 01 Sep 2022 at 10:28pm
|
a few ounces of laundry soap in the water will loosen any "oily stuff"... run for 20 minutes, drain and flush, then add your water and antifreeze.
piston rings "STICK" when setting for several years... Might take a couple hours to loosen up and reseal... That could be your SMOKE. ------------- Like them all, but love the "B"s. |
Posted By: 84 prospector
Date Posted: 01 Sep 2022 at 10:57pm
| Will dish soap work just as well? |
Posted By: WF owner
Date Posted: 02 Sep 2022 at 6:06am
Dish soap will make suds. You want a non-sudsing soap. You need to find where the oil in the coolant is coming from!
|
Posted By: steve(ill)
Date Posted: 02 Sep 2022 at 7:04am
if dish soap is all you got, that would work. Just dont add too much 3-4 spoon fulls are enough..... Seen them little oily duckies on the TV and DAWN seems to work good on them !  ------------- Like them all, but love the "B"s. |
Posted By: 84 prospector
Date Posted: 02 Sep 2022 at 7:27pm
| Radiator is cleaning up well, I looked at the letters on the voltage regulator and the middle one says batt, the right one with the red wire says F, and the one disconnected says L. Is it possible that this was converted to negative ground because the ammeter is reading “charge” while there is a load being put on the battery and it won’t go above 6.2. There is a sticker on the generator that has a local power supply shop name on it. |
Posted By: steve(ill)
Date Posted: 02 Sep 2022 at 7:42pm
|
"L" normally means LOAD and is hot like the BAT terminal when the tractor is running... On that type of regulator, the "G" or missing terminal might be on the BACK side ??? Look at your battery.. ONE terminal runs to the starter... the other is GROUNDED to the frame.. That will tell you if it is POS or NEG ground.... You need to test the generator without the regulator to see if it works.. Like i said, ground the "F" terminal ........ run a jumper wire from the "A" terminal to the battery ( or starter) HOT lug... When the tractor is running, measure the voltage between the "A and F" terminals.. If the generator works, it should read around 7 volts... If you pull the wire off the A terminal and measure the generator output, it might go to 13-14 volts NON REGULATED... since it cant see the battery. ------------- Like them all, but love the "B"s. |
Posted By: steve(ill)
Date Posted: 02 Sep 2022 at 7:51pm
This shows the regulator you have... I dont know if it works or not... FIRST you have to show that the generator works... then check or clean the regulator.... contacts inside can be dirty / stuck / etc.....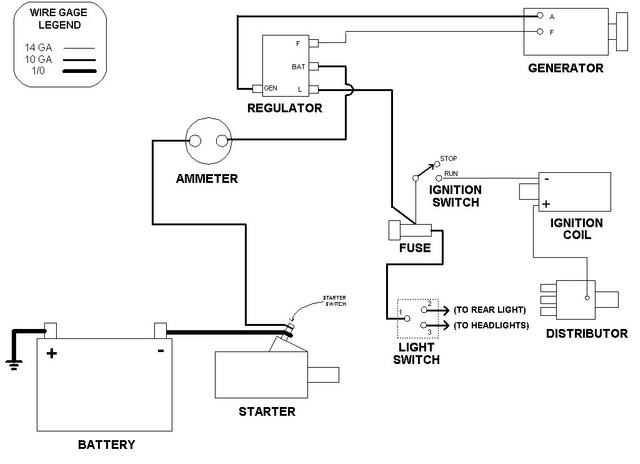 ------------- Like them all, but love the "B"s. |
Posted By: 84 prospector
Date Posted: 02 Sep 2022 at 8:04pm
| When I bought the tractor it had no battery and the coil didn’t have a positive or negative marking on it so I hooked it all up as a positive ground, how old tractors like this would be with the positive side of the coil on ground and the positive pole of the battery on ground and the negative side with the starter hooked up and the negative side of the coil hooked up as the “hot” side |
Posted By: steve(ill)
Date Posted: 02 Sep 2022 at 8:07pm
|
YES... if it uses a 6 volt battery it will be POSITIVE GROUND. ------------- Like them all, but love the "B"s. |
Posted By: 84 prospector
Date Posted: 02 Sep 2022 at 8:09pm
I can’t find a light switch on the tractor, but the second wire on the generator that is black is hooked up underneath the regulator on a terminal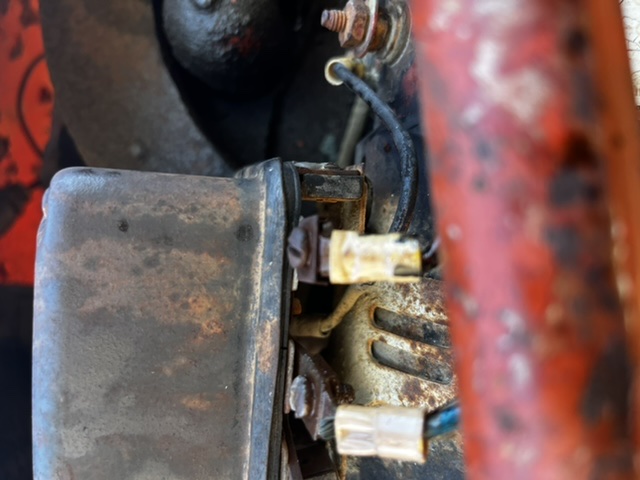
|
Posted By: steve(ill)
Date Posted: 02 Sep 2022 at 8:13pm
|
The wires should be in the same order as the drawing above.. The CENTER terminal is HOT and goes to the battery NEG terminal or starter terminal... You dont need the "L" terminal... the "F" on the corner should go to the "F" terminal of the generator ( ground)... The "G" terminal is on the BACK and goes to the "A" on the generator. Photo from AMAZON ............. CENTER (BAT) goes to the battery... "G" and "F" go straight to the generator. ------------- Like them all, but love the "B"s. |
Posted By: 84 prospector
Date Posted: 02 Sep 2022 at 8:16pm
| The g terminal goes to a terminal on the under side of the regulator, there’s no terminal on the back like that one so I’m going to assume that terminal on the bottom is the A terminal. I am going to try that test procedure you just sent and see if it’s any good |
Posted By: steve(ill)
Date Posted: 02 Sep 2022 at 8:24pm
|
With the reg setting on the generator, the easy test is to connect your volt meter with alagator clips on the A and F terminals of the gen.... Run a jumper from the "F" to ground.. Start tractor and look at volt meter.. If nothing, use a small jumper wire to touch the "G" and "B" terminals ( so the G or A terminal will see the battery)... and read the meter.. If less than 6.8 volts , the generator is bad. ------------- Like them all, but love the "B"s. |
Posted By: 84 prospector
Date Posted: 02 Sep 2022 at 9:05pm
| I got 5.9 so the generator must be bad |
Posted By: steve(ill)
Date Posted: 02 Sep 2022 at 9:11pm
|
YEP... long term you can remove disassemble and clean the commutator and brushes if you are up to that... Short term, just charge the battery once a week. ------------- Like them all, but love the "B"s. |
Posted By: WF owner
Date Posted: 03 Sep 2022 at 7:19am
|
I saw nowhere that you polarized (flashed) the generator. http://dueyschutter.freeservers.com/photo5.html" rel="nofollow - Allis Chalmers Page 3 (freeservers.com)
|
Posted By: 84 prospector
Date Posted: 03 Sep 2022 at 8:39pm
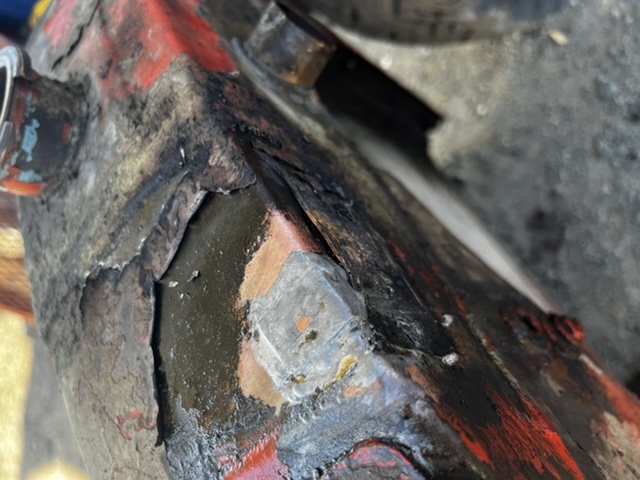
| Well I’ve got a new problem. The radiator is pretty clean now, but I came out to it today and there was a puddle of water under it. I looked at where the leak was coming from and it was coming from the top tank. So I took the hood and grille off the front and to my surprise there are two holes in the top tank where the hood and grille screw together. The previous owner must have put too long of screws on there. Those holes aren’t supposed to be there right? I cleaned the area pretty well, how can I fix these holes? |
Posted By: plummerscarin
Date Posted: 03 Sep 2022 at 8:53pm
| Would think you could solder them if you have the talent for that |
Posted By: 84 prospector
Date Posted: 03 Sep 2022 at 9:02pm
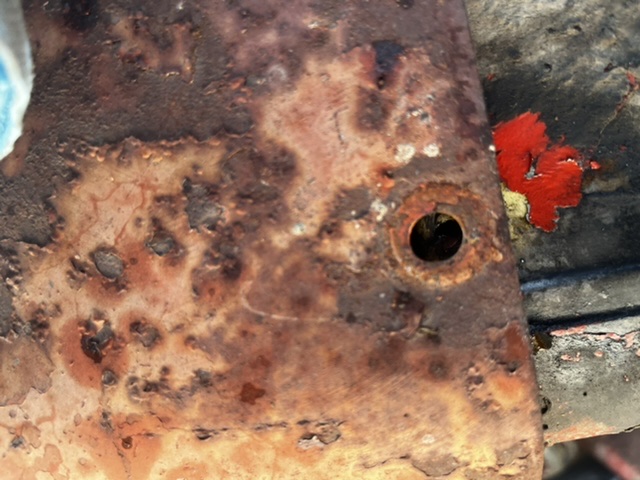 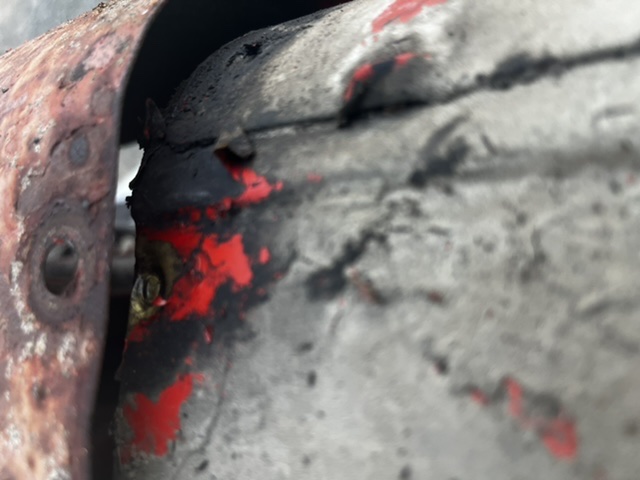 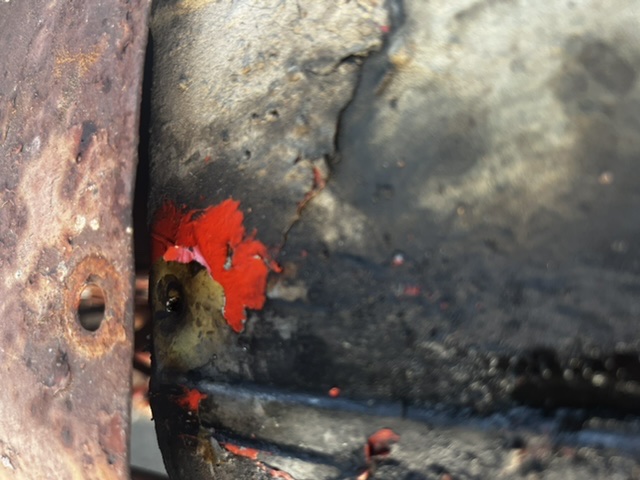
|
Posted By: 84 prospector
Date Posted: 03 Sep 2022 at 9:02pm
| These holes are good size, do you think solder could patch those? |
Posted By: steve(ill)
Date Posted: 03 Sep 2022 at 9:18pm
|
clean it up real good.. wire brush, small grinder, etc.... cut a little piece of sheet metal about 1/2 - 3/4 inch diameter and lay over it... then solder it together..... has to be REAL CLEAN !!
if you had a small piece of copper pipe, you could split it, pound it out flat, then cut out the small covers. ------------- Like them all, but love the "B"s. |
Posted By: 84 prospector
Date Posted: 03 Sep 2022 at 9:48pm
| Plumbing solder is what I use right? |
Posted By: steve(ill)
Date Posted: 03 Sep 2022 at 10:16pm
|
that should be fine.. ------------- Like them all, but love the "B"s. |
Posted By: Jim.ME
Date Posted: 04 Sep 2022 at 6:24am
| Deleted |
Posted By: SteveM C/IL
Date Posted: 04 Sep 2022 at 11:13am
| Good old acid core solder for me. Wash it all down good when done to flush the acid away. |
Posted By: 84 prospector
Date Posted: 04 Sep 2022 at 1:34pm
| Ok lead free acid core is cheapest so I’ll go with that. Is tinning flux alright to use with it? |
Posted By: steve(ill)
Date Posted: 04 Sep 2022 at 4:02pm
|
lead free / acid core is plumbing solder .... lead base / rosin core is for soldering wires together... you dont want the ACID on the WIRES... and you dont want the LEAD in your WATER PIPES.. Most "FLUX" will work with either... some are water base, some are not.. if its "lead free flux" it was designed to work with acid core solder. ------------- Like them all, but love the "B"s. |
Posted By: 84 prospector
Date Posted: 04 Sep 2022 at 6:02pm
 First hole done |
Posted By: plummerscarin
Date Posted: 04 Sep 2022 at 9:31pm
| Well that looks pretty good |
Posted By: 84 prospector
Date Posted: 04 Sep 2022 at 10:12pm
| Got all the holes sealed up, the bolts holding the radiator down were sheared off by the previous owner so I’m going to heat them up and Try to get them out and out of new ones on. All the hoses were junk so I am going to need to get new ones. What’s the inside diameter of the radiator hoses? 1 1/4? |
Posted By: steve(ill)
Date Posted: 04 Sep 2022 at 10:21pm
|
yes 1-1/4 inch hose ID. ------------- Like them all, but love the "B"s. |
Posted By: Brian G. NY
Date Posted: 05 Sep 2022 at 9:14am
I second that....especially considering the original condition!
|
Posted By: 84 prospector
Date Posted: 05 Sep 2022 at 5:07pm
| Well both bolts holding the radiator in from the bottom sheared off when I took it off, I tried heating the studs up and turning them with vice grips but had no luck. So instead I ground them down and welded new studs on them and put new nuts on. Putting it back on now hopefully no leaks! |
Posted By: plummerscarin
Date Posted: 05 Sep 2022 at 5:53pm
|
Dang, sounds like one of my days. Keep plugging. I'm rootin for ya |
Posted By: 84 prospector
Date Posted: 05 Sep 2022 at 10:57pm
| Before I put the hood and everything back on I would like to adjust the valves and make sure none are sticking. The tractor backfires and smokes it seems when a certain cylinder fires. How do I adjust the valves on one of these engines? |
Posted By: DiyDave
Date Posted: 06 Sep 2022 at 4:11am
Pull the valve cover and you'll find the rocker shaft, at the push rod side, you will see the adjusting hardware. I would recommend you acquire the shop manual, it has the procedure in it. While you have the VC off, look at the freeze plugs and check for leaks... ------------- Source: Babylon Bee. Sponsored by BRAWNDO, its got what you need! |
Posted By: steve(ill)
Date Posted: 06 Sep 2022 at 8:26am
|
look at the intake valve... when it closes, you are coming up on compression... about 90 degrees you will be at TDC.. ( center) .. you will also hear the SNAP !! .... Adjust the valves on that cylinder that just came to TDC ............Should be about .015 inch clearance between the valve top and the adjust screw above it. Rotate the motor 180 degrees and look for the NEXT cylinder to come to TDC... should be in 1-2-4-3 order ..... you can start at any cylinder ,, ( ex 4-3-1-2 ) ------------- Like them all, but love the "B"s. |
Posted By: 84 prospector
Date Posted: 06 Sep 2022 at 8:35am
| This is done while it is cold right? |
Posted By: SteveM C/IL
Date Posted: 06 Sep 2022 at 1:06pm
| Rule of thumb is .002 more cold than hot (book). More likely to have even adjustment cold. Hot begins cooling the moment you start and unless you are proficient and experienced it may well get away from you. |
Posted By: steve(ill)
Date Posted: 06 Sep 2022 at 4:02pm
Steve is right... .002 MORE if your setting cold.... Book actually says .010 HOT for B and C.. ........ but .012 HOT for CA ?????? YOUR CHOICE !  TOO tight is bad... A couple thousands loose is not a deal breaker. ------------- Like them all, but love the "B"s. |
Posted By: 84 prospector
Date Posted: 06 Sep 2022 at 6:37pm
| I should be good at .015 right? |
Posted By: 84 prospector
Date Posted: 06 Sep 2022 at 6:38pm
| Or will it make that big of a difference to go .014 |
Posted By: steve(ill)
Date Posted: 06 Sep 2022 at 7:12pm
|
No.... your fine... 1 - 2 thousandths LOOSE does not hurt. ------------- Like them all, but love the "B"s. |
Posted By: 84 prospector
Date Posted: 06 Sep 2022 at 7:20pm
| Kinda a dumb question but where can I spin the engine by hand? The crank pulley is too hard to grip by hand and spin |
Posted By: steve(ill)
Date Posted: 06 Sep 2022 at 7:52pm
|
there is a round hole in the radiator wrap around a couple inches below the grill... That looks at the crank shaft pulley front end.... There is a "hand crank" that goes into that hole.. Basically a 5/8 inch rod with a TEE on the end to engage the tangs on the pulley... you might also be able to engage the PTO shaft and turn it with a pipe wrench and roll over the motor... It is about 3 to 1 ratio ... put the transmission in neutral.... IGNITION OFF...... or plugs removed. --------------------------------- basically the hand crank has something like a 1/4 inch roll pin about 1-1/2 inch long ( im guessing) that grabs the inside of the pulley.. ------------- Like them all, but love the "B"s. |
Posted By: 84 prospector
Date Posted: 06 Sep 2022 at 8:27pm
| Ok thanks, just to be sure I’m doing this right, when I’m adjusting the #1 cylinder i rotate until either the exhaust or intake valve is completely closed (spring all the way up) and adjust that valve that is completely up to .015, then rotate the engine until the other valve is completely closed/ up and adjust that one to .015 |
 Dick L wrote: