D17 rotor shaft not?
Printed From: Unofficial Allis
Category: Allis Chalmers
Forum Name: Farm Equipment
Forum Description: everything about Allis-Chalmers farm equipment
URL: https://www.allischalmers.com/forum/forum_posts.asp?TID=187906
Printed Date: 02 Apr 2026 at 5:49am
Software Version: Web Wiz Forums 11.10 - http://www.webwizforums.com
Topic: D17 rotor shaft not?
Posted By: Hunt4Allis
Subject: D17 rotor shaft not?
Date Posted: 27 Apr 2022 at 4:34pm
| When I crank my D17 over the shaft that the rotor cap sits in should rotate with the cap off correct? Mine is not moving? Thanks Matt |
Replies:
Posted By: DiyDave
Date Posted: 27 Apr 2022 at 5:30pm
Yank it, and see what the gear below, and the gear that drives it look like... ------------- Source: Babylon Bee. Sponsored by BRAWNDO, its got what you need! |
Posted By: Hunt4Allis
Date Posted: 27 Apr 2022 at 5:37pm
| Ok, can I mess up timing at any point by removing things? |
Posted By: Gary
Date Posted: 27 Apr 2022 at 6:04pm
|
Absolutely - Big Time ! |
Posted By: DrAllis
Date Posted: 27 Apr 2022 at 6:11pm
| But it's already out of time anyway. |
Posted By: Hunt4Allis
Date Posted: 27 Apr 2022 at 7:27pm
| So once a gear spins when it shouldn't (associated with the rotor )it's timing is already thrown off by me continuing to crank it correct?I do have a shop manual that I was able to find the parts breakdown to start to see what to look for. What is the most common failure in these that I should look for? If it's already out of time it's not going to hurt it to take distributor off correct? |
Posted By: steve(ill)
Date Posted: 27 Apr 2022 at 8:08pm
|
right.. there should be one bolt below the distributor that holds it DOWN to the motor. Take the bolt out and wiggle, pull up on the distributor... the shaft is several inches long with a gear on the bottom... you may have a broken pin holding the gear onto the shaft ?? Before you pull the distributor, grab the shaft and try to turn it.. If something is BROKEN , it will turn.
------------- Like them all, but love the "B"s. |
Posted By: Hunt4Allis
Date Posted: 27 Apr 2022 at 8:53pm
| Okay I tried turning it to set the point gap and it would barely rotate enough to go open and closed so not very much movement rotation wise anyways |
Posted By: steve(ill)
Date Posted: 27 Apr 2022 at 9:09pm
well thats what it is suppose to do... rotate a few degrees in one direction for the mechanical advance.. So if your rotating the motor and the distributor is NOT turning, maybe the problem is not the distributor, but the cam shaft/ gear that is driving it..... maybe someone else knows for sure...if there is a common failure point? ------------- Like them all, but love the "B"s. |
Posted By: MACK
Date Posted: 27 Apr 2022 at 9:24pm
| If it is a older 17 with power steering, I would say the shaft and key wore out in governor gear. If so, it will run like a different tractor after repairs. MACK |
Posted By: steve(ill)
Date Posted: 27 Apr 2022 at 9:29pm
OUCH... my mistake, thanks MACK... the distributor drives off the front end gearing and not down thru the block onto the camshaft .
 ------------- Like them all, but love the "B"s. |
Posted By: DiyDave
Date Posted: 28 Apr 2022 at 4:45am
Getting it timed right after removal is easy, Get #1 on TDC, make sure rotor is pointing near #1 on cap, and install. Remember most distributors have a spiral cut gear, and will rotate slightly as you remove/install the dizzy, so you may have to tweak the position by a tooth or 2, on the gear. Also helps to scribe a line on the dizzy and on the side of the hole, before you pull it. Also, taking some before pictures on your phone can help... ------------- Source: Babylon Bee. Sponsored by BRAWNDO, its got what you need! |
 Hunt4Allis wrote:
Posted By: Hunt4Allis
Date Posted: 28 Apr 2022 at 5:44am
|
It's not power steering,then the issue probably isn't between the gear at the bottom of the distributor or the one that runs horizontally on the shaft? How could the motor turn over yet the shaft not rotate? Seem like it made a whining noise right before it stalled while I had it idling when I was giving the cows a round bale... (It wasn't anything really all that loud but it did make a difference sound for a short time as I was giving them hay but nothing crazy) |
Posted By: DrAllis
Date Posted: 28 Apr 2022 at 6:42am
| TDC on #1 cylinder is when the retaining bolt on the crankshaft pulley is pointing straight DOWN. At that point you are 50/50. It's either on #1 compression stroke or #4 compression stroke. So, place the rotor on the distributor at #1 wire on the cap and try it. If it doesn't run (assuming everything else is correct) then again place the crank pulley bolt straight down with the rotor pointing at #4 wire, pull the distributor out and turn it to point at #1 wire and you are in "time" to run. The timing should then be accurately set using a timing light with the engine running at wide-open throttle. |
Posted By: Hunt4Allis
Date Posted: 28 Apr 2022 at 9:22am
| Okay thanks for the details on how to get timing back but for now I need to find out what happened and where to start looking. Like I say trying to rotate the top of the rotor it seems pretty tight so that tells me it's probably connected at the bottom of the rotor gear onto the horizontal gear correct? |
Posted By: steve(ill)
Date Posted: 28 Apr 2022 at 9:33am
|
YES Hunt... the shaft is horizontal to the front of the motor and then gear driven from the crank shaft... About all you can do at this point, is pull the distributor and look down the hole at the drive... then go forward toward the governor... and keep looking for something BROKE or key sheared... last choice is to pull the radiator and start going in from the front cover toward the gears. Look at gears 27, and 17 above and if they are turning with the shaft.
------------- Like them all, but love the "B"s. |
Posted By: Hunt4Allis
Date Posted: 28 Apr 2022 at 10:39am
| How does this number 16 thrust bearing carrier work? It looks like the forks actuate it somehow on the horizontal shaft that has the large gear on it? I know I have to take it apart to see what failed I'm just asking these ahead of time so I know how to proceed at the time that I take it apart. With having kids and animals and everything else time is a limited quantity and I get chances to work on things during those quantities 😜 |
Posted By: Hunt4Allis
Date Posted: 08 May 2022 at 11:35am
| I pulled the distributor out after marking several reference points and the bottom gear that's attached to the distributor shaft is a mess. It looks very dry down inside where the gears mesh together and that gear looks stripped also. Are these gears able to be bought separately and reinstalled or is it not worth it and should I just try to get all new assemblies? I'm going to crank the motor over and see if the horizontal shaft and gear rotate down inside the opening that the distributor was in and go from there... It looks like there is any oil line that runs to the front of the assembly so is that where it gets its lubrication from? I just read another post that Dr Allis was in that talked about some one else that it was dry also but I couldn't read far enough into it to see what the solution was or the culprit? I know lots of questions there just trying to get my thoughts out to see what people's thoughts are is all...Thanks Matt |
Posted By: steve(ill)
Date Posted: 08 May 2022 at 12:40pm
|
Hunt, i dont know if the gear is available aftermarket or not. I see a lot of " distributor gears" listed on the NET, ( is this a generic DELCO gear ???) but not sure how you guarantee it would work on the D17.. You should also check the mating gear inside the housing for damage, and check the WOBBLE in the distributor shaft itself , for bushing wear... If all is good, i would keep looking for a gear.. If you see additional damage, you could get a good used or rebuilt unit. just an example...  ------------- Like them all, but love the "B"s. |
Posted By: Hunt4Allis
Date Posted: 08 May 2022 at 12:49pm
|
Ok will do. I actually looked at that website and seen that( wow! $300!?! The horizontal "mating gear" under distributor gear looks mashed up also. But like I say I'm going to crank it over to see if the horizontal mating gear rotates first... |
Posted By: steve(ill)
Date Posted: 08 May 2022 at 1:00pm
|
If you need the drive gear ( or shaft) and the distributor gear ( or shaft) ... you might be cheaper to look / ask on this site for someone that has a "good use" unit they are parting out. Get the complete drive shaft with new gear, and the distributor.... ask to verify that distributor shaft BUSHING is OK. ------------- Like them all, but love the "B"s. |
Posted By: Hunt4Allis
Date Posted: 08 May 2022 at 4:42pm
| The horizontal shaft coming out of the motor rotates, now I need to find out why it's so dry in there? Is it supposed to be filled separately from a fill plug or what? |
Posted By: DrAllis
Date Posted: 08 May 2022 at 6:38pm
| If that area has the power steering pump (old D-17's did) that gear area is a compartment of its own and needs oil or grease to lube the gears. If it doesn't have a power steering pump it has a small oil line from the cylinder head that comes down to the governor front cover and from the cover sprays oil directly backwards thus lubricating timing gears, governor weights and eventually the distributor gears. I don't think I've ever seen gears fail without a power steering pump because they have oil sprayed in that area whenever the engine runs. |
Posted By: steve(ill)
Date Posted: 08 May 2022 at 8:58pm
|
I'm going to crank the motor over and see if the horizontal shaft and gear rotate down inside the opening that the distributor was in and go from there... It looks like there is any oil line that runs to the front of the assembly so is that where it gets its lubrication from? I just read another post that Dr Allis was in that talked about some one else that it was dry also but I couldn't read far enough i........... HUNT... apparently you need to look at " the little line" closer.. REmove and blow air thru it ? AFter its running again, take line loose and see if you have flow. ------------- Like them all, but love the "B"s. |
Posted By: DrAllis
Date Posted: 08 May 2022 at 9:01pm
| Even if the line has oil the aluminum governor cover passage may be plugged. |
Posted By: Hunt4Allis
Date Posted: 09 May 2022 at 4:42am
| It does not have power steering and does have these small oil line going from the cylinder head down to the governor front cover. Thanks all I will chase that out and see if there's a blockage somewhere! Thanks for the good info... |
Posted By: Hunt4Allis
Date Posted: 06 Jul 2022 at 1:03pm
| I got a new governor that has been rebuilt. I need to check the mating gear that the distributor goes into for damage before I bolt this back together and clean the small line out and make sure it has flow. Is there anything else I should do before reassembling? Thanks Matt |
Posted By: Hunt4Allis
Date Posted: 07 Jul 2022 at 6:19am
| I'm mostly asking so I can get this up and running again to move around bales out of my hay field |
Posted By: Hunt4Allis
Date Posted: 07 Jul 2022 at 6:20am
|
Posted By: steve(ill)
Date Posted: 07 Jul 2022 at 8:27am
|
as Dr said, the normal things are the governor weights, and the mating gears for the distributor... You have a NEW governor, and your checking the gears that MATE to the distributor.. Make sure no burrs or sharp edges on the teeth... Clean the lube line and hole and you should be good to go !! ............. Great Job on the repairs !
Didnt see a post where you FIXED the distributor shaft.. I assume you got a NEW GEAR or replaced the DIST with a rebuild ? Top bushing in the distributor is good and NO SLOP in the shaft side to side ?? ------------- Like them all, but love the "B"s. |
Posted By: Hunt4Allis
Date Posted: 07 Jul 2022 at 8:39am
|
Bought one rebuilt from member here( all tight)I need to check weights in governor for anything in particular?(Its a bit intimidating for me since I've read posts on here talking about how touchy all settings on governor can be)- if I don't have to take that apart to check anything that'd be great...- The horizontal shaft rotates when engine cranks over,but I need to somehow look closely at the mating gear to ensure it's good before I bolt back on.( I'm hoping allis made the distributor gear softer steel than horizontal gear that's on shaft) Once bolted back together can someone do a step by step description for getting timing back?( please use simple terms)
|
Posted By: steve(ill)
Date Posted: 07 Jul 2022 at 9:15am
|
basically as you turn the motor over by hand, the #1 piston comes up to the top (TDC) on compression.. You know its on the compression stroke if you put your thumb on the spark plug hole and fee the AIR being pumped out..... Now that the piston #1 is at the TOP, you want the distributor to FIRE a spark to #1 plug wire... You install the distributor into the gear drive, then rotate it a couple degrees to see that the POINT is starting to open... If your off, pull the distributor back out and rotate a couple teeth and do it again... When the point starts to OPEN, the ROTOR will be pointing at #1 plug wire... If you dont want that to be #1, then pull the distributor out and move several teeth again, until the ROTOR points at your #1 wire.. This is the "BASIC" idea of how it works...... ------------- Like them all, but love the "B"s. |
Posted By: Hunt4Allis
Date Posted: 07 Jul 2022 at 9:19am
|
Ok, so standing on spark plugs side of engine which is number 1 cylinder? Okay I believe that I found the answer in a different post showing that number one cylinder is closest to the radiator and firing order is 1243 correct? |
Posted By: steve(ill)
Date Posted: 07 Jul 2022 at 9:36am
|
YEP... #1 at radiator end......Dr or other might have a more "SPECIFIC" procedure... MIne is the GENERIC version for all motors.
When your coming up on TOP DEAD CENTER and feel the compression, you stop at the TIMING MARK on the FLYWHEEL ( might actually be a couple degrees BEFORE TDC.. im not sure).... looking thru the TIMING HOLE.
------------- Like them all, but love the "B"s. |
Posted By: Hunt4Allis
Date Posted: 07 Jul 2022 at 9:47am
| Ok, at this point I may pull governor shaft out completely to check bearings and weights since I need to find out why no oil is getting in there anyway... |
Posted By: SteveM C/IL
Date Posted: 07 Jul 2022 at 1:16pm
| when you pull governor out,check weights for wear in holes which pins go through. Sloppy hole lead to broken weights which can junk out some timing gears. Be VERY cautious if you try to remove a pin from weight. The little clips holding pin will fly off like a rocket ship if not well held. Replacing keepers might be worse than removing as far as ZINGGGG!!! |
Posted By: Hunt4Allis
Date Posted: 07 Jul 2022 at 1:22pm
|
Ok, thanks! At this point I know timing is messed up since I've cranked over without distributor to check that horizontal mating gear was rotating, but can removing entire guts out of distributor housing change timing(I guess what I should ask is when disassembling /reassembling it is there need for marking anything or knowing a certain position when reassembling? |
Posted By: Hunt4Allis
Date Posted: 08 Jul 2022 at 7:13am
|
Ok, the mating gear on horizontal distributor assembly that drives the distributor is messed up also. I'm searching for a complete distributor assembly with thrust bearing and weights as a complete unit on Steiner website and it seems all I can find is from a model b up to a d15 for some reason? Even when I've looked on other websites, it only goes up to a d15? |
Posted By: TomC
Date Posted: 08 Jul 2022 at 7:41am
| Maybe try All States Ag parts,they salvage a lot of tractors and have several locations, another one is Austin's salvage in Butler Missouri |
Posted By: Hunt4Allis
Date Posted: 08 Jul 2022 at 7:47am
| The entire area is void of any oil which is probably what caused it to fail (I'm betting that without oil being in there that it spun a bearing and allowed it to wobble enough to chew up the gears on the distributor and mating gear but I will know more once I get it further apart |
Posted By: Hunt4Allis
Date Posted: 18 Jul 2022 at 7:48am
|
Got a new governor housing/ horizontal shaft/gear/ weights and distributor.the filter seamed like it may be falling apart some which may have led to a decrease in the amount of oil being sent to the governor area through the small line... I need to add this greasing of distributor gears to my yearly things to do on all my tractors. Now to get it all back together |
Posted By: DrAllis
Date Posted: 18 Jul 2022 at 8:25am
| Not needed. The ONLY tractor that could qualify for greasing of the distributer gears would be an older D-17 with the power steering pump on the governor shaft. Your failure must be from a lack of lube thru the oil line. I can show you D-17's that have 10,000 hrs on them with the original gears. |
Posted By: Hunt4Allis
Date Posted: 18 Jul 2022 at 8:32am
|
Okay when I pulled the filter off there was junk stuff down in the long tube in center of filter, but the lines and governor weights had oil on them, maybe it was not enough oil pressure to get the oil past the governor weights because it was bone dry behind separation plate(there is a 1 inch by 2 in cut out in between where the weights are and where the distributor gear meshes with horizontal gear but like a say( bone dry other than at weights area of governor housing...)??? Is it possible that it's low oil pressure as of a plugged filter and was only enough to keep the governor weights area lubricated and not get past the separation plate? Thanks Matt |
Posted By: Hunt4Allis
Date Posted: 18 Jul 2022 at 12:53pm
|
I guess I'm not sure if the oil from the front where the weights are is supposed to travel back towards the distributor through the openings cut in the plate that separates the weights from the distributor shaft? If so how can I know that I'm getting sufficient oil flow to get enough there? (I guess once it's running I could remove the oil line and just see how much oil is coming out of it? I know it was getting some because the weights and everything including the throwout bearing was oiled some when I pulled it apart.) When people say that they point the rotor at number one cylinder ( to get a engine back in time)which part of the rotor is pointed there? (is it in a literal term as the metal contact point is pointed at the wire that leads to the number one cylinder?) thanks Matt |
Posted By: steve(ill)
Date Posted: 18 Jul 2022 at 2:06pm
|
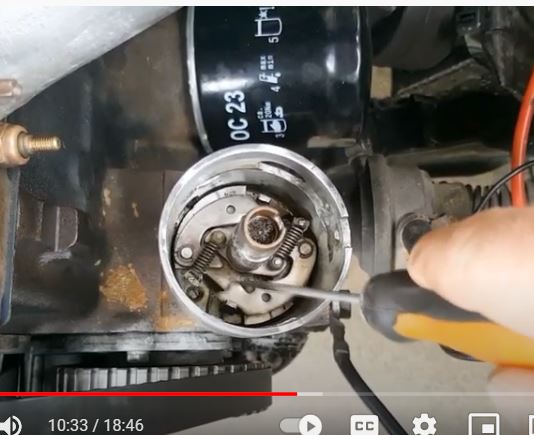
When people say that they point the rotor at number one cylinder ( to get a engine back in time)which part of the rotor is pointed there? (is it in a literal term as the metal contact point is pointed at the wire that leads to the number one cylinder?) thanks Matt YES... the ROTOR TIP is pointed at one of the 4 WIRES on the distributor cap this is not your distributor, but if you watch and understand what he is doing, they are basically "all the same" when installing and timing. https://www.youtube.com/watch?v=O4WRL513Gx4" rel="nofollow - https://www.youtube.com/watch?v=O4WRL513Gx4 ------------- Like them all, but love the "B"s. |
Posted By: Hunt4Allis
Date Posted: 20 Jul 2022 at 4:51am
| Gotcha, I got the new distributor housing bolted on yesterday and while I had the time changed the oil and filter just in case that's why there wasn't sufficient oil going through the line (which was all open.) My next issue is trying to rotate the motor by hand? I can turn it over without the distributor with the battery but it's too fast for me to see the timing marks through the hole on the right side? I made sure it was out of gear and still cannot get it to rotate by hand? |
Posted By: SteveM C/IL
Date Posted: 20 Jul 2022 at 10:24am
| Try pulling on fan blade while pushing in on fan belt. Do this on my 45,220 & 8070. |
Posted By: Hunt4Allis
Date Posted: 20 Jul 2022 at 5:40pm
| Okay that worked and I got it running it started off very rough so I loosened the two distributor bolts and rotated it clockwise until it's smoothed out but now the idle speed is very non-responsive (as in ,it takes about 5 or 10 seconds for it to respond?) Thanks Matt |
Posted By: steve(ill)
Date Posted: 20 Jul 2022 at 5:46pm
|
The problem is now you have no idea where the timing is set........... ------------- Like them all, but love the "B"s. |
Posted By: steve(ill)
Date Posted: 20 Jul 2022 at 5:52pm
|
also, double check you plug wires to see that you have them in the CORRECT ORDER on the CAP. ------------- Like them all, but love the "B"s. |
Posted By: Hunt4Allis
Date Posted: 20 Jul 2022 at 6:58pm
|
So how I did it was I pulled the number one spark plug out put my thumb over it and cranked it over until it popped my thumb off, looked in the hole and no matter which way I moved it by hand I could not find any TDC stamp anywhere? Flashlight in hole and only rotating a slight bit back and forth to find TDC with no luck. So I put thumb back over hole crank it over until it popped my thumb off put the distributor in with number 1 pointing rotor cap at it and it started but ran rough so I loosened rotor bolts and rotated it only a small amount until it smoothed out. I know it's not right but I cannot find any marks on the flywheel? It idle's down smoothly, but has poor throttle response... I put number one spark plug wire on number one as rotor was pointed at it, number two on the next distributor port clockwise, number four next distributor Port clockwise, number three next distributor port clockwise and the center obviously to the coil. (1,2,4,3) clockwise from number one... |
Posted By: steve(ill)
Date Posted: 20 Jul 2022 at 7:04pm
|
when the piston is coming up on compression, you will start to feel a lot of air coming out of the #1 hole... You might have to rotate 90 degrees more to get to the TDC mark.. Have someone look into the TDC hole while you rotate slowly.... if your by yourself, get a piece of bailing wire a foot long.. Stick one end into the plug hole and see how far DOWN the piston is... Move the crank a few degrees and do the WIRE trick again... Could be quite a bit of rotation until it comes up.
------------- Like them all, but love the "B"s. |
Posted By: Hunt4Allis
Date Posted: 20 Jul 2022 at 7:26pm
| I seen several things that look like possibly numbers or letters but I'll have to try to look again or use the wire trick. I'm not sure how obvious this TDC Mark is or what part of the flywheel to look at for it? |
Posted By: DrAllis
Date Posted: 20 Jul 2022 at 8:22pm
| TDC number 1 and number 4 is when the crankshaft pulley setscrew is straight DOWN at 6 o'clock. Now, you've got to figure out if you are on #1 or #4 compression stroke. |
Posted By: steve(ill)
Date Posted: 20 Jul 2022 at 8:49pm
|
HUNT... you should see a slash mark front to rear and the letters TDC above it.... Move 30 degrees BEFORE TDC and you should see another slash mark ( like a cold chisle line) and the word FIRE above it.... Unless you have rust, it should be easily visible.
if you were coming up and had COMPRESSION on #1, and the motor started... then your not too far off. ------------- Like them all, but love the "B"s. |
Posted By: Hunt4Allis
Date Posted: 20 Jul 2022 at 8:53pm
| Of course there's rust it's a 1959 that is all just in farm fresh condition not showroom... It's probably original which is why I'm having a hard time seeing anything on it... Even my shop manual says to put your thumb over the number one piston until air blows out and then look for the TDC mark? |
Posted By: steve(ill)
Date Posted: 20 Jul 2022 at 9:22pm
|
HUNT.......... i had forgot until Dr said something..... When your coming up on #1 cylinder... LOOK AT THE PULLEY on the front of the crank shaft... The SETSCREW should point straight DOWN.. you may have to rotate another 90 degrees to get it DOWN.. then verify by looking for your TDC mark on the crank
------------- Like them all, but love the "B"s. |
Posted By: Hunt4Allis
Date Posted: 21 Jul 2022 at 4:36am
|
Ok,will do! Thanks all for help |
Posted By: Hunt4Allis
Date Posted: 21 Jul 2022 at 4:49am
| Okay, so by loosening the two distributor bolts and rotating it clockwise while it running(I know that I read this somewhere, but maybe it's bad information to do this? It obviously is b/c you can smooth out a rough idle but throttle response is no good still) is not really helping it get more in time it just smooth out the idle? |
Posted By: Hunt4Allis
Date Posted: 21 Jul 2022 at 7:19am
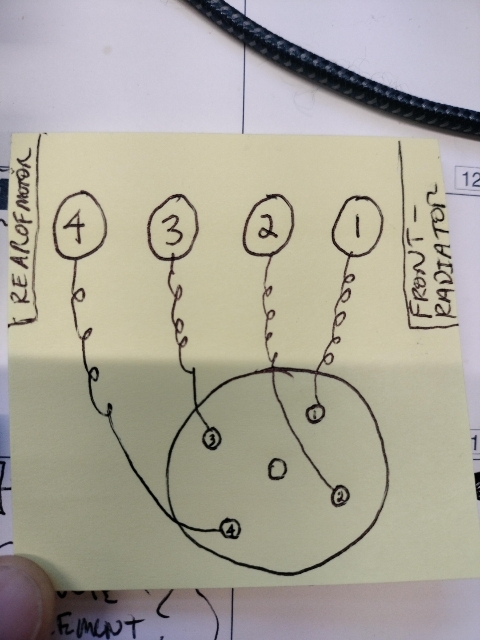 This is how I set up the distributor in relation to each cylinder, how I interpret it to need to be? |
Posted By: Tbone95
Date Posted: 21 Jul 2022 at 7:55am
| Well, if you had 2, or more, plug wires crossed, it would have an obvious continuous severe miss! (or 2) So if you got it started and somewhat smoothed out by rotating the distributor, you probably got the wires hooked up right. |
Posted By: steve(ill)
Date Posted: 21 Jul 2022 at 8:22am
|
dont set it by ear... --Rotate until you feel air pressure on #1 --continue to rotate until you have the FRONT PULLEY SET SCREW straight DOWN --flywheel should be at the TDC mark no --take the cap off the distributor.. --rotate the distributor CAM PLATE and weights ON THE SHAFT and watch the point open .020 inch at the MAX CAM point. --loosen the lock bolts and rotate the distributor until the point JUST STARTS TO OPEN (not turning the SHAFT-- only the distributor CASE). --tighten the lock down bolts --rotate the CAM PLATE by hand and see that it moves free, advances, and the point opens up .020 inch --this is the position ( if you were not holding it open) when you are on the FIRE mark on flywheel
------------- Like them all, but love the "B"s. |
Posted By: Hunt4Allis
Date Posted: 21 Jul 2022 at 8:39am
|
Posted By: steve(ill)
Date Posted: 21 Jul 2022 at 9:03am
|
NOTE... when i said turn the ROTOR SHAFT, your right , the SHAFT is not moving, but the CAM PLATE and WEIGHTS are moving on the shaft .. between the TDC and FIRE positions.. https://www.youtube.com/watch?v=bAxPSPdM61k" rel="nofollow - https://www.youtube.com/watch?v=bAxPSPdM61k ------------- Like them all, but love the "B"s. |
Posted By: SteveM C/IL
Date Posted: 21 Jul 2022 at 9:05am
| The timing marks on the flywheel are hard to see when things are clean.If rusty crusty you will struggle seeing them. I don't know if it would work but maybe you could push a stick in the hole while running and kinda knock the debris off enough to see the mark. It's helpful to paint line white but don't know how you could do that with things assembled. |
Posted By: DrAllis
Date Posted: 21 Jul 2022 at 9:06am
| When you say "throttle response", I doubt that timing is your problem. Governor or carburetor linkage. |
Posted By: Hunt4Allis
Date Posted: 21 Jul 2022 at 9:11am
| So it will start easily and idle all the way down( running this way won't hurt anything correct - only to try and rub rust off with stick for 10-15 second) |
Posted By: Hunt4Allis
Date Posted: 21 Jul 2022 at 9:14am
I didn't change anything on linkage of either of those and prior to this it was very responsive to movement of throttle handle at steering wheel, so I'm unsure? |
Posted By: steve(ill)
Date Posted: 21 Jul 2022 at 9:22am
|
you need to have the timing CORRECT at TDC so you can eliminate that as any problem.. ------------- Like them all, but love the "B"s. |
Posted By: Hunt4Allis
Date Posted: 21 Jul 2022 at 10:14am
| Watch what weights move out? |
Posted By: steve(ill)
Date Posted: 21 Jul 2022 at 11:33am
|
SORRY... NOTE:... this is not the type distributor you have.. but explained the WEIGHTS and ADVANCE system. ------------- Like them all, but love the "B"s. |
Posted By: steve(ill)
Date Posted: 21 Jul 2022 at 11:46am
|
HUNT......... maybe we should look at the actual PARTS so we are not confusing the CAP with the ROTOR.... There are variations in the distributors.. If the ROTOR will not move, then the WEIGHTS might be rotating the cam or point plate... You should be able to see the timing ( point opening) change if you take the PLATE off and move insides ??? Again, if your not getting the WEIGHTS working and the timing is STUCK at TDC ( zero advance)... then the motor will not easily increase speed.  ------------- Like them all, but love the "B"s. |
Posted By: Hunt4Allis
Date Posted: 21 Jul 2022 at 11:53am
There is a metal plate below black plastic dust cover that the condenser is strapped to along with the point that rides on lobes machined onto vertical distributor shaft.are these weights below that metal plate? |
Posted By: steve(ill)
Date Posted: 21 Jul 2022 at 12:01pm
|
YES... below the plate....this is not the distributor you have, but shows the weights and cam lobe movement... You dont need to actually SEE the weights.. but you do need to SEE that the Cam Lobe Plate can move 15 degrees ( half of engine crank rotation) and that the POINT gap is changing due to the little CAM moving on the shaft........(you said).the point that rides on lobes machined onto vertical distributor shaft.....yes.. thats what you need to see.
 ------------- Like them all, but love the "B"s. |
Posted By: Hunt4Allis
Date Posted: 21 Jul 2022 at 12:10pm
|
I have not looked below metal plate that the condenser and points are mounted to. I will try and redo my TDC, with looking for set screw at 6 o'clockon pulley at bottom of engine first, then move on to these...( Wish AC would have made a bigger viewing hole to see TDC... From other post and my manual I may only have a "TDC" and either a 25 or 30 mark since it's a 1959 model? When it started and ran I was surprised that the throttle response was so bad( was not like this before) thanks for your help,more to come! |
Posted By: steve(ill)
Date Posted: 21 Jul 2022 at 12:47pm
|
Some newer tractors are set a 4-6 degrees to start.. Older tractors were set at TDC and then advanced to FIRE.... You may only have two marks as you dont need the 2-4-6 degree settings. I hope i have not confused you with too many ideas on how various distributors work... YES, your MAIN GOAL is to get the engine timed statically to TDC and the point start to OPEN at that point..... My ramblings were ment to explain that if your MECHANICAL ADVANCE is stuck , you will not be able to SPEED UP / increase engine RPM smoothly.. The only way to verify that the MECHANICAL ADVANCE is working is to remove the "plastic plate" you talk about and see if things can MOVE inside . OLDER tractors had the weights connected to the CAM LOBES PLATE and that moved relative to the point... https://www.youtube.com/watch?v=ohfovCzq98s" rel="nofollow - https://www.youtube.com/watch?v=ohfovCzq98s ........... disassembly https://www.youtube.com/watch?v=bAxPSPdM61k ............ reassembly ------------- Like them all, but love the "B"s. |
Posted By: Hunt4Allis
Date Posted: 21 Jul 2022 at 12:54pm
|
All info is greatly appreciated 👍 It helps to know the workings of these as I have 3(1950-B,1953-ca,1959-d17)that I can apply more knowledge to these in the future! Thanks fellas |
Posted By: Hunt4Allis
Date Posted: 21 Jul 2022 at 7:52pm
|
Found the top dead center Mark I think only because of making sure the bolt was pointing straight down at 6:00 after number one compression popped .I noticed the bolt was straight out to the side and I figured the inertia moved it from straight down so I put it back there and found the top dead center mark! (Which was not really visible )other than the "c"but the long line below the "c" was a dead giveaway... Thanks guys! |
Posted By: steve(ill)
Date Posted: 21 Jul 2022 at 7:59pm
|
clean it good with sand paper or wire brush and shoot a little white or yellow paint in a 2 inch circle with TDC in the center..... for NEXT TIME. ------------- Like them all, but love the "B"s. |
Posted By: Hunt4Allis
Date Posted: 21 Jul 2022 at 8:07pm
| Yup, got it marked, thanks now to figure out the timing light to fine tune I guess? |
Posted By: steve(ill)
Date Posted: 21 Jul 2022 at 8:13pm
|
If you got the timing set ( point starts to open) at TDC..... then yes, the next step is to see if the ADVANCE works properly... If you have a timing light, you can use it and look at the flywheel and should see the FIRE mark when your up above 1500 RPM or so.... Might help to rotate the crank by hand and stop 30 degrees early ... and CLEAN the FIRE mark first. ........ once you see the FIRE mark, you know the ADVANCE is working OK. Does it startup OK and then REV UP OK ? ------------- Like them all, but love the "B"s. |
Posted By: Hunt4Allis
Date Posted: 21 Jul 2022 at 8:40pm
|
I Mark the top dead center line with a white paint marker. So I'm guessing I should Mark the 25 or 30° in a different color so I can differentiate between when using a timing light? This was a post from a different forum but it talks about the same thing that my manual says that it has a 25 or 30° mark 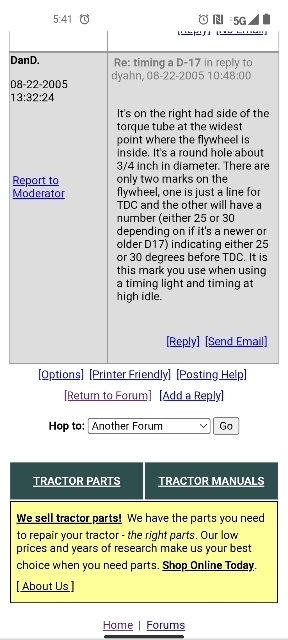
|
Posted By: DrAllis
Date Posted: 21 Jul 2022 at 9:17pm
| Take a 6 inch long piece of sandpaper or emery cloth and narrow it up and shove it in the timing hole with a rod or screwdriver while the engine idles and clean the whole flywheel in seconds. |
Posted By: Hunt4Allis
Date Posted: 22 Jul 2022 at 5:07am
| Dr, I thought about doing this but I feared I may grind off any hope of finding a mark. Now that I know that I found the center mark I may do this because I know how to find it again after smoothing everything out and cleaning it up |
Posted By: Hunt4Allis
Date Posted: 22 Jul 2022 at 5:09am
|
When people say they use a timing light and if you can see the fire or 25 or 30 degrees before center mark , Wouldn't I see my white line also from my center mark along with let's say if I painted the 25 or 30° before center mark yellow? I guess I need a little more detail on what to look for with a timing light... |
Posted By: SteveM C/IL
Date Posted: 22 Jul 2022 at 5:18am
| With engine at high idle you will only see the fire mark. The TDC will be out of the picture. |
Posted By: Hunt4Allis
Date Posted: 22 Jul 2022 at 6:59am
|
I guess I figured that, but if I have them marked respectively with white marker paint on the TDC line and the 25, 30, fire mark(whichever one I have) with yellow does the timing light still work or am I going to see a blur because of the white and yellow? I guess once I get rid of the white line with Emery cloth once I'm happy with the initial setup maybe the 25, 30, fire Mark will be more easily seen after it's cleaned up? (I'm guessing I should use 120 grit or finer so that I do not just put heavy scratches all the way around the flywheel)? After reading the manual more I guess I'm confused why the timing light is necessary since in the book it has an automatic advance built into the distributor (using the weights and springs below the condensing/points plate)? The manual says it's been proven that this engine runs best at 25°before top dead center I believe at 1800 RPM. I wish I could find a in good condition used tachometer gauge and cable for this 1959 gas series 1 so I knew what RPM I was running... My cable is snapped off internally so it could just need a new cable but I don't know how to check that gauge otherwise? Could I hook a battery drill up to it and see if the needle moves? |
Posted By: DrAllis
Date Posted: 22 Jul 2022 at 7:38am
| Set ignition timing at WIDE OPEN throttle, not at any other speed. Wide open sees to it the advance mechanism is fully advanced. If you time it at 2,000 RPM or 3,000 RPM it will come out the same. You try and dial it in to 1750 or 1800 the results may not be exactly the same. |
Posted By: Hunt4Allis
Date Posted: 22 Jul 2022 at 7:43am
| Without a tach I have no idea what RPM I'm running at at wide Open throttle, it sounds like it does not matter as long as it's WOT... |
Posted By: steve(ill)
Date Posted: 22 Jul 2022 at 8:15am
|
No, it does not matter.....just get the speed to the MAX......If your tractor starts good, throttles up, and has good power, then your advance is probably working OK... If you WANT to use a timing light thats fine... If your not having any problem, dont worry about it... The timing light LIGHTS when the plug FIRES... If your at 0 RPM that would be TDC, if you could get the light to work... The wieghts start to fly outward as speed increases.... If you measure at 500 RPM the advance might be 10 degrees and you would NOT see anything with a light... at 1000 RPM it might be 20 degrees and you still would NOT see anything with a light..... Somewhere up at 1600 - 18-- 2000 RPM the weights will be all the way OUT and you would see the light FLASH at the 25 or 30 degree mark ( depending on which weights are in the dist)..... Thats why Dr said "GO ALL THE WAY up with the RPM for the test..... Again it is a verification... If the tractor runs good... you can skip this part. ------------- Like them all, but love the "B"s. |
Posted By: Hunt4Allis
Date Posted: 22 Jul 2022 at 10:51am
| It starts immediatly/easy and idles way lower than ever before...( Still a slight delay in throttle response, but better than before) I still need to make sure the points are just opening at TDC and #1 compression (the way my book reads you loosen 2 9/16" clamp bolt just enough to rotate distributor housing so they just start to open...)it says counter clockwise? |
Posted By: SteveM C/IL
Date Posted: 22 Jul 2022 at 11:18pm
| Your delay may be nothing more than needing the idle screw adjusted a little richer. Turn housing counter clockwise to open points because the shaft goes clock wise to open them. "same difference" You are trying to open them with the shaft /engine/flywheel in a certain spot so you have to turn the housing. Confused yet? |
Posted By: Hunt4Allis
Date Posted: 23 Jul 2022 at 4:45am
| That could be I will try it, I'll need to look in my manual to see which way to turn the screw. Gotcha! |
Posted By: Hunt4Allis
Date Posted: 26 Jul 2022 at 8:44am
|
My service manual doesn't show carb that I actually have on tractor ( mine has a small bent screw adjustment on vevy bottom and one on top?) Can anyone tell me where they need set please? |
Posted By: steve(ill)
Date Posted: 26 Jul 2022 at 1:19pm
|
HUNT.... i dont know what you have... but normally the bent screw at the bottom is for an adjustable main jet to get MORE or LESS fuel at full throttle... The upper screw would be the low speed / idle screw adjustment... Turn the upper one in till it bottoms out.. count how many turns or 1/4 turns that takes... Normally 1-1/2 turns... Now turn it back out to 1-1/4 turn and check operation.. while running, back out to 1-3/4 and see how it runs... Pick the spot that seems best... Normally 1 to 2 turns out is it.
If you back it out to 2 or more it should start to blubber ... then screw it back in till it cleans up... Screw in to far and it will start to die out.. ------------- Like them all, but love the "B"s. |
Posted By: Hunt4Allis
Date Posted: 27 Jul 2022 at 6:12am
| Ok, where should the bottom bent screw set point be? |
Posted By: DrAllis
Date Posted: 27 Jul 2022 at 6:29am
| With the engine running wide open, slowly screw the "L" shaped main jet inward until the engine begins to falter. From that point screw it back out one full turn, drive it and fine tune as needed. If it stumbles when you crack the throttle suddenly, give it another 1/4 turn open. If it runs fine leave it alone. |
Posted By: Hunt4Allis
Date Posted: 03 Aug 2022 at 7:51am
Ok thanks for your info, how much does either of these adjustment screws play in how responsive the throttle lever at steering wheel is compared to actual engine response time when throttle lever is moved? |
Posted By: DrAllis
Date Posted: 03 Aug 2022 at 8:01am
| None, really. If the L-shaped screw is in too far, it will stumble every time you crack open the throttle, because it is too "lean" in fuel delivery. If it is too far out, it will just use more gas and maybe (and that means maybe) it will smoke black out the exhaust at certain engine speeds. I don't know what your issue is with throttle response. Gas tractors sometimes don't respond to every little movement of the throttle lever like a diesel does. They just don't. But if you pull the throttle clear down from a dead slow idle, the engine SHOULD increase RPMs to full speed in less than ONE SECOND. There is no delay from idle to full speed....none. |
Posted By: Hunt4Allis
Date Posted: 03 Aug 2022 at 9:29am
| Okay it could be that I got used to how it ran before I did the governor change out and distributor. It does respond like what you're saying it just seems to be delayed on the small movements of the throttle now which it wasn't before |