B Valve Train Issue
Printed From: Unofficial Allis
Category: Allis Chalmers
Forum Name: Farm Equipment
Forum Description: everything about Allis-Chalmers farm equipment
URL: https://www.allischalmers.com/forum/forum_posts.asp?TID=144673
Printed Date: 19 Oct 2025 at 11:38am
Software Version: Web Wiz Forums 11.10 - http://www.webwizforums.com
Topic: B Valve Train Issue
Posted By: theropod
Subject: B Valve Train Issue
Date Posted: 21 Nov 2017 at 4:23pm
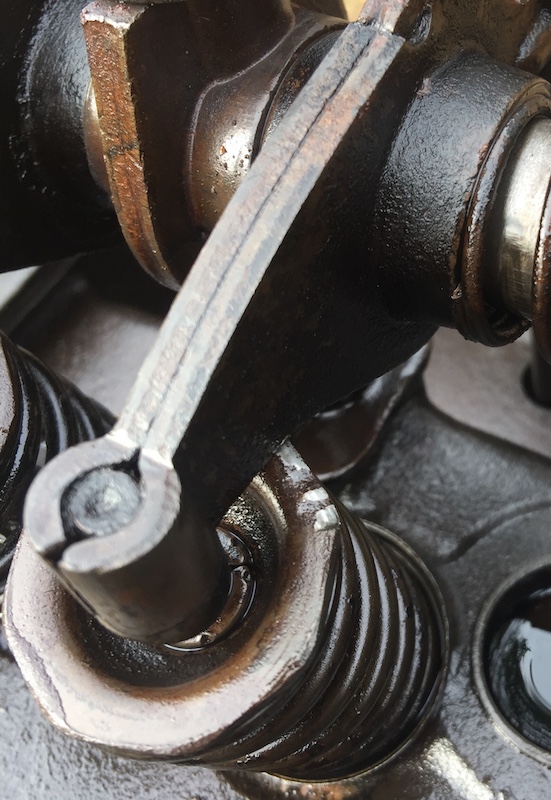 Pulled the valve cover on my B today and found this. I am not a mechanical genius but I know this is not good. At least 3 other tappets are impacting the valve spring top caps. My question is should I (can I) pull the rocker arm assembly and take my die grinder to the tappets without ruining them? It appears they need less than 1/16" to clear. I also got the old tractor to start and run today after going back through the old carb again. The run time was longer, maybe 2-3 minutes, but it did the exact same thing as last time. It ran smooth and rattle/smoke free and then just shut off like the ignition had been cut, but I am still getting sparks on the plugs. I fear the old carb has major issues that are invisible. All the passages are open, the float neither floods nor starves. I have a clear hose attached to the the inlet and when the engine was running the gas level slowly dropped. So, I broke down and bought a brand new carb, which was NOT cheap. ------------- Put the bunny back in the box! 1938 B, 1977 Yanmar YM2200 No private messages: use email: theropod AT yahoo DOT com |
Replies:
Posted By: theropod
Date Posted: 21 Nov 2017 at 6:53pm
|
After talking to my father-in-law he mentioned getting the head rebuilt by a local auto shop. Apparently they recut the seats and ground the valves. This allowed the valve stems to ride higher than stock and now the spring caps and rockers touch. Luckily he only ran the tractor for about 100 hours before putting it in his barn and buying a tractor with a starter. Unless someone thinks it’s a bad idea my plan to grind away the rockers to regain clearance is on. ------------- Put the bunny back in the box! 1938 B, 1977 Yanmar YM2200 No private messages: use email: theropod AT yahoo DOT com |
Posted By: rustydollar
Date Posted: 21 Nov 2017 at 7:25pm
|
From your picture it looks like the valve adjusters are broken off. Can you post a picture showing the full length of the valve train. Below is a model B cylinder head.  |
Posted By: theropod
Date Posted: 21 Nov 2017 at 7:35pm
|
I will get a picture of the adjusters tomorrow, but they are intact. Checked each one to make sure that wasn’t the issue. They seem to have the proper clearance too. ------------- Put the bunny back in the box! 1938 B, 1977 Yanmar YM2200 No private messages: use email: theropod AT yahoo DOT com |
Posted By: rustydollar
Date Posted: 21 Nov 2017 at 7:44pm
Picture would be good, On some small engines valve adjustment is accomplished by removing material from the valve stem. But your B model cylinder head should have adjusters as shown in the picture I uploaded. |
 theropod wrote:
Posted By: littlemarv
Date Posted: 21 Nov 2017 at 7:54pm
|
Maybe the valve stems wore in to the rocker arms so much they are starting to hit. The rocker arms are not centered over the valve stems for whatever reason. A picture would help here, I will look and see if I can find one. I took a set of rocker arms in and had the radius's (radii?) reground, they come out as good as new. If you take the rocker shaft off, loosen all four nuts evenly. The rocker shaft is hollow, and breaks easily, if it isn't broken already. ------------- The mechanic always wins. B91131, WC23065, WD89101, CA29479, B1, Early B10, HB212, 416H |
Posted By: theropod
Date Posted: 21 Nov 2017 at 7:55pm
It does have the slotted bolt for a flat blade screwdriver with locking nuts like every solid lifter engine I have ever seen. Let me get some daylight to work with. ------------- Put the bunny back in the box! 1938 B, 1977 Yanmar YM2200 No private messages: use email: theropod AT yahoo DOT com |
Posted By: littlemarv
Date Posted: 21 Nov 2017 at 8:01pm
Here's what they look like after machining. I don't have a before picture, but you will see the wear if you take the rockers off. Not sure if it pertains to what you are doing, but its food for thought. ------------- The mechanic always wins. B91131, WC23065, WD89101, CA29479, B1, Early B10, HB212, 416H |
Posted By: HoughMade
Date Posted: 21 Nov 2017 at 8:11pm
His pic is of the valve end, not the adjuster end...so no adjusters. That explanation about the valves seat re-cutting makes sense. If the rockers and shaft are in good condition, I don't see why a little grinding wouldn't solve this. Also, the rockers on my B aren't perfectly centered over the valve stems and it runs fine. Did your new carb solve the problem? Mine would have to disintegrate before I spent that much money on a new one. ------------- 1951 B |
Posted By: littlemarv
Date Posted: 21 Nov 2017 at 8:13pm
|
They are all offset. I only mentioned it because if they had full rocker to stem contact, it would wear better. ------------- The mechanic always wins. B91131, WC23065, WD89101, CA29479, B1, Early B10, HB212, 416H |
Posted By: rustydollar
Date Posted: 21 Nov 2017 at 10:39pm
Thanks for clearing that up, i don't think the shop should have removed material form the button which almost looks like it could be replaceable. Find an old Chevy stove bolt engine to rob the buttons from the rockers. I've ground a few valve seats and resurfaced valves, if the valve head after grinding sunk into the head that deep the shop should have replaced the valves. Next time that head goes to the shop for a regrind have them install stellite seats along with new valves and guides. I've used the thin wall bronze guides, the kit comes with a drill reamer combo, a driver to install the guide and a knurling tool to seat the guide and a cut off tool to trim the top of the guide off. The optional kit had a cutter to size the outside diameter of the guide to accept teflon seals. The thin wall bronze guides are easy to install, the kits is manufacture by K-Line. The kit would be a good club purchase. http://www.cylinderheadsupply.com/valve-guide-liners-installation-kits.html  |
Posted By: Dick L
Date Posted: 22 Nov 2017 at 6:26am
My fix to this would be to shim under the four stands. When I mill .150 off a head I add that amount under the stands. The head in this picture does not have the shims. I could not find a close up picture of a shimmed stand. Checking the amount of adjustment you have will tell you if you can shim under the stands. Your picture is not an angle to see for sure but it does look like the valve stem above the keepers are short. Without knowing what was all done to the head it would really need measured to be sure.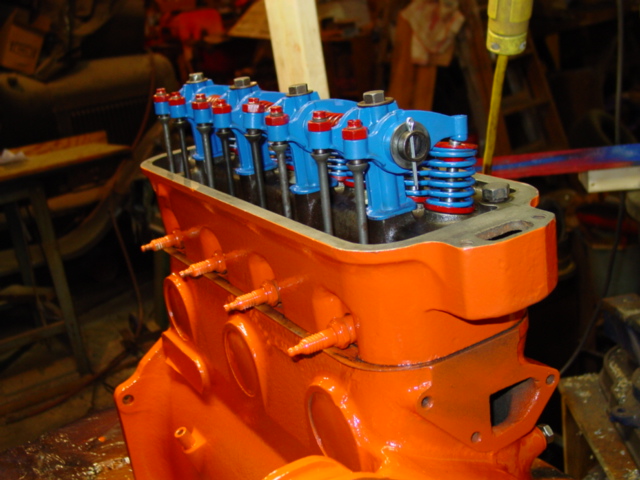 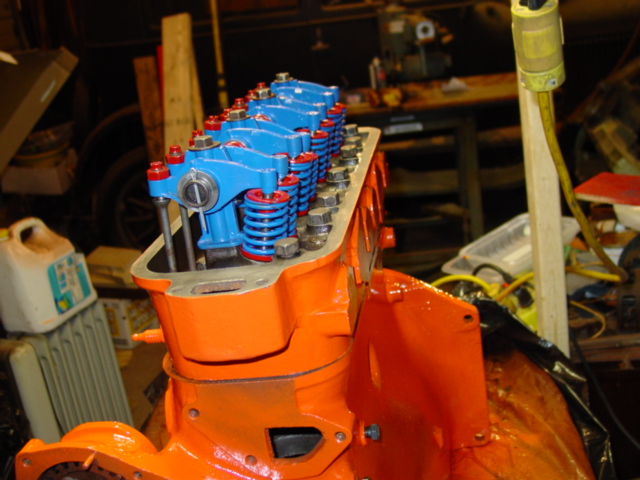 You pads look good. 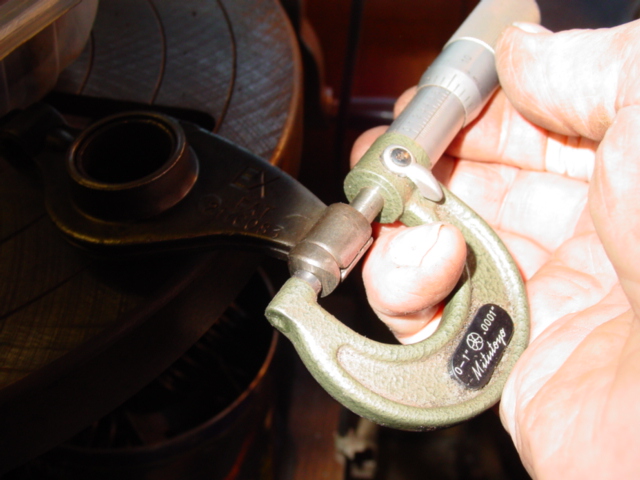
|
Posted By: theropod
Date Posted: 22 Nov 2017 at 6:52am
I won’t know about the carb for a few days as it is being shipped from California to Arkansas. During the last disassembly I coated the inside of the float bowl with JB Weld in an attempt to seal the crackS, which failed as gas was dripping from the thing from at least two places not involving gaskets. Trust me this old carb has had it. It is losing vacuum somehow and I am done messing with it. I ain’t made of money, but I want a tractor that will start when asked. A new/rebuilt mag is also going to happen as the battery and coil currently employed is Jerry rigging at its finest. Along with new rear rims and tires. It’s like any other restoration. I will have far more invested in the old B than it is worth when I am done. This is a labor of love, and we all know the silly things we do for love. From what I can see the valve stem and rocker contact points are as they are supposed to be. The engine hasn’t run much since it had a complete rebuild. The plan is to get out this morning and get pictures of the entire rocker assembly from a couple angles, pull the thing and do some careful grinding with my Dremel. I am also going to drain the 30+ year old oil out. I had hoped to get the block warmed up, but a couple days dripping should get that tar-like goop out just as well. I have zero confidence that there is any lubrication left in that junk. I may refill the crankcase with diesel and spin the devil out of it and drain that too. ------------- Put the bunny back in the box! 1938 B, 1977 Yanmar YM2200 No private messages: use email: theropod AT yahoo DOT com |
Posted By: theropod
Date Posted: 22 Nov 2017 at 7:12am
Images removed That is one sharp looking rocker assembly! Wow!! Ya gotta remember that the rebuild was done sometime back about 1962-63, and my father-in-law isn’t a master mechanic. He was the senior lineman for Southwestern Bell. The shop that did the head work wasn’t a tractor shop and just tightened up the combustion sealing. Since the shop didn’t have the engine, and probably never saw a B head before or after this one I can live with the recessed valves. As long as the tractor ran without killing mosquitoes he was happy. Yes, shimming up the rocker stand is the proper method, and there is adjustment room for this solution. I don’t know if the head was decked or not. I just think some careful grinding will give me the clearance needed. If the grinding doesn’t work I will look for the shims to get the rocker/valve stem setting correct. ------------- Put the bunny back in the box! 1938 B, 1977 Yanmar YM2200 No private messages: use email: theropod AT yahoo DOT com |
Posted By: Dick L
Date Posted: 22 Nov 2017 at 8:45am
|
I have a tool shop so made the shims out of flat stock and ground on the surface grinder. I am sure you can find flat washers the same thickness that could be slipped under the stands with out removing the total assembly. The shims would be faster and easier than grinding. Grinding would do it. A lot of the stands I have removed were broken. Stands for the B thru CA are all the same height. I have stands from other make engines that look almost the same with the same shaft that are taller and shorter. That is another possible cause if there was a broken stand and all were replaced with slightly shorter ones. Sinking the valves that deep is hard for me seeing being done. Stranger things have been done though. |
Posted By: Gerald J.
Date Posted: 22 Nov 2017 at 9:04am
|
The B shop manual should cover lots of those details. http://geraldj.networkiowa.com/Trees/Allis-Chalmers-G-B-C-CA-Service.pdf" rel="nofollow - http://geraldj.networkiowa.com/Trees/Allis-Chalmers-G-B-C-CA-Service.pdf Gerald J. |
Posted By: Leon n/c AR.
Date Posted: 22 Nov 2017 at 9:04am
| The washers or shims like Dick L said would be best route to go-with the arm hitting like that you can cause a keeper to come out , then the valve will be on top of piston. Not good. Leon |
Posted By: rustydollar
Date Posted: 22 Nov 2017 at 9:30am
We all have the same resources of Leno's garage at our local technical schools and colleges most of which will take on outside jobs as teaching aids. To replace an disintegrated part Jay has his team scan the part using 3D technology then from the data collected from the scan then a 3D printer prints out plastic pattern of the part which is sent to the foundry. It's an interesting world we live in. [TUBE]7ZrJsrTT4EA[/TUBE] |
Posted By: HoughMade
Date Posted: 22 Nov 2017 at 10:36am
Is it possible to adjust the rocker spacing to center them on the valves? ------------- 1951 B |
Posted By: Dick L
Date Posted: 22 Nov 2017 at 11:13am
| Not the space. I adjusted every complete head and rocker arm assembly by clamping the rocker in a vice and bending it to make full contact on the valve stem. It takes a little time to assemble and disassemble until you get them all centered over the valve stem. I never took a rocker assembly off that all the rocker arms was centered on the stems. It must not have been a concern when built new. |
Posted By: HoughMade
Date Posted: 22 Nov 2017 at 11:39am
|
Thanks for the info. Next time I have occasion to dig into the valve train, I may have to do that. ------------- 1951 B |
Posted By: steve(ill)
Date Posted: 22 Nov 2017 at 11:52am
|
theropod - Dicks fix with the shims under the holders is a good idea... That being said, I don't see much trouble with a slight dremel grinding on the underside of the rocker to get a few thousands clearance.. Don't know if all 8 are needing that, or only a couple. ------------- Like them all, but love the "B"s. |
Posted By: theropod
Date Posted: 22 Nov 2017 at 12:20pm
|
Sigh, Well laddies and germs I dug into things, and what I found was not good. Aside from the issues with the rockers impacting the valve spring caps I found a bent push rod. The intake on number three has a distinct bend, and that alerts me to a stuck, or sticking, valve. I don't think my father-in-law would have put it back together like this. I am amazed it ran at all. Maybe I can straighten it out with gentle vice clamping. I wish it hadn't ever started! Read on. 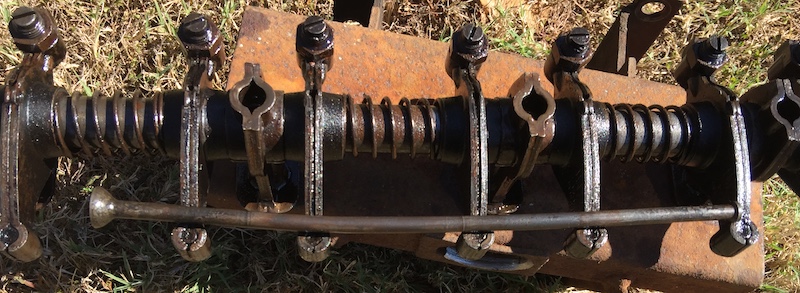 On top of the bent push rod bad news I drained the old oil and was shocked to find that clear water ran out for 5 or 6 seconds before the tar-like glop that passed for oil came out. There was well over a quart of water in the crankcase. There hasn't been any coolant fluid of any kind in it for many many years as a bad water pump prohibited that. I think this was years and years of condensation adding up. I feel like such an idiot for even attempting to make it run with that in the crankcase. I should have drained the old oil and WATER before even attempting to get it to start and run. I hope I have not scored the lower end, but knowing my luck I have. I may be looking at a fresh rebuild now. I am amazed that the engine hasn't seized with that water in there. I have poured 1.5 gallons of diesel in it and cranked it over under I am wore out. I will let that sit in there for a couple days and drain it out and see what it looks like. I may put my small Weber Kettle BBQ under the oil pan and get the block nice and hot and give it another cranking session before draining the diesel. I am so disgusted with myself right now. Below is a wide angle shot of the entire rocker assembly. A little crud but no obvious issues aside from the rockers banging into the valve spring caps and the bent push rod. I am not going to set in grinding on those rockers, and will look into shims to raise the rocker assembly. I may pull the oil pan and take a look at the lower end before going much further with anything. I know that is a serious chore, but I am determined to make this old B right again. I just hadn't planned on these sorts of issues, as I was under the impression that the engine was tight. 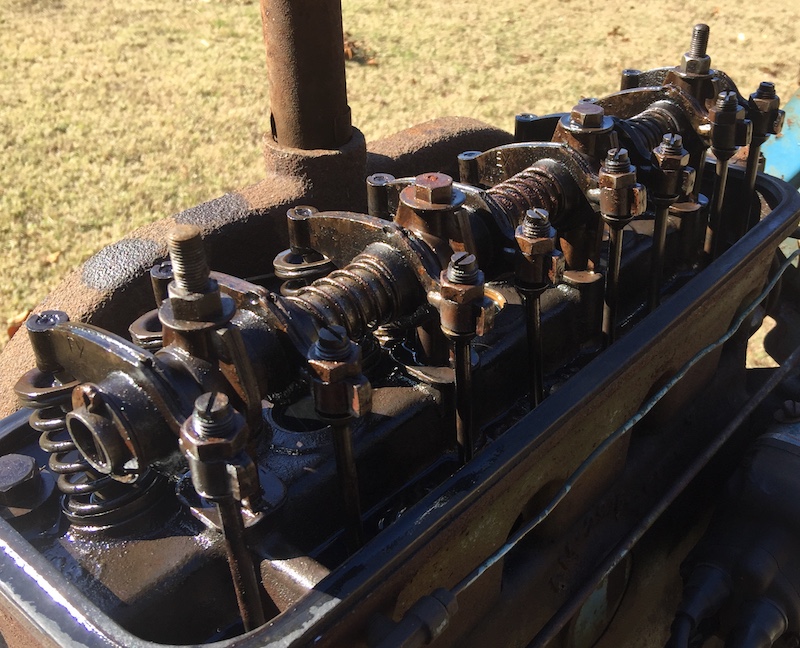 ------------- Put the bunny back in the box! 1938 B, 1977 Yanmar YM2200 No private messages: use email: theropod AT yahoo DOT com |
Posted By: HoughMade
Date Posted: 22 Nov 2017 at 12:34pm
|
The truth of the matter is, as water floats on oil, and the oil pickup is at the bottom of the sump, you may not have circulated much, if any water. If it wasn't seized...which is wasn't, then maybe there's no harm. In fact, I'd think that it is less likely to be damaged from what you did than not. Any issue you find is likely preexisting. As for the water, it may be condensation, but it may do well to get the cooling system water tight, fill it and pressurize it and inspect with the oil pan off to see if there is any seepage. By way of encouragement, I just got a B that was my Dad's running and running well after sitting for several years. A cylinder had rusted due to sitting in a humid barn basement with the exhaust valve open on that cylinder. I did not have to do a complete rebuild. These things can be challenging, but if you are committed, you can get good results. ------------- 1951 B |
Posted By: theropod
Date Posted: 22 Nov 2017 at 12:47pm
Are you sure about the water floating on oil? I have never known that to be the case. The water was on the bottom as it came out well before any oil upon draining. At any rate the water wasn't mixed with the resulting grey froth typical of a blown head gasket. There hasn't been any coolant liquid of any kind in it for years and years. I am almost positive this is entirely a condensation issue. Oh, I'm a stubborn type and even if I need to rebuild the engine I will. In for a penny and all that. Yes, the oil pan is probably going to come off anyway. I don't have the radiator mounted right now, or even a belt to the water pump. I had hoped to get it to start and run before attacking that set of issues. ------------- Put the bunny back in the box! 1938 B, 1977 Yanmar YM2200 No private messages: use email: theropod AT yahoo DOT com |
Posted By: HoughMade
Date Posted: 22 Nov 2017 at 12:50pm
|
No, you're right, I had that backwards. I guess optimism got in the way of clear thinking. I maintain that if it is still turning over easily, there may not be any new damage. If it started tightening up, well....
------------- 1951 B |
Posted By: Dick L
Date Posted: 22 Nov 2017 at 1:41pm
|
Looking at your adjustors I am sure you need to shim the stands. The adjusters are all the way up. When everything is in spec they should be about half way on the threads. A compression check will tell you if you have a valve sticking open and with the assembly off you can push down on each valve to see if they are sticking closed. Did you by any chance check the gap between the rocker arm pad and the valve stem? You can straighten push rods. Roll it on a flat board and tap the high side until you do not have a gap in the center when rolling it. |
Posted By: Dick L
Date Posted: 22 Nov 2017 at 1:55pm
If you look at a rocker arm you will notice that the pad is farther from the center of the shaft that from the adjuster to the center of the shaft. When the adjusters are that far up and the valve not being pushed open the distance the valve can be pushed down is less as the cam lobe comes up. This can effect the high rpm under load. Not sure it makes a difference in your case if your not going for a hot rod. 
|
Posted By: drobCA
Date Posted: 22 Nov 2017 at 2:12pm
|
theropod - #1 - thanks for getting Dick L interested!  he is always a great source of practical, not-in-any-manual ways to get things done. I'm learning plenty from this thread. #2 - is it possible that water got into the oil pan before it was "parked"? seems an awful lot of water for condensation. ------------- 3 Ford 8N's I loan to neighbors, but the '52CA, '41B and little B1 I do not. |
Posted By: steve(ill)
Date Posted: 22 Nov 2017 at 2:16pm
|
theropod----- your on the right track. Several problems you have found, but nothing to be overly concerned with. LIke many here, I have had motors that looked 10 x worse and brought them back to life. If it cranks over nice, and has good compression....... I would fill the water side and see if you have any leaks around the liners... and look at the freeze plugs in the head , under that rocker arm. Fix the top end, flush good, and maybe you wont need much else.. If it holds water, and gets new oil, and has compression, you may be back in business !!
forgot about your stuck valve... put penetrant on the stem and tap on the top with a small hammer. It should BOUNCE up and down, not stick....... maybe it has been that way for years, maybe it got small corrosion on it and bent the pushrod when you first cranked it ? I have seen stems loosen up by tapping and spraying penetrant on them. ------------- Like them all, but love the "B"s. |
Posted By: theropod
Date Posted: 22 Nov 2017 at 2:38pm
You got to understand this tractor sat for nearly 30 years in my father-in-law’s shed before I got it, and it’s been sitting at my place for another 7. It has not had any coolant/water in it over this entire time. Here in Arkansas we get wild temperture and humidity swings. Rocks often sweat from these warm/cool cycles and the oil would have sealed any such water off from evaporation. I am pretty confident the water is accumulated over time. I am going to give everything anserious going over before I try to make it run again. ------------- Put the bunny back in the box! 1938 B, 1977 Yanmar YM2200 No private messages: use email: theropod AT yahoo DOT com |
Posted By: theropod
Date Posted: 22 Nov 2017 at 2:59pm
About 6 months before my father-in-law brought the tractor to me we managed to get the B started and ran it for about 10 minutes with no coolant. When I first started cranking it I noticed it was very stiff at one point, but became easier after a few tries. I bet the valve was stuck then and I bent the push rod. I watched carefully today as I cranked it over through several revolutions, and all the valves were opening and closing well. I will check each valve manually later to make sure they are all working right. I bet that valve was in the half open position for the 30 years the tractor sat in the shed. I haven’t panicked yet, but I sure am sick with myself for not getting that crankcase drained and fresh oil in it before doing anything else. ------------- Put the bunny back in the box! 1938 B, 1977 Yanmar YM2200 No private messages: use email: theropod AT yahoo DOT com |
Posted By: JK in Pa
Date Posted: 22 Nov 2017 at 3:41pm
| For anyone curious about the rockers not centered on the valve stems there is a reason for them being like that. Believe it or not they will actually rotate the valves over time. Not as much as if rotators were installed but the valves definetly do rotate. |
Posted By: Dick L
Date Posted: 22 Nov 2017 at 5:55pm
| If you are cranking it by hand you would not to be able to bend a push rod. One stuck valve will cause a rear wheel to slide before bending a push rod on a B. Popping the clutch when pulling will though. Push rods have been the cause of a miss for years for people until they took the valve cover for another reason. Make sure the valves are all working freely, straighten the push rod and worry no more about it. I wouldn't worry about water that was in the engine as long as it is all free now. All you need now is compression, fuel drawn into the firing chamber and a good spark at the correct time. If it runs when you get to that point and does not rattle like a diesel or smoke like a musketeer fogger your home free. It is not uncommon for an engine that has set for a long time to have the rings stuck in the pistons to cause some smoke. From the sounds it should not be from bad rings. Seafoam and working under load will loosen up stuck rings. |
Posted By: theropod
Date Posted: 22 Nov 2017 at 6:37pm
Thanks. That does make me feel better! At no point did the engine seize or really get any harder to crank. I have talked to my pop-in-law since my last post and he told me he had to pull start the tractor after the rebuild back in the 60’s and it did skip and pop a while before smoothing out. He also said he never had the valve cover off after he rebuilt it, and set the clearance. That tells me he set that on a cold engine! So it may be that intake valve was stuck a long time ago and since freed up. I am still going to double check all the valves by hand some time tomorrow. The stems all look smooth and rust free, but we will see. ------------- Put the bunny back in the box! 1938 B, 1977 Yanmar YM2200 No private messages: use email: theropod AT yahoo DOT com |
Posted By: sandman2234
Date Posted: 23 Nov 2017 at 10:27am
|
Theropod, are you anywhere near the SW corner of Ark? My Dad is in the south end of Polk County almost at Sevier County. David from jax ------------- A proud member of the Allis Express movement! Northeast Florida |
Posted By: theropod
Date Posted: 23 Nov 2017 at 11:15am
|
Whew! I got out this morning and straightened that push rod, which was far easier than I imagined. I wrapped it in some old denim and clamped it in my vise. I rolled it on a sheet of glass and it has a tiny warp (<1/16”) I think will be acceptable. I pulled and checked all the other push rods, and they are fine. I then made sure they were all riding on the lifters as they are supposed to. I also manually pushed each valve down and none of them have any binding I can feel. I turned the engine over and rechecked each one as a couple contacted piston tops. No, I didn’t use much force at all. With the spark plugs out and the rocker off I cranked and cranked on the little beast as fast as I could several times. The push rods all rose and fell as they are supposed to. The diesel was pumped up through the slotted rocker stud at the rear of the engine, and when I stopped I could hear the diesel running back down out of the oil pump and passages into the sump. This tells me that the oil pump is working and the pickup screen is clear. Most importantly the friction became less and less and the cranking got so very easy. I also squirted oil into the cylinders with a 10cc syringe and made sure there were no “sticky” points by slowly turning the engine. Now for the rockers contacting the vlave spring caps. Will solid washers with a center opening matching the studs/bolts work, or do I need something different? When I do get the rocker assembly raised up what rough cold clearance should I use to get the engine warmed up for a final setting? Will 20% over be enough, or should I allow more? I am going to warm the block up with my little BBQ and give the beast a couple more cranking sessions. I may drain that diesel and repeat the process. When I am satisfied that all the water and gunk is cleared fresh oil, sea foam and new filter is going in. WHEN I do get it warmed up from running, and the valve clearance set, another oil change will follow. Would 2 or 3 hours of running be enough, or too much? I want to thank all of you for holding my hand, and the generous reassurance. I was pretty upset with myself yesterday. Let my foolishness be a lesson. If your engine has been sitting for years without running get that dead oil out before beginning any other efforts. Had my carb worked, and I got the engine hot, I could have done major damage. Thankfully that old carb did freeze and crack! I am on my way now boyz! Have a great Thanksgiving everyone. Mine is looking top notch. When I was about to come back in the house a bald eagle was doing lazy circles over our house, and I take that as a great sign. ------------- Put the bunny back in the box! 1938 B, 1977 Yanmar YM2200 No private messages: use email: theropod AT yahoo DOT com |
Posted By: theropod
Date Posted: 23 Nov 2017 at 11:29am
No, but my in-laws live near Mena. We live in eastern Stone county on 60 acres of ledge rocks on the side of a steep hill. ------------- Put the bunny back in the box! 1938 B, 1977 Yanmar YM2200 No private messages: use email: theropod AT yahoo DOT com |
Posted By: TimNearFortWorth
Date Posted: 23 Nov 2017 at 12:00pm
|
Any new to me tractor gets a can of Seafoam in the oil as soon as it is driven off the trailer, run 30 minutes while watching oil pressure and new filter/oil change. Firm believer in Seafoam and run it in all my gas engine fuel systems a couple times/year as well. |
Posted By: bradley6874
Date Posted: 23 Nov 2017 at 1:17pm
|
Ok if the seats were ground enough to make it hit the rocker (1) did they shim the springs to correct seat pressure (2)resurfacing the head would not cause the rocker to hit the valve like his picture resurfacing WILL change rocker geometry but in the opposite direction by making the push rods taller ------------- You can wash the dirt off the body but you can’t wash the farmer out of the heart and soul |
Posted By: steve(ill)
Date Posted: 23 Nov 2017 at 2:16pm
|
theropod, I think you are doing a good job... You are actually overthinking this problem. You flushed it with diesel once, and have the valves working up and down....... if the water system holds good without leaks, you are ready to go !! ------------- Like them all, but love the "B"s. |
Posted By: HoughMade
Date Posted: 23 Nov 2017 at 2:23pm
|
I set my valve clearance to .012" cold before I got it started. Warm, it was very close. Good work. ------------- 1951 B |
Posted By: Leon n/c AR.
Date Posted: 23 Nov 2017 at 2:26pm
|
Theropod I am just south of you, About ten miles east of Heber Springs, off hwy 16. Leon |
Posted By: theropod
Date Posted: 23 Nov 2017 at 2:32pm
I have no idea what was done, and my father-in-law is now 75 and cannot remember all the details. The springs sure seem stiff to me, but I have no idea if they are up to spec. I don’t see any spring shims. The tractor is never going to see serious work again, so I am not worried about burning a valve too much. The most I plan on doing with the B is maybe dragging a road roller, or maybe a trailer for firewood. I just want to save the old machine from rusting down into sheer junk. I think if I hadn’t started working on it this fall it might have not been possible. ------------- Put the bunny back in the box! 1938 B, 1977 Yanmar YM2200 No private messages: use email: theropod AT yahoo DOT com |
Posted By: theropod
Date Posted: 23 Nov 2017 at 2:38pm
Yeah, I tend to do that. Part of that profession in a previous lifetime. There aren’t many second chances with 66 million year old fossils. If you don’t get it right the first time there are no second chances. I do want to get the block heated up though to at least dry out any water hidden in nooks and crannies. I may forego the second flush with diesel if I can do that. ------------- Put the bunny back in the box! 1938 B, 1977 Yanmar YM2200 No private messages: use email: theropod AT yahoo DOT com |
Posted By: Dick L
Date Posted: 23 Nov 2017 at 2:46pm
|
I would think a standard 3/8" flat washer would get you back close. Without being able to measure what was causing the problem I would buy both 3/8" and 1/2" flat washers. The 1/2" are a little thicker than the 3/8" washers. Most bulk flat washers of the same size are the same thickness but not always. You are in a cut and try situation so lay four on your piece of glass and lay a ruler over them and look to see they are the same thickness. When you are close to the center of the adjustment you are home free. You could get fancy and buy fender washers and grind them the shape of the stand.
|
Posted By: theropod
Date Posted: 23 Nov 2017 at 2:48pm
We need to get together then! PM me and I will shoot you directions to come visit, or vise versa. You might be interested in my plastic drum electrolysis tank that is working like a dream. You could also check out the pile of rust I am trying to convert into a running B. We are off highway 5 near the Lighthouse church and Hilltop apartments on Bob Davis Mountain Road. Most of the lumber in my house came from F.L. Davis in Heber. Howdy neighbor. ------------- Put the bunny back in the box! 1938 B, 1977 Yanmar YM2200 No private messages: use email: theropod AT yahoo DOT com |
Posted By: Dick L
Date Posted: 23 Nov 2017 at 2:50pm
Now if you really want to get into all the nooks and crannies this is the way to go at it.  
|
Posted By: theropod
Date Posted: 23 Nov 2017 at 2:58pm
Thanks! Yep I thought about the consistent thickness thing. I have a micrometer I use for measuring rifle cartridges in reloading, and should tell me how close they are to each other, but your glass/straight edge would work just as well. I may be crazy about details but the washers don’t need to match the rocker stand profile. I have a pile of both sizes and can pick 4 of those within a few thousandths of each other. I just need to make sure they are flat so the rocker arm doesn’t lose oil sealing and no bending happens to he rocker shaft. Thanks again for the advice!! ------------- Put the bunny back in the box! 1938 B, 1977 Yanmar YM2200 No private messages: use email: theropod AT yahoo DOT com |
Posted By: theropod
Date Posted: 23 Nov 2017 at 3:08pm
Yes, that would do it, but I don’t even have a shop. I am doing all this out in the yard. If the engine has to come apart it will have to go to a shop with the right tools. I am hoping I can get the old beast to just start and run without making it detonate. ------------- Put the bunny back in the box! 1938 B, 1977 Yanmar YM2200 No private messages: use email: theropod AT yahoo DOT com |
Posted By: Gerald J.
Date Posted: 23 Nov 2017 at 5:42pm
|
It may be that SAE grade washers will have more consistent thickness. Gerald J. |
Posted By: theropod
Date Posted: 24 Nov 2017 at 2:12pm
|
Got out this morning and reset the rocker assembly and shimmed it up, and clearances set cold at .015”. All the rocker arms clear the valve spring caps and the valves all open and close as they are supposed to. Good advice on shimming the rocker assembly up! The gunk line on the valve stems went past the top of the seals so the valves are now opening like they are supposed to. Apparently they were not being pushed to full open after the rebuild so long ago. I pulled the oil filter and cranked the devil out of the engine again after warming it up with my little kettle BBQ. A little water squirted out of the up pipe. I am sure that old filter is full of water and useless. A new one awaits! I took off the little supply lines and blew those out. Yes, water came out of those too. I think I have 99% of that evil junk out of the engine now. After that I managed to pull the steering wheel and pitman arm in preparation for getting the tool box in the electrolysis. Of all the sheet metal it is the least effected by rust so that should go pretty quick. That pitman arm was seriously stuck as I am sure it has not been moved since it was installed. ------------- Put the bunny back in the box! 1938 B, 1977 Yanmar YM2200 No private messages: use email: theropod AT yahoo DOT com |
Posted By: LeonR2013
Date Posted: 24 Nov 2017 at 2:34pm
| If you need thicker flat washers, use metric washers because they are thicker than American, at least some of them are. |
Posted By: Dick L
Date Posted: 24 Nov 2017 at 2:35pm
|
That's the way to go fellow, I never did believe that the tooth brush was invented in Arkansas.
|
Posted By: theropod
Date Posted: 24 Nov 2017 at 2:47pm
Done already with SEA washers. Everything is good now. ------------- Put the bunny back in the box! 1938 B, 1977 Yanmar YM2200 No private messages: use email: theropod AT yahoo DOT com |
Posted By: theropod
Date Posted: 24 Nov 2017 at 2:52pm
Ha ha ha, no I doubt it was. Us Arkie have been resourceful though and we call those thorns on black locust trees “Arkansas toothpicks”. To prove I come from humble folks I distinctly remember having a sassafras twig toothbrush as a kid. Maybe that’s part of the reason my choppers are all plastic now. ------------- Put the bunny back in the box! 1938 B, 1977 Yanmar YM2200 No private messages: use email: theropod AT yahoo DOT com |
Posted By: drobCA
Date Posted: 24 Nov 2017 at 9:43pm
|
sittin' here rooting' for you from about 2k miles away and read "That pitman arm was seriously stuck as I am sure it has not been moved since it was installed." I had to reread that a couple times to get my pulse rate back down to get it that you meant had not been removed. nasty issue with my B was frozen steering due to invasion of rainwater while parked for a year before I got it. hoping you have no issues with steering. applause for what you're doing and for posting/sharing the experience. ------------- 3 Ford 8N's I loan to neighbors, but the '52CA, '41B and little B1 I do not. |
Posted By: sandman2234
Date Posted: 25 Nov 2017 at 7:46pm
|
Drob, I am 1K miles in the other direction rooting for him as well!! David from jax ------------- A proud member of the Allis Express movement! Northeast Florida |
Posted By: theropod
Date Posted: 25 Nov 2017 at 8:34pm
My bad for not proofing my post more carefully. Yes, I did mean REMOVING the pitman arm. I cannot believe how much pressure I had to apply with the puller to finally get it to pop loose. I am not sure the puller would have taken much more. The steering gearbox is surprisingly tight (lacking play/slop). The toolbox/steering column shroud is now in my electrolysis tank, and has the least rust of any of the sheetmetal parts. Now that all the sheet metal is off I can get the running gear cleaned up and painted. All the other sheetmetal is either primed or painted, and my 55 gallon plastic drum electrolysis tank is a winner! It has made short work of all the dead and peeling paint, not to mention the rust. Sorry for not being more precise in my prose. ------------- Put the bunny back in the box! 1938 B, 1977 Yanmar YM2200 No private messages: use email: theropod AT yahoo DOT com |
Posted By: drobCA
Date Posted: 25 Nov 2017 at 8:49pm
|
pretty sure previous owner here got too aggressive with a hammer - mine has been broken and welded back together. works good tho. main reason I'm following your progress (and generated advice) is that after I get this #$%@ 8N's multiple problems resolved my B becomes front and center for a second round look at getting it totally sweet. got to! you never know when Bill Long might drop by... don't I wish!!! ------------- 3 Ford 8N's I loan to neighbors, but the '52CA, '41B and little B1 I do not. |
Posted By: theropod
Date Posted: 26 Nov 2017 at 8:34am
My father-in-law bought another B just for the PTO/belt drive that has a freeze busted block. He paid something like $25 for it. I thought this tractor had a starter hole, but it is another ‘38. This parts tractor is now here at my place. While the gas tank is a rusted out hunk of junk it has many good parts. From the torque tube back is in pretty good shape, and the steering sector is tight too. The cam and crank look to be in pretty good shape, and the cam has been in the electrolysis tank and came out clean. I am going to salvage as many parts as possible off this second B and use what I need and sell the rest. That junk tractor has the front hubs with automotive style wheel lugs, and will probably go on the B I am trying to save. ------------- Put the bunny back in the box! 1938 B, 1977 Yanmar YM2200 No private messages: use email: theropod AT yahoo DOT com |
Posted By: theropod
Date Posted: 26 Nov 2017 at 8:52am
 Here is my pop-in-law unloading the other B. ------------- Put the bunny back in the box! 1938 B, 1977 Yanmar YM2200 No private messages: use email: theropod AT yahoo DOT com |
Posted By: Bill Long
Date Posted: 30 Nov 2017 at 9:50pm
|
thropod, What a challenge you have taken on to restore that B. I congratulate you for taking the challenge and cheer from the sidelines. Thanks for all you are doing to keep my favorite alive. You know, I only wish I was able to stop by to see your progress. It would be my honor. However, long trips are just out of the question for me now. Keep us informed as to how it goes. Good Luck! Bill Long ps: I review my posts from time to time and this popped up. Just had to respond. Also, Listen closely to what Dick L says. He in one fine mechanic. |
Posted By: davh
Date Posted: 01 Dec 2017 at 6:41am
| Would love to see a pic of your 55 gal plastic electrolysis setup sometime. Been thinking of making one myself. Love all the comments of this forum and the progress of your B. Hope all continues to go well. |
Posted By: theropod
Date Posted: 01 Dec 2017 at 7:09am
I fully agree with your opinion about Dick L. His picture of the magneto drive dog/slot position alone was an eye opener. It took most of the mystery out of the issue for me. His advice to shim up the rocker assembly was top shelf! Just yesterday the last piece of sheet metal came out of my electrolysis tank, the toolbox/steering column shroud, and is now primed. Now I am anxious for the magneto to arrive and get the old machine to make noise again. Those Autolite 295’s are gapped and installed! The engine needs to run, and get warmed up. I can then set the valve clearance, and steam off any water I know is still hiding down deep in the block. This project means a great deal to me. Being a family heirloom is first on that list. Saving a antique is important to me as well. Then there is the aspect of keeping me busy, which this sure has done! I am not particularly a tractor geek, but I love old machines of all kinds. I can’t afford to restore an old car or truck so the B is my outlet. So much remains ahead of me. I have to clean up the entire drive train, and then get it repainted. I am still leaning toward flat black for that. Then the rear rims and tires need to be bought. I need a new manifold, and muffler, too as rust has eaten a couple holes almost an inch wide into the exhaust side, and I don’t want any warped valves! I looked long and hard at my old rims and they are just too far gone to be safe or reliable. The front rims can be saved, but my father-in-law’s spare tractor has 5 stud hubs and I am going to use those for sheer simplicity, and get 3 rib tires mounted on new rims. I am going to box in under the seat bracket and carry all my onboard tools in that, and I am going to try to build my own seat. The gearbox and final drives need drained and lubes refilled. After all that, and the other things I haven’t found that need fixed, is done I will then have to reassemble everything with a ton of new fasteners. Yeah, this is almost overwhelming, but I am mule stubborn when I set my mind on something, and the old B is going to be saved from being turned into Chinese junk. Don’t worry about keeping y’all updated. I am not shy by any means! I take pride in doing something like this, and am documenting nearly every step with photos. My science training forces me to document trivial things, and I have a small notebook just for the B. My restoration isn’t for show, or to impress folks. I am doing this to save the B! I despise rust with a passion! Anyone that wants to come visit and look over the B is more than welcome. Just give me a heads up so I can let you in past the gate we keep locked 24/7. Meth monkeys worry the hell out of us, and I take my home defense very seriously. Just leave me a private message and we’ll work out the time. Some of y’all might be interested in checking out our off grid electrical system too. ------------- Put the bunny back in the box! 1938 B, 1977 Yanmar YM2200 No private messages: use email: theropod AT yahoo DOT com |
Posted By: theropod
Date Posted: 01 Dec 2017 at 7:36am
I will get a picture or two of the tank today, and post them. The seat bracket needs dunking so I will post a picture of that going in, and then after it gets cleaned up. It doesn’t have a speck of paint left on it so the process should go faster than the sheet metal parts I have treated so far that had dead paint insulating the steel from the electrolyte. That dead paint gets as soft as if paint stripper had been applied, but with no toxic mess left over. I wish I had discovered this process years ago. There’s no telling how much time I have spent sanding and grinding on old parts from other projects. I am still amazed at how well it just kills rust. I have seen where other folks used kiddie swimming pools for even larger parts, but the plastic drum is plenty big enough for the parts from the B. I have a set of barrels from a seriously old shotgun I found while doing survey work looking for dinosaur bones in South Dakota. They were out on the badlands miles and miles from anything. Turst me when I say I looked hard for the reciever! When I get time it is getting the treatment. If those barrels could talk there’s no telling what story they could tell. ------------- Put the bunny back in the box! 1938 B, 1977 Yanmar YM2200 No private messages: use email: theropod AT yahoo DOT com |
Posted By: davh
Date Posted: 01 Dec 2017 at 9:11am
| What do you use for a power source? And how many rods around the barrel? Thx. Dave |
Posted By: Gerald J.
Date Posted: 01 Dec 2017 at 9:29am
|
Be sure there is some valve gap before starting it, probably 5 or 10 thousanths more than the hot specification. Gerald J. |
Posted By: theropod
Date Posted: 01 Dec 2017 at 1:10pm
An old non automatic 12 volt 10 amp battery charger, and right now 5 rods. I have used old web wire fencing and it works great, but it's very hard to clean up when it gets coated in junk. Here are the images I took this morning. The first one is of the barrel with the seat bracket just barely showing. There was a little paint left on it, but very little. I topped up the barrel with more electrolyte to cover the bracket completely. I expect 3-4 days will have it ready to wire brush, rinse off and prime. Note the broken weld near the all thread rod I use to suspend the parts. 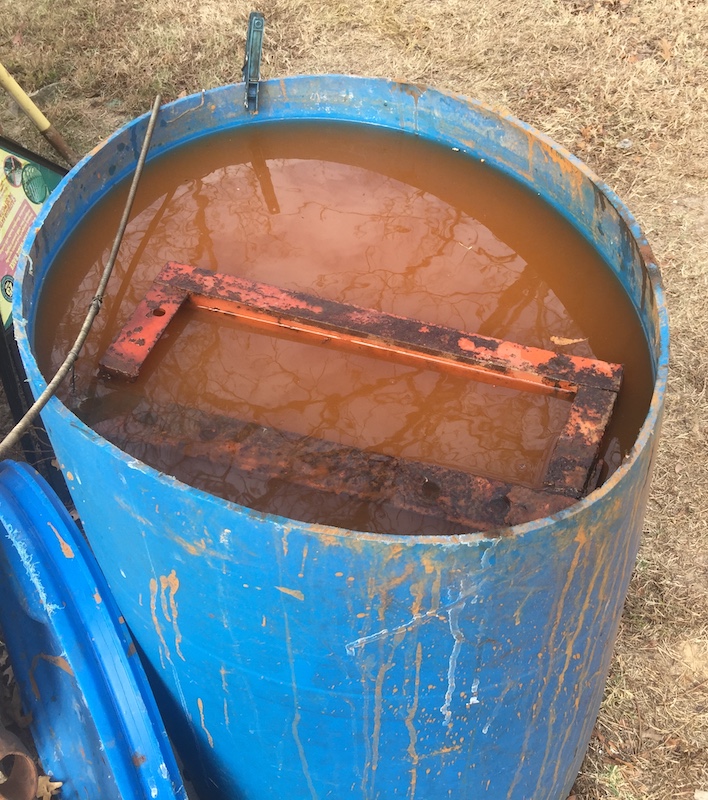 The next picture is of the rods arrayed and the charger clamps attached. 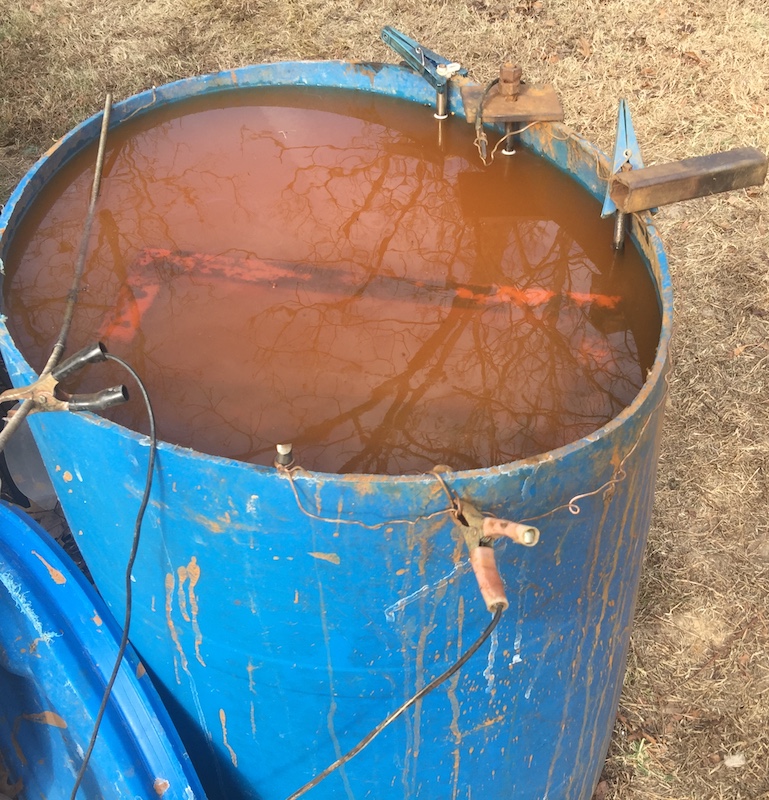 The last picture is a closeup of the process starting. Note the foam forming around the anodes. As the process goes on a skim of gunk covers the surface, and I skim that off and throw it on the ash pile. 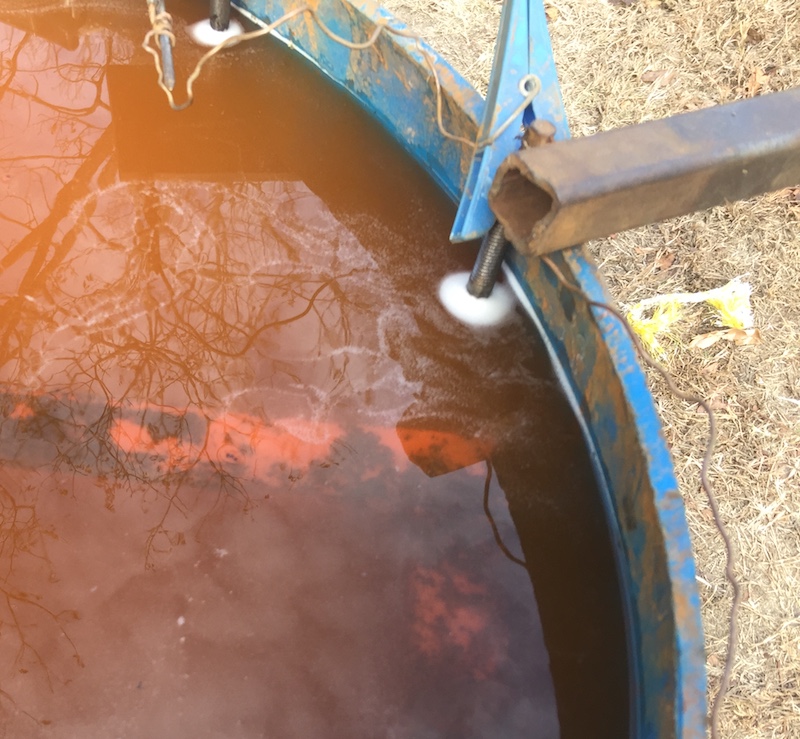 ------------- Put the bunny back in the box! 1938 B, 1977 Yanmar YM2200 No private messages: use email: theropod AT yahoo DOT com |
Posted By: theropod
Date Posted: 01 Dec 2017 at 1:13pm
Yep. I have them set at 15 thousandths now, which might be a tad tight after it gets warmed up, but I am gonna be careful to make sure they don't burn. ------------- Put the bunny back in the box! 1938 B, 1977 Yanmar YM2200 No private messages: use email: theropod AT yahoo DOT com |
Posted By: davh
Date Posted: 01 Dec 2017 at 2:44pm
| Great pics of the Electrolysis setup! Going to set mine up this weekend and try it out. I have projects that will keep it going for some time! Thanks for the pics and explaining the details of the setup. Dave |
Posted By: Reindeer
Date Posted: 01 Dec 2017 at 4:09pm
|
I have been really enjoying the dialogue back and forth on this project, and like many others learned quite a bit. DickL has a world of experience and much to teach would be mechanics such as myself. Rooting for your success from north of the 49th. ------------- |
Posted By: Sugarmaker
Date Posted: 01 Dec 2017 at 4:42pm
|
Just a comment/ question? I haven't had my E tank fired up for a while, but I usually see bubbles at the part being cleaned, can't remember seeing much bubbles from the sacrificial anodes?? And I can never remember the correct hook up of the pos and neg!? If the parts are clean then its good! I like the process a lot too. Your doing a good job on bringing the B back to life. When you talk about running it for a while I assume you have radiator and water cooling systems functioning? Sorry for the questions. Regards, Chris ------------- D17 1958 (NFE), WD45 1954 (NFE), WD 1952 (NFE), WD 1950 (WFE), Allis F-40 forklift, Allis CA, Allis D14, Ford Jubilee, Many IH Cub Cadets, 32 Ford Dump, 65 Comet. |
Posted By: theropod
Date Posted: 01 Dec 2017 at 5:35pm
|
The silver coated copper core plug wire showed up today and I have cut it to length and the little clips are soldered on to the plug ends. I used one of my plugs to make sure the boots were set so the rubber goes down past the ribs of the porcelain to the smooth part, but not touching the steel shank. The ends that attach to the magneto cap have the clips too, but I formed little blunt spikes that fit into the dimples of the distributor copper contacts like a glove. That wasn’t all that hard to do as I over applied solder and let it form little teardrops that I formed to fit with needle nosed pliers. When I get everything to fit just so a small bead of high temp RTV will seal the wire to the boots. The magneto didn’t make it today, but tracking shows it to be in route. I am another step closer to getting the B to make some noise. Maybe tomorrow. I am thinking about packing the exhaust half of the manifold in fiberglass wool to keep the air from rushing back in and warping exhaust valves after I shut it down. Yes, a new manifold is on the list. I have just spent beyond my budget for the month. A new carb, wires, plugs and mag has done me in. Good thing this was the wifes dads old tractor! Thanks for all the kind words y’all. I figure the least I can do is share my journey since I am getting so much help from this awesome group. The way I see it I am, and will be, getting the better end of this deal. If what I am doing can help someone else all the better. ------------- Put the bunny back in the box! 1938 B, 1977 Yanmar YM2200 No private messages: use email: theropod AT yahoo DOT com |
Posted By: theropod
Date Posted: 01 Dec 2017 at 6:09pm
I too see bubbles coming off the part being cleaned, which is the CATHODE, or negative post. In my picture above my ANODE, or positive, rods have just been given an angle grinder wire brushing down to bright steel, and always seem to go nuts bubbling after that. The part being cleaned spreads the bubbles out more, and the bubbles rise straight up around the rods. No, the cooling system is not functional yet. I don’t plan on running it long enough for the engine to get seriously hot. Maybe 5-10 minutes depending. When the block gets warm to the touch I will shut it down. When I am satisfied with the function of the running, and set the valve clearance, I will mount the radiator. I want to flush out the block and radiator before mounting them. Mice may have crammed junk in the block as the water pump was off for a long time. My plan is to jam a hose into the bottom/intake of the block and make sure there is not a wad of nesting material that would get sucked/pushed into the radiator. I think the new water pump will push anything like that out. I have removed the thermostat and will put a long hose on the housing so I don’t soak the mag or carb. I was thinking about putting a screen in line with the thermostat housing to catch any junk that might be in there. I will face that problem when I get to it. I don’t think running the engine for a few minutes under close observation is much of a risk. Every car engine I have rebuilt has followed this pattern, and I haven’t cooked one yet.
------------- Put the bunny back in the box! 1938 B, 1977 Yanmar YM2200 No private messages: use email: theropod AT yahoo DOT com |
Posted By: Dick L
Date Posted: 01 Dec 2017 at 8:03pm
| I wouldn't run it 5 minutes without water in the block. The heat is built inside the firing chamber heating the sleeves and valves. Without water around the sleeves they are going to be really hot before you will feel much heat on the outside of the block. |
Posted By: theropod
Date Posted: 01 Dec 2017 at 8:34pm
OK, I will get that cooling system flushed and sorted. Perhaps that screen between the thermostat and radiator can cover my backside in case mice made a nest in the block. Again, I might be over thinking the issue, but a plugged up radiator is something I cannot deal with right now. Could I run it without the pump belt and just have coolant in there? I have never delt with a sleeved engine before, again my assumption was wrong and learned something. Edit: OK, I am going to flush the block and make a metal screen wire “cone” to fit inside the upper radiator inlet with enough extra to overlap the outside and clamp down with the hose. I may have to change it several times, but I cannot allow that radiator to get plugged with trash.
------------- Put the bunny back in the box! 1938 B, 1977 Yanmar YM2200 No private messages: use email: theropod AT yahoo DOT com |
Posted By: steve(ill)
Date Posted: 01 Dec 2017 at 8:51pm
|
on the electrolysis , how long it works ( hours) and how often it needs cleaned, depends on the "rods" that collect the rust / paint/ crud off your parts......... one thing you might try is to replace the "rods" with material that has more surface area...... I have used 1 or 2 inch pipe , flat strap 2 inches wide / 1/4 inch thick , 2 inch angle iron, old leaf spring off a car, etc....... MORE SURFACE area is good... use 3-4 equally spaced around the barrel.
old steel fence post cut to 30 inch lengths would also work ! ------------- Like them all, but love the "B"s. |
Posted By: theropod
Date Posted: 01 Dec 2017 at 8:56pm
Makes sense. I will dig around my scraps and see what I can come up with. ------------- Put the bunny back in the box! 1938 B, 1977 Yanmar YM2200 No private messages: use email: theropod AT yahoo DOT com |
Posted By: theropod
Date Posted: 19 Dec 2017 at 3:44pm
OK, A buddy of mine gave me a set of leaf springs from an old dead log truck and I cut a couple up to make new anodes for my electrolysis setup. I am redoing my hood and gas tank for the B with the same primer/sanding/painting process as the fenders, radiator shroud and tool box. I am amazed at the difference as the paint I applied in late August is already peeling and the part is absolutely foaming! Maybe I can have it cleaned up and primed before the weekend, as we are off to the in-laws for Christmas. We'll be down in Mena, AR for a few days and tractor work will be on hold.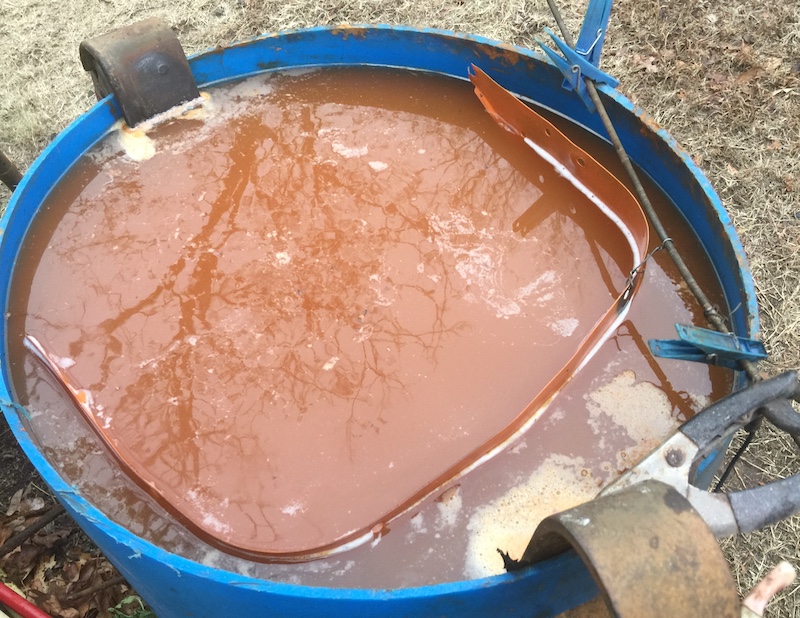 Above is a shot of the barrel with the springs used for the anodes. I used my angle grinder to cut them to length and kept the curls from the attachment points to hook over the edges. 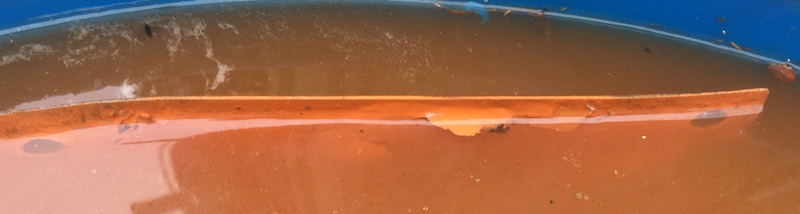 Above is a closeup of how the paint I applied in late summer is already starting to soften and come loose. I think this may be a good move as not only is the color match not right the smoothness of the finished paint is just much better with a good layer of primer to bind to. When the hood is finished the gas tank is going to get the treatment too. The huge anodes seem to be working much much better. I skimmed off the crud to show the progress, and this has only been going on for about two hours. I know the hood is exposed here, and will turn the thing over to get to the now exposed end treated before ending the electrolysis on this part. ------------- Put the bunny back in the box! 1938 B, 1977 Yanmar YM2200 No private messages: use email: theropod AT yahoo DOT com |
Posted By: john2189
Date Posted: 19 Dec 2017 at 8:59pm
|
Theropod, on the parts tractor, what are the front hubs? ------------- '41 Allis B '45 Allis B '49 Farmall Cub '72 IH Cub |
Posted By: theropod
Date Posted: 20 Dec 2017 at 5:12am
They are 5 lug type, and I am not sure of the pattern. They “look” like Ford spacing, but I haven’t given them a good looking at yet. In the unloading picture one can see that there is a brake drum on one side and a bare steel wheel on the other. I do know these were not standard equipment for a 38, and were added who knows when. The donor had a freeze cracked block when my pop-in-law bought it for parts. I am going to get the donor jacked up and pull them off late next week as I begin to split the old machine. I am going to pull the entire steering system off, so they need to go anyway. The transmission and differential seem to be in good shape, but no PTO. I will probably have to replace the bearings and get new seals, and I am not sure about the spindles if they are the same as the ones on my 38. I will get a picture of the hubs and post it later today. I have to make a run into town early today and pick up a goodie for the wife’s Christmas present. My problem there is she was born on Christmas day, so it’s a double tap for me. ------------- Put the bunny back in the box! 1938 B, 1977 Yanmar YM2200 No private messages: use email: theropod AT yahoo DOT com |
Posted By: HoughMade
Date Posted: 20 Dec 2017 at 7:16am
|
I get it. My wife's birthday was the 11th, my Mom's birthday on the 15th, my anniversary (25) was yesterday, then there's Christmas. ------------- 1951 B |
Posted By: Ranse
Date Posted: 20 Dec 2017 at 8:56am
| I wish I had your work ethic theropod. My projects seem to sit idle most of the time. I've tried the electrolysis. I can see that it will work, but my problem is my battery charger. I have to use a battery in line just to get it to run, then when the battery reaches 100% the charger shuts off. I can't keep the process going long enough to accomplish anything. I've tried using a worthless battery that wouldn't charge up in a 100 years and that don't work either. I need to find a older charger that still works. I'm enjoying keeping up with your progress, but it reminds me of my lack of progress lol. Keep up the good work. |
Posted By: HoughMade
Date Posted: 20 Dec 2017 at 9:53am
|
This charger from Tractor Supply will work. It's what I use. It doesn't need a battery to run as it is old tech, a dumb charger, if you will. Inexpensive.
https://www.tractorsupply.com/tsc/product/traveller-2-6a-manual-battery-charger" rel="nofollow - https://www.tractorsupply.com/tsc/product/traveller-2-6a-manual-battery-charger ------------- 1951 B |
Posted By: theropod
Date Posted: 20 Dec 2017 at 2:47pm
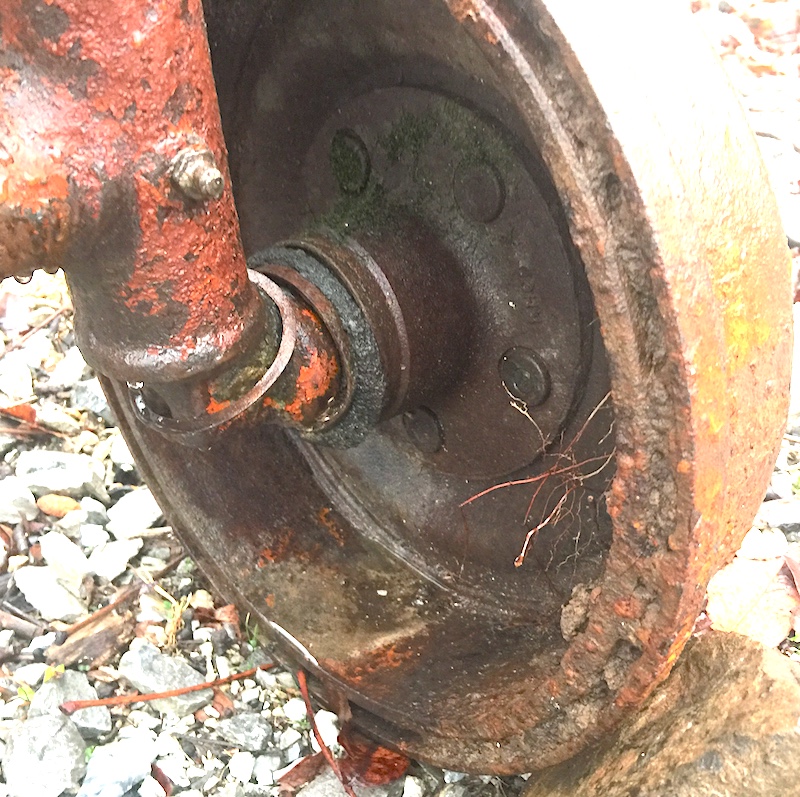 Above is the inside view of the 5 lug hub with the brake drum mounted for some reason. 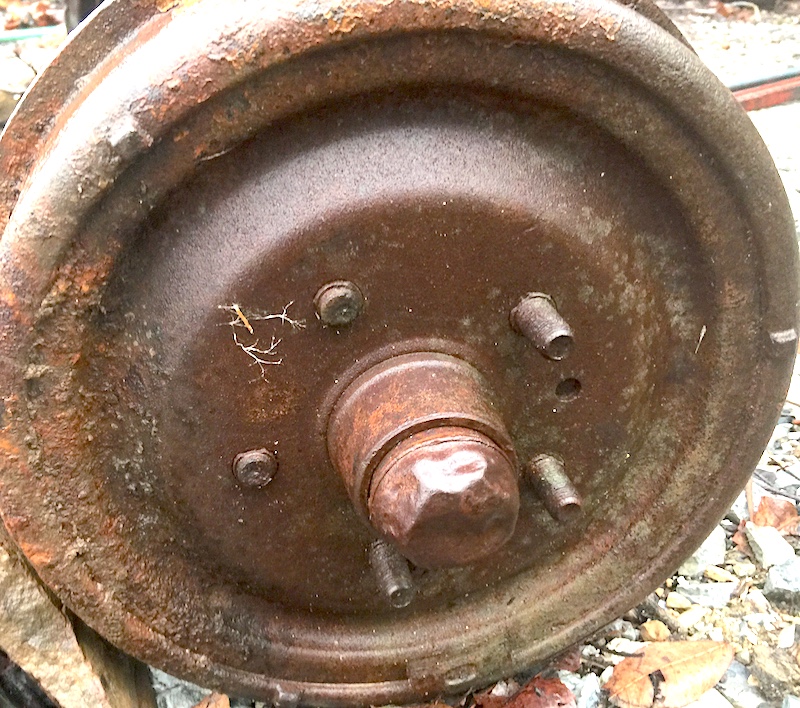 Above is what that looks like from the outside. 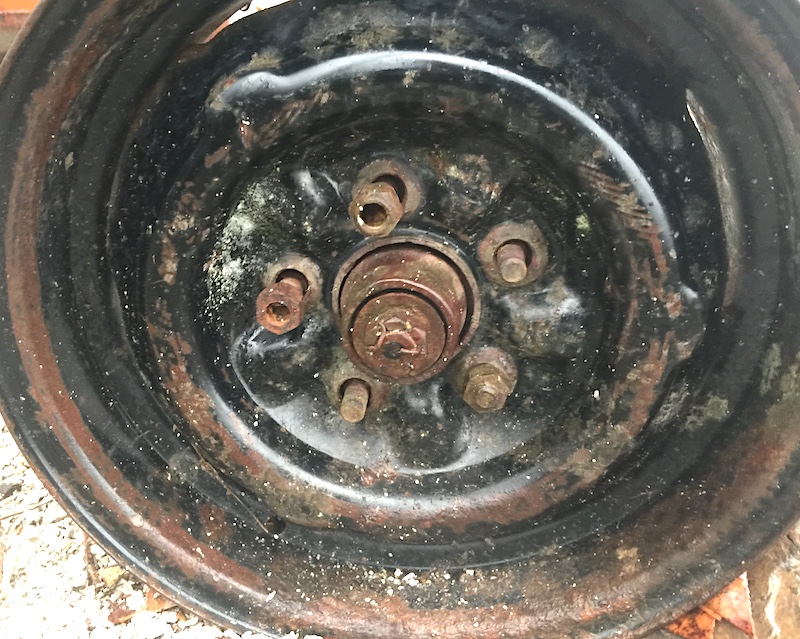 Here's what the other side looks like with a steel wheel. Below is the inside view of that. 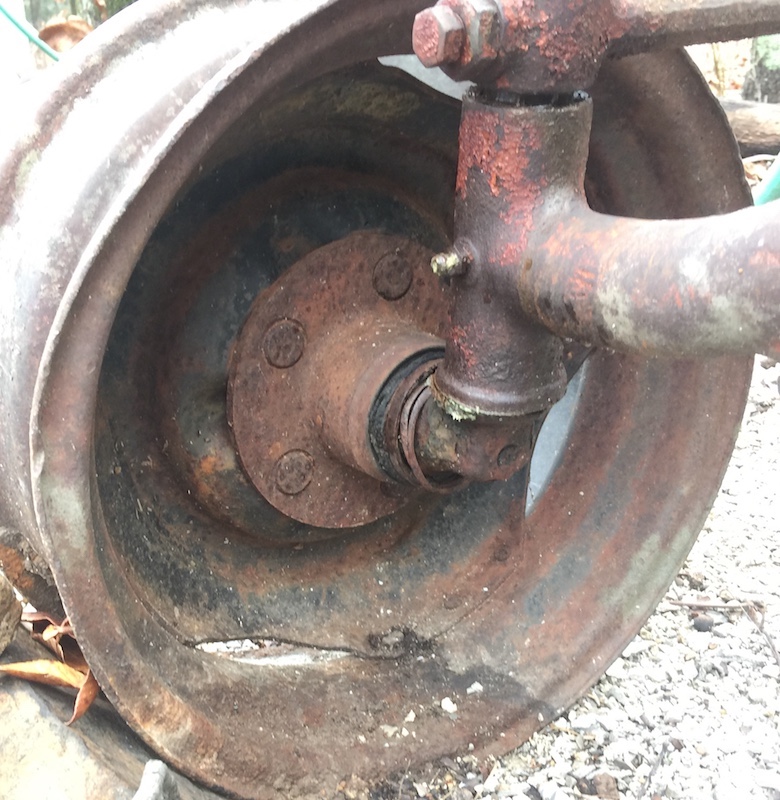 Of course the seals are non existent, and the bearing are rusted junk, but just by looking these hubs seem to be about right to fit on my project B. I had plans on making the front end tighter anyway, so new races and bearings were already on the menu. My upright pivots bushings (whatever they're called) are in much better shape than this, but probably need replacing nonetheless. With these hubs I should be able to find some nice new steel rims and 3 ribbed tires to follow. Maybe some flat spoke 4 " wide trailer rims? Yep, new studs and maybe chrome nuts on both. I think the brake drum was just used as a spacer, but I will look into the difference more fully when I pull things apart. Both hubs look exactly the same to me. Is there a chance these are hubs for an old pickup, or trailer, and never intended for the tractor? I know AC didn't offer these in 1938. My tractor has the disc looking center with a set of hoop type wheels that lock at 4 points with bolts. ------------- Put the bunny back in the box! 1938 B, 1977 Yanmar YM2200 No private messages: use email: theropod AT yahoo DOT com |
Posted By: theropod
Date Posted: 20 Dec 2017 at 2:49pm
Sustained assault, eh?  ------------- Put the bunny back in the box! 1938 B, 1977 Yanmar YM2200 No private messages: use email: theropod AT yahoo DOT com |
Posted By: theropod
Date Posted: 20 Dec 2017 at 3:20pm
No, don't give up on the process. It is just too cool. It takes the ability to apply sustained wattage. Think of this as a battery in reverse, and instead of acid as the electrolyte this is a base. The electrolyte carries the current from anode to cathode, and displaces iron oxide (live rust) with ferrite (dead rust). An extra oxygen atom is added to the iron oxide which stops that molecule of iron/steel from reacting with oxygen further. The iron molecule cannot absorb another oxygen atom. cathode ( + ) {sacrificial steel} anode ( - ) {part to be treated}. The supply voltage can vary, but probably shouldn't. amp X volts = watts. 12 V X 10 amps = 120 watts This is what I am running when my anodes are fresh. The amperage drops as crud collects on the anode and reduces surface area. That isn't a lot of power! I would love to try the DC function on a good welder where I could crank the voltage AND amperage. 48 V X 15 amps = 720 watts To do that with 12 V it would take nearly 33.8 amps! A 50 amp charger should be able to do the same thing, or better, IF it is not one of these computerized jobs. What is needed is a constant flow of power through the process. How many watts are applied determines the POTENTIAL action of the process. As I have learned larger plate size on the anode side makes a big difference in not only speed/efficiency of the process, but greatly increase the longevity of anodes. With the little 1/2" rods I was using I had to clean them every 8 hours, or less, to keep a good reaction going. With these big wide springs I ground to shiny steel before using them they only need wire brush cleaned every couple days. Again this will depend on how covered in rust the part to be cleaned is. My hood has very little, if any, rust, but the process gets under paint and works on the steel anyway. Just checking it and it already looks like paint stripper has been applied. After a couple more days my angle grinder wire brush should clean it up enough to rinse it off in hot soapy water, dry it, sand it, clean it again, prime it, sand it, clean it again and finally paint it. Then my gas tank is going to get another round in the barrel, and refinished. Whew! ------------- Put the bunny back in the box! 1938 B, 1977 Yanmar YM2200 No private messages: use email: theropod AT yahoo DOT com |
Posted By: theropod
Date Posted: 20 Dec 2017 at 3:26pm
Just tryin to stay busy. I firmly believe sittin on your backside after retirement leads to an early grave. I'm going to go til I can't. See my other post. I realized I quoted the wrong person and I ain't changing it. ------------- Put the bunny back in the box! 1938 B, 1977 Yanmar YM2200 No private messages: use email: theropod AT yahoo DOT com |
Posted By: Gerald J.
Date Posted: 20 Dec 2017 at 5:21pm
|
Looks like the brake drum was there to space that rim from the hub a bit so the rim and tire didn't drag on the axle end. The other rim has more offset. Tractor fronts or wagon wheels will be available with several offsets and will be reversible to allow using positive or negative offset with the same rim. Gerald J. |
Posted By: theropod
Date Posted: 20 Dec 2017 at 5:43pm
Yeah, that’s what I thought too. Right after Christmas I find out what’s what. I need to figure out the stud pattern and start shopping for rims, bearings and seals. I need to look for the upright bushings too. I’ll learn how my B goes together by taking the donor apart. Thanks! ------------- Put the bunny back in the box! 1938 B, 1977 Yanmar YM2200 No private messages: use email: theropod AT yahoo DOT com |
Posted By: Gerald J.
Date Posted: 20 Dec 2017 at 8:12pm
|
http://www.baumhydraulics.com" rel="nofollow - http://www.baumhydraulics.com has a good collection of hubs, bearings, seals, and rims. http://www.shoupparts.com" rel="nofollow - http://www.shoupparts.com has a fairly good collection of hubs, bearings, seals, and rims. All sorted by dimensions, not necessarily by what they fit. They both have spindles too. The best way to search Baum Hydraulics is to download their catalog sections. Those .pdf search better than their web page. Prices in the catalog are suggested resale prices so buying from them is usually with some discount. Usually hidden on a page with the code DATE 2000 means 20% discount from the catalog prices. Gerald J. |