Cylinder head/manifold erosion
Printed From: Unofficial Allis
Category: Allis Chalmers
Forum Name: Farm Equipment
Forum Description: everything about Allis-Chalmers farm equipment
URL: https://www.allischalmers.com/forum/forum_posts.asp?TID=12602
Printed Date: 31 Mar 2026 at 12:18pm
Software Version: Web Wiz Forums 11.10 - http://www.webwizforums.com
Topic: Cylinder head/manifold erosion
Posted By: DaveKamp
Subject: Cylinder head/manifold erosion
Date Posted: 17 May 2010 at 9:49pm
|
Hi everybody! So I'm working on a WD engine, and the #1 exhaust port surface is about 0.050" eroded on the HEAD side... the manifold looks flat, but the head is eroded away. Obviously, the best answer is to stick a different head on it... but... has anyone attempted other methods of solving this problem? My D17 had MANIFOLD erosion around the #3E port, so I set it up in the Bridgeport and milled it off 'till flat, and it's been happy ever since. I don't think I wanna put that head in the mill and chew off that much iron... mebbie cut a sleeve that'll fit inside the port, and inside the manifold? |
Replies:
Posted By: ChuckLuedtkeSEWI
Date Posted: 18 May 2010 at 6:09am
| Dave, that might be alot to be milled off, but I had that done on a WC head once that was quite eroded and it worked out fine. |
Posted By: David Maddux
Date Posted: 18 May 2010 at 6:17am
| I have had the heads brazed up and then planned down. Not the best situation, but gets a little more out of a good head. |
Posted By: DaveKamp
Date Posted: 18 May 2010 at 8:52am
|
Okay, thanks guys. I was considering just milling up a 'sleeve/wedge' to put in there for now (rather than yanking the head)... but I'll wait 'till after I've fired it up to decide on my plan of action. I do have another head here of unknown condition- I'll give it a thorough look-over and see if it's in appropriate condition for a swap. I assume that if they planed 'em, that there was a fair amount of 'meat' in that casting? |
Posted By: Dick L
Date Posted: 18 May 2010 at 8:52am
| You can clean it up with a die grinder and build it up with cast iron then machine it back to the rest of them. You can use cast iron piston rings for the filler if you do not have cast iron rod. It will flow in/on a lot like TIG. When you see the base under the heat look wet you add filler. When the filler starts to flow and look wet add more filler. You can make it look as good as new. You are only heating the surface in that area and not the whole head. I use my TIG most of the time but have used the torch. |
Posted By: Gerald J.
Date Posted: 18 May 2010 at 9:45am
|
On an old F-350 with 390 that had that problem (brought on, I think, by running with a rotten manifold gasket) I considered making a crushable soft copper gasket that was thick enough to fill the gap. I'd take a sheet of copper and after heating it to red and letting it cool (fast or slow, either anneals copper) I'd form ridges around the places for the manifold openings. So it was corrugated, one or more times. The ridges would make complete passes around each opening. Then I'd anneal it again to be sure it was soft after cutting the require passage and bolt holes and squeeze it in place. On that V-8, exhaust manifold RTV or a new gasket would hold until the first time I used more than 1/4 throttle going up a hill loaded, then the chemical gasket would blow out from the pressure of the pipe and muffler. I didn't ever get around to making the copper gasket. Milling head and manifold is the best solution, if there is metal to mill. Gerald J. |
Posted By: CTuckerNWIL
Date Posted: 18 May 2010 at 9:54am
|
I milled my 45 head when I replaced the manifold gaskets. I think I probably took .035 or so off. I don't know how much is acceptable but if your manifold is cleaned up and the head is cut, new gaskets should last a very long time. Best thing is to fix the problem before the head is washed out but who has the time?
------------- http://www.ae-ta.com" rel="nofollow - http://www.ae-ta.com Lena 1935 WC12xxx, Willie 1951 CA6xx Dad bought new, 1954WD45 PS, 1960 D17 NF |
Posted By: Brian G. NY
Date Posted: 18 May 2010 at 3:50pm
| I put one together like that by filling the "pit" with a high quality refractory (furnace) cement. put it together "wet" and never had a problem with it. |
Posted By: mlpankey
Date Posted: 18 May 2010 at 6:12pm
|
Belzona 111 supermetal have a 201 head that has been done exactly that way in the exhaust now for five years . just did a 4 inch head that way this year havent ran it yet. ------------- people if they don't already know it you can't tell them. quote yogi berra |
Posted By: DaveKamp
Date Posted: 19 May 2010 at 12:57am
|
Thanks for the suggestion, ML... I went-a-hunting, and found Belzona 1111- I assume that's the product to which you referred. Here's a couple'a pictures of it... this is a pretty big gap... 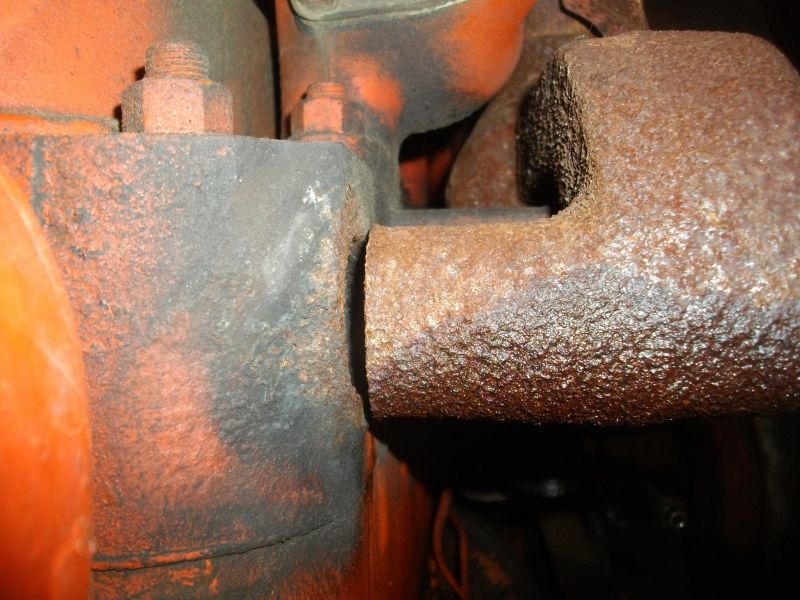 |
Posted By: DaveKamp
Date Posted: 19 May 2010 at 12:59am
and here: 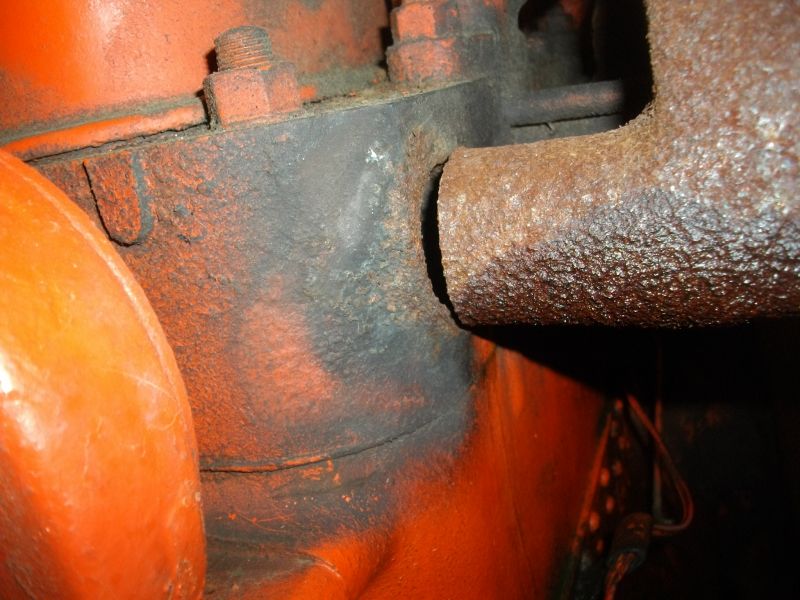 |
Posted By: DaveKamp
Date Posted: 19 May 2010 at 1:00am
And for perspective... this is one of the manifold nuts...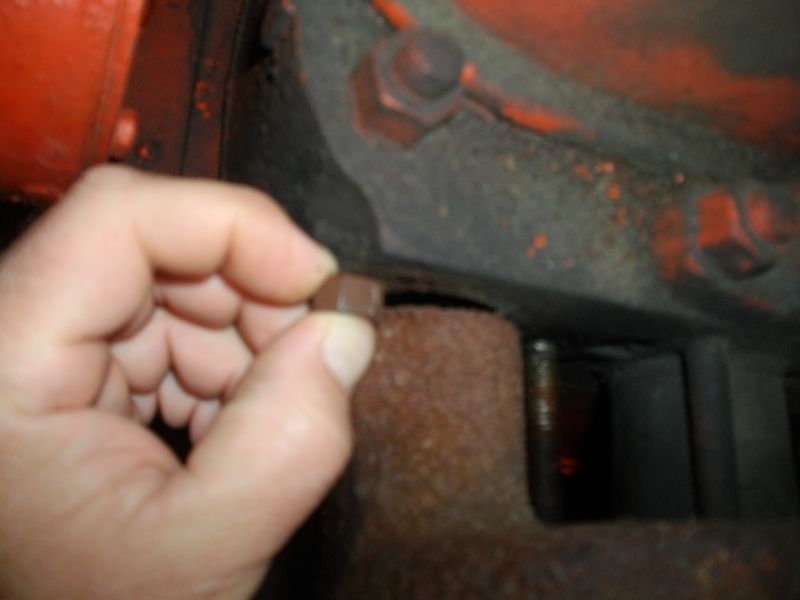 |
Posted By: DaveKamp
Date Posted: 19 May 2010 at 1:04am
| That seems like a lotta fill... and I'm thinkin' that even brazing it up might not be good enough, considering the exhaust heat here. Mebbie Belzona 1111 can do this (I've never tried anything like it). My thought, though, was that these are round holes, so if I cut a steel sleeve that'd slip between port and manifold, that the remaining gap would be irrelevant... what I was looking for, was some solution that didn't require removing the head... at least, not for now. Someday I will... but perhaps a combination of sleeve and Belzona is the answer... |
Posted By: Nathan (SD)
Date Posted: 19 May 2010 at 2:42am
| Mine looked that bad also. The reason it looks so bad is because the gaskets are awfully thick. You won't need as much fill as you think. I just used the wire feed to speck in a couple of bad pits and then sanded a little. Not 100 percent right but it was what worked at the time. Mine was the same port. |
Posted By: Dave(inMA)
Date Posted: 19 May 2010 at 5:48am
|
I can't contribute to this discussion but have a question. Is there supposed to be a built-up ridge on the head where the manifold opening meets the head? Or is the side of the head flat? Thanks. ------------- WC, CA, D14, WD45 |
Posted By: Lonn
Date Posted: 19 May 2010 at 6:15am
|
I'd still plane the manifold. Did you lay a straight edge across the manifold? I bet that would close the gap up some. Then build the head up with weld and plane it smooth. That worked for me. ------------- -- --- .... .- -- -- .- -.. / .-- .- ... / .- / -- ..- .-. -.. . .-. .. -. --. / -.-. .... .. .-.. -.. / .-. .- .--. .. ... - Wink I am a Russian Bot |
Posted By: mlpankey
Date Posted: 19 May 2010 at 4:56pm
|
I hold some welding certs. for working at a nuclear plant .I own a systematic mig miller stick tig and high freq. box .I find myself going to the belzona bucket when I port through a thin cast iron spot in the head or when water has set in the exhaust port and rusted through to the water steam holes. Even repair farmers cracked blocks when they don't antifreeze them up soon enough. sure beats taking one all the way down . just clean the area with mek and heat it good with a torch so that you have all the oil removed from the porous cast iron and it works . They will as always be more than one way to skin the cat and they will always be the sceptics . ------------- people if they don't already know it you can't tell them. quote yogi berra |
Posted By: DaveKamp
Date Posted: 19 May 2010 at 7:50pm
|
Did some more workin' on it, pulled the manifold (it was plugged with a wasp nest) and doulble checked timing, sprayed a little oil in the I-ports, cranked it a few times, then a shot of starting fluid, contact, crank, and she fires nicely on all four for about a dozen rotations, so it's a runner... even the oil pressure gauge jumped, so it's a winner for now. I put a straightedge on the head, and while there IS a little erosion on the manifold, it's only about 0.044 off. The head, however, is 0.204" out. I went to set the manifold up in the Bridgeport to skim a bit off, and noticed a hole burned through the center segment of the manifold, and there's other areas that're very thin. I looked at my other manifold/head combination, and the #1E manifold side is out by about 0.120", but the mating head side is pretty flat. The 'necks' of the manifold are pretty eroded down, so I think my best move is to boil out this head, verify the port flatness, and buy a new manifold, reassemble it and call it good. If I had no other reason to pull the head, I'd find an easy fix, but I'd rather do it right, than do it twice... especially with a new manifold going in place. |
Posted By: Dave(inMA)
Date Posted: 19 May 2010 at 8:13pm
|
Sure sounds like the rightest way to fix things, Dave. Great to hear that you've got a running engine there! ------------- WC, CA, D14, WD45 |
Posted By: DaveKamp
Date Posted: 20 May 2010 at 8:52pm
|
Thanks for the encouragement, Dave. I stripped down this other head... it was gunky, and a couple'a valves were lightly stuck... two of the manifold studs (far right side) broke off flush with the head, and this one doesn't have valve rotators, but does have valve seat inserts. Springs all seem good. I'll try MIG-welding a nut to the broken studs and see if they'll back out nicely... I'm guessing that the way the others backed out, they probably will... if not, it'll be a visit to the Bridgeport for a date with the punch and a center-drill. I'm pretty sure this head is from a WC (no rotators, but seat inserts should date it fairly well). Would a guy normally replace the seats? The valve faces are rounded a bit, so they'll need grinding... the seats are probably the same way... I don't think a 3-angle would clean 'em up without really boogering the geometry, but otherwise the valves are good. I've got a valve grinder, but no seat grinder. |
Posted By: mlpankey
Date Posted: 20 May 2010 at 9:02pm
|
depends on the depth. if the valve sets deep in the head once the seat is ground it would pay to either go to a larger valve size or install new seats . if its a wc head the seats are not replaceable like they are in the 45 head . ------------- people if they don't already know it you can't tell them. quote yogi berra |
Posted By: DaveKamp
Date Posted: 21 May 2010 at 9:26pm
|
Hmmm... well, it's got seat inserts, but after cleaning the valves, they're not wonderful... and there's no rotators, so this one is a little early. But I did visit Bill Deppe, and came home with a manifold, some gaskets, and a carb kit for an M-S. After looking some more, I decided that no matter what route I go, this head will have to come off, and if I have it off, it really wouldn't be a big deal to put it under the mill and trim back.... SO... I Started pulling down the top end, have everything out of the way, ready to lift the head off, and it's adhered down really good. Double, then triple checked to make sure that I haven't missed any fasteners... yep, all clear... and even with a carefully placed bar, she won't move. Now, about 70% of the head-studs are still in place... the nuts backed off, and studs stayed in... so I'm sure that's not helping. Are there any places on the head/block commonly considered acceptable for driving in a wedge to break 'em free? |
Posted By: CTuckerNWIL
Date Posted: 21 May 2010 at 9:32pm
|
I would remove the rocker arm assembly and bolt something in place to do a little lifting. Then squirt some oil in each cylinder and try cranking it by hand. Put your favorite panther piss around each stud for a couple days before trying this.
------------- http://www.ae-ta.com" rel="nofollow - http://www.ae-ta.com Lena 1935 WC12xxx, Willie 1951 CA6xx Dad bought new, 1954WD45 PS, 1960 D17 NF |
Posted By: DaveKamp
Date Posted: 21 May 2010 at 10:17pm
| Already have the rockers off... you mean, bolt to the rocker-shaft's tower studs and apply lift? Should I unthread the studs and thread bolts in there with a piece of chain? |
Posted By: CTuckerNWIL
Date Posted: 22 May 2010 at 7:46am
|
Yea, bolt a piece of chain to the head. If that doesn't work, I would consider removing the studs from the block. Double nut them and wrench on the bottom nut. If you lack threads for 2 full nuts, get a jam nut. ------------- http://www.ae-ta.com" rel="nofollow - http://www.ae-ta.com Lena 1935 WC12xxx, Willie 1951 CA6xx Dad bought new, 1954WD45 PS, 1960 D17 NF |
Posted By: DaveKamp
Date Posted: 23 May 2010 at 2:34am
|
Hi Guys! Well, I double-nutted the studs... couldn't get enough grip, so I TRIPLE-NUTTED the studs (for the water-neck), socked 'em down good, and they STILL laughed at me. I wound up sticking a piece of 1" bar stock in each port, and putting little hydraulic jacks on 'em. I was really careful about it, finally managed to lift it free. Since then, I've cleaned it off, milled the manifold face flat (took off a whole lot!), scrubbed it again, dropped, cleaned, lapped, and reinstalled each valve, and then took a pair of vise-grips and more penetrant to the studs... got most of 'em out, then spun/wire brushed 'em clean, reinserted. Gotta make a new pair'a gaskets for the water neck, and reassemble... tomorrow's a busy day already, so probably figure on lighting it up on Wednesday or so. Here's a few pix: 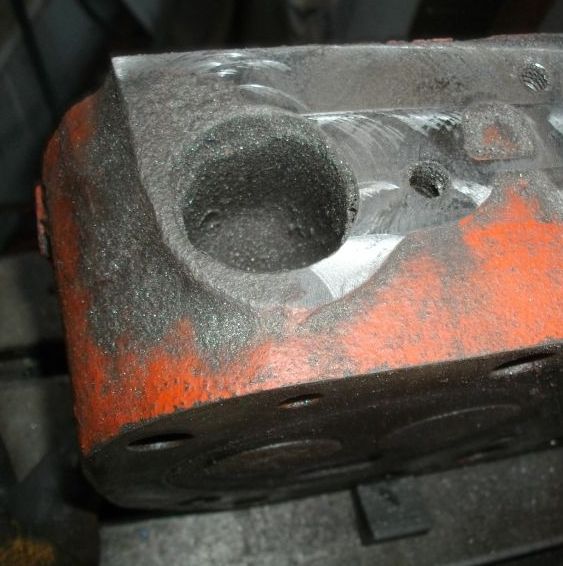 Yeah, this flycutter is a bit small for making this pass... and I'm slightly out-of-tram. I made this flycutter about ten years ago, and I should make a few more, probably about 4" diameter would be right... but the lines you see constitute less than a thou... probably more due to deflection (spindle and knee) than tram error. |
Posted By: DaveKamp
Date Posted: 23 May 2010 at 2:38am
And a few more: 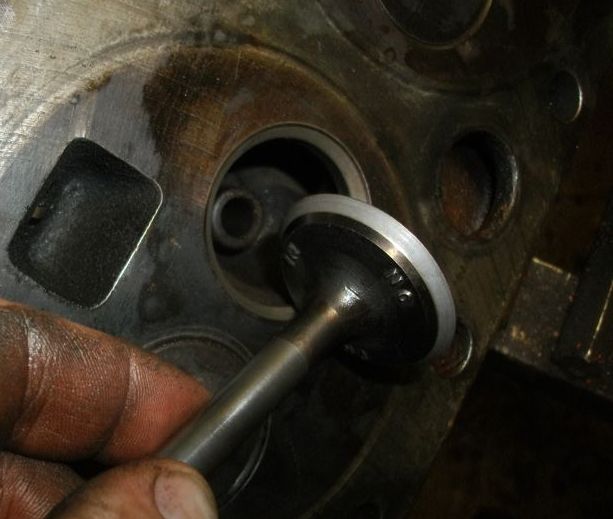
|
Posted By: Dave(inMA)
Date Posted: 23 May 2010 at 7:45am
|
Valve grind looks good! You certainly are having fun....... ------------- WC, CA, D14, WD45 |
Posted By: DaveKamp
Date Posted: 23 May 2010 at 9:13am
|
Yes- these valves were in really good shape- what you see there is simply a few minutes with some lapping compound and a sucker-stick. These ex valves don't have rotators- wish I had four, I'd've put 'em on, but they can be done later. When I get this job done, I'm gonna start scouting for materials to make a larger flycutter... I could've easily cut the milling-time in half or less with a one-pass tool. |
Posted By: Gerald J.
Date Posted: 23 May 2010 at 9:36am
|
That manifold is designed to warp at the ends with those few bolts holding it down. And when the manifold ends warp the head gets eroded like the ends of the manifold. A design flaw. Gerald J. |
Posted By: DaveKamp
Date Posted: 23 May 2010 at 4:21pm
| Yeah, well, my D17 had erosion on the manifold, which I corrected by face-milling the manifold and installing new gaskets... in this case, though, the manifold runners were perfectly fine, but the erosion was on the head instead. I'm sure that had someone found it shortly after the gasket blew, they would've fixed it, but they didn't... |
Posted By: DaveKamp
Date Posted: 23 May 2010 at 10:21pm
HERE's what it looks like now: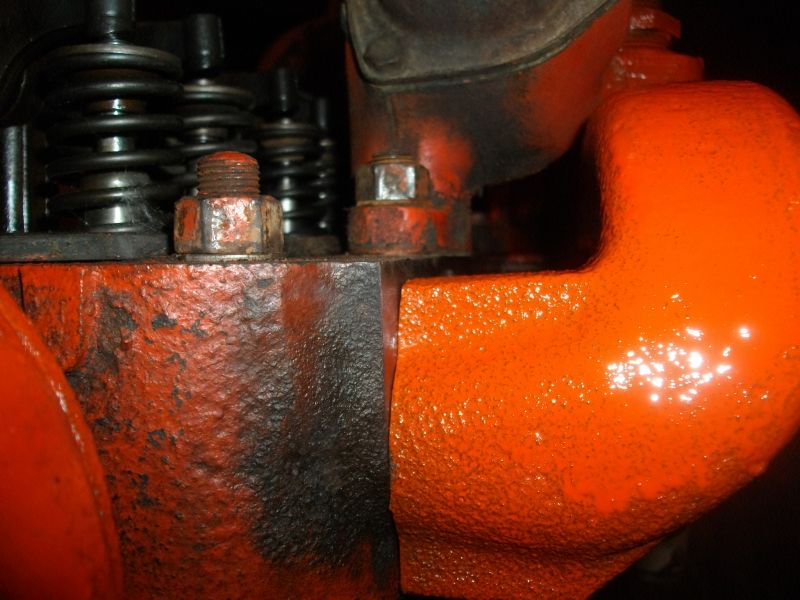 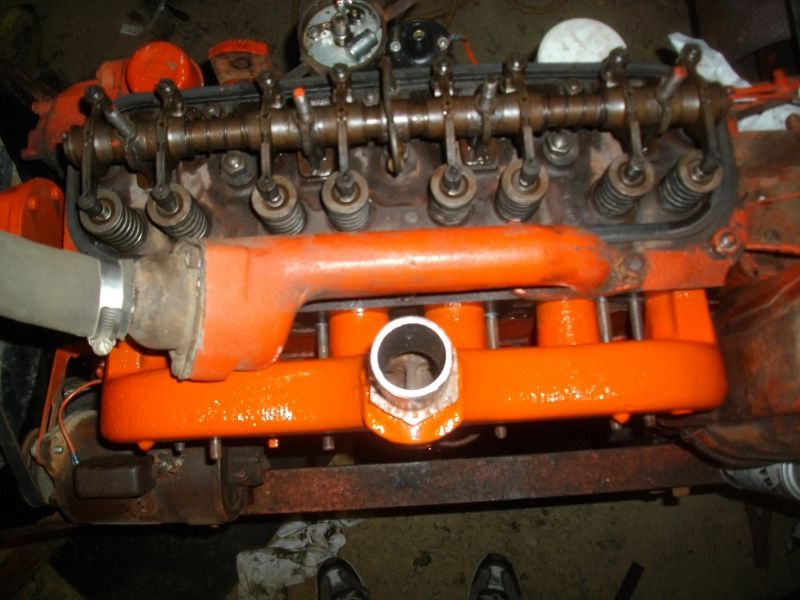 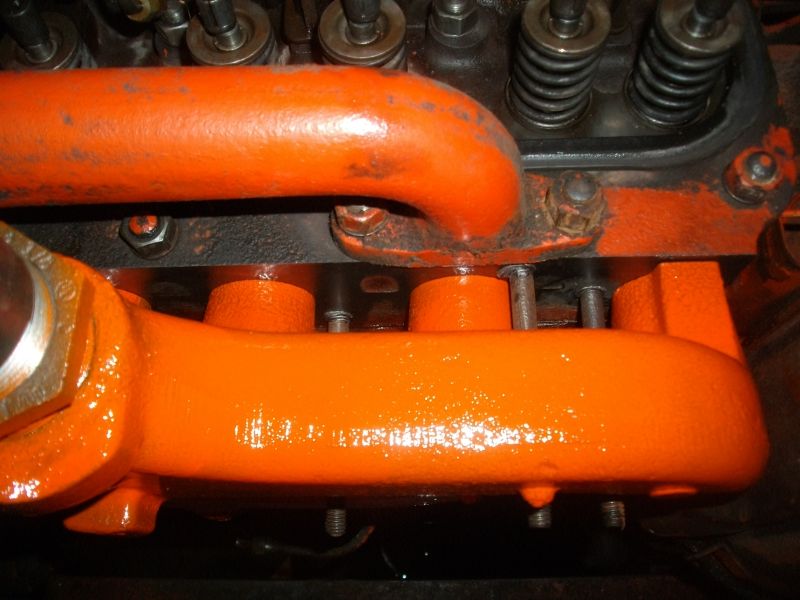 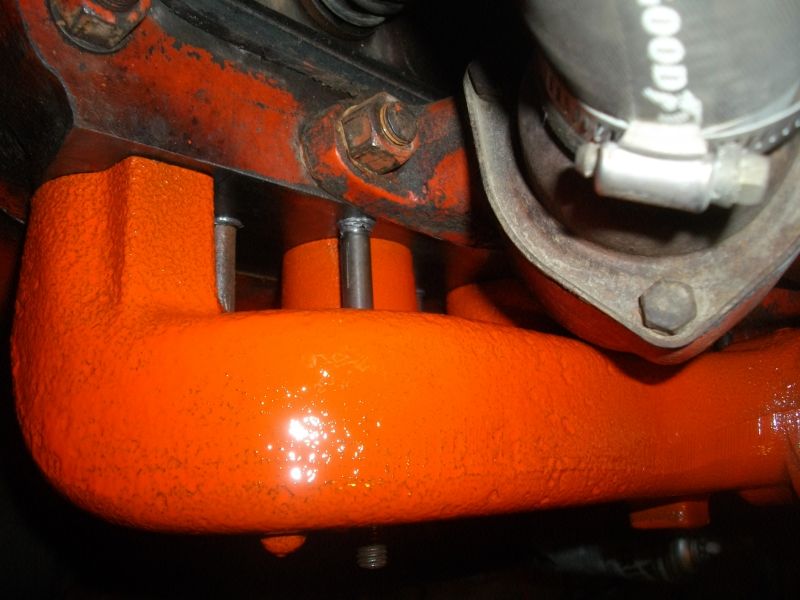 |
Posted By: Dave(inMA)
Date Posted: 24 May 2010 at 5:51am
|
Dave - sure looks like you cured the problem! I am inches away from installing a new-to-me manifold on my WD45 - manifold checked out nice and flat - we will see about the head - several of the manifold gaskets were completely history when the old one came off, but I didn't see any obvious erosion like you had. We'll know for sure when we test-fit the manifold. ------------- WC, CA, D14, WD45 |
Posted By: DaveKamp
Date Posted: 26 May 2010 at 10:32pm
|
Okay, the verdict is in: Milling the head worked perfectly. Nice, tight seal, no problems. Lapping the valves was a good idea, too. She runs well. Initially, it was leakin' around the head in a couple of places. I let it get good and warm, then shut her down... I went back and retorqued the heads. Obviously I had a little coolant dribbling in, 'cause it sent up a cloud of steam when I lit it back up, but after that, no leaks or bubbles, and a shutdown, wait a few, restart resulted in no smoke. |