| Author |
 Topic Search Topic Search  Topic Options Topic Options
|
kelso 
Bronze Level


Joined: 07 Jan 2020
Location: Port Ludlow, WA
Points: 42
|
 Post Options Post Options
") Thanks(0) Thanks(0)
 Quote Quote  Reply Reply
 Topic: My C project Topic: My C project
Posted: 27 Jul 2020 at 6:08am |
Another AC story:)
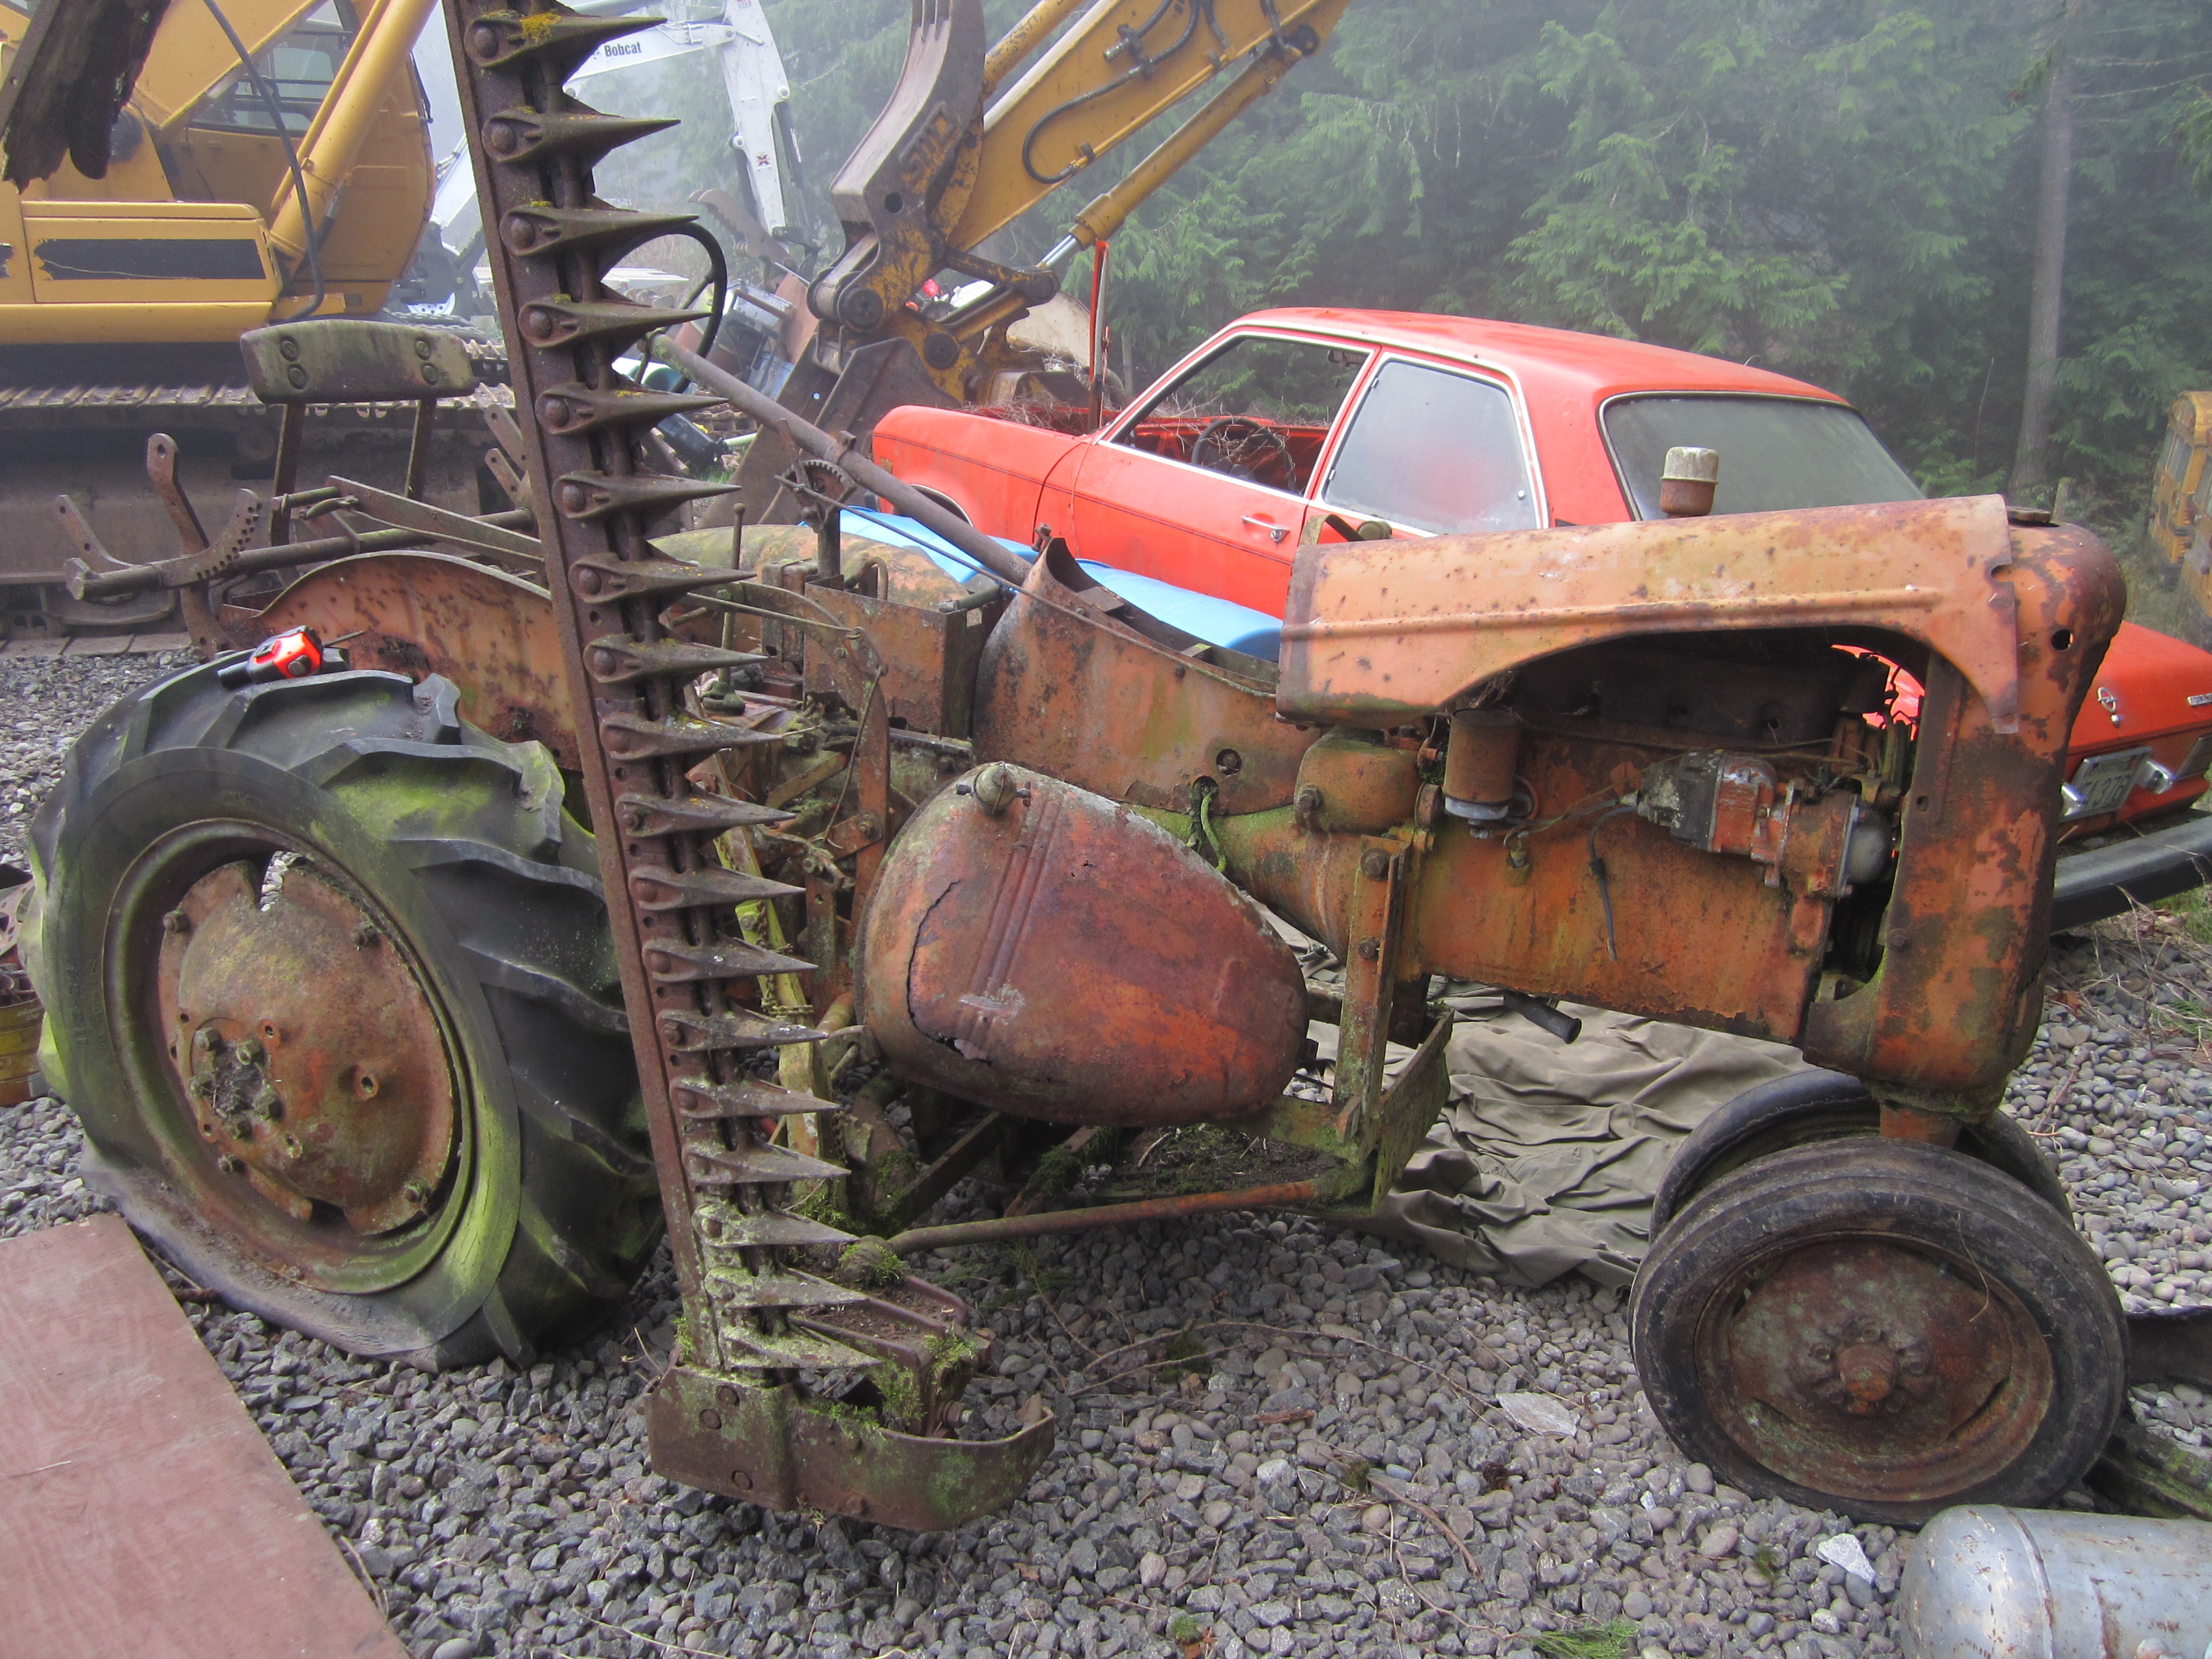
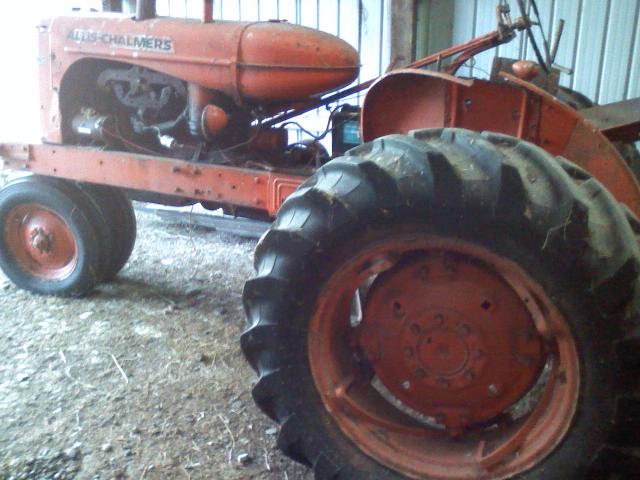
I have been working on restoring a family 1949 model C that lived on Lopez Island in the San Juan islands of Washington State. In the late 60's it was moved to Port Townsend, Washington on the mainland and became non-operable. In the 1980's is was given away and the family lost track of it assuming it was scraped.
When I became part of the family I wanted to find it and restore it but figured it had indeed been scraped. Well a few years ago a picture was found of it being loaded on a tow truck. We contacted the guy who got it and low in behold he remembered the tractor. Of course our first question was what did he do with it???? He stated that he had sold it to a farmer only a few miles away from him.
With that news I made a mad dash over to the farmer who had brought it and well yes he still had the tractor:) The sad news was that he never got the tractor operating. He had broken the engine open to work on it but after years in the barn he pulled it out into the pasture and it became a poesy bed of junk and briers. It has been sitting out for about 30 years with the engine block open to the elements. Needless to say I brought it off his hands very quickly:)
This tractor has had many stories told about it by the children who grew up with it so I wanted to find it and do a complete restoration back into operating condition (big eye syndrome).
Below is a picture of the C as I found it on the farm.
A close-up before starting work
|
 |
|
Sponsored Links
|
|
|
IBWD MIke
Orange Level


Joined: 08 Apr 2012
Location: Newton Ia.
Points: 4285
|
Post Options
Thanks(0)
Quote Reply
Posted: 27 Jul 2020 at 7:54am |
|
That's going to take some love!
|
|
Boss Man
Orange Level
Joined: 03 Mar 2018
Location: Greenleaf, WI
Points: 617
|
Post Options
Thanks(0)
Quote Reply
Posted: 27 Jul 2020 at 8:24am |
|
Good luck on your adventure. Hope it isn't as bad as it looks.
|
|
kelso
Bronze Level
Joined: 07 Jan 2020
Location: Port Ludlow, WA
Points: 42
|
Post Options
Thanks(0)
Quote Reply
Posted: 27 Jul 2020 at 11:30am |
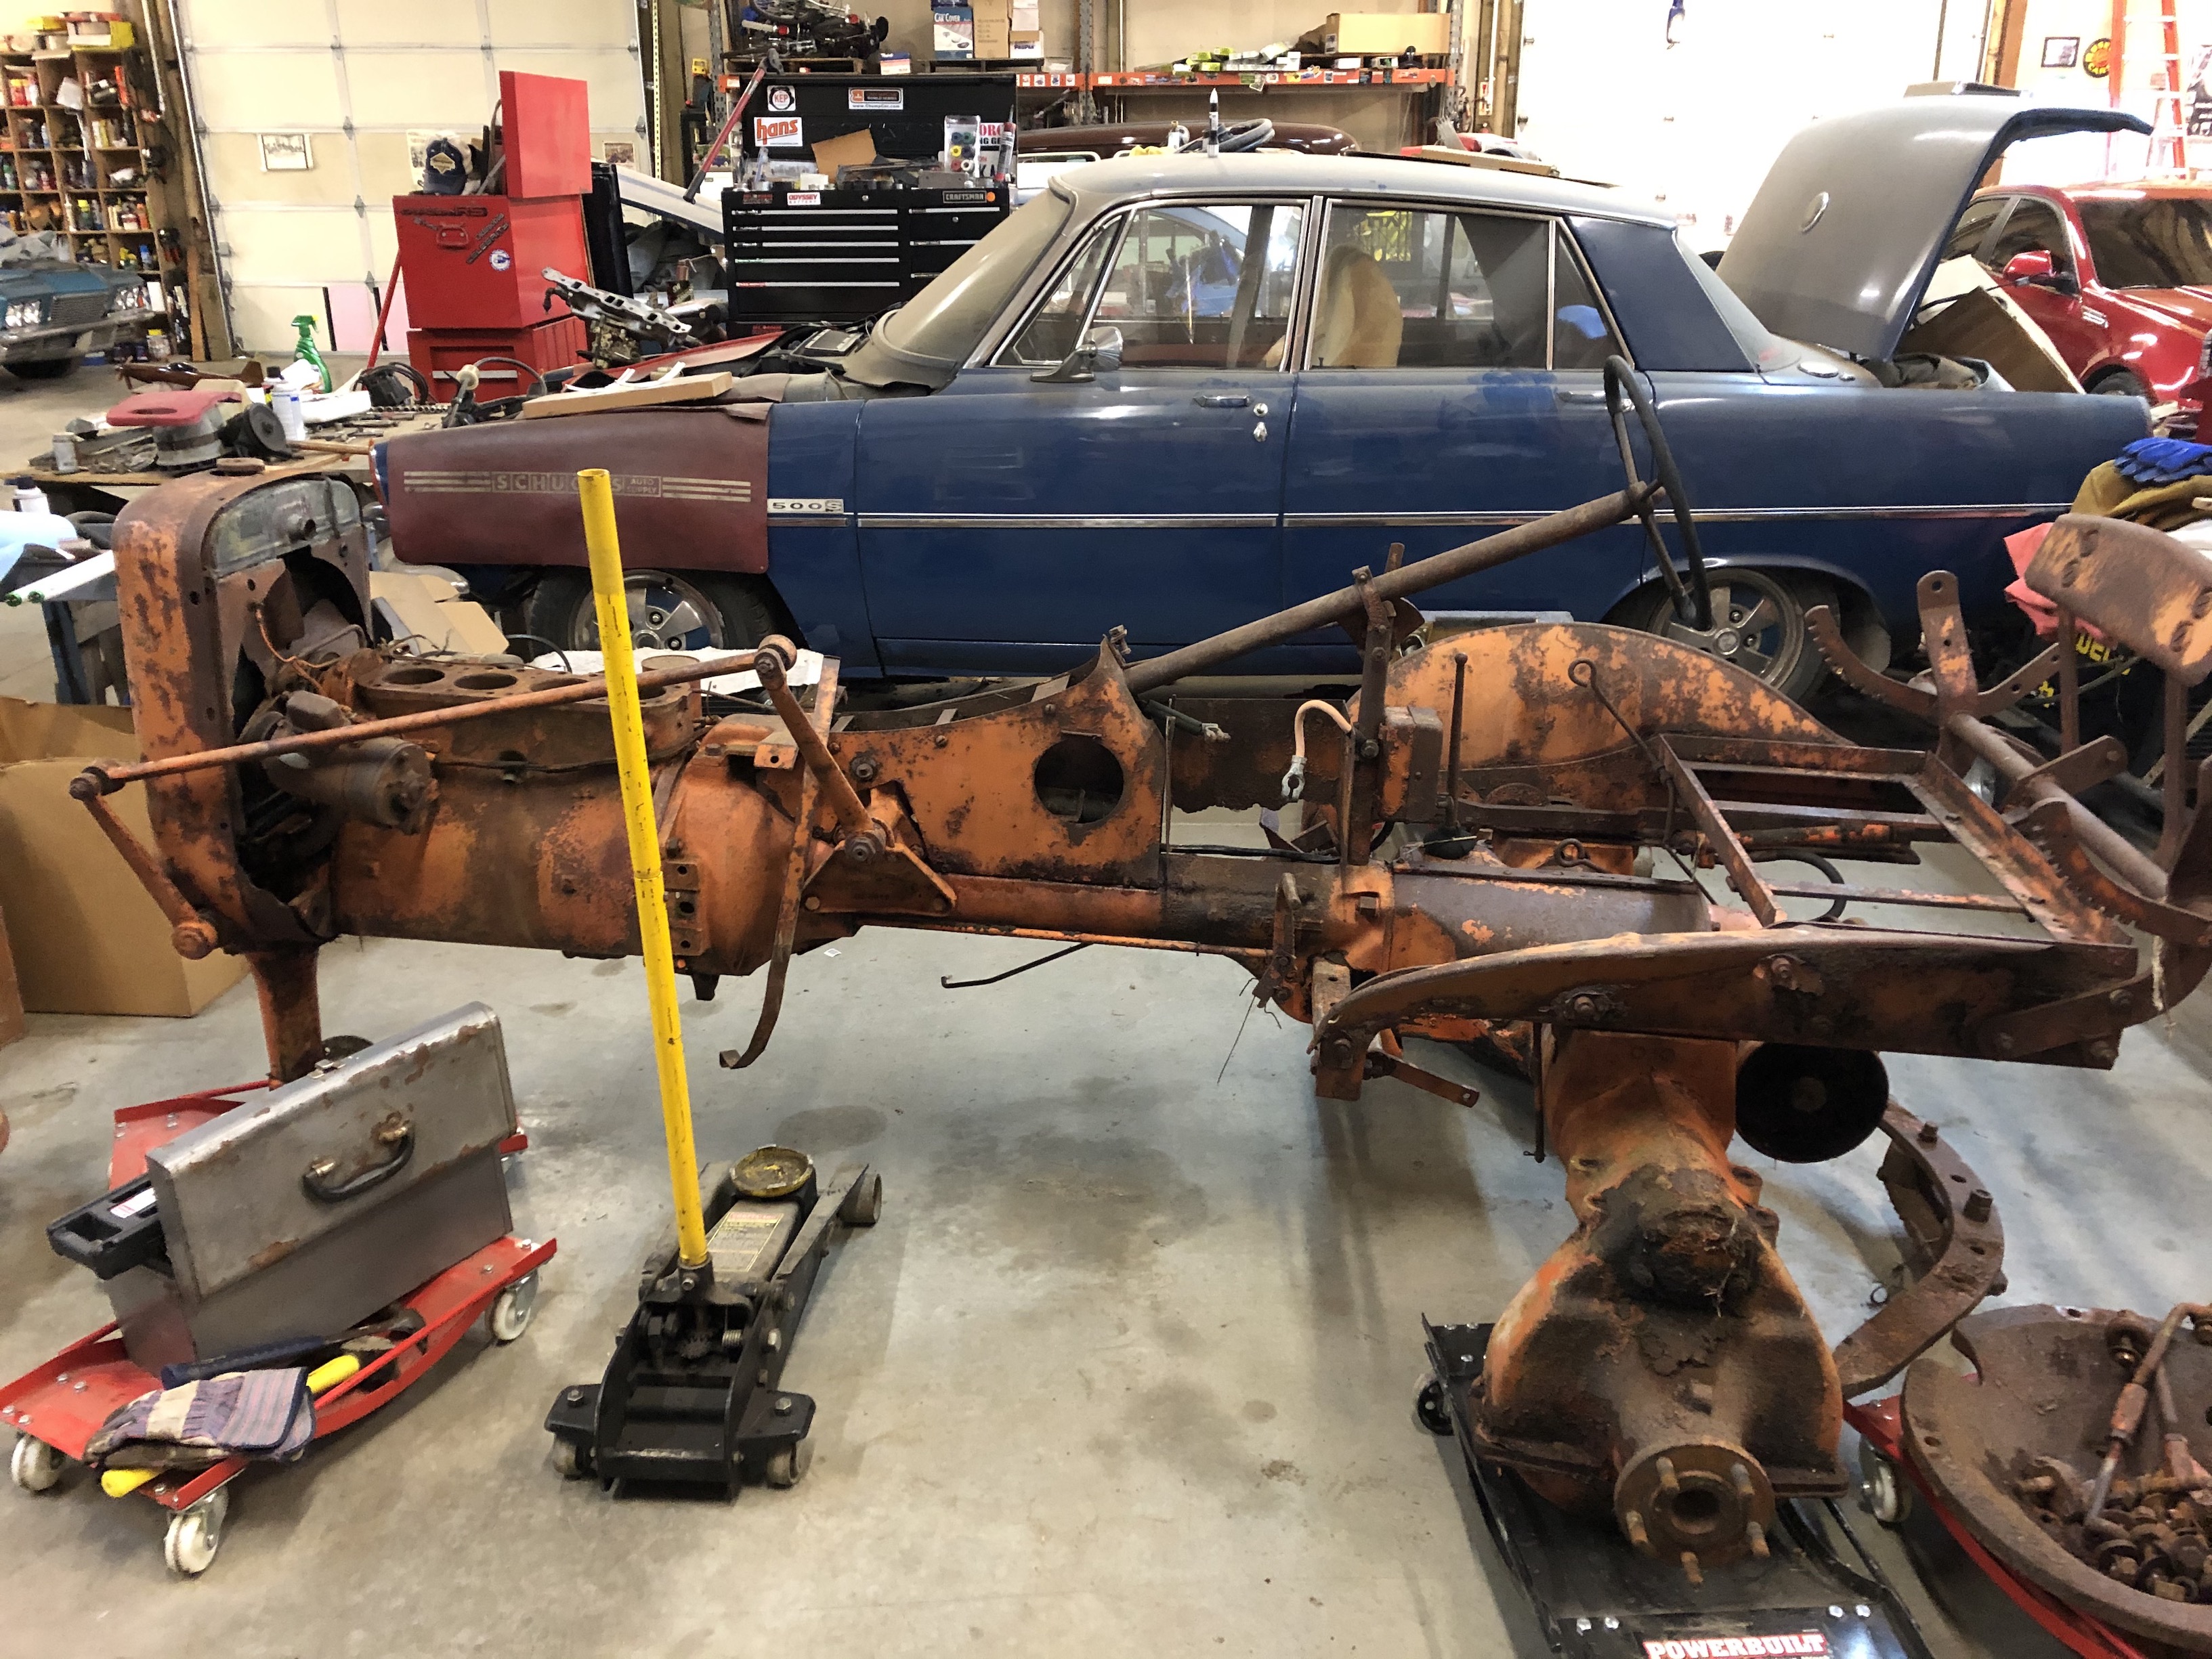
Here are pictures at the start of the process. First removing the sickle mower.
As I start to break it apart
Yes it is a rusty bucket. I have used a lot of elbow grease, heat, and BK blaster to get it apart:)
|
|
Dick L
Orange Level

Joined: 12 Sep 2009
Location: Edon Ohio
Points: 5093
|
Post Options
Thanks(0)
Quote Reply
Posted: 27 Jul 2020 at 11:46am |
Not an impossible task! I have started with less. The C I used in tractor pulls was in such condition. It is like they tell you how to eat an elephant. (one bite at a time) There is not a bolt or part I have not removed or replaced on the B's and C's. I bought 7 of each all in non running condition over the past. I have many pictures in fotki that you are welcome to look at for reference if you have a need.
|
|
Steve in NJ
Orange Level Access
Joined: 12 Sep 2009
Location: Andover, NJ
Points: 12071
|
Post Options
Thanks(0)
Quote Reply
Posted: 28 Jul 2020 at 12:46pm |
Great story so far! I've seen worst than that, but it does take big love (and a little extra wide wallet) to bring this ole' girl back to lookin' better than new! My first B that I did (which I still have yet) was out in the Adirondack woods rustin' away for years till yours truly came along to rescue it. My wife at the time thought I was nuts, but that was over 20 years ago already! My B still runs nice, but its time to do her over again pretty soon. She's been sitting outside under a tarp for quite a few years cause she gave up her space in the pole barn for some Antique cars. She still works around the property yet. Keep at it, before ya know it, she'll been lookin' dandy!! Steve@B&B BTW, when your ready for a wiring harness, or any electrical, stop by to see us via the internet. We can fix ya up with lottsa' cool stuff....!
|
|
39'RC, 43'WC, 48'B, 49'G, 50'WF, 65 Big 10, 67'B-110, 75'716H, 2-620's, & a Motorhead wife
|
|
Boss Man
Orange Level
Joined: 03 Mar 2018
Location: Greenleaf, WI
Points: 617
|
Post Options
Thanks(0)
Quote Reply
Posted: 28 Jul 2020 at 1:14pm |
 Steve in NJ wrote: Steve in NJ wrote:
Great story so far! I've seen worst than that, but it does take big love (and a little extra wide wallet) to bring this ole' girl back to lookin' better than new! My first B that I did (which I still have yet) was out in the Adirondack woods rustin' away for years till yours truly came along to rescue it. My wife at the time thought I was nuts, but that was over 20 years ago already! My B still runs nice, but its time to do her over again pretty soon. She's been sitting outside under a tarp for quite a few years cause she gave up her space in the pole barn for some Antique cars. She still works around the property yet. Keep at it, before ya know it, she'll been lookin' dandy!!Steve@B&B BTW, when your ready for a wiring harness, or any electrical, stop by to see us via the internet. We can fix ya up with lottsa' cool stuff....! |
Read that as the wife you had at the time needed a do over because she was under the tarp......lol
|
|
garden_guy
Orange Level
Joined: 05 Jul 2013
Location: Illinois
Points: 1167
|
Post Options
Thanks(0)
Quote Reply
Posted: 28 Jul 2020 at 1:35pm |
|
Oh man, make sure to take lots of pics as you go -- I love these restoration threads!!
|
|
Dave(inMA)
Orange Level

Joined: 12 Sep 2009
Location: Grafton, MA
Points: 2400
|
Post Options
Thanks(0)
Quote Reply
Posted: 28 Jul 2020 at 9:39pm |
|
Should be a great project! Looking forward to your pictures and stories along the way.
|
|
WC, CA, D14, WD45
|
|
Jacob (WI,ND)
Orange Level

Joined: 11 Sep 2009
Location: Kenmare, ND
Points: 1249
|
Post Options
Thanks(0)
Quote Reply
Posted: 28 Jul 2020 at 10:16pm |
|
I'm a sucker for projects, and bringing things back from the dead. Keep us posted, keep up the good work!
|
|
Jacob Swanson
1920 6-12; 1925,1926 20-35 longfenders; 1925,1926 15-25's; 1927,1929 20-35 shortfenders; C; B's; IB; WC's; WD; WD45
|
|
Sugarmaker
Orange Level
Joined: 12 Jul 2013
Location: Albion PA
Points: 8662
|
Post Options
Thanks(0)
Quote Reply
Posted: 28 Jul 2020 at 10:59pm |
kelso, Welcome! As one guys says on another tractor forum: if it casts a shadow it can be restored. This tractor is close to that. Good news is there are lots on donor tractor/s and parts out there. Nice project! I will be watching too. Makes me want to check on that CA near by too! Good documentation/ pictures! Regards, Chris
Edited by Sugarmaker - 28 Jul 2020 at 11:01pm
|
|
D17 1958 (NFE), WD45 1954 (NFE), WD 1952 (NFE), WD 1950 (WFE), Allis F-40 forklift, Allis CA, Allis D14, Ford Jubilee, Many IH Cub Cadets, 32 Ford Dump, 65 Comet, 66 F100.
|
|
kelso
Bronze Level
Joined: 07 Jan 2020
Location: Port Ludlow, WA
Points: 42
|
Post Options
Thanks(0)
Quote Reply
Posted: 29 Jul 2020 at 3:59pm |
Thank everyone for your support!
Yes Dick these are slow but fun projects. I now have 3 C's and 1 B models to work with:) I have been using your pictures a lot what a good resource.
The hardest part to work on has been the final drives. Getting the brake pins out and then the brake drums off took a long time. They were some of the most rusted and seized parts to get off.
I was very surprised how good of a condition the bearing and cups, and gears are. There is some gunk but they were not dry and rusted out. I am replacing all the seals but the bearings are in great shape after a good cleaning.
Tim
|
|
Dick L
Orange Level
Joined: 12 Sep 2009
Location: Edon Ohio
Points: 5093
|
Post Options
Thanks(0)
Quote Reply
Posted: 30 Jul 2020 at 6:46am |
The brake pins are easy the way my pictures show. I had one fellow wanted to trade a final drive he couldn't get the pins out. He had already put holes in the final drive. I took my air chisel with a long punch I had made up out to his trailer. I pushed out his pins in a puff of rust dust. He took his own final drive back home. The pictures are from before I started using the air chisel.
My moto has always been (don't force it, get a bigger hammer)
My bigger hammer !
Edited by Dick L - 30 Jul 2020 at 6:47am
|
|
steve(ill)
Orange Level Access
Joined: 11 Sep 2009
Location: illinois
Points: 90956
|
Post Options
Thanks(0)
Quote Reply
Posted: 30 Jul 2020 at 9:25am |
I bought a CASE backhoe that looked like that, setting in the field........... I can still remember the kids saying "pour some gas in it dad and lets pull start it "... 
|
|
Like them all, but love the "B"s.
|
|
kelso
Bronze Level
Joined: 07 Jan 2020
Location: Port Ludlow, WA
Points: 42
|
Post Options
Thanks(0)
Quote Reply
Posted: 17 Aug 2020 at 11:21pm |
I am making progress but I have several questions.
I have been trying to get the axles out of the final drives to replace the axle seals. I have gotten the retaining nut loosen on the axle by the bull gear and have been trying to drive them out but have had no luck so far. I do not have any kind of puller (like shown in the service manual) that could pull the axle out from the hub end of the final drive. Does anyone have suggestions on getting the axle out.
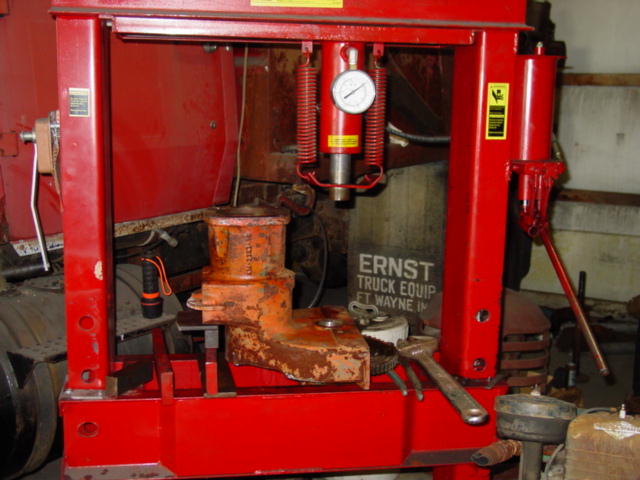
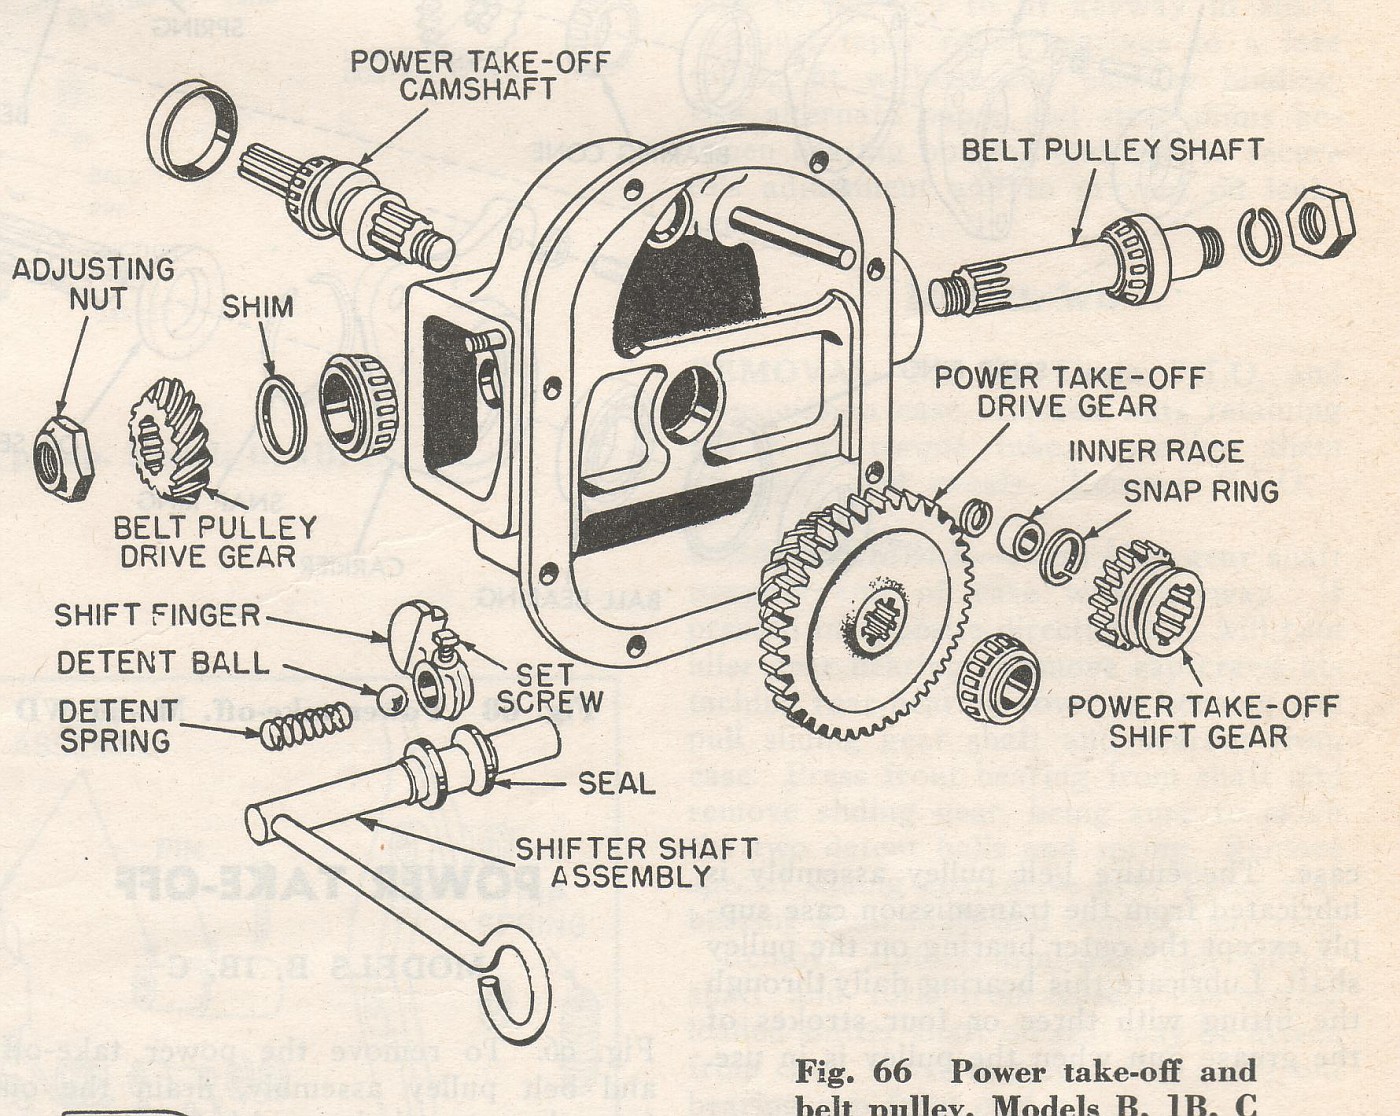
The other problem is getting the PTO shaft out so I can replace its seal and then remove the Belt pulley shaft so I can replace that seal also. I have wedged the gear and have tried to press the PTO shaft out with a 12 ton press but no luck so far. I even had the press bend with the press force. Again any suggestions with the PTO shaft?
Thanks, Tim
|
|
Sugarmaker
Orange Level
Joined: 12 Jul 2013
Location: Albion PA
Points: 8662
|
Post Options
Thanks(0)
Quote Reply
Posted: 18 Aug 2020 at 5:44am |
Tim, I have never been into a C. So cant help much. But two things. There will be a bunch of folks on here that will help you. And second when I am in doubt I call Bill at Sandy Lake Implement. He is a good recourse for these AC tractors. We need more pictures too! Regards, Chris
|
|
D17 1958 (NFE), WD45 1954 (NFE), WD 1952 (NFE), WD 1950 (WFE), Allis F-40 forklift, Allis CA, Allis D14, Ford Jubilee, Many IH Cub Cadets, 32 Ford Dump, 65 Comet, 66 F100.
|
|
Dick L
Orange Level
Joined: 12 Sep 2009
Location: Edon Ohio
Points: 5093
|
Post Options
Thanks(0)
Quote Reply
Posted: 18 Aug 2020 at 7:25am |
kelso wrote:
I am making progress but I have several questions.
I have been trying to get the axles out of the final drives to replace the axle seals. I have gotten the retaining nut loosen on the axle by the bull gear and have been trying to drive them out but have had no luck so far. I do not have any kind of puller (like shown in the service manual) that could pull the axle out from the hub end of the final drive. Does anyone have suggestions on getting the axle out.
The other problem is getting the PTO shaft out so I can replace its seal and then remove the Belt pulley shaft so I can replace that seal also. I have wedged the gear and have tried to press the PTO shaft out with a 12 ton press but no luck so far. I even had the press bend with the press force. Again any suggestions with the PTO shaft?
Thanks, Tim
|
The final drive axle is a press fit. Most of the time trying to beat them out will damage the threads on the end. As they are pressed out the inner nut will have to be loosened a littlie at a time as the axle moves.
Most likely you have not removed the snap ring.
|
|
kelso
Bronze Level
Joined: 07 Jan 2020
Location: Port Ludlow, WA
Points: 42
|
Post Options
Thanks(0)
Quote Reply
Posted: 31 Mar 2021 at 3:42pm |
hello folks sorry for the long time in getting back to ya'll on my model c work.
I owe ya'll a lot of picture but right now I need a quick bit of info.
I am rebuilding the oil pump and am trying to get the blades/vanes in the right direction.
The shop book saids to install the tapered edge of the blades/vanes leading in a anti/counter clockwise direction from the drive end! What is considered the drive end for this purpose?
I currently have them installed with the tapered edge leading to the right as looked from the oil pump cover end toward the engine block.
I have several books and forum post but my brain is not getting this right.
Thanks for your help.
Tim
|
|
kelso
Bronze Level
Joined: 07 Jan 2020
Location: Port Ludlow, WA
Points: 42
|
Post Options
Thanks(0)
Quote Reply
Posted: 31 Mar 2021 at 4:15pm |
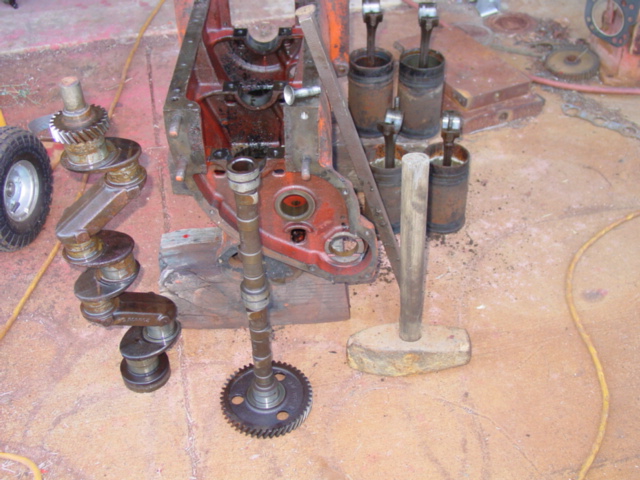
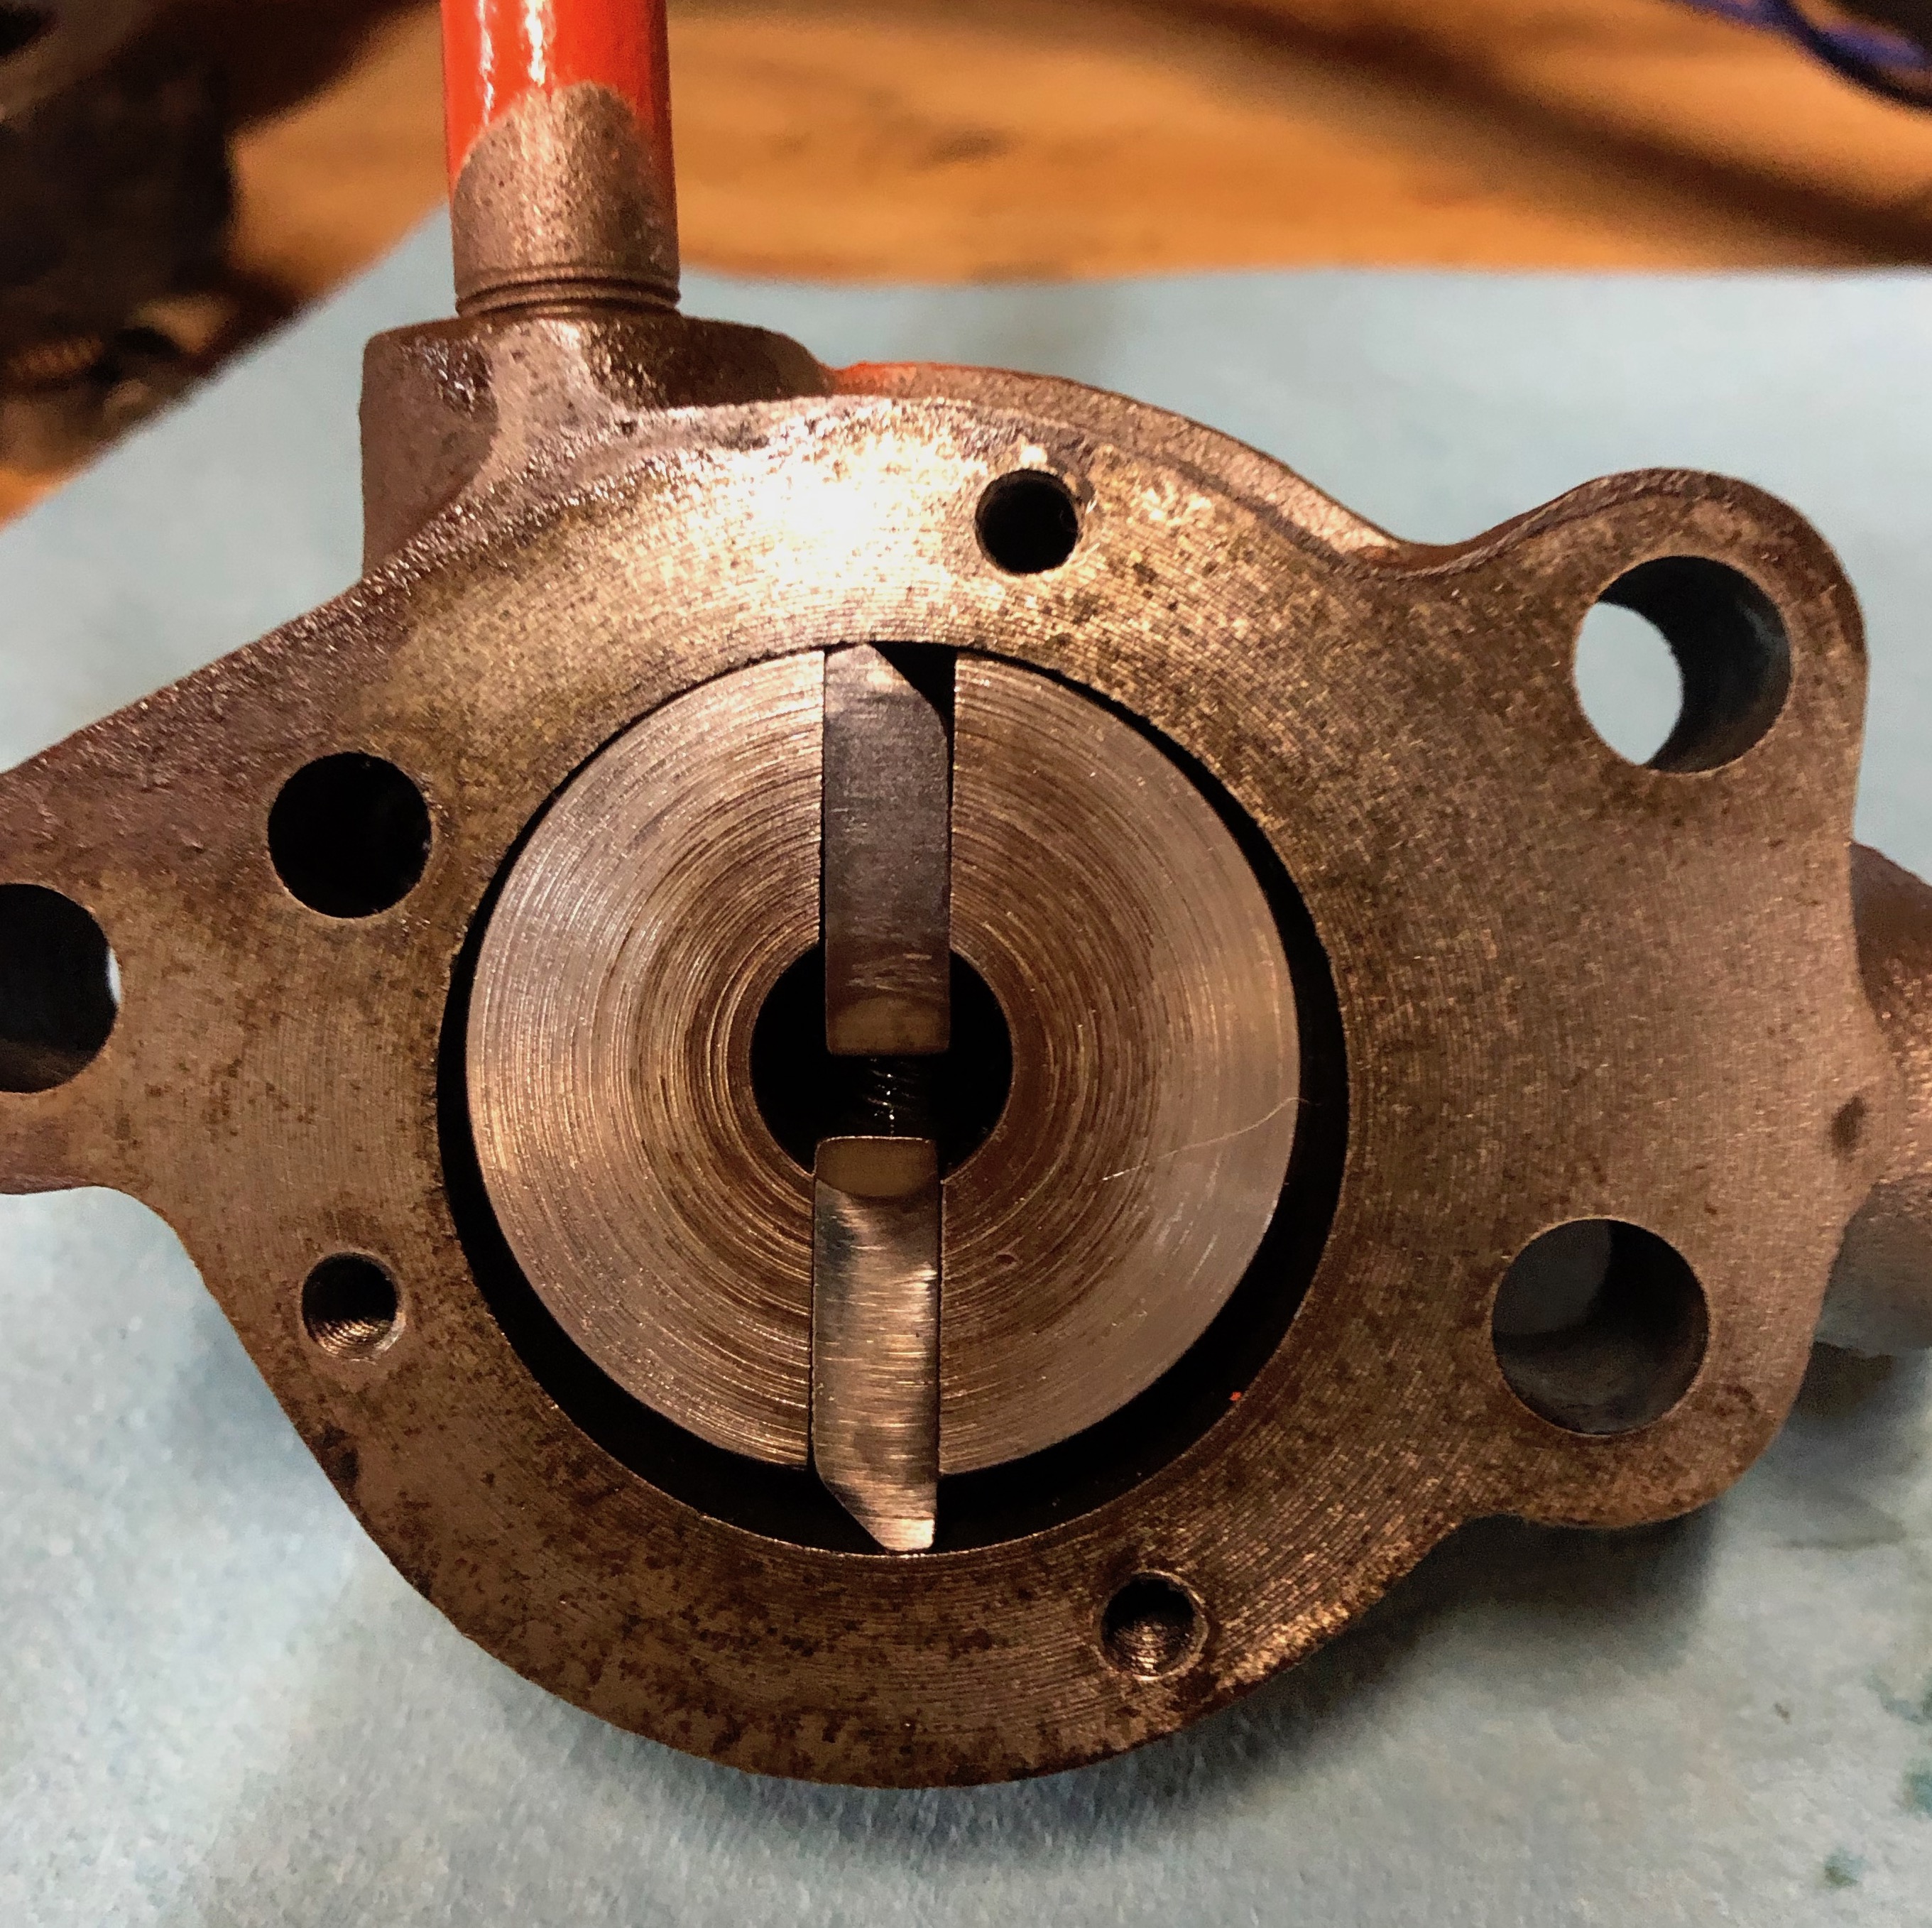
below are two pictures of my oil pump. the second one shows the blades/vanes as I have them installed. The first shows the inside of the cover cap with a little wear. Is this two much wear? I have a rebuild kit that I am using.
|
|
steve(ill)
Orange Level Access
Joined: 11 Sep 2009
Location: illinois
Points: 90956
|
Post Options
Thanks(0)
Quote Reply
Posted: 31 Mar 2021 at 5:46pm |
|
The blades as installed should be about FLUSH with the side of the case ?? If your cover plate has .020 inch clearance and you install it, you will have that area as LEAK BY inside the pump.. The blades should be FLUSH and you should sand or machine the cover FLAT... Then you add a very thin gasket to get Minimum clearance ( maybe .003 ?)
Edited by steve(ill) - 31 Mar 2021 at 5:48pm
|
|
Like them all, but love the "B"s.
|
|
kelso
Bronze Level
Joined: 07 Jan 2020
Location: Port Ludlow, WA
Points: 42
|
Post Options
Thanks(0)
Quote Reply
Posted: 31 Mar 2021 at 6:38pm |
Steve,
Thanks, I have cleaned (removed the old gasket) and sanded the cover and have it petty smooth.
What do you think about the direction of the blades? I only got a little oil pressure with them this direction. To me this is backwards to what the paper saids about the taper of the blade facing the counter clockwise direction of travel.
I am taking the drive view means from the driver seat looking toward the engine which would make the rotation counter clockwise.
Tim
|
|
steve(ill)
Orange Level Access
Joined: 11 Sep 2009
Location: illinois
Points: 90956
|
Post Options
Thanks(0)
Quote Reply
Posted: 31 Mar 2021 at 6:53pm |
the DRIVE they are talking about is the DRIVE END of the PUMP... it plugs into the cam shaft. ........... and yes, the book is confusing.
its been a while since i read the book.. but i think i installed the blades as in your photo.... end clearance on the pump cover is CRITICAL.
for pressure, are you testing on the bench or in the motor ? Cam shaft is hollow and there is a spring / piston at the front end that must be in position to maintain pressure.
Edited by steve(ill) - 31 Mar 2021 at 7:00pm
|
|
Like them all, but love the "B"s.
|
|
C in Concord
Bronze Level

Joined: 26 Sep 2019
Location: Concord, WI
Points: 109
|
Post Options
Thanks(0)
Quote Reply
Posted: 31 Mar 2021 at 7:01pm |

Manual says the vanes must be installed with tapered side towards direction of rotation. Rotation is clockwise when viewed with cover removed, as the image above shows. Looks like you have it right.
Ben
|
|
Leave things better than you found them.
1941 Model C (restored 2020)
|
|
kelso
Bronze Level
Joined: 07 Jan 2020
Location: Port Ludlow, WA
Points: 42
|
Post Options
Thanks(0)
Quote Reply
Posted: 02 Apr 2021 at 4:38pm |
Thanks everybody for the oil pump replies.
I got the oil pump rebuild kit and new check ball in oil pump and tractor back together. Tractor starts up but still not priming so I stop and prime oil pump the way Dick L. has stated (rubber hose on oil filter filler tub and fill with oil) I laid the rubber hose over in the head.
Start tractor and oil pressure come up to the 'N' of normal on the oi gauge and oil is pumping out of hose.
Stop tractor and 15 minutes later start tractor and no oil pressure:( Re-prime oil pump and get oil pressure to 'N' of normal.
Every time I let tractor sit it losses oil pump prime. Checked all fittings I could and everything is tight.
Any suggestions?????
Tim
|
|
steve(ill)
Orange Level Access
Joined: 11 Sep 2009
Location: illinois
Points: 90956
|
Post Options
Thanks(0)
Quote Reply
Posted: 02 Apr 2021 at 6:42pm |
check ball not seating ? clean up the seat... maybe touch with a drill bit if it looks real bad.. if not too bad, smack the ball with a hammer and punch and deform the seat to fit the ball.
Edited by steve(ill) - 02 Apr 2021 at 6:49pm
|
|
Like them all, but love the "B"s.
|
|
AC720Man
Orange Level

Joined: 10 Oct 2016
Location: Shenandoah, Va
Points: 5488
|
Post Options
Thanks(0)
Quote Reply
Posted: 02 Apr 2021 at 7:48pm |
|
You do have the pump vanes installed correctly, we just rebuilt our D15II. We bought a rebuild kit which includes the springs, new blades,ball and new pump. We have great oil pressure. There is a lot of wear on the end plate as it appears extremely worn especially on one side which would mean a lot of wear where the pump shaft slides into the housing. The kit is well worth the money it cost, it will provide the engine with the blood it needs to survive. There are certain parts I will not reuse, our vanes, pump, springs, and ball looked good. But we choose to replace them since it was 53 years old.
|
|
1968 B-208, 1976 720 (2 of them)Danco brush hog, single bottom plow,52" snow thrower, belly mower,rear tine tiller, rear blade, front blade, 57"sickle bar,1983 917 hydro, 1968 7hp sno-bee, 1968 190XTD
|
|
kelso
Bronze Level
Joined: 07 Jan 2020
Location: Port Ludlow, WA
Points: 42
|
Post Options
Thanks(0)
Quote Reply
Posted: 04 Apr 2021 at 6:52am |
Steve,
That is what I was afraid of:(
I have a completely new pump insides...rotor, new ball and spring, vanes and springs.
The new ball seamed to seat fine into the rotor but I did not tap it in to make a hard seat. The new spring is tight holding the check ball.
Is there a way to bench test the pump operation before installing in motor?
I used both thin gaskets under cover which is what was on the pump before I rebuilt it. There was some play but not much could this cause lost of oil prime?
I am getting a 0-30psi oil gauge so I can see what actual pressure I am getting.
Tim
|
|
kelso
Bronze Level
Joined: 07 Jan 2020
Location: Port Ludlow, WA
Points: 42
|
Post Options
Thanks(0)
Quote Reply
Posted: 04 Apr 2021 at 3:35pm |
another question I have is when did the model C's switch from a non-pressurized radiator to a pressurized radiator. Mine is a 1949 C and seems to have had a pressure radiator cap, from old photos, but the book shows a cap like the gas cap.
If it is pressurized what cap is right? I have a 7lb cap but I also see a 4lb cap used.
What Little I have run my C so far I had the radiator over flow at about 110 degrees with a a 7lb cap. I have a rebuilt thermostat on the tractor. Is this normal??
Tim
|
|
steve(ill)
Orange Level Access
Joined: 11 Sep 2009
Location: illinois
Points: 90956
|
Post Options
Thanks(0)
Quote Reply
Posted: 04 Apr 2021 at 9:16pm |
You could probably test the pump on the bench spinning it with an electric drill.. I have never bothered to do that.......You should not notice any SIDE TO SIDE shake on the pump. The internal clearance is only 2-3 thousands i think ? If you have too much , you need a paper thin gasket . The blades should be the same width as the pump case. The only clearance you get is putting a 1-2 thousandths paper gasket on each end... The cover can not have excess wear / more clearance.... The only time i have heard of oil LEAKING BACK was when the ball did not seat in the pump.
If your radiator is over flowing at 110 degrees, it could be the thermostat is stuck, not opening, or in backward... It is spring loaded, right ? I have several tractors and they have 4 or 7 psi caps.. None are "no pressure" caps. Since there is no overflow tank, you can not fill the radiator to the top.. I have the top tank about 1/2 full. Keep level down an inch and give room for things to breath / expand.
|
|
Like them all, but love the "B"s.
|
|
kelso
Bronze Level
Joined: 07 Jan 2020
Location: Port Ludlow, WA
Points: 42
|
Post Options
Thanks(0)
Quote Reply
Posted: 05 Apr 2021 at 2:39pm |
Does anyone know of a source for rebuilt or rebuilding and checking these oil pumps? I am now looking for a completely rebuilt oil pump for a AC 1949 model C.
Thanks, Tim
|
|