| Author |
 Topic Search Topic Search  Topic Options Topic Options
|
drobCA 
Orange Level


Joined: 20 Jun 2017
Location: Perris, CA
Points: 292
|
 Post Options Post Options
 Thanks(0) Thanks(0)
 Quote Quote  Reply Reply
 Topic: med-lg electrolysis tank Topic: med-lg electrolysis tank
Posted: 03 Aug 2017 at 1:52am |
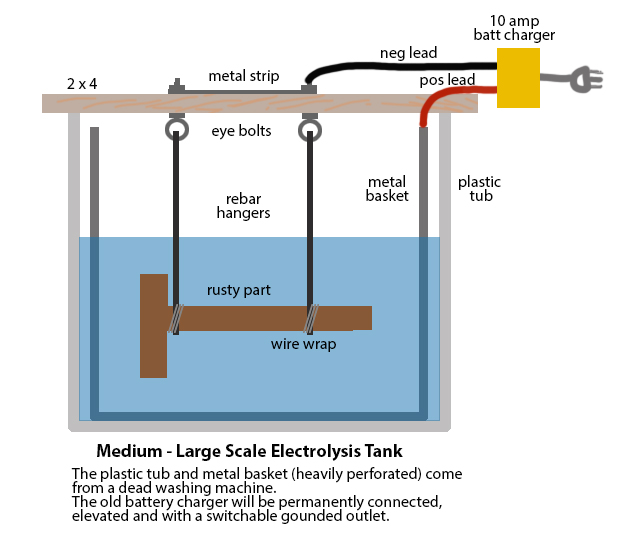
finally retired from teaching and getting around to some long delayed projects... like converting scavenged parts from a dead washing machine into a dedicated electrolysis tank. The plan is to locate it outside the shop under a rain roof but open to the constant breezes here (southern calif.) the plastic tank bottom will need to be sealed - I plan to use fiberglass. I have read the how-to on the link the esteemed Mr. Tucker provided, but I would appreciate any cautions, advice and/or suggestions. also - what happens to the wooden handle if I put in a garden shovel or hoe?
thanks as always.
Edited by drobCA - 03 Aug 2017 at 8:10am
|
 |
|
Sponsored Links
|
|
 |
DiyDave 
Orange Level Access


Joined: 11 Sep 2009
Location: Gambrills, MD
Points: 51708
|
 Post Options Post Options
 Thanks(0) Thanks(0)
 Quote Quote  Reply Reply
 Posted: 03 Aug 2017 at 4:43am Posted: 03 Aug 2017 at 4:43am |
I would prolly use a ubiquitous blue plastic barrel, less work...
As for wood, it is a non conductor, so nothing will happen to it, unless you forget its in the barrel, for like a period of 10-20 years...
|
 |
jaybmiller 
Orange Level Access

Joined: 12 Sep 2009
Location: Greensville,Ont
Points: 22474
|
 Post Options Post Options
 Thanks(0) Thanks(0)
 Quote Quote  Reply Reply
 Posted: 03 Aug 2017 at 5:54am Posted: 03 Aug 2017 at 5:54am |
|
I use the plastic '45 gallon' barrel as well and connect scrap steel at 12,2,4,6,8,10 oclocks.
a suggestion. Replace the receptacle that the charger will be plugged into with a GFCI version....just in case..
a comment, In the diagran it show the positive of the charger as a black wire. Up her e in Canada RED is psoitive, BLACK is negative, so perhaps the colours are backwards or the + and - symbols are. I cannever remember which is which, wrote it on the decicated charger and that's next door...I'm sure someone else will say which it is...
Jay
|
|
3 D-14s,A-C forklift, B-112
Kubota BX23S lil' TOOT( The Other Orange Tractor)
Never burn your bridges, unless you can walk on water
|
 |
Lonn 
Orange Level


Joined: 16 Sep 2009
Location: Назарово,Russia
Points: 29781
|
 Post Options Post Options
 Thanks(0) Thanks(0)
 Quote Quote  Reply Reply
 Posted: 03 Aug 2017 at 6:04am Posted: 03 Aug 2017 at 6:04am |
|
red is pos, black neg
|
|
-- --- .... .- -- -- .- -.. / .-- .- ... / .- / -- ..- .-. -.. . .-. .. -. --. / -.-. .... .. .-.. -.. / .-. .- .--. .. ... -
Wink
I am a Russian Bot
|
 |
BrianC 
Orange Level

Joined: 16 Jun 2011
Location: New York
Points: 1619
|
 Post Options Post Options
 Thanks(0) Thanks(0)
 Quote Quote  Reply Reply
 Posted: 03 Aug 2017 at 6:13am Posted: 03 Aug 2017 at 6:13am |
|
You got to fix that picture, re-label the black lead as negative, red as positive.
The colors are correct for any battery charger I ever saw.
I think you can used the edit post function to swap out the picture.
People use plastic stock tanks, the blue barrels, IBC totes...
|
 |
drobCA 
Orange Level


Joined: 20 Jun 2017
Location: Perris, CA
Points: 292
|
 Post Options Post Options
 Thanks(0) Thanks(0)
 Quote Quote  Reply Reply
 Posted: 03 Aug 2017 at 8:15am Posted: 03 Aug 2017 at 8:15am |
yep, fixed the reversed labels on the leads. apologies... it was sleepy late when I did the original.
|
 |
BrianC 
Orange Level

Joined: 16 Jun 2011
Location: New York
Points: 1619
|
 Post Options Post Options
 Thanks(0) Thanks(0)
 Quote Quote  Reply Reply
 Posted: 03 Aug 2017 at 11:44am Posted: 03 Aug 2017 at 11:44am |
|
I see much on the net about the electrolysis set up, but not so much about next steps.
Seems to me when it is out from the tank, it is a slimy mess.
Would a good power wash blast it clean? Then it is still wet and will start to rust.
Blow it off, wipe down with mineral spirits, dry with hair dryer and then prime?
|
 |
JoeM(GA) 
Orange Level


Joined: 12 Sep 2009
Location: Cumming,GA
Points: 4658
|
 Post Options Post Options
 Thanks(0) Thanks(0)
 Quote Quote  Reply Reply
 Posted: 03 Aug 2017 at 2:44pm Posted: 03 Aug 2017 at 2:44pm |
Don, it's a great system to play with,I have cleaned every tractor I have taken down with it and really like how it works. A couple of comments on your design if I may- I highly recommend the 30/55 gallon plastic drums you see for sell everywhere, if you intend to do larger pieces the IBC 275 gallon totes with the top cut out are great (and have a bottom drain) I have done very small pieces in a plastic cup up to cutting a trench and lining it with plastic to do WC frame rails. I've used four picnic table benches in a square and a tarp for some large rear wheels. Most anything non-metallic will do! Your washer basket, most are porcelain-coated, it must be bare metal, you will find removing that coating to be quite the chore, along with the fact that what ever you use for an anode must be cleaned often as the part is cleaned. Removing your part, removing the basket, then scraping or brushing it clean would be a lot of unneeded effort! You could also find if cleaning a smaller part that you end up with too much amp draw with that much surface and no way to adjust it. I use old mower and bush hog blades. They can be clamped around the edges and moved up or down as more area is needed and are easy to scrape clean. You will find if doing really rusty pieces that the anodes will need cleaning more frequently to keep the reaction going and the easier it is to get to them, the better. Also realize the anode will not last too long, it will become Swiss cheese as it is eaten by the reaction. As far as the question of the next step, I wash my part with a hose and scotch brite pad to remove the black coating you will find on the freshly done piece, then blow dry with air and then a spray of a metal etch containing phosphoric acid, I use "must for rust" found at Lowes and Home Depot because its cheap. I have found that treated parts will be fine for over 12 months if kept inside. the question about disposal, as long as you're using metal for the anode, the fluid is just iron rich water, I just drain mine off in the woods with a garden hose (caution, it will stain EVERYTHING it touches!) then let the container dry a few days and the rust, dirt, and paint will harden in the bottom and can be bagged and thrown in the trash. A couple of rules you must follow - 1-if you hook up the power backwards, your part will be ruined 2-don't let copper, brass, Aluminum into the tank, the alkaline solution will attack it here's you some ideas of what it can do and clean - http://s33.photobucket.com/user/Joecdeere/slideshow/Electrolysis
|
|
Allis Express North Georgia
41 WC,48 UC Cane,7-G's,
Ford 345C TLB
|
 |
drobCA 
Orange Level


Joined: 20 Jun 2017
Location: Perris, CA
Points: 292
|
 Post Options Post Options
 Thanks(0) Thanks(0)
 Quote Quote  Reply Reply
 Posted: 03 Aug 2017 at 3:38pm Posted: 03 Aug 2017 at 3:38pm |
wow, Joe - thanks for the words and the pictures - very informative.
new to me was/is the idea that total submersion is not required! can do half at a time.
and btw I just discovered that the washer plastic got brittle from too long in the Calif sun, so... so much for that plan. and pack rat me has plenty of disposable iron around, so that will be my easy-to-use anode supply.
again - thanks all for the input. good advice and I will act on it.
|
 |
DiyDave 
Orange Level Access


Joined: 11 Sep 2009
Location: Gambrills, MD
Points: 51708
|
 Post Options Post Options
 Thanks(0) Thanks(0)
 Quote Quote  Reply Reply
 Posted: 03 Aug 2017 at 6:04pm Posted: 03 Aug 2017 at 6:04pm |
Some cheap lemon juice, and water will clean up the slime. I find that some tater peelings in a 5 gallon bucket of water, cleans up small parts like wrenches and bolts very well... 
|
 |
wiplowboy 
Silver Level

Joined: 29 Nov 2012
Location: Custer Wisc.
Points: 313
|
 Post Options Post Options
 Thanks(0) Thanks(0)
 Quote Quote  Reply Reply
 Posted: 03 Aug 2017 at 8:20pm Posted: 03 Aug 2017 at 8:20pm |
|
Do I understand Potato peelings and water in bucket Do you have to keep the bolts suspended. Thanks for all the info.
|
 |
DiyDave 
Orange Level Access


Joined: 11 Sep 2009
Location: Gambrills, MD
Points: 51708
|
 Post Options Post Options
 Thanks(0) Thanks(0)
 Quote Quote  Reply Reply
 Posted: 03 Aug 2017 at 9:06pm Posted: 03 Aug 2017 at 9:06pm |
 wiplowboy wrote: wiplowboy wrote:
Do I understand Potato peelings and water in bucket Do you have to keep the bolts suspended. Thanks for all the info. |
Nope, just drop it all in, shake it goos, rinse off, takes a day to a week...
|
 |
Ranse 
Orange Level


Joined: 11 Mar 2016
Location: Tennessee
Points: 773
|
 Post Options Post Options
 Thanks(0) Thanks(0)
 Quote Quote  Reply Reply
 Posted: 03 Aug 2017 at 9:52pm Posted: 03 Aug 2017 at 9:52pm |
|
Very interesting, I'm thinking of trying this myself. I was just wondering how long this process takes. I'm sure it varies, but what's a ball park figure, a few hours, a few days, etc.? The water looks like it gets really nasty, does it ever need changing before the part gets done?
|
 |
JoeM(GA) 
Orange Level


Joined: 12 Sep 2009
Location: Cumming,GA
Points: 4658
|
 Post Options Post Options
 Thanks(0) Thanks(0)
 Quote Quote  Reply Reply
 Posted: 03 Aug 2017 at 10:14pm Posted: 03 Aug 2017 at 10:14pm |
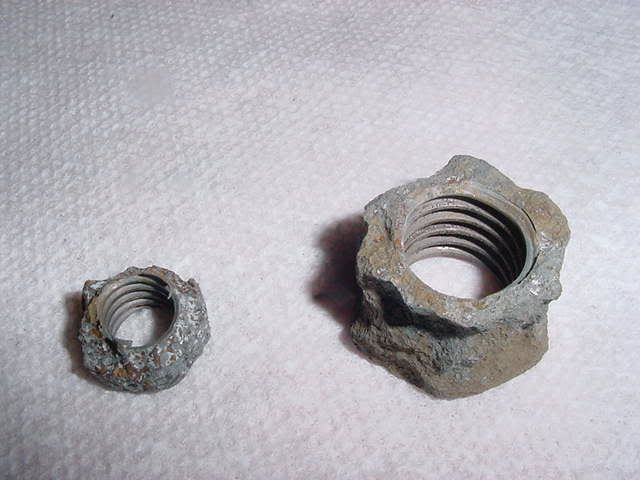
I've never had it take more than a couple of days for a big heavy housing, smaller pieces or pieces with only light rust can be a few hours, but I tend to not keep an eye on it all the time because the reaction will stop when the last of the rust is gone. The water can get really nasty, but I tend to only change it every few months if using it a lot. The main thing is to keep it alkaline to help the current move and as a bonus, it really loosens up old paint. If you're doing something really rusty like the lift linkage these nuts came off of that was laying in the mud for who knows how long and you want to be able to get it apart, then it's best to just let it "cook" for 3-4 days so it can really get into everything! 
|
|
Allis Express North Georgia
41 WC,48 UC Cane,7-G's,
Ford 345C TLB
|
 |
WF owner 
Orange Level

Joined: 12 May 2013
Location: Bombay NY
Points: 4666
|
 Post Options Post Options
 Thanks(0) Thanks(0)
 Quote Quote  Reply Reply
 Posted: 04 Aug 2017 at 5:47am Posted: 04 Aug 2017 at 5:47am |
Here's the link to a very informative tutorial about using electrolysis. I have posted it several times. Let me know if you like the link.
|
 |
Sugarmaker 
Orange Level


Joined: 12 Jul 2013
Location: Albion PA
Points: 8292
|
 Post Options Post Options
 Thanks(0) Thanks(0)
 Quote Quote  Reply Reply
 Posted: 04 Aug 2017 at 7:55am Posted: 04 Aug 2017 at 7:55am |
|
I like this process for cleaning parts too. I have a medium sized fiberglass container for the water and Arm and Hammer washing soda mixture. I bolt the steel sacrificial anodes around the inside of the tub, and wire them together. a 2x4 across the top to suspend the parts. I try to connect the wire from the power source to the part if possible. The direct link is better than going through the hanger. Yes if the part wont totally fit let it hang out and reverse it tomorrow.
Yes this process is a little messy. have a hose handy. Dont clean these in the kitchen. I scrub the part with a wire brush to remove the paint and rust and black smut.
I use a 12 volt battery between the charger and the tank/ parts.
I have used this process for most of the parts for 4 tractors and half a dozen implements.
Warning this thing is working when your not! It can clean parts faster than you can finish them!:)
Regards,
Chris
|
|
D17 1958 (NFE), WD45 1954 (NFE), WD 1952 (NFE), WD 1950 (WFE), Allis F-40 forklift, Allis CA, Allis D14, Ford Jubilee, Many IH Cub Cadets, 32 Ford Dump, 65 Comet.
|
 |
Dave H 
Orange Level


Joined: 11 Sep 2009
Location: Central IL
Points: 3493
|
 Post Options Post Options
 Thanks(0) Thanks(0)
 Quote Quote  Reply Reply
 Posted: 04 Aug 2017 at 12:54pm Posted: 04 Aug 2017 at 12:54pm |
|
I use the same process as Joe.
However I like to work in warm weather with direct sun.
When that is available I blast the parts coming out with pressure washer, hit is a lick with scotch bright, quick blast again, set it on as tilt in direct sun to dry it off, then spritz it with the phosphoric acid and let the sun help in drying the processed piece.
|
 |
Ranse 
Orange Level


Joined: 11 Mar 2016
Location: Tennessee
Points: 773
|
 Post Options Post Options
 Thanks(0) Thanks(0)
 Quote Quote  Reply Reply
 Posted: 04 Aug 2017 at 9:00pm Posted: 04 Aug 2017 at 9:00pm |
|
Thanks for the link WF owner. I printed the info for future reference.
|
 |


 Topic Options

 Post Options
 Thanks(0)


 wiplowboy wrote:

