| Author |
 Topic Search Topic Search  Topic Options Topic Options
|
modirt 
Orange Level Access

Joined: 18 Jul 2018
Location: Missouri
Points: 8833
|
 Post Options Post Options
") Thanks(0) Thanks(0)
 Quote Quote  Reply Reply
 Posted: 25 Jun 2025 at 9:29pm Posted: 25 Jun 2025 at 9:29pm |
|
Also, at end of day, parked it, then turned the key off. On a whim, tried to start and she groaned a bit, but did start and run........even when hot. Extra juice in the battery may have been a factor.
|
 |
|
Sponsored Links
|
|
|
modirt
Orange Level Access
Joined: 18 Jul 2018
Location: Missouri
Points: 8833
|
Post Options
Thanks(0)
Quote Reply
Posted: 26 Jun 2025 at 3:08pm |
Quick update. Pulled the battery and had it tested and they said still good. Was low on charge, but voltage output tested OK.
Battery cables were #4 and negative was grounded to the engine block. Cables corroded, so have upgraded to new #2 cables. Will install those on the existing battery. If memory serves, 725 cold cranking amps. They sell one with more CCA's that sits in same foot print. As is, the battery box is full. BTW, forgot but there is a 2nd battery box. So may have been setup to run a 2nd battery in parallel for running lights at night.
Existing alternator......one in the video......despite being large in physical size is only putting out 30 amps or so. Since it has been causing trouble anyway, new 90 amp single wire (self regulated) alternator on order. Local NAPA can make me new charging wire.........thinking #6 AWG wire to handle the loads.
Will make those changes, then see what happens.
|
|
Ed (Ont)
Orange Level

Joined: 08 Nov 2009
Location: New Lowell, Ont
Points: 1505
|
Post Options
Thanks(0)
Quote Reply
Posted: 26 Jun 2025 at 9:59pm |
That sounds like good changes. Bigger battery cables should help. 30 amp alternator is not a whole bunch but a lot of alternators back in the day were in that range. Chev in the 70's were 37 amps. I plowed snow with a 77 GMC with 37 amps. We would stop in the middle of the night when the lights got so dim you could not see. Park truck and let it run and go for a coffee. Then work again!!! Lol. 
|
|
WF owner
Orange Level
Joined: 12 May 2013
Location: Bombay NY
Points: 5041
|
Post Options
Thanks(0)
Quote Reply
Posted: 27 Jun 2025 at 6:01am |
Probably not the same problem, but years ago (80's), I had a Chevy motorhome that never wanted to start when it was warm. The starter was very close to the exhaust. With the setback style of the engine, engine compartment heat was always a problem. I tried various attempts at heat shielding and only ever managed to make the problem worse.
A local electrical shop rebuilt the starter, and I had no more problems.
|
|
modirt
Orange Level Access
Joined: 18 Jul 2018
Location: Missouri
Points: 8833
|
Post Options
Thanks(0)
Quote Reply
Posted: 27 Jun 2025 at 8:06am |
Bad starter could be part of problem, but in this case, not from the exhaust. Open air mounting and this one has a pair of cherry bomb glass packs on duel exhaust pipes. Somebody had a sense of humor.
I added turnouts so the hot exhaust didn't hit rear tires directly.
|
|
TedN
Bronze Level

Joined: 30 Apr 2025
Location: Central WA
Points: 102
|
Post Options
Thanks(0)
Quote Reply
Posted: 27 Jun 2025 at 10:34am |
|
Fix the (now) known alternator issue, replace the cables, and see if that solves the problem. Looks like it uses an electric fan, that will speed up a little too. I think if I were working on it I would get some convoluted tubing and zip ties and get some of the wiring cleaned up a little while doing it. A few extra minutes gains quite a bit of piece of mind.
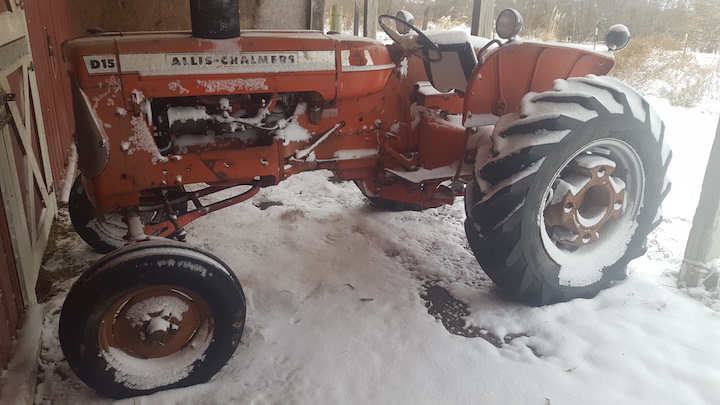
Its neat to see something like that out being used, and it works for what you are doing.
Ted
Edited by TedN - 27 Jun 2025 at 10:38am
|
|
190XTD seriesIII, 190XTD seriesI, maroon belly 7000, 190XTD series??? project(or maybe parts)
|
|
modirt
Orange Level Access
Joined: 18 Jul 2018
Location: Missouri
Points: 8833
|
Post Options
Thanks(0)
Quote Reply
Posted: 03 Jul 2025 at 5:37pm |
Quick update. Got the #2 battery cables installed, then put battery charger on and left it overnight. Battery needed it. Got a chance to get it all back to normal and hit starter. Volt meter went from 12 volts to 10 (had been dropping below 6 volts), engine turned over way faster than had been before and once she started, volt meter quickly climbed up to over 14.......so alternator was trying to charge. New alternator has arrived, currently waiting on mounting brackets to install it.
Also, as mentioned before, part of fuel line was lacking insulation, so that has been replaced. For first time I also noticed that the 2 or 3 inch area where the insulation was missing passed within about 2 inches or so of exhaust manifold, which is likely why it was cooked off. New high temp insulation on it now.
Old alternator is unable to keep up with any type of load, so belief is under normal operation was getting a slow battery drain. With any lights on, drain was killing the battery. Hoping new alternator fixes that. Will see.
|
|
Ed (Ont)
Orange Level
Joined: 08 Nov 2009
Location: New Lowell, Ont
Points: 1505
|
Post Options
Thanks(0)
Quote Reply
Posted: 03 Jul 2025 at 9:27pm |
|
Sounds good. Voltage should be about 13.6 to 14.5 with engine running so the alternator seems to be good. Or does it drop when you turn some accessories on?
|
|
modirt
Orange Level Access
Joined: 18 Jul 2018
Location: Missouri
Points: 8833
|
Post Options
Thanks(0)
Quote Reply
Posted: 04 Jul 2025 at 7:31am |
As noted, this is a 318 Chrysler engine, but has none of the normal charging system.....external voltage regulator, etc........and somebody in the past rigged up an AC Delco GM style alternator with internal regulator. Rigged is an understatement. They found a way to mount wrong fit alternator to engine......big stack of washers used to get belts to align......then made a tensioning bracket......and welded it to the frame.......so belt tension varies if engine and frame do not move together.
Had this GM alternator tested to see if it was working and it was only putting out something like 30 amps. Have seen the original stickers for some Dodge D600 farm trucks from early 70's era.....same engine....and even those had 43 amp alternators.
If you don't get all the day's hay picked up before dark, and turn on the lights, the drain on battery goes way up.
Doing some research on this, they also say it is very hard on the alternator if battery ever gets really low and engine is then jump started such that alternator then has to charge a nearly dead battery. That has happened with this.
Another reason for getting the bigger 90 amp alternator installed. Hopefully it will keep up with the load and keep battery topped up all the time. Once topped up, extra capacity of bigger alternator won't matter. It only charges as needed. Seems like only way to go.
|
|
SteveM C/IL
Orange Level Access
Joined: 12 Sep 2009
Location: Shelbyville IL
Points: 8654
|
Post Options
Thanks(0)
Quote Reply
Posted: 04 Jul 2025 at 10:33am |
|
366 & 427 truck engines were known for no start hot and the cure was an extra solenoid on the fender or firewall but your starter is not encased in a heat zone so may not be a helpful suggestion. I'm pretty sure your engine doesn't get "tight" when hot.
|
|
modirt
Orange Level Access
Joined: 18 Jul 2018
Location: Missouri
Points: 8833
|
Post Options
Thanks(0)
Quote Reply
Posted: 16 Jul 2025 at 3:30pm |
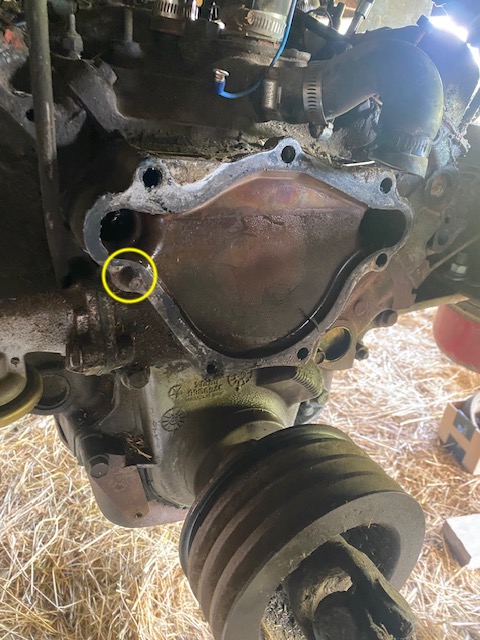
Quick update......with new replacement alternator, pulled the old one and was ready to install new........instantly ran into trouble. The lower, main support OEM alternator bracket is held in place by either two or three bolts......depending on the age and style of water pump......but that braket and the bracket to tension it is held one by only one bolt. One of 7 that holds the water pump in place. The key one.......the one that has to be used.......was found to have been snapped off inside the water pump housing. That bolt passes thru bracket, bracket, water pump, timing chain cover, then screws into the block.....and the end of it is open to coolant. So to install, a good thread sealant has to be used. No telling now many youtube videos there are documenting removal of that snapped off bolt. Now my turn to figure it out. Has been soaking in penetrating oil for days. Trying hard not to snap it off again as that would require removal of timing chain cover. Exciting times.
Next question.........I now have 3 or 4 of these long bolts out, and hopefully 4th and final is coming out with no drama. I normally would plan to chase the threads in engine block with an oiled tap before putting bolts back. Problem being my 3/8" tap appears to be damaged (won't go into a matching nut without binding) and not long enough to reach thru the timing chain cover to get to the threads in the block anyway.
Do they make a longer than standard tap with 4 inch or so shank? If so, what is now a good brand to buy? What I have now are Blue Point, which as I understand it was an economy line of tools sold by Snap On. I may be able to buy Irwin or Hanson locally. Anything else to consider?
|
|
modirt
Orange Level Access
Joined: 18 Jul 2018
Location: Missouri
Points: 8833
|
Post Options
Thanks(0)
Quote Reply
Posted: 16 Jul 2025 at 3:32pm |
As she sits now.........that big 4 belt pulley is in place of a harmonic balancer. Have no clue how that is being held in place.......and no desire to find out. But if that bolt gets snapped, I get to find out.
|
|
Acguywill
Bronze Level
Joined: 15 Jan 2024
Location: Vauxhall ab Can
Points: 148
|
Post Options
Thanks(0)
Quote Reply
Posted: 16 Jul 2025 at 11:15pm |
|
If you just want to clean the threads take a grinder and cut a groove or two through the threads of a bolt that is long enough to reach. I have done lots of times. Simple cheap and don't have to worry about damaging a tap.
|
|
DiyDave
Orange Level Access

Joined: 11 Sep 2009
Location: Gambrills, MD
Points: 54304
|
Post Options
Thanks(0)
Quote Reply
Posted: 17 Jul 2025 at 4:43am |
 modirt wrote: modirt wrote:
Quick update......with new replacement alternator, pulled the old one and was ready to install new........instantly ran into trouble. The lower, main support OEM alternator bracket is held in place by either two or three bolts......depending on the age and style of water pump......but that braket and the bracket to tension it is held one by only one bolt. One of 7 that holds the water pump in place. The key one.......the one that has to be used.......was found to have been snapped off inside the water pump housing. That bolt passes thru bracket, bracket, water pump, timing chain cover, then screws into the block.....and the end of it is open to coolant. So to install, a good thread sealant has to be used. No telling now many youtube videos there are documenting removal of that snapped off bolt. Now my turn to figure it out. Has been soaking in penetrating oil for days. Trying hard not to snap it off again as that would require removal of timing chain cover. Exciting times.
Next question.........I now have 3 or 4 of these long bolts out, and hopefully 4th and final is coming out with no drama. I normally would plan to chase the threads in engine block with an oiled tap before putting bolts back. Problem being my 3/8" tap appears to be damaged (won't go into a matching nut without binding) and not long enough to reach thru the timing chain cover to get to the threads in the block anyway. Might be that the nut is not made to the standard of the tap. All that means it you're cutting more thread, and that particular nut would fit a little looser...
Do they make a longer than standard tap with 4 inch or so shank? If so, what is now a good brand to buy? What I have now are Blue Point, which as I understand it was an economy line of tools sold by Snap On. I may be able to buy Irwin or Hanson locally. Anything else to consider? Try Mcmaster-carr, link below... |
|
|
Source: Babylon Bee. Sponsored by BRAWNDO, its got what you need!
|
|
modirt
Orange Level Access
Joined: 18 Jul 2018
Location: Missouri
Points: 8833
|
Post Options
Thanks(0)
Quote Reply
Posted: 24 Jul 2025 at 11:40am |
Not much progress on the bolt, except new plan to attack it. Have now added an induction heater to stable to tools. Have had more than one guy who turns wrenches for a living tell me that is what they use to free stuck bolts. For lack of a better way to explain it, seems to work like a microwave oven or some such........a coil is placed over end of the bolt and when you hit the on switch, energy waves are directed towards center of the coil (like a loose coil spring), with bolt positioned in the center. Some show it heating to read hot in a matter of seconds. No open flame as a torch or welder. Anyway, going to heat it up, let it cool and bang on it. Do that a couple times and hopefully bolt gives it up.
Interesting that I've now watched dozens of youtube videos of guys working on front end of these old 318 motors and that very same bolt is problem for 99% of them. Generally it gets broken (as mine was), then drama follows as guys figure out ways to get it out.
It may be a major design flaw. In normal use, carbon steel bolt passes thru steel alternator mounting bracket 1, then steel alternator mounting bracket 2, then aluminum water pump housing, then aluminum timing chain cover, then into thread in cast iron block (held in place by some nasty sealant), where tip of bolt is then exposed to some form of coolant cocktail. If for some reason, stray current finds it's way from alternator frame or electrical system you could have no telling what in terms of corrosion from dissimilar metals and all the rest. Bolt just gets chemically welded into place. Don't know if there is a non-metalic bolt tough enough for that duty, but would be worth looking into.
|
|
modirt
Orange Level Access
Joined: 18 Jul 2018
Location: Missouri
Points: 8833
|
Post Options
Thanks(0)
Quote Reply
Posted: 24 Jul 2025 at 11:55am |
And while we are at it, here is another issue. Has power steering,
turns left OK, but does not turn same to the right. Turn radius to the
right might be 150 feet or so. At a T intersection, always concerned it
will end up in the opposite road ditch or field on other side before it
will turn down the road.
Looking for problems,
I now see the steering cylinder has a hard stop on the shaft. Why would
that be there? Either mismatched cylinder pulled from another use or
maybe if it retracts too far it hits something? Once she is running
again, will have to look to see if that is a problem. As is, using less than half the throw of the piston when trying to retract to turn right.
|
|
TedN
Bronze Level
Joined: 30 Apr 2025
Location: Central WA
Points: 102
|
Post Options
Thanks(0)
Quote Reply
Posted: 24 Jul 2025 at 12:55pm |
|
Without seeing the whole cylinder this is just speculation, but maybe it is mounted incorrectly. That may be as far as the cylinder retracts, but you may be hitting the steering stop before it is fully extended. If it were me, I would pop the end loose from the steering arm and cycle it fully as a first step. You may just need to move the rear mounting point.
Glad to hear you have your hot start issue figured out.
Ted
|
|
190XTD seriesIII, 190XTD seriesI, maroon belly 7000, 190XTD series??? project(or maybe parts)
|
|
modirt
Orange Level Access
Joined: 18 Jul 2018
Location: Missouri
Points: 8833
|
Post Options
Thanks(0)
Quote Reply
Posted: 05 Aug 2025 at 12:26pm |
No progress at all on the broken stud. Have concluded it all needs
to come off. Started with PTO shaft this morning and front end popped
right off. Rear end......the part in front of pulley.......is stuck
tight. If it is same as front, and it looks to be......is keyed onto the
shaft and held there by set screw. But is locked tight from fit, corrosion or all the above. Can't pry it
off and won't even slide back on further if you whack it with a hammer.
Last U-joint like this I wrestled with was off a hay rake and we managed to pull
the shaft out of the rake, take it to a bench, heat it with a torch and
eventually drive it off with a hammer. Considering all the grease, oil
on engine and that rig is parked in a pole barn full of equipment and
loose hay, not wanting to get a fire going on front of engine . So torch
option last resort.
If the U-joint could be
taken apart, might be able to get wheel puller on it (and on the belt
pulley), but see no way to get the cross out of that joint to take it
apart. All 4 cap ends for the cross appear solid. Really hoping to not
destroy the U-joint.
Any ideas? (currently being doused with penetrating oil pending better ideas).
|
|
steve(ill)
Orange Level Access
Joined: 11 Sep 2009
Location: illinois
Points: 88285
|
Post Options
Thanks(0)
Quote Reply
Posted: 05 Aug 2025 at 1:38pm |
normally the pulleys on "most" engines are retained by a bolt in the end of the crank.. What holds your pulley onto the shaft ? Possible to pull the pulley off and bring the shaft with it ?... Could you put a rectangular bar thru the U joint by the cross, that has a pusher bolt hole on each side, and screw down agains the pulley to push the joint OUT ?
some type of slide hammer attached to the shaft between the two u joints... and then slam with the hammer to shock the shaft out ?
Edited by steve(ill) - 05 Aug 2025 at 1:40pm
|
|
Like them all, but love the "B"s.
|
|
modirt
Orange Level Access
Joined: 18 Jul 2018
Location: Missouri
Points: 8833
|
Post Options
Thanks(0)
Quote Reply
Posted: 05 Aug 2025 at 2:16pm |
It may be possible to run flat bar stock thru the U-joint yoke, then use a bolt / bar stock / flat washer / nut.......one on each side......to gently push it off. Worth a try. You would be pushing on the yoke's cross, so may damage that to the point it has to be replaced, but so be it.
What holds pulley on is unknown. Behind the U-joint are for 3/8" bolts going aft towards the engine, so I assume there is a flange of some type behind / under it holding it in place. Like fan belt pulley? Then expect that to also be held on by the usual big bolt they use to hold the harmonic balancer in place. Remove the bolt, pull the flange and maybe that would do it?
Had hoped to avoid removing timing chain cover, but may be best after all. From dates, it is mismatched to the block anyway and appears to be showing some corrosion. Also need to get it off to chase threads on the block so that can run bolts back in good condition threads. Also won't hurt to get a peek at unknown condition of timing chain and gear. Clean out all the gang green and build back better?
Not happy to be doing all that, but willing to if it makes things better. Just pain in the hinny when it wants to fight with you every step of the way.
|
|
plummerscarin
Orange Level Access
Joined: 22 Jun 2015
Location: ia
Points: 3953
|
Post Options
Thanks(0)
Quote Reply
Posted: 05 Aug 2025 at 5:41pm |
|
Pretty greasy there but think if you clean it some you would find circlips inside the yoke to be removed then push the caps out.
|
|
SteveM C/IL
Orange Level Access
Joined: 12 Sep 2009
Location: Shelbyville IL
Points: 8654
|
Post Options
Thanks(0)
Quote Reply
Posted: 05 Aug 2025 at 10:31pm |
plummerscarin wrote:
Pretty greasy there but think if you clean it some you would find circlips inside the yoke to be removed then push the caps out. |
agree on the internal clips
|
|
DiyDave
Orange Level Access
Joined: 11 Sep 2009
Location: Gambrills, MD
Points: 54304
|
Post Options
Thanks(0)
Quote Reply
Posted: 06 Aug 2025 at 4:44am |
Use your induction heater on the PTO shaft...  Them are handy things!
|
|
Source: Babylon Bee. Sponsored by BRAWNDO, its got what you need!
|
|
modirt
Orange Level Access
Joined: 18 Jul 2018
Location: Missouri
Points: 8833
|
Post Options
Thanks(0)
Quote Reply
Posted: 06 Aug 2025 at 12:00pm |
plummerscarin wrote:
Pretty greasy there but think if you clean it some you would find circlips inside the yoke to be removed then push the caps out. |
Cleaned it up and you look to be right. These are what I suspect are the clips or snap rings.
And this is where the unskilled mechanic hits the wall. If there is an opening on any of these so you can pry them off, I've not found it. Opening may be facing aft out of sight and just can't see them, but also had no luck rotating the clip to get it to show it's pretty face.
I have worked with the external clips and if this was off the shaft an on a bench, could probably defeat this one too. But until then........
Once these are off, have concluded will be good idea to replace both crosses anyway. Aside from engine propelling machine around the field and up and down the road, all the rest of the functions run off the small hydraulic pump this shaft powers. Machine is helpless without it. And it would only break down with hay in the field. Not a good time to be fixing anything. Cheap insurance while it's apart anyway.
|
|
modirt
Orange Level Access
Joined: 18 Jul 2018
Location: Missouri
Points: 8833
|
Post Options
Thanks(0)
Quote Reply
Posted: 06 Aug 2025 at 12:04pm |
Another view. Can see the bolt heads holding pulley on. This shaft comes off, may be home free.
|
|
plummerscarin
Orange Level Access
Joined: 22 Jun 2015
Location: ia
Points: 3953
|
Post Options
Thanks(0)
Quote Reply
Posted: 06 Aug 2025 at 12:31pm |
|
Yep, that’s it
Use a punch or screwdriver to drive on the end of the snap ring. It will either pop out or rotate. If if rotates, then switch to two punches or needle nose pliers and drive both ends simultaneously.
|
|
DonBC
Orange Level Access

Joined: 12 Sep 2009
Location: Courtenay, BC,
Points: 946
|
Post Options
Thanks(0)
Quote Reply
Posted: 06 Aug 2025 at 1:37pm |
|
A failing coil could also be the problem. They can be warm but if they are getting warm or hot it is a sign that they are failing. When the get hot they can have a weak spark and worst case, no spark.
|
|
Jack of all trades, master of none
|
|
DiyDave
Orange Level Access
Joined: 11 Sep 2009
Location: Gambrills, MD
Points: 54304
|
Post Options
Thanks(0)
Quote Reply
Posted: 06 Aug 2025 at 3:49pm |
|
Give one of the caps a smack with a medium size hammer. An O-ring pick can help rotate the SR into a visible position. Once you get 1 off, do the same thing on the other side...
|
|
Source: Babylon Bee. Sponsored by BRAWNDO, its got what you need!
|
|
Ray54
Orange Level Access
Joined: 22 Nov 2009
Location: Paso Robles, Ca
Points: 4756
|
Post Options
Thanks(0)
Quote Reply
Posted: 07 Aug 2025 at 10:56am |
|
In my experience it looks like the u joint could be removed by taking the cap screws out I see in the last picture. Very similar to the hydraulic drives on many things made in the same era. They have always been bolted to the flywheel pully.
|
|
modirt
Orange Level Access
Joined: 18 Jul 2018
Location: Missouri
Points: 8833
|
Post Options
Thanks(0)
Quote Reply
Posted: 07 Aug 2025 at 12:37pm |
Progress!!!
Went on a blood hunt and managed to find the ends of the clips......as suspected, both facing aft and hidden. But eventually got on the ends and they pooped off. One into the ether.......I heard it ping off metallic stuff 2 or 3 times, but it is gone.
About an hour later, had the cross out, and as suspected, the yolk was just keyed onto the shaft. Used a wheel puller and it didn't give it up easy. Was close to point breaking....tapped it a few times with hammer......tighten....tap......then came the big bang when it broke free.
This is where she sits now. Ran out of time and battery powered trouble light went dead at same time. But now off and running. Once those 4 cap screws are off, will know what's left to get this pulled apart.
|
|