| Author |
 Topic Search Topic Search  Topic Options Topic Options
|
dfwallis 
Orange Level

Joined: 09 Mar 2023
Location: DFW
Points: 702
|
 Post Options Post Options
") Thanks(0) Thanks(0)
 Quote Quote  Reply Reply
 Posted: 21 Mar 2025 at 7:10pm Posted: 21 Mar 2025 at 7:10pm |
 wjohn wrote: wjohn wrote:
I'd be curious to know what they found wrong in the pump, if they'll tell you? Not knowing would bug me forever! |
I'm anxious to know too. He indicated that one or more parts were in the wrong order or backwards. He said he had it apart about 15 times, following the manual (as did I at least 5 times). I had difficulty interpreting some of those pictures in the manual. I even tried following
this depiction assuming the ordering was correct since it matched what I thought I saw in the manual.
I'll try to get more info when I pick it up.
|
|
1952 CA13092
|
 |
|
Sponsored Links
|
|
|
dfwallis
Orange Level
Joined: 09 Mar 2023
Location: DFW
Points: 702
|
Post Options
Thanks(0)
Quote Reply
Posted: 10 Apr 2025 at 9:23pm |
|
4/10/2025 Status: Former AGCO dealer called and said the CA is done and ready to be picked up. MY brother will go get it soon (TBD). I had 5 repairs done (hydraulic pump, front wheel bearings, PTO shaft seal, diagnose random misfire (fix if easy), can't remember. For the misfire, it purrs along nicely then there's a single pop...more purring, pop pop, etc. My next trip home begins Saturday (12th).
|
|
1952 CA13092
|
|
dfwallis
Orange Level
Joined: 09 Mar 2023
Location: DFW
Points: 702
|
Post Options
Thanks(0)
Quote Reply
Posted: 20 Apr 2025 at 7:10pm |
|
4/20/2025 Status: Got the tractor back from former AGCO dealer. Repairs appear successful. 1) Hydraulic pump fixed (4 different people apparently made the same mistake repeatedly, including me)...cause: valve sections reversed...simple, obvious, embarrassing, expected that it was something dumb. 2) front wheel bearings, 3) repacked hydraulic cylinders which were leaking. 4) PTO shaft seal, 5) ran out of time to diagnose misfire problem. Resumed some minor repair work outlined in following posts.
|
|
1952 CA13092
|
|
dfwallis
Orange Level
Joined: 09 Mar 2023
Location: DFW
Points: 702
|
Post Options
Thanks(0)
Quote Reply
Posted: 20 Apr 2025 at 7:19pm |
The throttle control was so worn that it would not hold an RPM greater than about 1/2 throttle. So, I welded a new surface and filed the landing slots to alleviate the slippage. I'm not too hot of a welder, but the tiny off brand wirefeed welder barely has enough current draw 400 foot to the barn on 12 gauge house circuit wire to tack two pieces together). I did the same to the bottom slide surface. It was worn about 1/2 way through. I guess I could have turned off the LED lights in the barn :(
Edited by dfwallis - 21 Apr 2025 at 10:34am
|
|
1952 CA13092
|
|
dfwallis
Orange Level
Joined: 09 Mar 2023
Location: DFW
Points: 702
|
Post Options
Thanks(0)
Quote Reply
Posted: 20 Apr 2025 at 7:27pm |
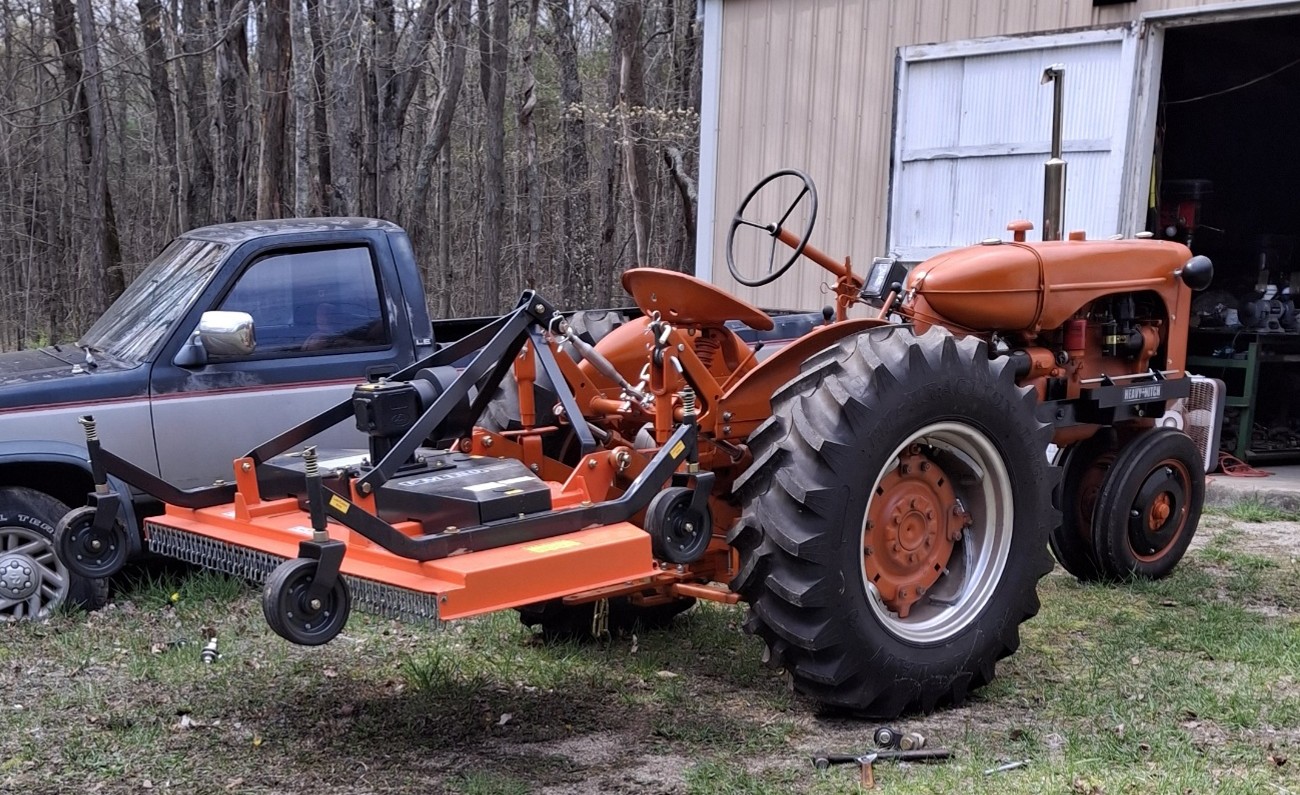
In preparation for attaching the first 3pt implement, I attached the new front wheel weights. It probably wasn't necessary. The finish mower is 524 lbs.
Because the right side rim was damaged (calcium chloride damage) and welded all the way back in the 60s, the wheel weight isn't sitting flat on the right side. I'm probably going to have to grind the weld down more to get the weight to sit flat and reduce wheel wobble and then see if I can balance it better. If I have to get a new rim, I will.
|
|
1952 CA13092
|
|
dfwallis
Orange Level
Joined: 09 Mar 2023
Location: DFW
Points: 702
|
Post Options
Thanks(0)
Quote Reply
Posted: 20 Apr 2025 at 7:39pm |
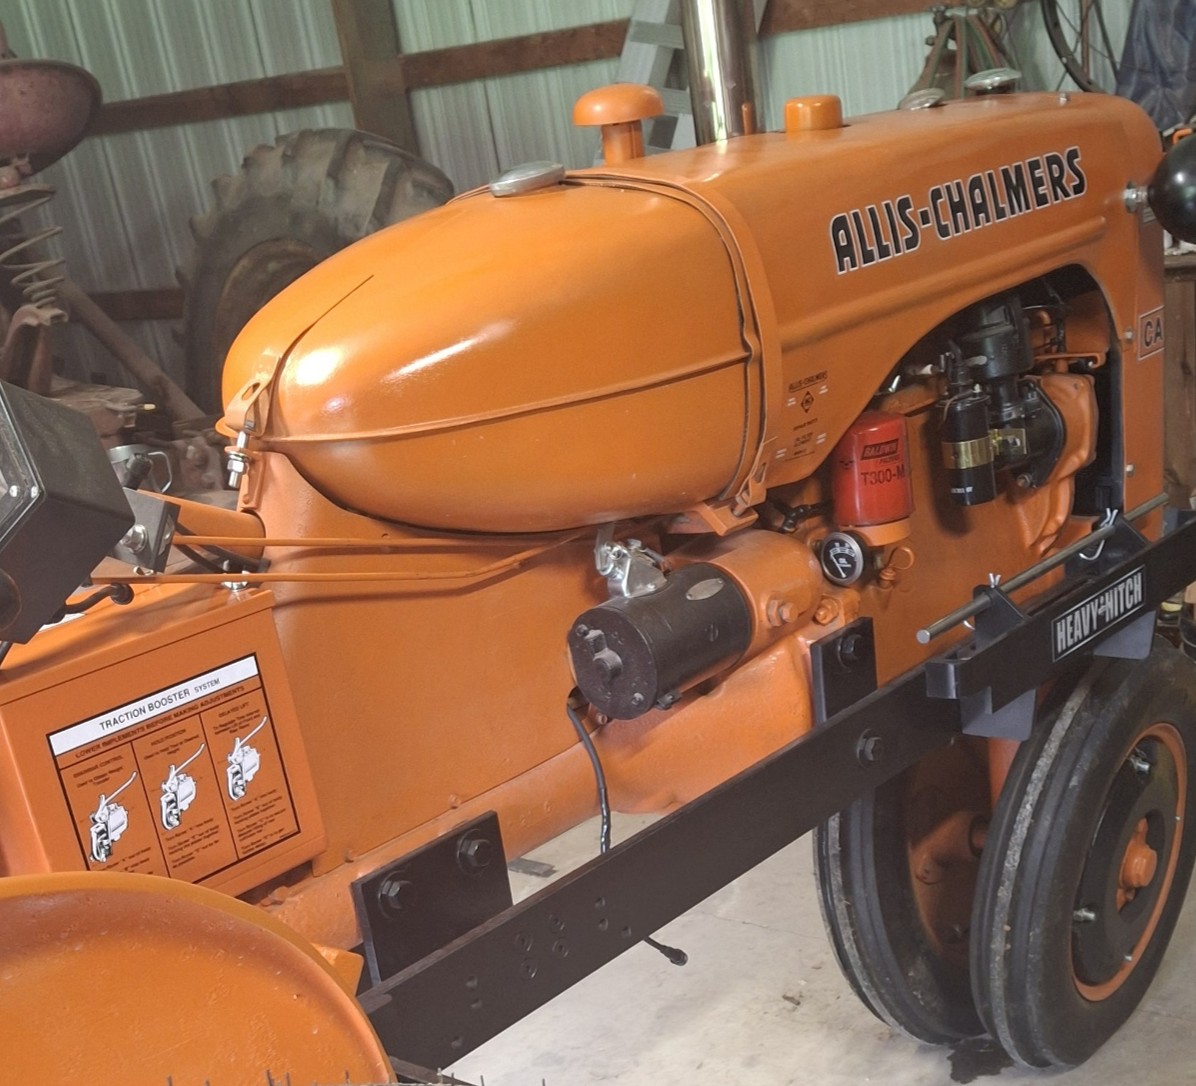
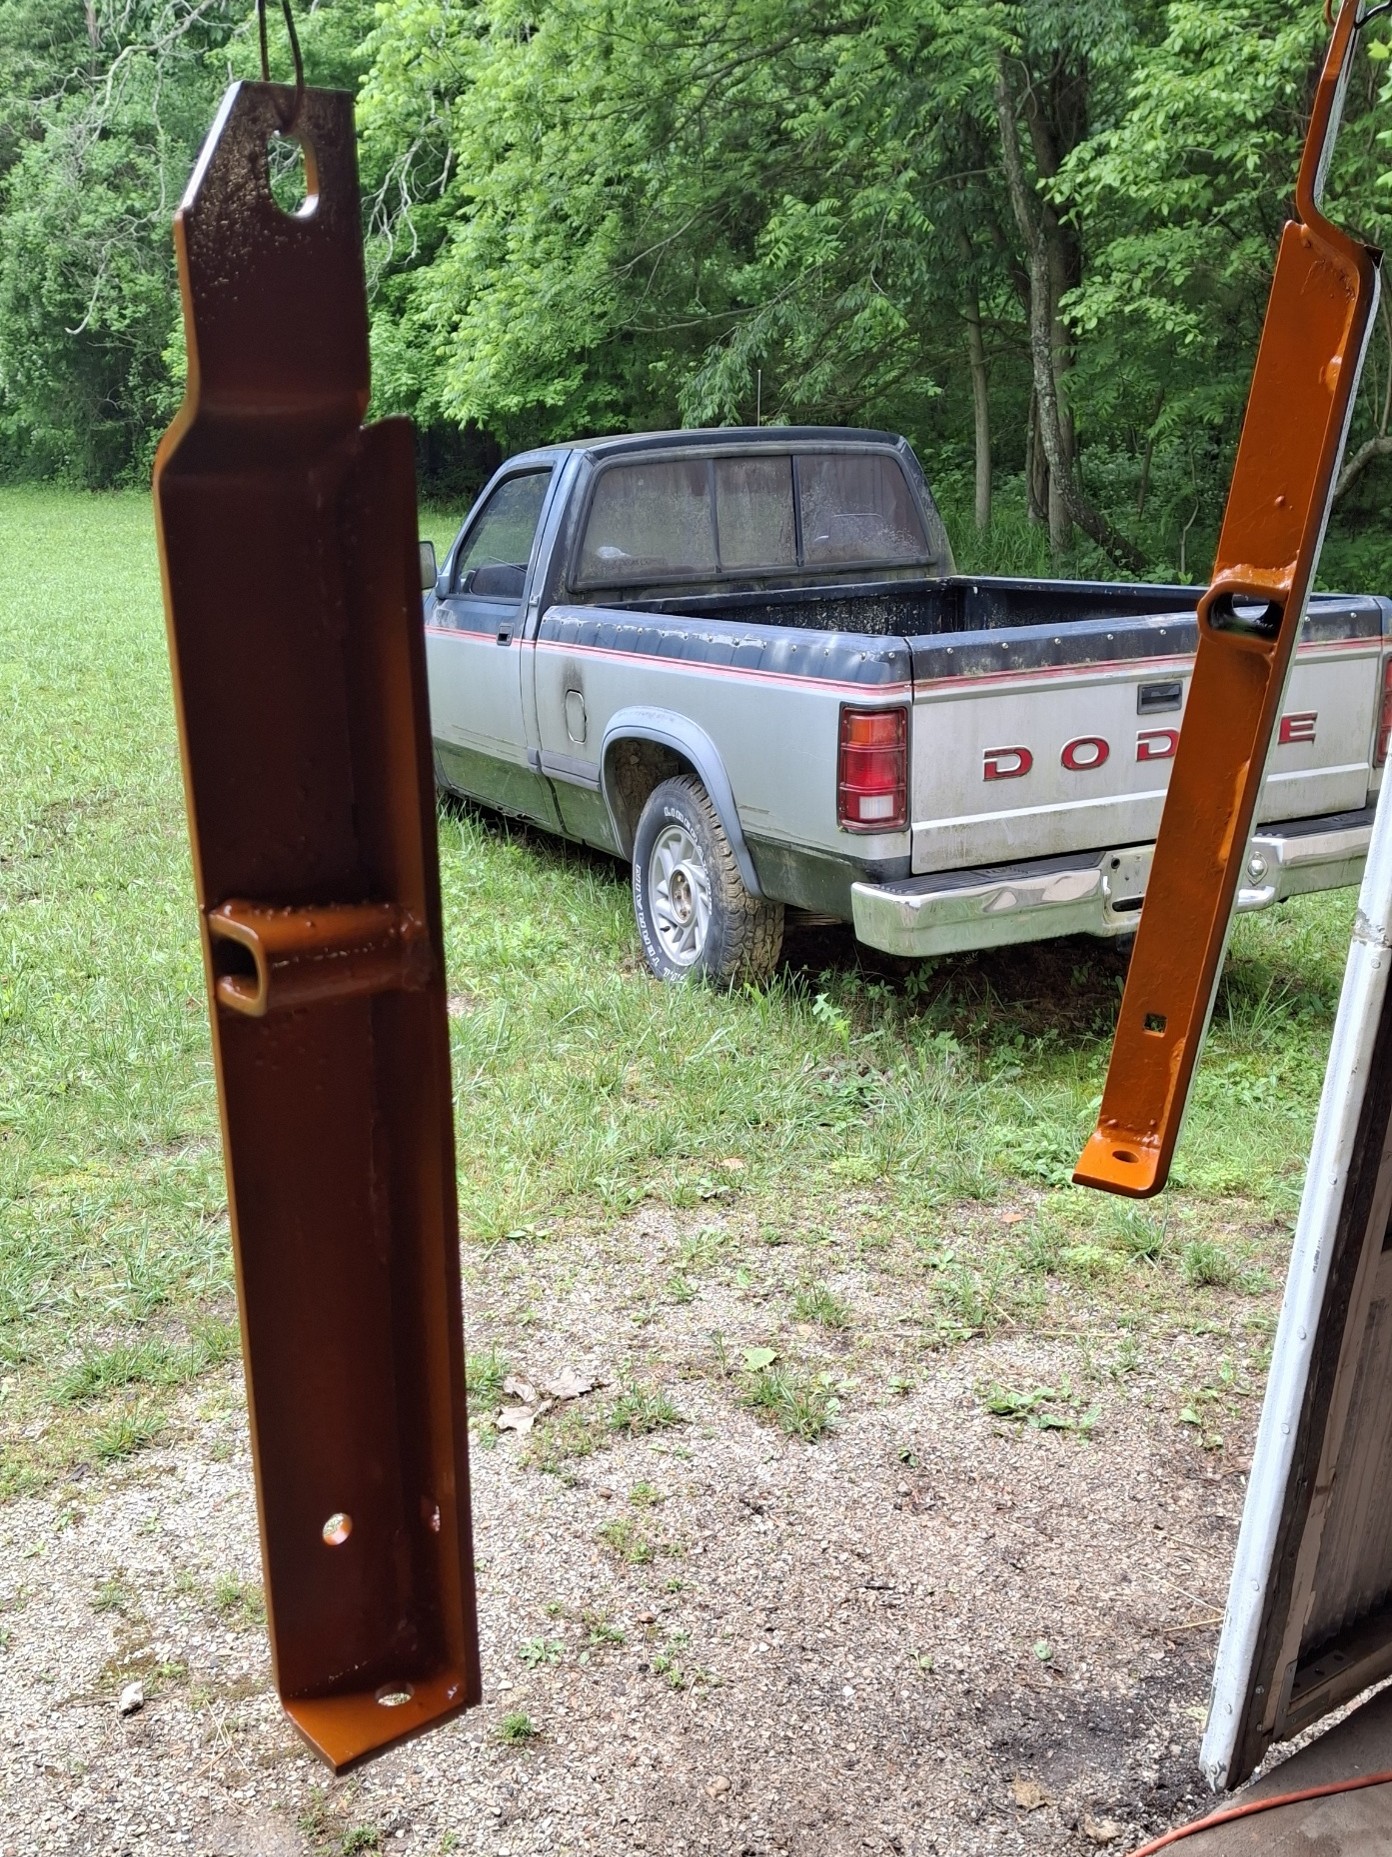
On the February and March trips I partially designed the frame wraparound section that extends toward the rear wheels. This month, I finished, painted, and installed the complete frame and the new weight brackets. Because I didn't originally plan to extend the frame, I placed the rear mounting point for the heavy hitch a couple of inches too far aft (for the frame extension to clear the brake pedals and tires). So I had to cut a small notch out of the heavy hitch to clear the frame. This doesn't impact the heavy hitch capacity in any significant way. On the left side of the tractor, I intend to mount my new step. It will perfectly clear the heavy hitch weight bracket and weights when mounted in the aft location. I decided that this wraparound section is beneficial to counter the twisting of the frame from heavy weights on the weight bracket.
Actually, weights fit perfectly directly on the frame itself, if needed. I believe this frame contributes significantly to the strength of the tractor frame and lessens any concerns with adding a light duty front end loader as discussed previously. Whether I will ever do that is undetermined.
I also prototyped some mounts for the auxiliary hydraulic fluid tank you can see on the floor below. That's kind of a low priority task.
Edited by dfwallis - 20 Apr 2025 at 9:50pm
|
|
1952 CA13092
|
|
dfwallis
Orange Level
Joined: 09 Mar 2023
Location: DFW
Points: 702
|
Post Options
Thanks(0)
Quote Reply
Posted: 20 Apr 2025 at 7:51pm |
First attempt connecting a 3pt attachment. It worked fairly well although the rockshaft mounted top link bracket makes for an extremely short top link requirement. I have some improvements in work (including for improved safety). The CA PTO shaft is a bit too high and too close to the top link bracket. I have some design tweaks to make to eliminate any potential collisions when the top link angle declines.
The tractor picked the mower up with not even a hint of complaint (524lbs).
The remote is still leaking. The pipe extension was pretty rusted, I'll probably have to change it out. I think I have some spare stainless pipe extensions.
I also installed an overrunning clutch.
Another repair was to fix the rear tail light. It turned out that the entire fender was not grounded. I had added some largish flat washers to distribute the load on the thin fender metal. I guess grounding was previously via the lock washers digging through the paint.
|
|
1952 CA13092
|
|
dfwallis
Orange Level
Joined: 09 Mar 2023
Location: DFW
Points: 702
|
Post Options
Thanks(0)
Quote Reply
Posted: 20 Apr 2025 at 7:59pm |
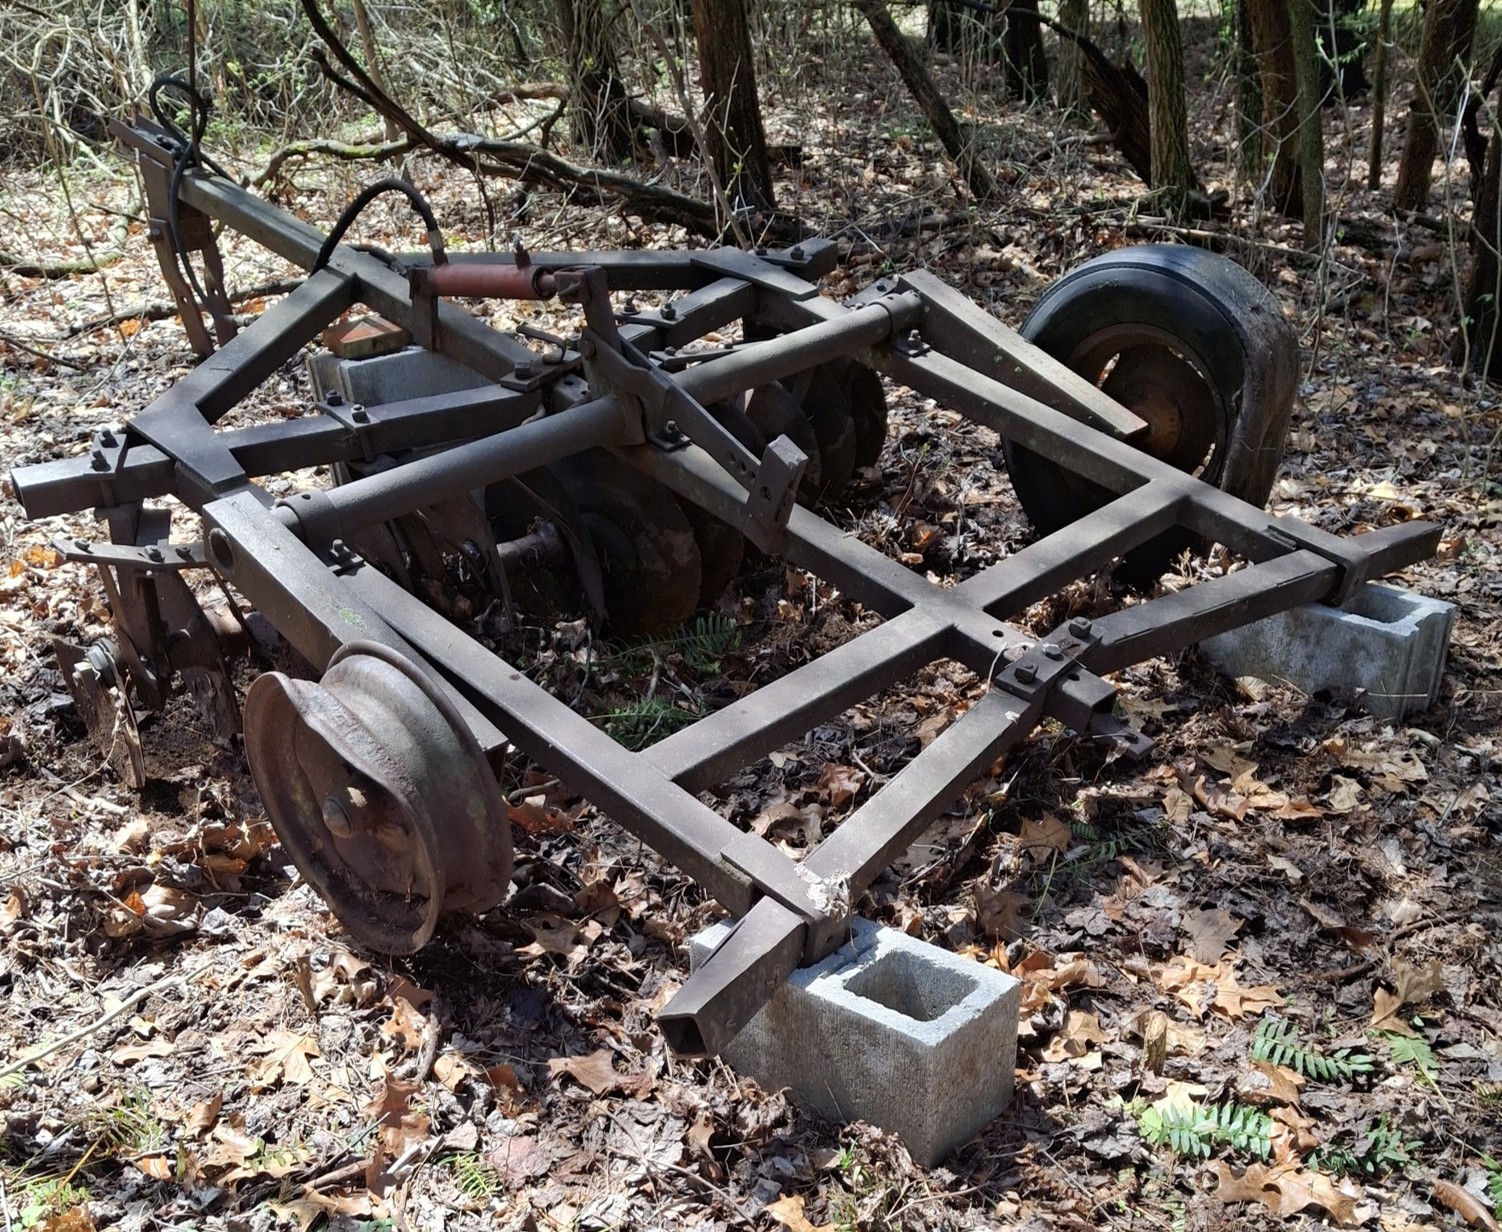
I worked to get some additional basket case implements out of the dirt and up on blocks. The more I look at this twisted heap (Krause), the sadder I get :( The rear disk sections are a few hundred feet behind. I'll have to cut them out of the saplings. The disk sections and the wheels turn fine. Most of the disks seem like they might be cleaned up. I only saw one that was severely disintegrated along the bottom (and one broke in half). Straightening out some of those major frame twists might be difficult. Local body shop perhaps (if I proceed, probably not this year). I guess somebody used it to try to disk down large trees :(
|
|
1952 CA13092
|
|
Sugarmaker
Orange Level
Joined: 12 Jul 2013
Location: Albion PA
Points: 8445
|
Post Options
Thanks(0)
Quote Reply
Posted: 27 Apr 2025 at 8:22am |
DFW Great pictures of your continued work on your nice CA! Might get me moving a little on ours! Regards, Chris and Cheryl
|
|
D17 1958 (NFE), WD45 1954 (NFE), WD 1952 (NFE), WD 1950 (WFE), Allis F-40 forklift, Allis CA, Allis D14, Ford Jubilee, Many IH Cub Cadets, 32 Ford Dump, 65 Comet.
|
|
dfwallis
Orange Level
Joined: 09 Mar 2023
Location: DFW
Points: 702
|
Post Options
Thanks(0)
Quote Reply
Posted: 27 Apr 2025 at 11:15am |
Sugarmaker wrote:
DFWGreat pictures of your continued work on your nice CA! Might get me moving a little on ours! Regards, Chris and Cheryl |
:) Thanks, I wish I had more time to work on it. Traveling to my parents a week here and a week there makes for slow going. Part of the reason I get frustrated when I'm wasting too much time on one thing (like the hydraulic pump). But I am inching closer to having it functional and useful again.
|
|
1952 CA13092
|
|
dfwallis
Orange Level
Joined: 09 Mar 2023
Location: DFW
Points: 702
|
Post Options
Thanks(0)
Quote Reply
Posted: 27 Apr 2025 at 12:35pm |
|
I'm guessing that the generator may have stopped charging for the same reason as the tail light stopped working, lack of ground. Seems less likely, but all the brackets were painted and I also used flat washers in places because the lock washers I had were not quite large enough for the slide section to clamp down properly. The last thing I remember doing was tightening the belt that had come loose, I may have changed the washers at that time and didn't notice it stopped charging until later. Its always something...
|
|
1952 CA13092
|
|
dfwallis
Orange Level
Joined: 09 Mar 2023
Location: DFW
Points: 702
|
Post Options
Thanks(0)
Quote Reply
Posted: 28 May 2025 at 9:50am |
5/28/2025 Status: Quite a bit of progress was made on this recent trip: 1) Replaced the venturi in the TSX486. The one received was not a good match but I machined to match (length, new one was too long for the top of the carb to tighten into position). The major hole diameter of the venturi was also smaller. Was not happy about that, I was very clear to the vendor to ensure it was correct for a TSX-486 (can't tell from the online pic). The documentation implied it was correct, but it obviously was not a good match (I've since ordered the correct venturi). Anyway, the engine does run better and noticeably leaner (did not overheat with a good workout). The spark plugs are no longer rapidly coating with carbon. So, I'm sure that was part of the problem (although still not fixed correctly). It still misses sporadically.
2) I Completed the bracket for mounting the step on the left side rail in front of the clutch pedal and mounted the step.
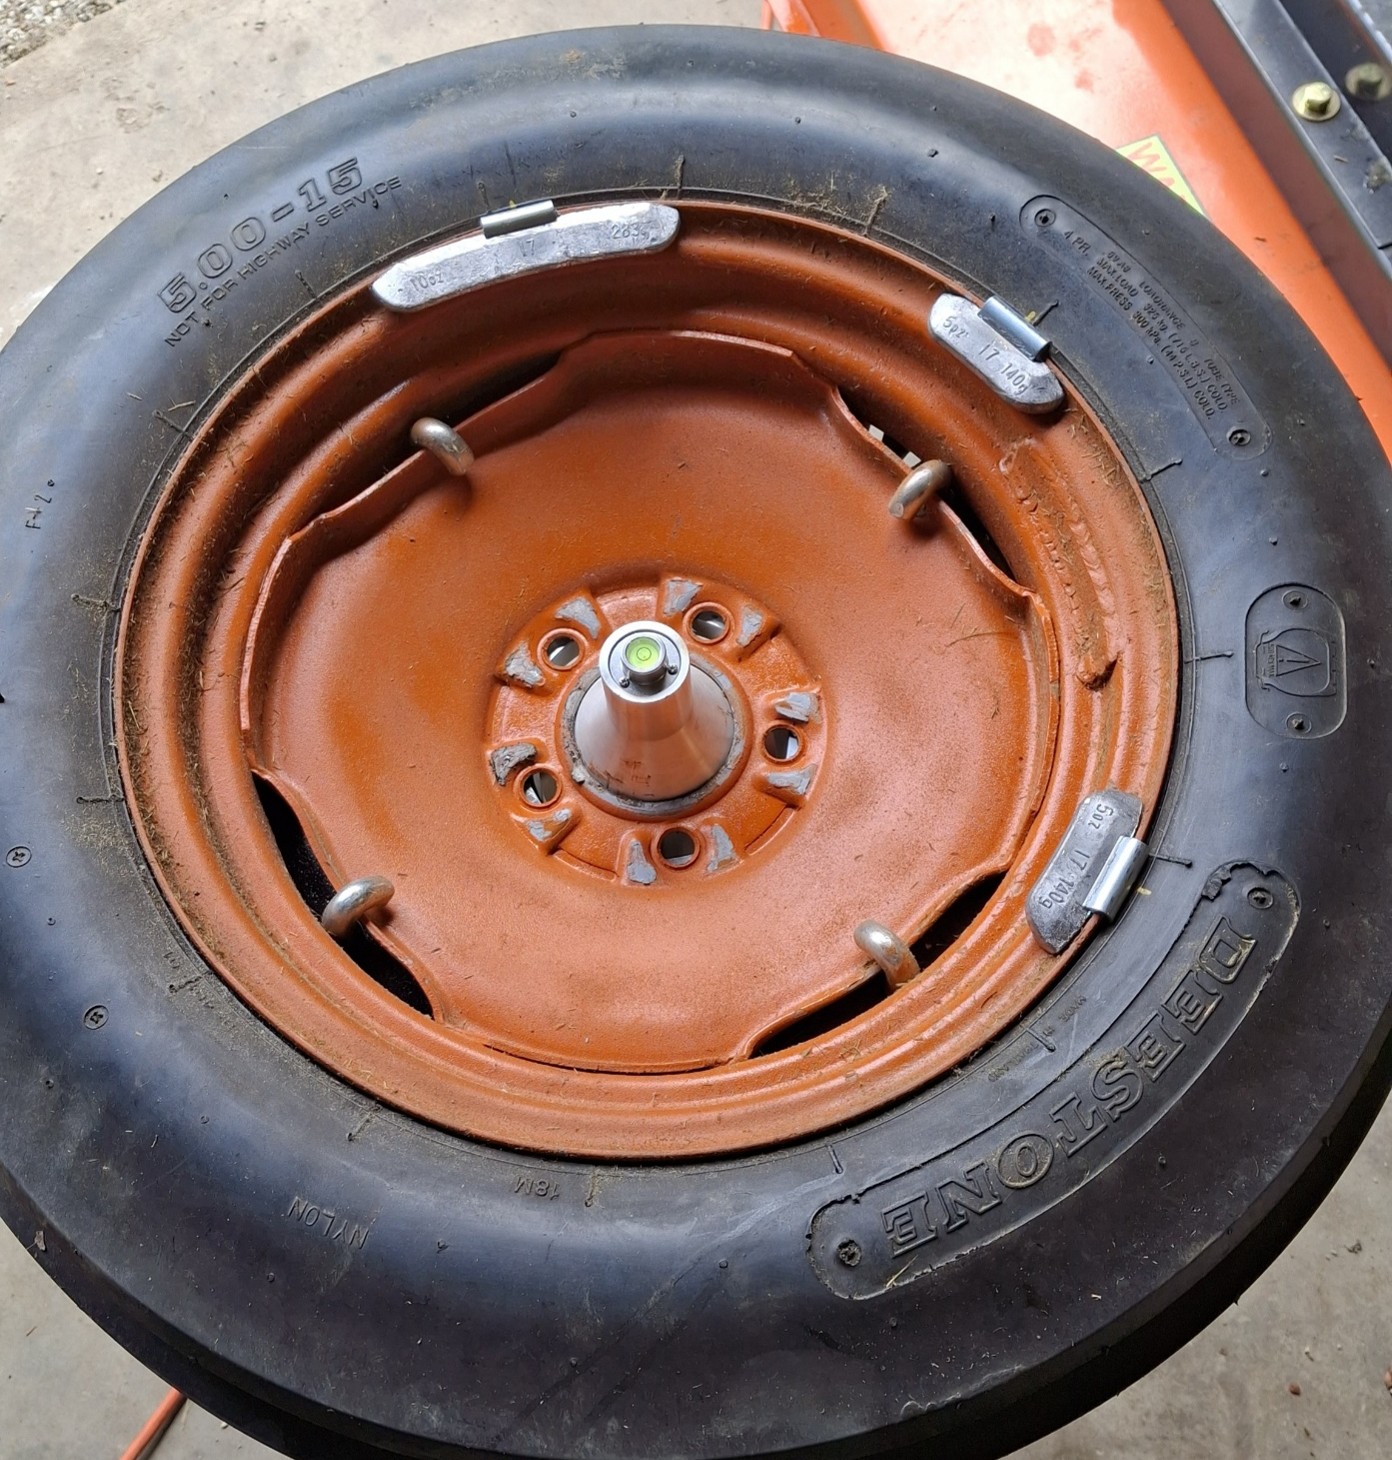
3) Balanced the front tires. On the road, the wheels and steering wheel were WILDLY oscillating. Several of the tire places I called didn't want anything to do with it (thinking it couldn't possibly matter going that slow, but it DOES in 4th), so I bought a harbor freight bubble balance and some I7 weights and did it myself. The result was a dramatic improvement. No more wild oscillation. The tires were each off around a pound. It took 20 oz to balance one and 15 oz to balance the other. Depending on whether they were in or out of sync, the amount of oscillation could be dramatically different as well.
4) Applied all of the decals.
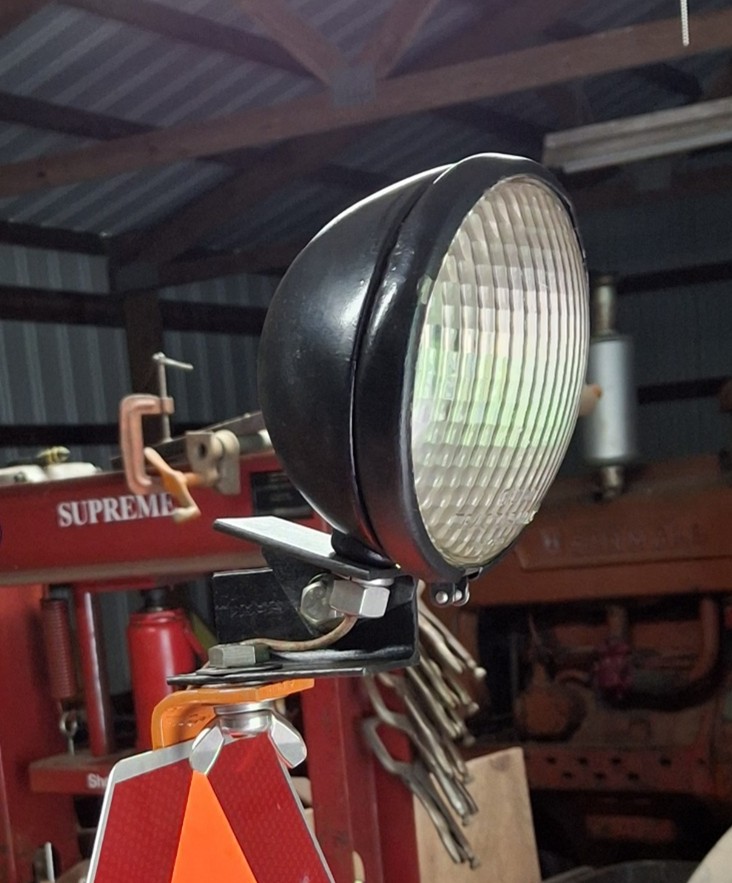
5) Made brackets for the safety emblem and added a spotlight above it on the rear of the tractor. Wired the spotlight. First switch position is headlights/taillights, second position adds the rear spotlight. I purchased separate magnetic flashers for occasional use on multiple tractors.
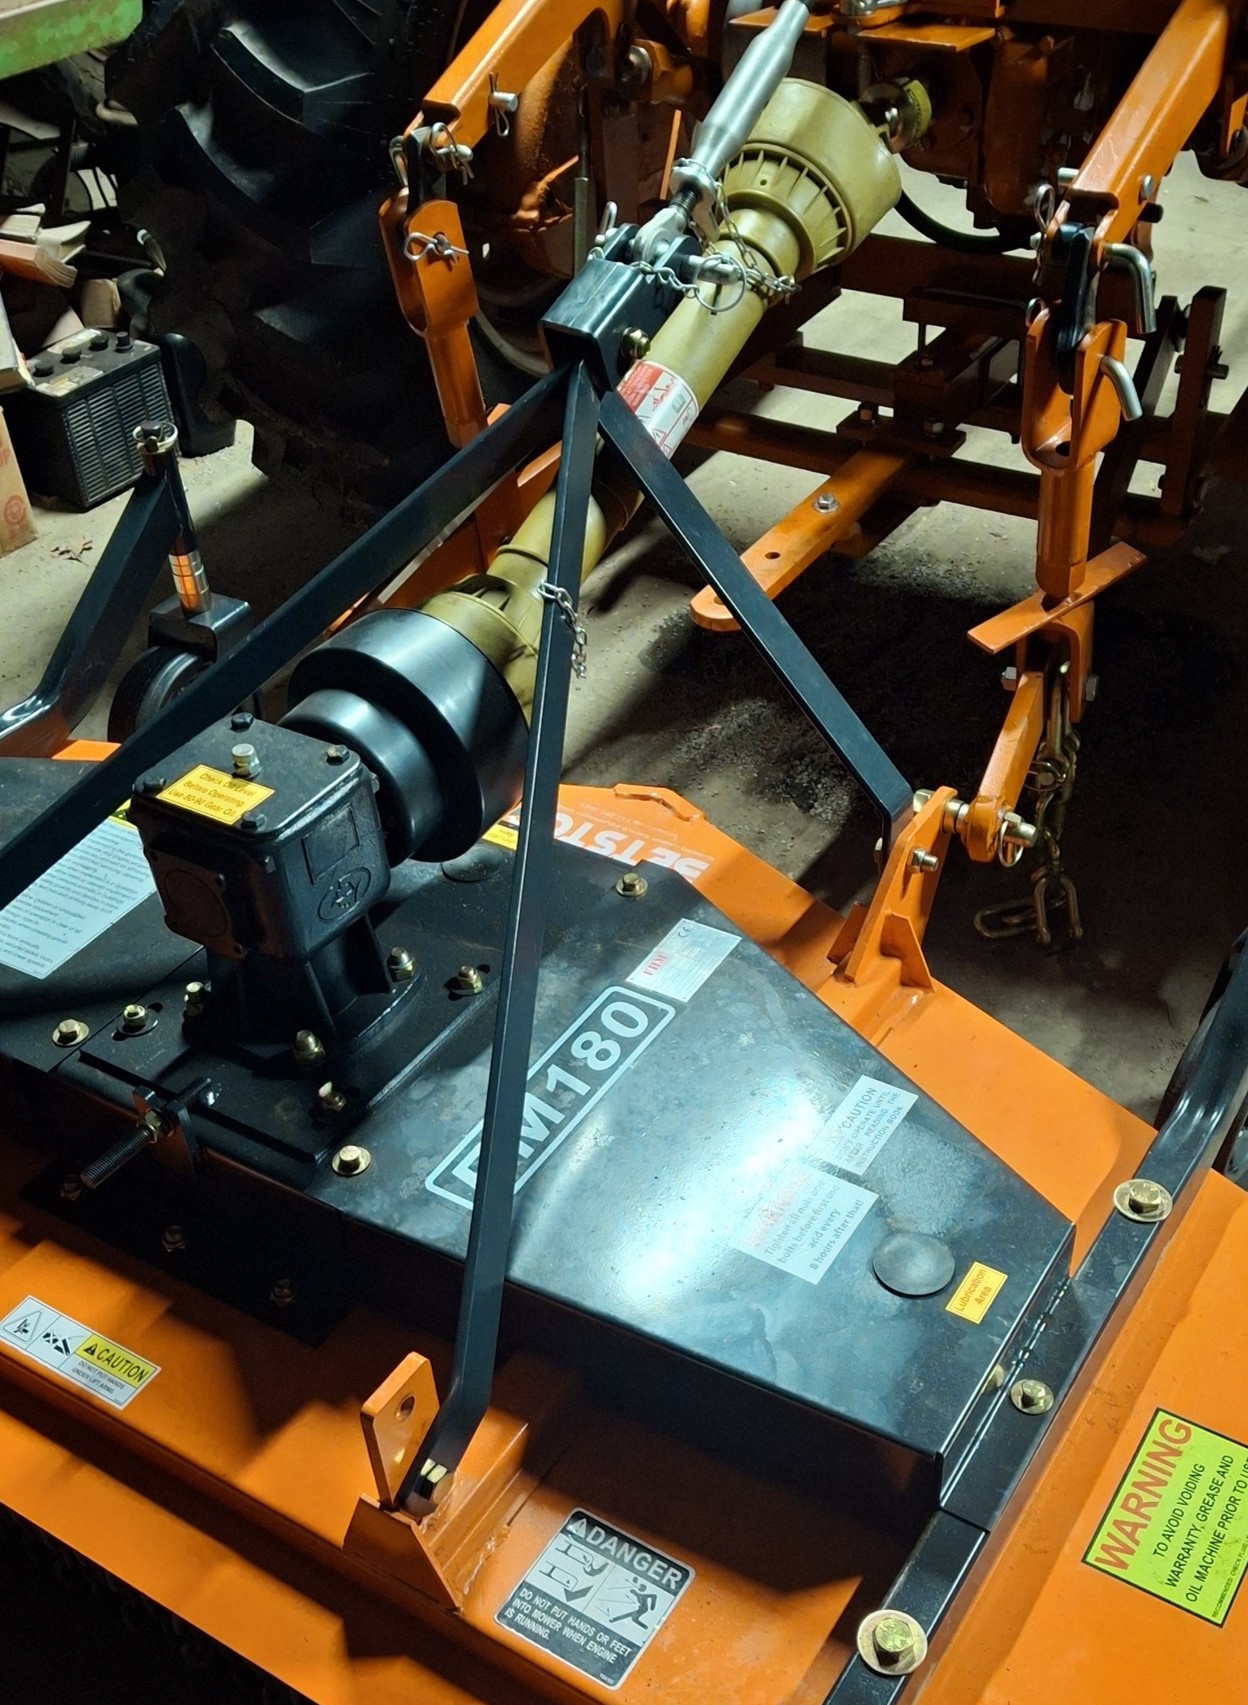
6) Modified the finish mower to lower the rear mounting points of the rails that attach the rear of the mower to the top link bracket. As designed, they were so long that they pushed the top link bracket supports too far forward which caused the PTO shaft to hit the supports in certain lift positions. I pulled the top link bracket on the finish mower back to be fully vertical and inline with the lower lift attachments. This mod requirement was partly due to the geometry of the 3 point mods to the tractor (OR clutch extends the PTO shaft, top link bracket on the rock shaft causes the top link to be further rearward than normal which makes for a very short top link connection...and PTO shaft).
7) Verified that the generator/regulator is in fact generating...whenever it takes a notion. I assume it just doesn't see the battery as being low enough voltage to turn on most of the time. A simple LED current draw plus ignition doesn't seem to be enough.
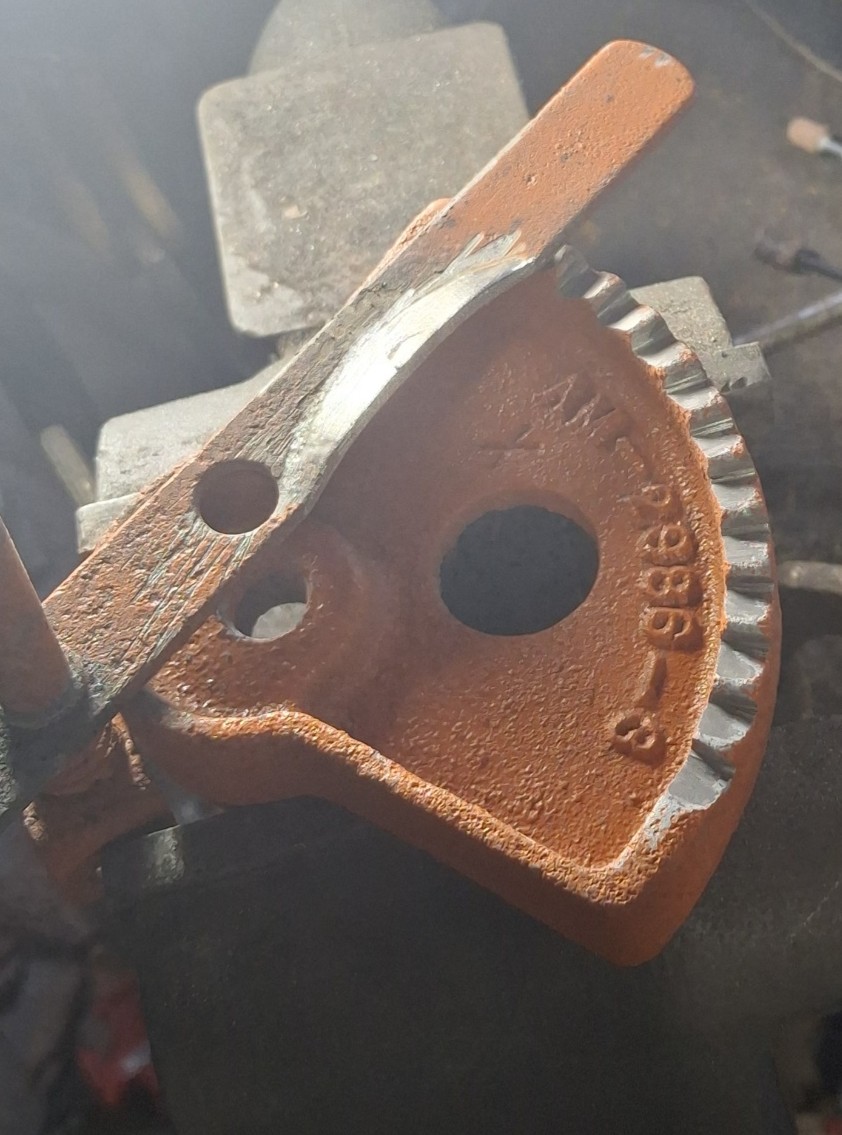
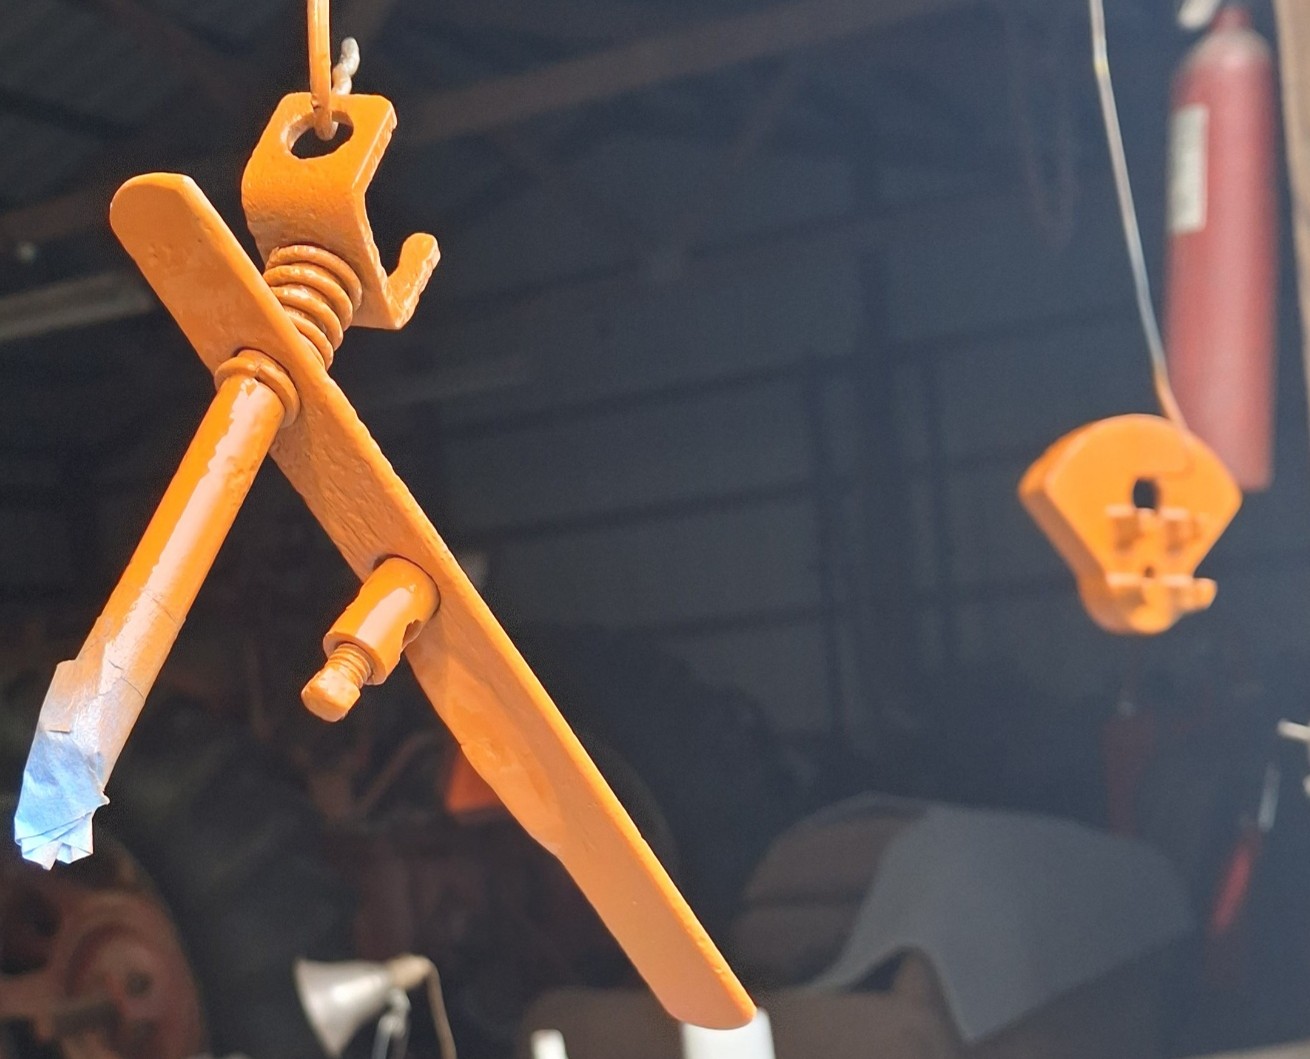
8) Although they won't immediately be mounted, I cleaned up the side weight and cultivator brackets and began painting (ran out of orange but they are primed and ready). The cultivator lower arms (1-3/8 inch diameter rods) is bent on one side. I left that with the former AGCO guy to straighten if he can. I didn't have anything substantial enough to clamp it to. It only needs about 1 inch of movement straight outward. It seems to still be in alignment otherwise. It looks like someone ran into it exactly from the side, head on into the end of the rod.
9) After first use mowing a small field with a finish mower, it was clear that I had to make a minor mod to the 3-point hitch bail attachment. The lift arms needed to go down further. I previously made some flex attachments to allow them to go lower, but that caused a clearance problem when lifting. Because horizontal stability uses the legacy drawbar bail, it was necessary for me to move the old bail forward a few inches to let the 3-point arms drop further without hitting the bail. I knew that was likely coming and wasn't too worried about it. I made a new bracket to attach the legacy bail and the 3-point lift arms can now go all the way to the ground (and beyond).
10) I uploaded a new video (Youtube https://www.youtube.com/@OrangeAcres-h2k) showing the original state of the tractor as of March of 2023. A second video of first use of the tractor mowing a small field with a finish mower was also added.
11) I shipped the distributor to B and B for rebuild. I'm not convinced this is the cause of the misfires, but the end play is around 2X what AI says is the spec (.014 to .017). I wasn't able to confirm the spec and saw .010 and even smaller elsewhere.
12) I added an extension on the PTO shield to keep the rockshaft mounted top link bracket from going down too far and contacting the PTO shaft (if something went wrong). This allowed me a convenient mounting point for the safety emblem (it was previously on the old original PTO shield, which I have saved unmodified).
13) I also installed the platform and fixed some hydraulic leaks and adjusted the linkage.
Edited by dfwallis - 28 May 2025 at 12:00pm
|
|
1952 CA13092
|
|
dfwallis
Orange Level
Joined: 09 Mar 2023
Location: DFW
Points: 702
|
Post Options
Thanks(0)
Quote Reply
Posted: 28 May 2025 at 9:55am |
Mounting of the step on the left side in front of the clutch. This is a better location than the designed placement at the cultivator mount on the torque tube. I never really had any trouble getting on/off, but this does make it a bit easier.

|
|
1952 CA13092
|
|
dfwallis
Orange Level
Joined: 09 Mar 2023
Location: DFW
Points: 702
|
Post Options
Thanks(0)
Quote Reply
Posted: 28 May 2025 at 10:00am |
Tires balanced. It took 15oz for the left front tire and 20oz for the right front tire. This dramatically improved/eliminated the wild oscillations in 4th gear. I was disappointed in the tire shops I called pooh poohing balancing these tires. Both rims show to be bent but they are very large gradual bends all but invisible unless you use a straight edge to compare with. The right side tire has a heavy weld in two spots where the rim was destroyed by a tire ballast leak in the 60s, but surprisingly, that was not where the imbalance was. I did have to grind the weld down a little in one spot to get the wheel weights (not the clip on balance weights) to center.

Edited by dfwallis - 28 May 2025 at 11:11am
|
|
1952 CA13092
|
|
dfwallis
Orange Level
Joined: 09 Mar 2023
Location: DFW
Points: 702
|
Post Options
Thanks(0)
Quote Reply
Posted: 28 May 2025 at 10:18am |
I added an extension on the PTO shield to keep the rockshaft mounted top link bracket from going down too far and contacting the PTO shaft (if something went wrong). This allowed me a convenient mounting point for the safety emblem (it was previously on the old original PTO shield, which I have saved unmodified). I also added a spotlight on the top. This is one of the original headlights. Both were pretty mangled, but I made one good one out of the two and a repair kit for the bulb socket. It has an LED bulb, but I'm not sure if it's bright enough. There are LED bulbs in the headlights too, but I couldn't locate the same non-polarized bulbs I used. The headlight bulbs are 2X brighter. The bracket is just a tad too close to the seat, but I don't think it will be a problem. I can always move it back if it is.
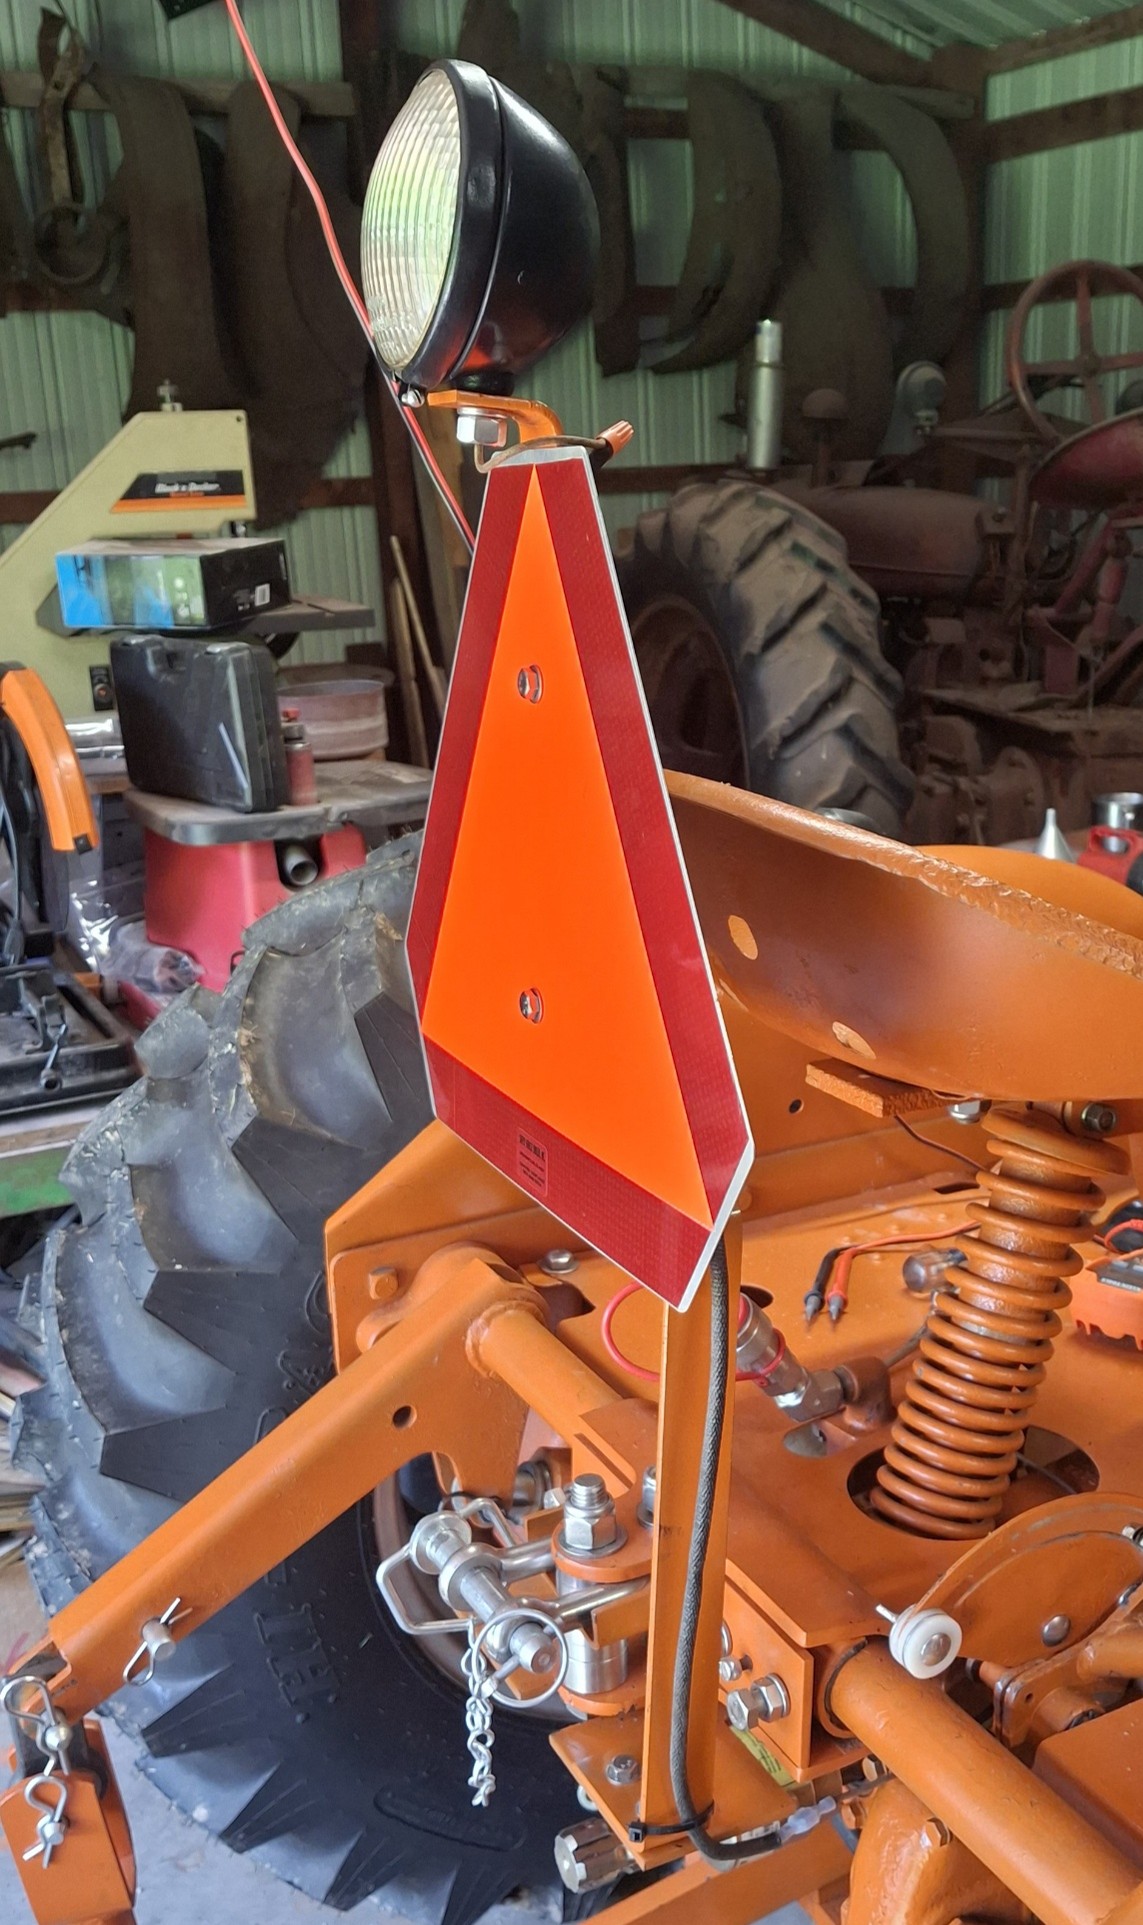
I created an adjustable bracket for the spotlight. I can point it pretty much anywhere I might need it. It isn't quite convenient because you do need a wrench to hold the bolt while tightening the wing nut. I may find or create a lock for the bolt heads to make it easier. I ordered some 2-tab washers that may work if the tabs are long enough. Bend one tab up and one tab down.
Edited by dfwallis - 28 May 2025 at 1:08pm
|
|
1952 CA13092
|
|
dfwallis
Orange Level
Joined: 09 Mar 2023
Location: DFW
Points: 702
|
Post Options
Thanks(0)
Quote Reply
Posted: 28 May 2025 at 10:25am |
I installed the overrunning clutch (fixed with a roll pin, April trip). I then created a bracket for the PTO shield to extend it out to prevent the rockshaft mounted top link bracket from going down too far and contacting the PTO shaft (might not happen in operation, but could if something broke or a pin came out, or ...). This provided a mounting option for the safety emblem and rear spot. I also installed the platform and fixed some hydraulic leaks and adjusted the linkage. I fit checked the seat cover but didn't leave it on because my sitting on the floor working on the hydraulics and bail got my clothes pretty dirty. I may only install it for special occasions to hide the severely rusted original seat.

Edited by dfwallis - 29 May 2025 at 11:35am
|
|
1952 CA13092
|
|
dfwallis
Orange Level
Joined: 09 Mar 2023
Location: DFW
Points: 702
|
Post Options
Thanks(0)
Quote Reply
Posted: 28 May 2025 at 10:39am |
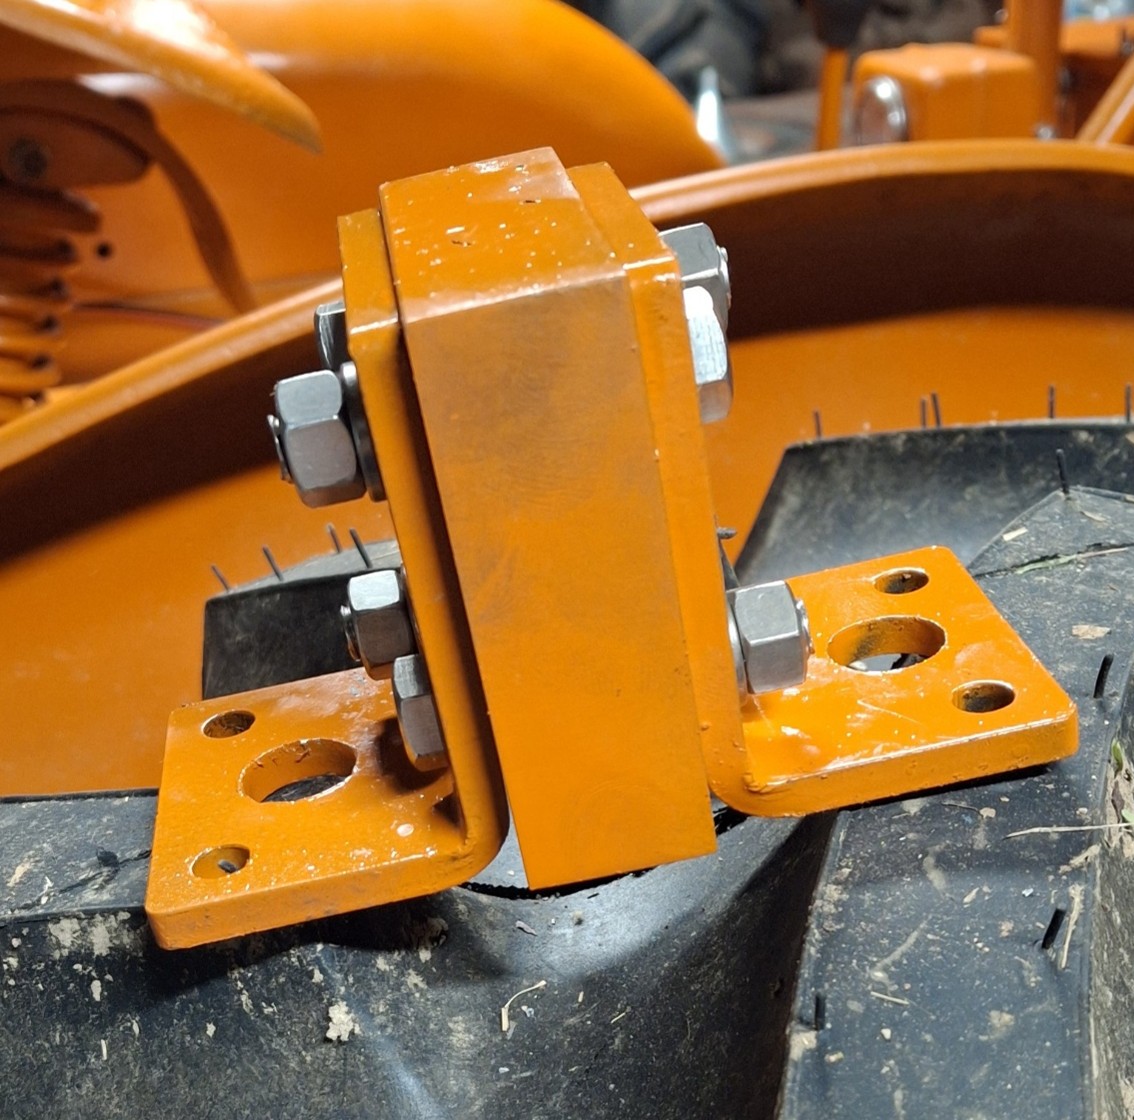
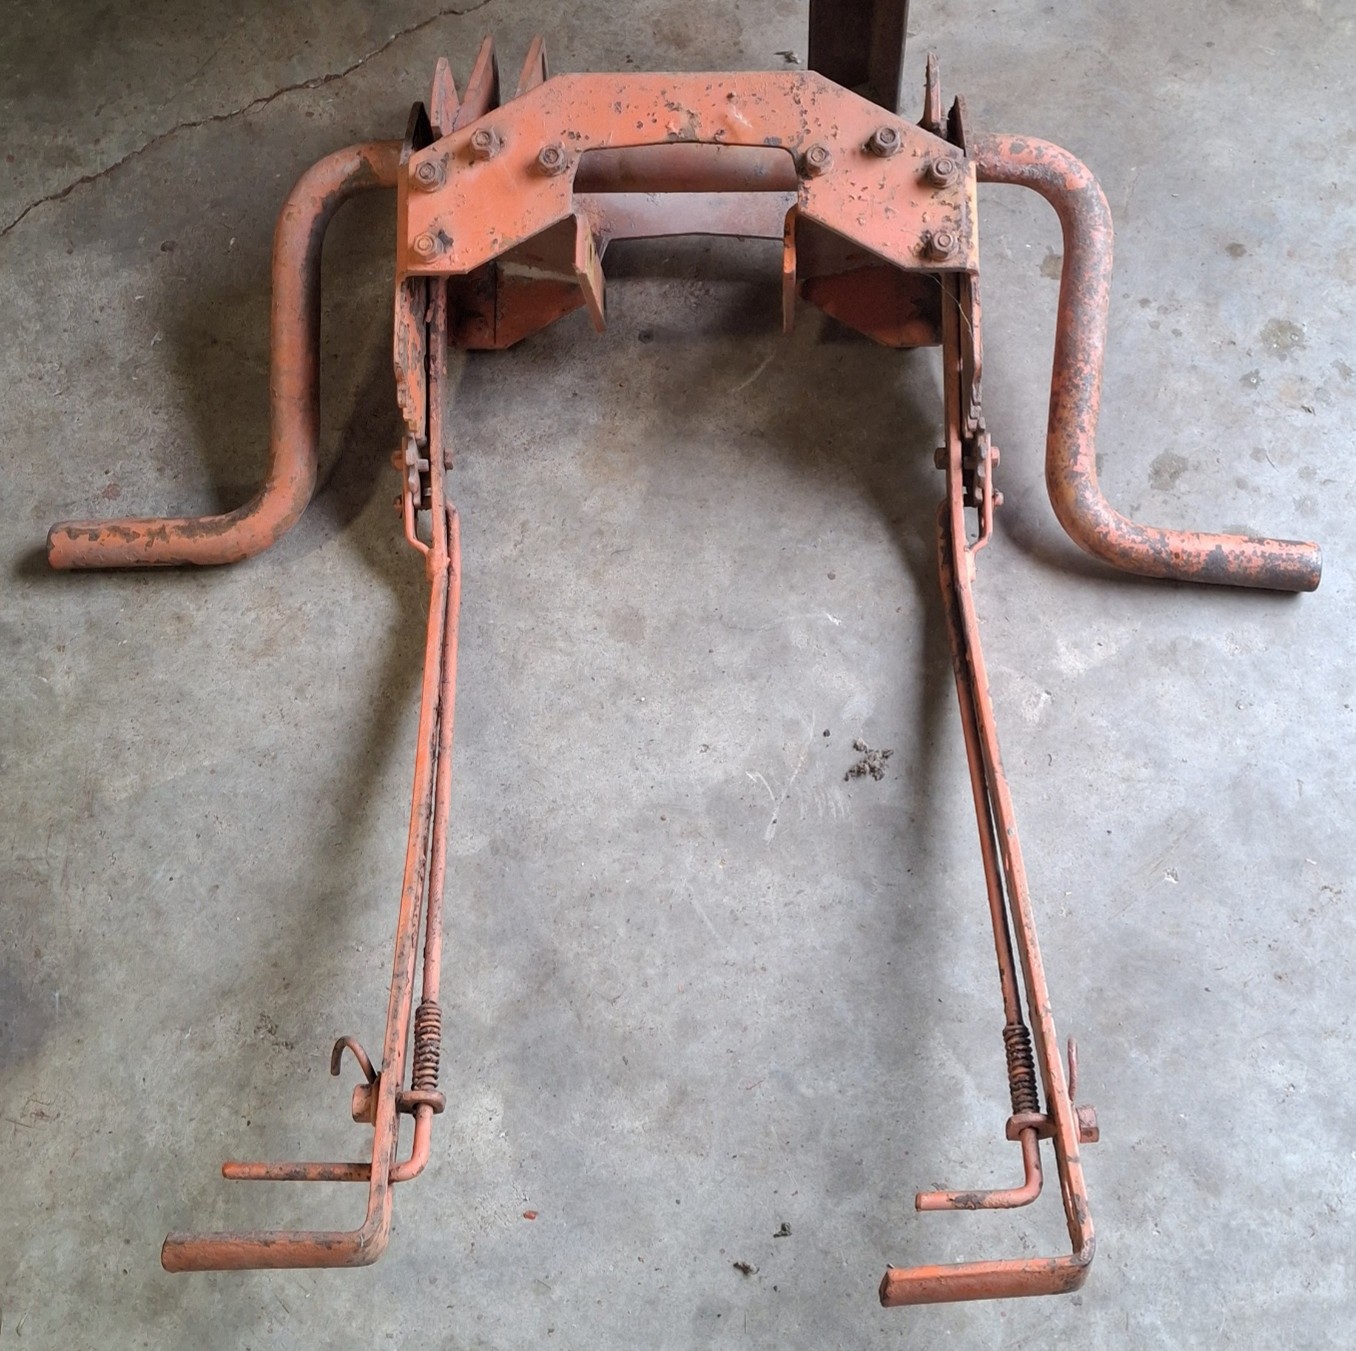
The original bail was initially just moved furthest back in the hangar on the bottom side of the draw bar. In order to get it further out of the way of the 3-point lift arms, it needed to go further back about 3 inches. This necessitated a spacer (shown below). The original bail is used to provide part of the horizontal stability of the add-on bail. It still only requires removal of 3 pins to completely remove the drawbar (e.g. to connect the plow). However, it is a bit heavier, and advisable to remove the 3-point arms to lower the weight a bit.
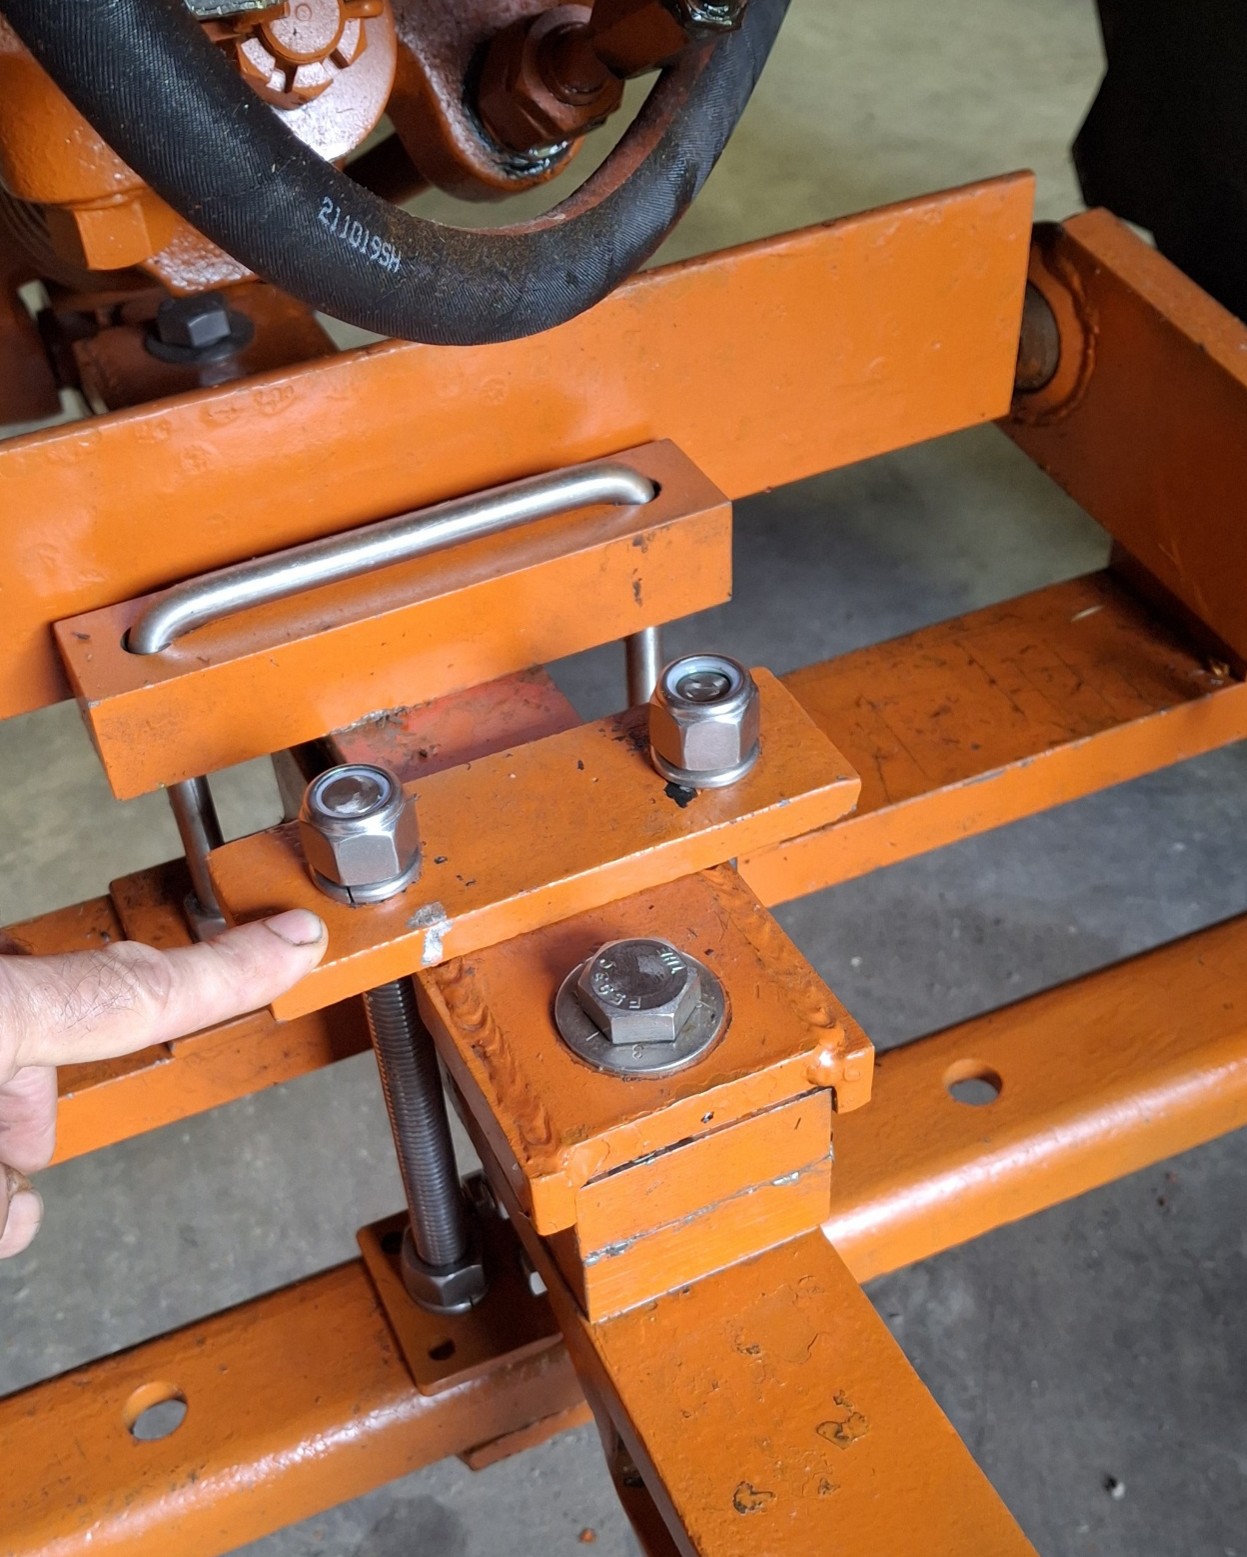 The bracket needed to move the bail forward required a 3 inch spacer which I luckily had an exact 1 inch thick x 3 inch remnant available (got a few more coats of orange after this pic).
|
|
1952 CA13092
|
|
dfwallis
Orange Level
Joined: 09 Mar 2023
Location: DFW
Points: 702
|
Post Options
Thanks(0)
Quote Reply
Posted: 28 May 2025 at 10:45am |
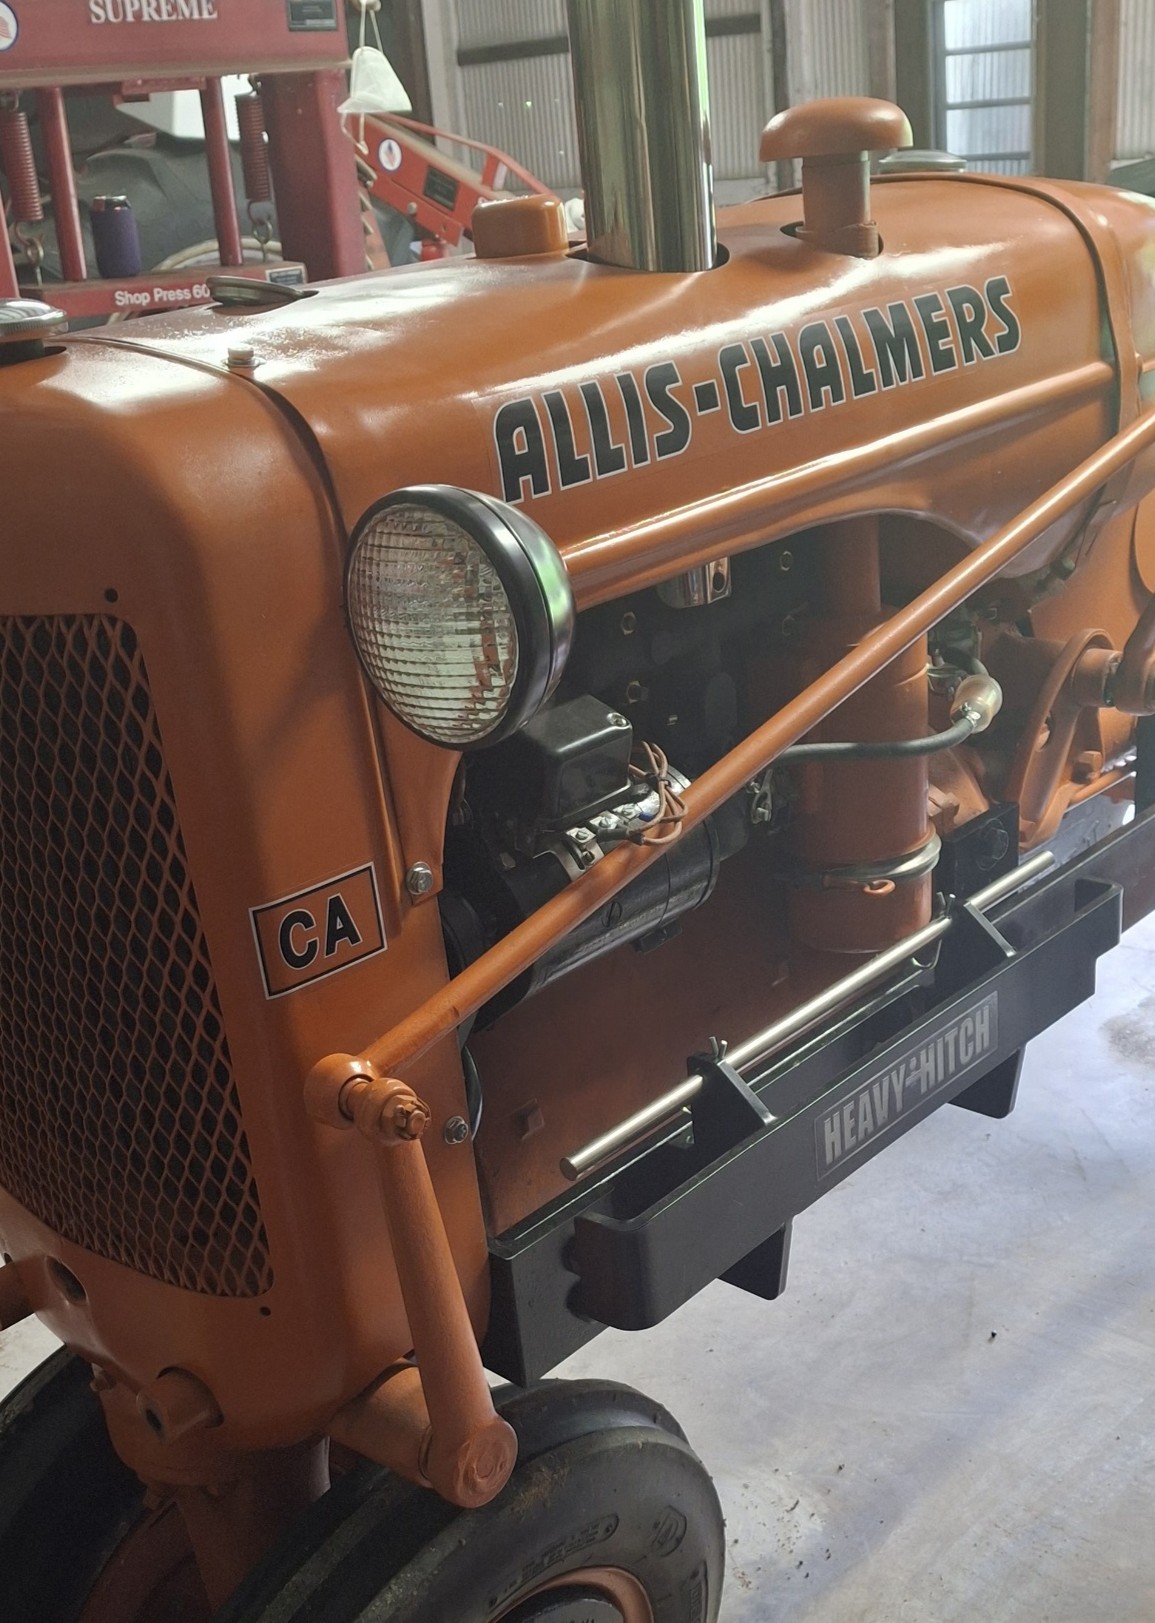
One of the last things done was to apply all the decals (not all technically in the right positions). I don't think the "CA" decal was designed quite right. It had a rectangular box around it which caused the decal to wrap around the front of the cowling. I guess I could have placed it lower, but the directions indicated it should go in front of the lower hood bolt.
The hood and gas tank were severely damaged in various logging accidents. I spent more time than I had trying to improve them, but there were too many other mechanical issues I had to get to so I cut my losses. I may revisit it one day.
Edited by dfwallis - 29 May 2025 at 11:40am
|
|
1952 CA13092
|
|
dfwallis
Orange Level
Joined: 09 Mar 2023
Location: DFW
Points: 702
|
Post Options
Thanks(0)
Quote Reply
Posted: 28 May 2025 at 10:53am |
In order to keep the PTO shaft from hitting the implement top link bracket, I modified the rear to top link braces to bring the top link bracket fully vertical and inline above the lower lift arm attachments. This significantly improved the PTO shaft clearance by several inches (mostly problematic at the lowest lift position). The old Zephyr 510 450RPM 1/2 inch drill nearly broke my arm drilling those large holes. I remember it almost broke my arm in the 60s when I used it too. I was surprised it's still functional :).
|
|
1952 CA13092
|
|
dfwallis
Orange Level
Joined: 09 Mar 2023
Location: DFW
Points: 702
|
Post Options
Thanks(0)
Quote Reply
Posted: 28 May 2025 at 10:58am |
One shows the tractor state as of March of 2023. The other shows the tractor in use mowing this field. I didn't start recording until after the field was mowed and I was going back over chopping the "wind rows" and missed sprigs. This was 3 feet tall in spots.
Edited by dfwallis - 28 May 2025 at 11:24am
|
|
1952 CA13092
|
|
dfwallis
Orange Level
Joined: 09 Mar 2023
Location: DFW
Points: 702
|
Post Options
Thanks(0)
Quote Reply
Posted: 28 May 2025 at 11:05am |
Toward the end of the trip I began cleaning up and priming the cultivator and side weight brackets. You can see where the right side of the cultivator lift arm is slightly bent in. I left this with the former AGCO dealer to see if he can straighten it a bit. It looks to be bent exactly straight inward, little to no twisting. I didn't have anything substantial enough to clamp it to.
|
|
1952 CA13092
|
|
CA13414
Silver Level

Joined: 25 Feb 2024
Location: Nebraska
Points: 295
|
Post Options
Thanks(0)
Quote Reply
Posted: 28 May 2025 at 9:39pm |
|
Spectacular and awesome job! What a transformation!!!!
Dan
|
|
Helping the aged survive and thrive! 1953 CA
|
|
CA13414
Silver Level
Joined: 25 Feb 2024
Location: Nebraska
Points: 295
|
Post Options
Thanks(0)
Quote Reply
Posted: 28 May 2025 at 9:55pm |
dfwallis wrote:
|
I really like how you added the extension off the PTO shield. I think I will do that with a flashing LED light and a slow reflector.
|
|
Helping the aged survive and thrive! 1953 CA
|
|
dfwallis
Orange Level
Joined: 09 Mar 2023
Location: DFW
Points: 702
|
Post Options
Thanks(0)
Quote Reply
Posted: 29 May 2025 at 10:32am |
CA13414 wrote:
Spectacular and awesome job! What a transformation!!!!
Dan |
:) Thanks, Dan. I just couldn't bear to see it wasting away. Probably not the smartest thing I've ever done, but it was fun.
|
|
1952 CA13092
|
|
dfwallis
Orange Level
Joined: 09 Mar 2023
Location: DFW
Points: 702
|
Post Options
Thanks(0)
Quote Reply
Posted: 29 May 2025 at 10:49am |
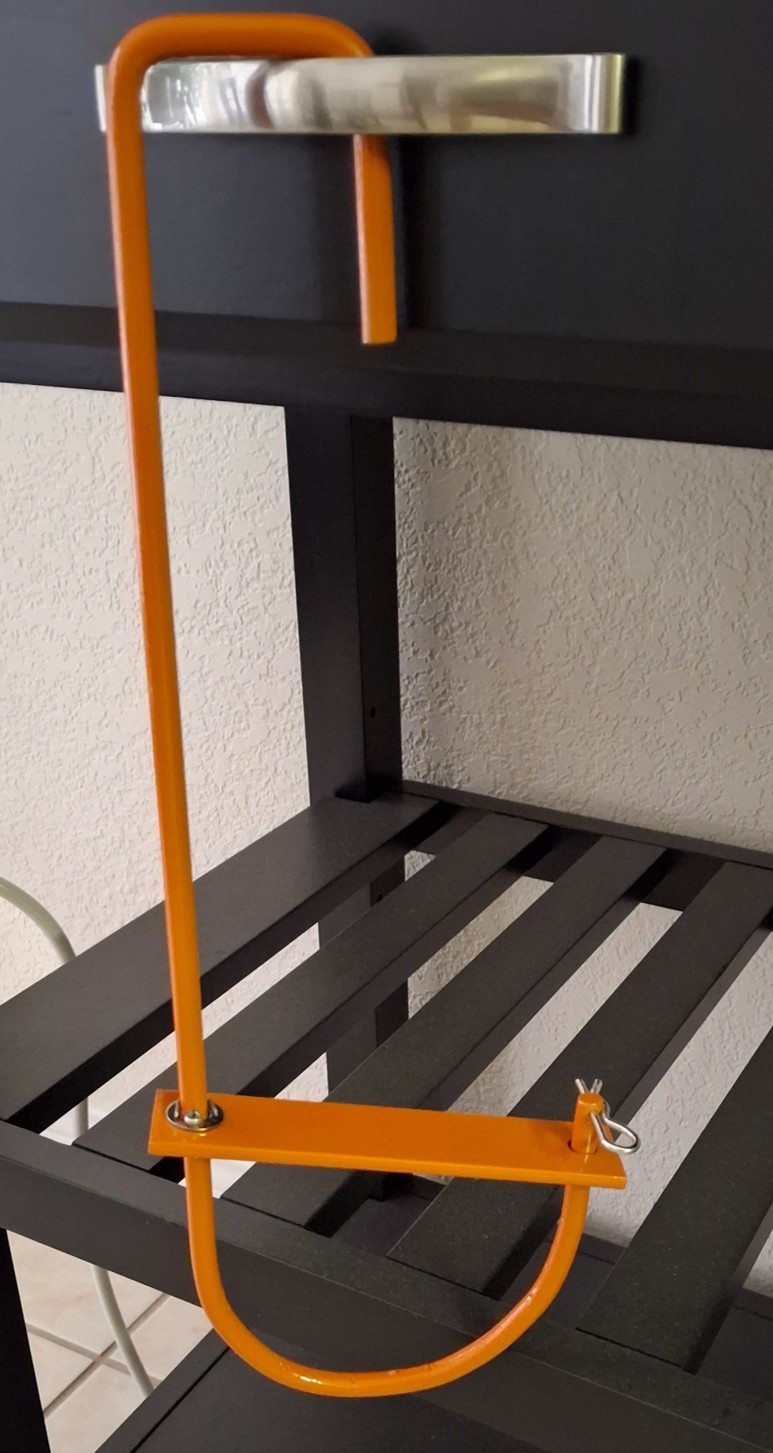
I'm not sure how often it might be useful, but I don't like the idea of going down the road with the implement raised in the "hold" position with the PTO off (to stop blades from turning, etc.). I've not detected any droop so far, but for longer distances between fields, I might just disconnect the PTO shaft and leave the pump on. So, I made a little PTO shaft hanger with a lock mechanism (probably unnecessary). It should hang on the PTO shield extension through a single hole (to be drilled). I had intended to add a little flare of the top hanging end straight outward as a sort of locking mechanism for the top attachment, but I should have added that bend first because it no longer fit in the bender tool or vise conveniently. I doubt it would bounce out anyway though. If I decide not to add the bend later, I may need to shorten the top hook just a bit to avoid the PTO shaft if needed. Surprisingly, my cheap tubing bender bent this solid rod easily. But it didn't quite have enough throw length, and I had to finish it in the vise. I looked at some rebar benders that look useful for these types of brackets. I typically do these in a vise. I have an Eastman bender that does a good job, but sometimes the bend radius is not sharp enough and sometimes the bend is too complex (or part too small) to fit the part in.
Edit: I compromised and bent the tip of the top end straight back (90deg) instead of out. The hole in the PTO shield bracket will need to be slightly larger to accommodate inserting the upper end and rounding the 90 degree bend. I only scuffed the paint a little.
Edited by dfwallis - 29 May 2025 at 2:58pm
|
|
1952 CA13092
|
|
Sugarmaker
Orange Level
Joined: 12 Jul 2013
Location: Albion PA
Points: 8445
|
Post Options
Thanks(0)
Quote Reply
Posted: 04 Jun 2025 at 7:30am |
Very detailed work on getting your CA preforming again. I like it! Should be a great tractor for years to come too! Thanks for sharing your journey. (Might get me going on my old CA project too?) Regards, Chris and Cheryl
|
|
D17 1958 (NFE), WD45 1954 (NFE), WD 1952 (NFE), WD 1950 (WFE), Allis F-40 forklift, Allis CA, Allis D14, Ford Jubilee, Many IH Cub Cadets, 32 Ford Dump, 65 Comet.
|
|
dfwallis
Orange Level
Joined: 09 Mar 2023
Location: DFW
Points: 702
|
Post Options
Thanks(0)
Quote Reply
Posted: 04 Jun 2025 at 10:02am |
Sugarmaker wrote:
Very detailed work on getting your CA preforming again. I like it! Should be a great tractor for years to come too! Thanks for sharing your journey. (Might get me going on my old CA project too?)Regards, Chris and Cheryl |
Thanks Chris and Cheryl :) I was happy with the most recent trip. Still a few things planned:
Left side final drive oil pan, clean and apply gas tank sealer compound (did the right side already because it was leaking).
Get it running better (B and B working on the distributor, install correct venturi in carburetor)...?
Explore ROPS and Canopy (I've used (thick) flat steel so far and I know C-channel might be better/stronger but flats are easier for me to fit). I think 3/4" flats will be acceptably strong as compared to a typical thin walled C channel or square tubing, when corner braced. I could easily go thicker if needed. Of course, adding a ROPS will complicate removing the drawbar with 3-point in use, since it will attach to the secondary bail I created for the 3-point mods. That's not very desirable since I want it to be easily reconfigurable.
Explore secondary hydraulic pump mounting options. I'm inclined to design the bracket to support either mounting via rear belt pulley or on the front via the installed cultivator bracket (i.e. both places as needed), designed for easy removal to reconfigure for cultivator use. I've been looking at the front engine pulley (adaptors, spline rods) that's commonly sold. It does not support the hand crank, but I think I can mod it to supply both a spline and a hand crank fitting. That is, if there is room for the hand crank fitting which is doubtful (from memory), but I haven't measured it. I might try cutting the hand crank notch out of the spline fitting if there's enough metal to work with. Possibly silly, but I want to keep the hand crank capability.
Edit: I intentionally chose a CW pump to interface with the belt pulley better in my selected mounting location. I would need a CCW pump to mount on the front. I'll probably go ahead and make the dual bracket, but I'd have to buy another pump (SAE B mount) to use it on the front.
Edited by dfwallis - 22 hours 16 minutes ago at 6:49pm
|
|
1952 CA13092
|
|
dfwallis
Orange Level
Joined: 09 Mar 2023
Location: DFW
Points: 702
|
Post Options
Thanks(0)
Quote Reply
Posted: 22 hours 7 minutes ago at 6:58pm |
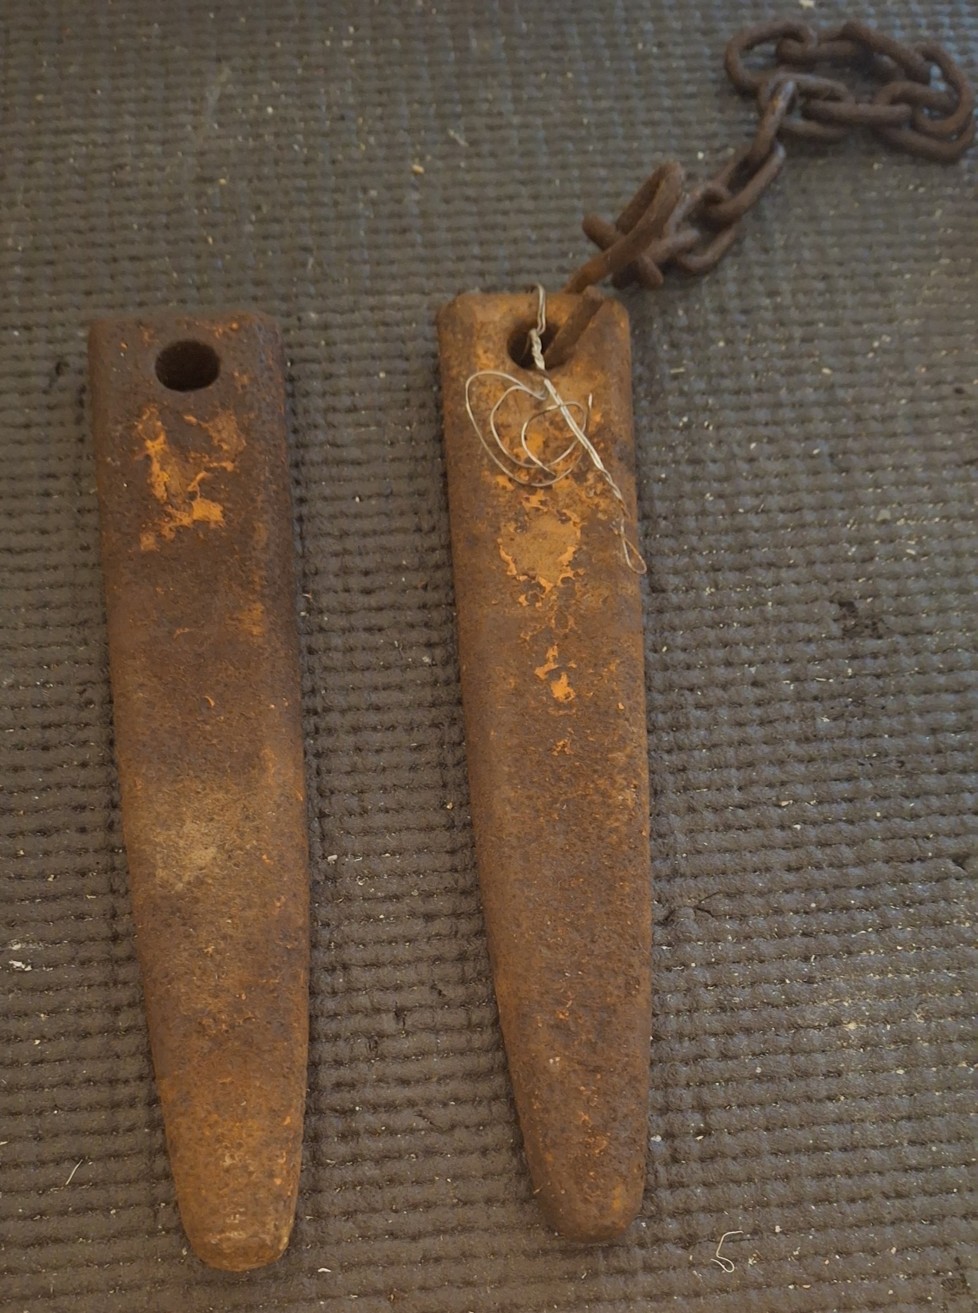
My brother thinks he remembers seeing one of these "recently", but I searched high and low to no avail. So I found these online for a pretty penny. I have both the original chains, they were still attached to the bracket. I could probably take a metal detector and scour the 40 acres and find them both... I don't really like those cheap knockoffs they're selling, but I could probably have machined them to look a little closer to the originals.
Edited by dfwallis - 22 hours 4 minutes ago at 7:01pm
|
|
1952 CA13092
|
|