| Author |
 Topic Search Topic Search  Topic Options Topic Options
|
Leon B MO 
Orange Level

Joined: 12 Sep 2009
Location: Old Monroe, Mo
Points: 2111
|
 Post Options Post Options
 Thanks(0) Thanks(0)
 Quote Quote  Reply Reply
 Topic: WD seat shock update Topic: WD seat shock update
Posted: 07 Feb 2017 at 8:35pm |
Finally getting around to posting an update on what I did. Gerald's info, Advance Auto, part #5752 was a pretty close match. Collapsed is the same length, it is about 3/4" longer extended, but that was not a problem. I used the stop ring off the old shock and welded it to the dust cover of the new shock at the same length. I used the rubber bushings that came in the new shock and seemed to work out ok. Here is a pic. Everything is original except the shock. It cost me like $27 with tax and a little time. Thanks to Gerald for the info. Leon B Mo
|
|
Uncle always said "Fill the back of the shovel and the front will take care of itself".
|
 |
|
Sponsored Links
|
|
 |
Auntwayne 
Orange Level

Joined: 23 Apr 2011
Location: Edwardsville Il
Points: 1589
|
 Post Options Post Options
 Thanks(0) Thanks(0)
 Quote Quote  Reply Reply
 Posted: 07 Feb 2017 at 8:39pm Posted: 07 Feb 2017 at 8:39pm |
|
Nice to have that heated shed this time of the year.
|
|
Dad always said," If you have one boy, you have a man. If you have two boys, you have two boys". "ALLIS EXPRESS"
|
 |
allischalmerguy 
Orange Level


Joined: 11 Sep 2009
Location: Deep River, IA
Points: 2877
|
 Post Options Post Options
 Thanks(0) Thanks(0)
 Quote Quote  Reply Reply
 Posted: 07 Feb 2017 at 8:56pm Posted: 07 Feb 2017 at 8:56pm |
|
Wow that looks nice! You want to do one for me? LOL!
Mike
|
|
It is great being a disciple of Jesus! 1950 WD, 1957 D17...retired in Iowa,
|
 |
Leon B MO 
Orange Level

Joined: 12 Sep 2009
Location: Old Monroe, Mo
Points: 2111
|
 Post Options Post Options
 Thanks(0) Thanks(0)
 Quote Quote  Reply Reply
 Posted: 07 Feb 2017 at 9:37pm Posted: 07 Feb 2017 at 9:37pm |
Auntwayne, it's actually warm here today, but yes the heat helps this time of year, since it's the only time of the year I have tinker time. Leon B MO
|
|
Uncle always said "Fill the back of the shovel and the front will take care of itself".
|
 |
Gerald J. 
Orange Level

Joined: 12 Sep 2009
Location: Hamilton Co, IA
Points: 5636
|
 Post Options Post Options
 Thanks(0) Thanks(0)
 Quote Quote  Reply Reply
 Posted: 08 Feb 2017 at 12:53am Posted: 08 Feb 2017 at 12:53am |
|
|
 |
Ted J 
Orange Level


Joined: 05 Jul 2010
Location: La Crosse, WI
Points: 18821
|
 Post Options Post Options
 Thanks(1) Thanks(1)
 Quote Quote  Reply Reply
 Posted: 08 Feb 2017 at 8:10pm Posted: 08 Feb 2017 at 8:10pm |
|
Is this also the same shock for the WD45?
Gerald, do you have a number for the early D-17? I need one of those too
|
|
"Allis-Express"
19?? WC / 1941 C / 1952 CA / 1956 WD45 / 1957 WD45 / 1958 D-17
|
 |
Leon B MO 
Orange Level

Joined: 12 Sep 2009
Location: Old Monroe, Mo
Points: 2111
|
 Post Options Post Options
 Thanks(0) Thanks(0)
 Quote Quote  Reply Reply
 Posted: 09 Feb 2017 at 4:41pm Posted: 09 Feb 2017 at 4:41pm |
Ted this is a 53 WD with the factory 45 trans/rearend, so I "assume" this advance auto part # works for a 45. As I said, it is about 3/4" longer but my seat sits right down on the spring. Leon B MO
|
|
Uncle always said "Fill the back of the shovel and the front will take care of itself".
|
 |
Gerald J. 
Orange Level

Joined: 12 Sep 2009
Location: Hamilton Co, IA
Points: 5636
|
 Post Options Post Options
 Thanks(0) Thanks(0)
 Quote Quote  Reply Reply
 Posted: 09 Feb 2017 at 6:56pm Posted: 09 Feb 2017 at 6:56pm |
|
I found that number in a shock catalog based on the dimensions a few years ago. I have no idea what the D17 might take.
Gerald J.
|
 |
TMiller/NC 
Orange Level Access

Joined: 11 Sep 2009
Location: Lenoir, NC
Points: 1774
|
 Post Options Post Options
 Thanks(0) Thanks(0)
 Quote Quote  Reply Reply
 Posted: 09 Feb 2017 at 7:18pm Posted: 09 Feb 2017 at 7:18pm |
|
I took the one off my CA to O'Reilly and they found one really close.
|
 |
HudCo 
Orange Level


Joined: 29 Jan 2013
Location: Plymouth Utah
Points: 3542
|
 Post Options Post Options
 Thanks(0) Thanks(0)
 Quote Quote  Reply Reply
 Posted: 15 Feb 2017 at 7:37pm Posted: 15 Feb 2017 at 7:37pm |
|
just got a monroe 5752 shock from the napa store and will try to get it done this week mine was sure starting to sag . what about a new spring how much differance does that make?
|
 |
Leon B MO 
Orange Level

Joined: 12 Sep 2009
Location: Old Monroe, Mo
Points: 2111
|
 Post Options Post Options
 Thanks(0) Thanks(0)
 Quote Quote  Reply Reply
 Posted: 16 Feb 2017 at 8:42am Posted: 16 Feb 2017 at 8:42am |
|
I used the spring that came off the tractor but it was the exact same length as another one I had from a parts tractor.
Leon B
|
|
Uncle always said "Fill the back of the shovel and the front will take care of itself".
|
 |
Big_Joe 
Bronze Level


Joined: 30 Jun 2017
Location: Fort Scott, KS
Points: 13
|
 Post Options Post Options
 Thanks(0) Thanks(0)
 Quote Quote  Reply Reply
 Posted: 30 Jun 2017 at 8:06pm Posted: 30 Jun 2017 at 8:06pm |
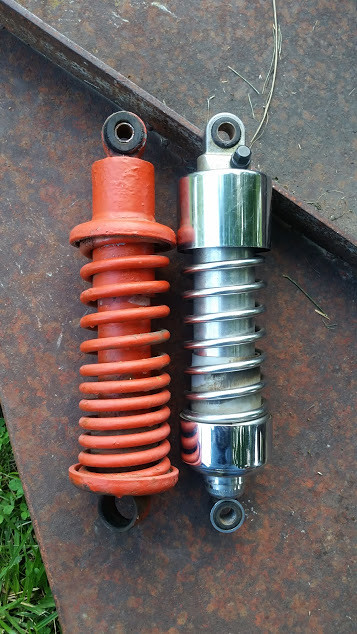
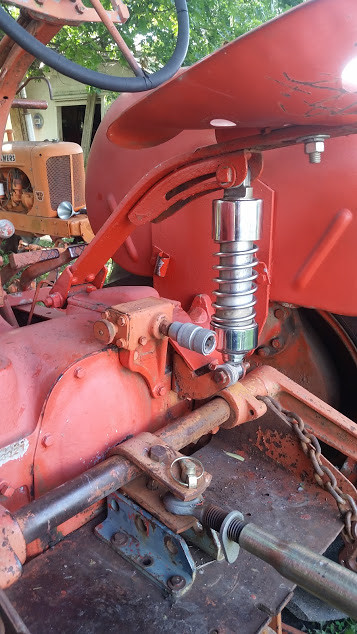
I just wanted to pass along some info about what I've done to my seat on my WD45. I am a pretty big guy and after mowing last weekend and having a sore back for 3 days, decided to try and find a solution for bottoming out the seat. I ordered a used air assisted shock absorber for a 750 Kawasaki Vulcan on ebay. Cost was $17 shipping included. It seemed to be about exactly the same length as the stock shock and spring.
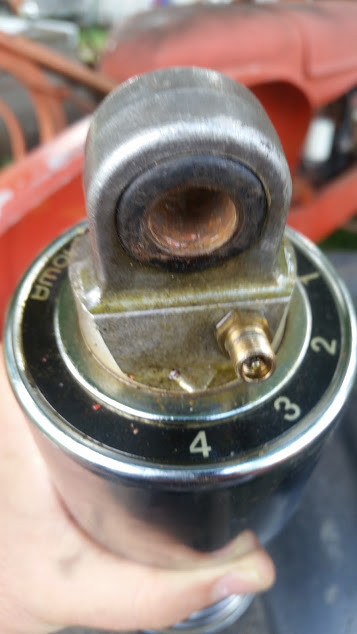
It has 4 position settings for rebound and a valve stem to add air.
The diameter of the holes are a little larger and the width of the eyes are a little narrower. I had to use washers to take up the extra space in the mount.
I put about 40 psi in the shock and it seems to be about right for me. I'm 6'2" and 300+. I can still bottom out the seat if I try real hard but the stop is definitely less abrupt. Huge improvement to the ride of my tractor. I'll let you know more next month after I mow again.
Edited by Big_Joe - 30 Jun 2017 at 8:10pm
|
 |
allischalmerguy 
Orange Level


Joined: 11 Sep 2009
Location: Deep River, IA
Points: 2877
|
 Post Options Post Options
 Thanks(0) Thanks(0)
 Quote Quote  Reply Reply
 Posted: 30 Jun 2017 at 8:26pm Posted: 30 Jun 2017 at 8:26pm |
|
I will have to get one and try it! Thanks !!! That might be a big help!
Mike in Iowa
|
|
It is great being a disciple of Jesus! 1950 WD, 1957 D17...retired in Iowa,
|
 |
Big_Joe 
Bronze Level


Joined: 30 Jun 2017
Location: Fort Scott, KS
Points: 13
|
 Post Options Post Options
 Thanks(1) Thanks(1)
 Quote Quote  Reply Reply
 Posted: 01 Jul 2017 at 4:11pm Posted: 01 Jul 2017 at 4:11pm |
 allischalmerguy wrote: allischalmerguy wrote:
I will have to get one and try it! Thanks !!! That might be a big help!
Mike in Iowa |
Make sure you google these shocks and research the correct way to adjust them. Good Luck!
|
 |
allischalmerguy 
Orange Level


Joined: 11 Sep 2009
Location: Deep River, IA
Points: 2877
|
 Post Options Post Options
 Thanks(0) Thanks(0)
 Quote Quote  Reply Reply
 Posted: 17 Jul 2017 at 10:05pm Posted: 17 Jul 2017 at 10:05pm |
|
Big Joe,
I ordered one of these shocks on ebay today. I hope it helps mine. Where did you find out how to set them?
Thanks
Pastor Mike
|
|
It is great being a disciple of Jesus! 1950 WD, 1957 D17...retired in Iowa,
|
 |
JC-WI 
Orange Level Access

Joined: 11 Sep 2009
Location: wisconsin
Points: 33828
|
 Post Options Post Options
 Thanks(0) Thanks(0)
 Quote Quote  Reply Reply
 Posted: 17 Jul 2017 at 11:03pm Posted: 17 Jul 2017 at 11:03pm |
|
Now, is that an 'air ride' seat? LOL
|
|
He who says there is no evil has already deceived himself
The truth is the truth, sugar coated or not. Trawler II says, "Remember that."
|
 |
Ted J 
Orange Level


Joined: 05 Jul 2010
Location: La Crosse, WI
Points: 18821
|
 Post Options Post Options
 Thanks(2) Thanks(2)
 Quote Quote  Reply Reply
 Posted: 18 Jul 2017 at 6:57am Posted: 18 Jul 2017 at 6:57am |
|
Pastor Mike,
First of all, are you going to Hutch this year? I've got something for you and I'll be there. Otherwise, PM me your address etc. and I'll mail it.
Now, I did some research on the air ride shocks and here is what I got.
The sock absorber can be adjusted by changing the air pressure and rebound damping force to suit various riding conditions.
Before making any adjustments, however, read the following procedures:
AIR PRESSURE
The air pressure in the shock absorber can be adjusted for different roads and loading conditions.
The following table shows an example of air pressure adjustment. To obtain a suitable ride, adjust the air pressure as indicated.
The standard air pressure for an average-build rider of 68 kg (150 lb) with no passenger and no accessories is atmospheric pressure. Ordinarily, the heavier the total load becomes, the higher the air pressure should be set.
THIS IS IMPORTANT:
1 pound per 10 pounds of rider, so 20 pounds for a 200 pound person and you are not supposed to use a compressor.
Too much air or too fast and you'll blow the seals.
Air Pressure Adjustment
Air Pressure Setting Load Road
------------------------------------------------
Atmospheric Soft Light Good
Pressure
| /\ /\ /\
| | | |
\/ \/ \/ \/
290 kPa
(3.0kg/cm², 43 psi) Hard Heavy Bad
MAX Air pressure is 43 psi!
TO ADJUST THE AIR PRESSURE
NOTE: Check and adjust the air pressure when the rear shock absorbers are cold (room temperature).
A. Air Valve
B. Rebound Damping Force Adjuster (Just above the Air Valve-the numbers)
• Check the air pressure with the air pressure gauge.
NOTE: Do not use tire gauges for checking air pressure. They may not indicate the correct air pressure because of air leaks that occur when the gauge is applied to the valve.
• To lower the air pressure, push the valve core slightly.
To raise the pressure, inject air through the valve with a tire pump.
Change the air pressure within the range specified in the preceding table to suit various riding conditions.
NOTICE
Inject air little by little so that air pressure does not rise rapidly.
Air pressure exceeding 290 kPa (3.0 kg/cm (Squared), 43 psi) may damage the oil seal.
WARNING
Be sure to adjust the air pressure within the specified range. Only use compressed air or nitrogen gas for filling the shocks. Under normal use heat is generated within the shock, so never use oxygen or any other kind of explosive gas to prevent the possibility of explosion. Do not incinerate the rear shock absorber since it may explode.
REBOUND DAMPING FORCE
The rebound damping force adjuster on each rear shock absorber has 4 positions so that the rebound damping force can be adjusted for different
roads and loading conditions. The numbers on the adjuster show the setting position.
The following table shows an example of damping force adjustment. To obtain stable handling and a suitable ride, adjust the damping force as indicated. The damping force can be left soft for average riding. But it should be adjusted harder for high speed riding or riding with a passenger. If the damping feels too soft or too stiff, adjust it in accordance with the following table.
The standard setting position under the same conditions as in air pressure adjustment is No.II.
TO ADJUST THE DAMPING FORCE
• Turn the adjusters to the desired position until you feel a click.
• Check to see that both adjusters are turned to the same relative position.
REBOUND DAMPING FORCE ADJUSTMENT (This is where the numbers on the shock come in)
Adjuster Damping Setting Load Road Speed
Position Force
I | Soft Light Good Low
II | /\ /\ /\ /\
| | | | |
III \/ \/ \/ \/ \/
IIII Stronger Hard Heavy Bad High
|
|
"Allis-Express"
19?? WC / 1941 C / 1952 CA / 1956 WD45 / 1957 WD45 / 1958 D-17
|
 |
Big_Joe 
Bronze Level


Joined: 30 Jun 2017
Location: Fort Scott, KS
Points: 13
|
 Post Options Post Options
 Thanks(1) Thanks(1)
 Quote Quote  Reply Reply
 Posted: 18 Jul 2017 at 11:42am Posted: 18 Jul 2017 at 11:42am |
 allischalmerguy wrote: allischalmerguy wrote:
Big Joe,
I ordered one of these shocks on ebay today. I hope it helps mine. Where did you find out how to set them?
Thanks
Pastor Mike |
I just googled it and found the information on this thread: http://www.vn750.com/forum/27-wheels-suspension-brakes/6409-setting-rear-shocks.htmlI used a dial type air pressure gauge to check the current state of charge. Mine was at zero psi. I then set the air regulator on my compressor to 10 psi and charged the shock. Worked my way up to 40 by increasing the pressure at the regulator a little at a time. Good luck!
|
 |
allischalmerguy 
Orange Level


Joined: 11 Sep 2009
Location: Deep River, IA
Points: 2877
|
 Post Options Post Options
 Thanks(0) Thanks(0)
 Quote Quote  Reply Reply
 Posted: 18 Jul 2017 at 12:24pm Posted: 18 Jul 2017 at 12:24pm |
|
Thanks for all the info Ted and Big Joe! That is so so helpful!!!!
I hope my used shock is good and has not been blown. We will see when I get it and get a chance to put it on the WD.
I am busy watching grandsons today.
Pastor Mike
Edited by allischalmerguy - 18 Jul 2017 at 12:25pm
|
|
It is great being a disciple of Jesus! 1950 WD, 1957 D17...retired in Iowa,
|
 |
GreenwoodCreations 
Bronze Level


Joined: 18 Jul 2018
Location: Bellwood, NE
Points: 9
|
 Post Options Post Options
 Thanks(0) Thanks(0)
 Quote Quote  Reply Reply
 Posted: 31 Aug 2018 at 6:09pm Posted: 31 Aug 2018 at 6:09pm |
|
So I am not alone: I replaced all the shocks on my tractors with the Rear shocks off the Super Beetles (1970's) fits well and holds my big a$$ up nicely. but on the three that i have just done, nothing on the original shocks was 'welded'? U just give it a half turn to unlock the circles and on the VW shocks it just goes back into place.
|
 |
Ted J 
Orange Level


Joined: 05 Jul 2010
Location: La Crosse, WI
Points: 18821
|
 Post Options Post Options
 Thanks(0) Thanks(0)
 Quote Quote  Reply Reply
 Posted: 03 Sep 2018 at 9:28am Posted: 03 Sep 2018 at 9:28am |
|
Bob, do you have some parts numbers for us? From the super Beetles? Thanx, Ted
|
|
"Allis-Express"
19?? WC / 1941 C / 1952 CA / 1956 WD45 / 1957 WD45 / 1958 D-17
|
 |
garden_guy 
Orange Level

Joined: 05 Jul 2013
Location: Illinois
Points: 1136
|
 Post Options Post Options
 Thanks(0) Thanks(0)
 Quote Quote  Reply Reply
 Posted: 03 Sep 2018 at 10:25am Posted: 03 Sep 2018 at 10:25am |
Grandpa put some sort of four position aftermarket seat (or maybe it was an AC offering?) on his WD when he first got it, he told me. It rides real nice; makes mowing for several hours quite easy. I can tell when I plow with my other tractor that the seat is not as comfy. No idea what seat this is, though.
|
 |
IBWD MIke 
Orange Level


Joined: 08 Apr 2012
Location: Newton Ia.
Points: 3733
|
 Post Options Post Options
 Thanks(0) Thanks(0)
 Quote Quote  Reply Reply
 Posted: 05 Sep 2018 at 9:30am Posted: 05 Sep 2018 at 9:30am |
 garden_guy wrote: garden_guy wrote:
Grandpa put some sort of four position aftermarket seat (or maybe it was an AC offering?) on his WD when he first got it, he told me. It rides real nice; makes mowing for several hours quite easy. I can tell when I plow with my other tractor that the seat is not as comfy. No idea what seat this is, though.
|
I would be interested in any information about these seats too. My Grandpa's WD has had one since before me. I thought it was original, until seeing ones that are.
|
 |
CrestonM 
Orange Level


Joined: 08 Sep 2014
Location: Oklahoma
Points: 8391
|
 Post Options Post Options
 Thanks(0) Thanks(0)
 Quote Quote  Reply Reply
 Posted: 05 Sep 2018 at 9:38am Posted: 05 Sep 2018 at 9:38am |
|
Looks like a Knoedler (Needler) seat to me.
|
 |
garden_guy 
Orange Level

Joined: 05 Jul 2013
Location: Illinois
Points: 1136
|
 Post Options Post Options
 Thanks(0) Thanks(0)
 Quote Quote  Reply Reply
 Posted: 05 Sep 2018 at 6:00pm Posted: 05 Sep 2018 at 6:00pm |
 CrestonM wrote: CrestonM wrote:
Looks like a Knoedler (Needler) seat to me. |
Hot dang I think you're right. Perhaps the "flow-ting" seat?
|
 |
GreenwoodCreations 
Bronze Level


Joined: 18 Jul 2018
Location: Bellwood, NE
Points: 9
|
 Post Options Post Options
 Thanks(0) Thanks(0)
 Quote Quote  Reply Reply
 Posted: 12 Sep 2018 at 1:39pm Posted: 12 Sep 2018 at 1:39pm |
|
Like you I just finished a shock for my WD 45, I used a rear shock for a VW Squareback from the 70's, cost me $18.95 delivered to the house off ebay. I used a cutting wheel on the die grinder to cut a rectangle in the top of the old shock sleeve that has the spring ring on it, and tapped the old shock down out of the sleeve. I then placed that over the new shocks top loop and gave it a half turn and wire welded it into place. As the sleeve on the new shock was just small enough the old one just slid down over it like the halves of a good pto shaft cover. As soon as the paint drys i will put the original plates and spring back on and bolt it back into the seat frame.
|
 |
markjlemmon 
Bronze Level

Joined: 11 Sep 2020
Location: Fresno, CA
Points: 2
|
 Post Options Post Options
 Thanks(0) Thanks(0)
 Quote Quote  Reply Reply
 Posted: 21 Sep 2020 at 3:36am Posted: 21 Sep 2020 at 3:36am |
Hi, This is Mark. I'm Experts to help you in the choice of your tractor Brands and all Things About tractor.
Use the AC Early WD Series Seat Shock Absorber with Spring to take the wear off of your seat and to help absorb the shocks of every bump in the road on your tractor to add more comfort while you're busy at work
|
 |


 Topic Options

 Post Options
 Thanks(0)


 allischalmerguy wrote:

