| Author |
 Topic Search Topic Search  Topic Options Topic Options
|
CAdon 
Orange Level


Joined: 14 Mar 2012
Location: southern CA
Points: 1019
|
 Post Options Post Options
") Thanks(0) Thanks(0)
 Quote Quote  Reply Reply
 Topic: ready to split CA Topic: ready to split CA
Posted: 24 Mar 2012 at 5:34pm |
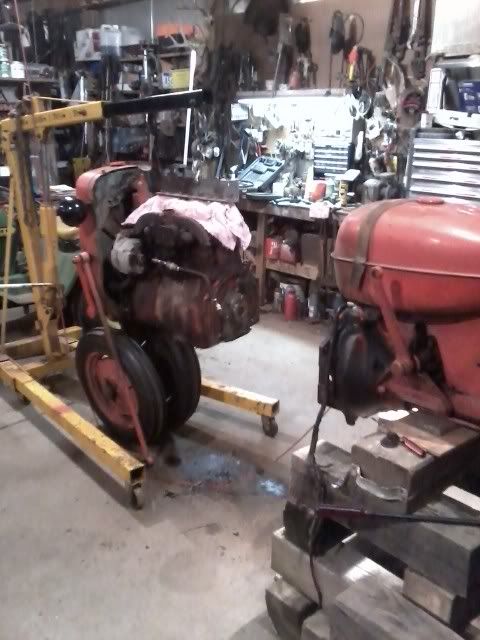
... but i seem to remember reading a warning on here about disconnecting the steering connecting rod. all places circled in blue are heavily painted with 50/50 acetone atf mix and have been for hours. (that's how i got the 2 castle nuts off). i've tapped the rod with a heavy hammer & also tried prying (but not too vigorously yet) with a decent sized crowbar to see if the bar would slide out, but no. looking for recommendations on procedure - where to disconnect & how. btw not braced for splitting yet, want to get all removals done first. (more below on that!) also - somebody should have warned me! as i take off each part preparing for the split, i have been cleaning them up and figuring i might as well paint them now instead of later as planned. well... i also uncover more 60 year crud to be cleaned out, so taking off more to get at it,,, and so it goes. now i guess i'm commited to a pretty complete repaint, cuz i definitely can't put this hardworking beauty back together looking so shabby.
Edited by CAdon - 24 Mar 2012 at 5:36pm
|
 |
|
Sponsored Links
|
|
|
Don(MI)
Orange Level

Joined: 15 Sep 2009
Location: Michigan
Points: 3887
|
Post Options
Thanks(0)
Quote Reply
Posted: 24 Mar 2012 at 6:26pm |
|
I think I might try what they call a "tie rod fork", its got 2 prongs, that are tapered on the end of a punch. Should work unless its a real bugger.
Edited by Don(MI) - 24 Mar 2012 at 6:34pm
|
|
Galatians 5:22-24
"I got a pig at home in a pen and corn to feed him on, All I need is a pretty little girl to feed him when I'm gone!"
|
|
MNLonnie
Orange Level
Joined: 11 Sep 2009
Location: Baxter MN
Points: 4791
|
Post Options
Thanks(0)
Quote Reply
Posted: 24 Mar 2012 at 6:47pm |
|
Get 2 big hammers. Hold one on one side of the arm and hit the other side with the other hammer as if you are trying to squish the hole that the bolt goes thru. After a couple good smacks thread the nut back on the bolt and try a couple light taps, should pop right out.
|
|
Waukesha B, B, IB, G, styled WF, D15, 615 backhoe, 2-Oliver OC3's, 4 Ford Model T's, 3 Model A Fords, AV8 Coupe, AV8 Roadster, 1933 Ford Wrecker
|
|
dad2many
Silver Level

Joined: 19 Jun 2011
Location: NC
Points: 104
|
Post Options
Thanks(0)
Quote Reply
Posted: 24 Mar 2012 at 6:48pm |
|
I would recommend a tie rod puller. It will press the rod out were the fork can tear up the joint. I would only use the fork if I was replacing the joint. The pulley will press the joint out cleanly.
|
|
Don(MI)
Orange Level
Joined: 15 Sep 2009
Location: Michigan
Points: 3887
|
Post Options
Thanks(0)
Quote Reply
Posted: 24 Mar 2012 at 6:57pm |
|
Do the tie rod pullers look like a gear puller? Just thinkin, wondering if a small gear puller would work too?
|
|
Galatians 5:22-24
"I got a pig at home in a pen and corn to feed him on, All I need is a pretty little girl to feed him when I'm gone!"
|
|
dad2many
Silver Level
Joined: 19 Jun 2011
Location: NC
Points: 104
|
Post Options
Thanks(0)
Quote Reply
Posted: 24 Mar 2012 at 7:19pm |
|
It does but the arms are fixed. A small puller will work if you can get the arms to hook.
Edited by dad2many - 24 Mar 2012 at 7:20pm
|
|
Dnoym N. S. Can.
Orange Level Access

Joined: 03 Oct 2009
Points: 544
|
Post Options
Thanks(0)
Quote Reply
Posted: 24 Mar 2012 at 7:24pm |
if you do what MNLonnie said Get 2 big hammers. Hold one on one side of the arm and hit the other
side with the other hammer as if you are trying to squish the hole that
the bolt goes thru. it should work on the top 2 tie rods end but this site show you what they look like http://www.google.ca/search?q=tie+rod+pullers&hl=en&safe=off&client=firefox-a&hs=3Ac&rls=org.mozilla:en-US:official&prmd=imvns&tbm=isch&tbs=simg:CAQSEglmLumBWkZSDyFZhG6qYIWoXA&dur=3293 B:-) Dnoym
|
|
Bill_MN
Orange Level

Joined: 12 Sep 2009
Location: Sioux Falls, SD
Points: 1471
|
Post Options
Thanks(0)
Quote Reply
Posted: 24 Mar 2012 at 7:35pm |
|
"pickle fork" is another name for the tie rod fork or ball joint separator, they make them to go on an air chisel, I would say that would be your best bet. may need another wedge beside it as you separate it farther
|
|
1951 WD #78283, 1918 Case 28x50 Thresher #76738, Case Centennial B 2x16 Plow
|
|
Murph-NC
Orange Level

Joined: 11 Sep 2009
Location: Western NC
Points: 797
|
Post Options
Thanks(0)
Quote Reply
Posted: 24 Mar 2012 at 8:50pm |
|
Not saying it will work every time... but I was in the same place as you on my C about a year ago. I had a hammer and was hitting here, hitting there, with no luck. My uncle walks up and tells me to hit straight down on the top/end of the steering arm instead of either side. He pointed out that when you hit the sides, the arm just rotates a little, but if you hit straight down, the arm supports the force of the hit and allows the force of the blow to do what you intend... separate the joint at the taper. Didn't take me but one or two hits to get both ends off using that method.
|
|
'41 C w/Woods L503 mower, #3 mower, 2-way plows for C
|
|
Chalmersbob
Orange Level
Joined: 11 Sep 2009
Location: Pennsylvania
Points: 2122
|
Post Options
Thanks(0)
Quote Reply
Posted: 24 Mar 2012 at 8:56pm |
|
You only need to remove the rod at the front pedistal arm and then swing it back, out of the way. Bob
|
|
CAdon
Orange Level
Joined: 14 Mar 2012
Location: southern CA
Points: 1019
|
Post Options
Thanks(0)
Quote Reply
Posted: 24 Mar 2012 at 8:58pm |
thanks all. i believe i do have something like that pickle fork around... and also a variety of pullers. from what lonnie says it sounds like a fair amount of force will be required. i'll give them all a try tomorrow UNLESS... i tried the nut on the lower right (attaching to the housing) and got it to rotate a couple of degrees. what about undoing it there and rotating the whole arm assembly out of the way? there's a bushing behind that vertical arm that looks really shot so i could replace that at the same time. (project has evolved into a much more complete refurb than originally planned... which is really not a problem. now or later, it all needs to be done. this is a "lifer", do not plan to sell it EVER!
Edited by CAdon - 24 Mar 2012 at 9:00pm
|
|
jaybmiller
Orange Level Access
Joined: 12 Sep 2009
Location: Greensville,Ont
Points: 24664
|
Post Options
Thanks(0)
Quote Reply
Posted: 24 Mar 2012 at 9:09pm |
I've got my D-14 split,so here's a couple hints..
1) be sure to block the steering to prevent the wheels from turning. I use short 6by6s wedged between the steering tie rod ends and the axle.
2) I use open end wrenches as 'spacers' when using 'pickle fork'.Kinda fun to hold everything but it seems the pickle fork is never quite 'forky' enough to get the job done.
3) be sure to block and secure rear wheels,put tranny in gear and remember be careful. even 'little' tractors like the CA are HEAVY and unforgiving !
|
|
3 D-14s,A-C forklift, B-112
Kubota BX23S lil' TOOT( The Other Orange Tractor)
Never burn your bridges, unless you can walk on water
|
|
CAdon
Orange Level
Joined: 14 Mar 2012
Location: southern CA
Points: 1019
|
Post Options
Thanks(0)
Quote Reply
Posted: 24 Mar 2012 at 9:19pm |
!!! thanks jay even dropping the cultivator framing was a weight issue! super cautious here since i don't have cherry pickers etc at my disposal.
but i am getting done... and safely.
Edited by CAdon - 24 Mar 2012 at 9:20pm
|
|
Eldon (WA)
Orange Level

Joined: 11 Sep 2009
Location: Spokane, WA
Points: 7765
|
Post Options
Thanks(0)
Quote Reply
Posted: 24 Mar 2012 at 9:33pm |
|
I use a big pry bar and put force between the drag link and arm like you want to force it off....just put your body against it, then take about a 3lb hammer and smack the steering arm on the end, this temporarily distorts the tapered hole inside and releases the tapered bolt of the drag link. I've use this procedure many times and it has always worked. You might have to smack it a few times.... Thread the nut on a couple of turns before you do this or the drag link will go flying.
|
|
ALLIS EXPRESS!
This year:
|
|
ron nca
Silver Level

Joined: 14 Sep 2009
Location: california
Points: 66
|
Post Options
Thanks(0)
Quote Reply
Posted: 24 Mar 2012 at 9:34pm |
|
DOn if tou have a small torch heat the sterring arm up a little then hit it that mite help. ron nca
|
|
Ted in NE-OH
Orange Level

Joined: 12 Nov 2009
Location: Austinburg OH
Points: 1703
|
Post Options
Thanks(0)
Quote Reply
Posted: 24 Mar 2012 at 9:35pm |
|
Remember when separated the engine can pivot on the front axle and hurt you. You have to block it at the front axle with wedges.
|
|
CA, WD, C, 3 Bs, 2 Gs, WC, I-400, 914
|
|
CAdon
Orange Level
Joined: 14 Mar 2012
Location: southern CA
Points: 1019
|
Post Options
Thanks(0)
Quote Reply
Posted: 24 Mar 2012 at 9:43pm |
yep, ted. and am hanging the engine half with a chain hoist attached to the engine. building a permanent sturdy frame to do that since here in southern calif i can work outside nearly year round (and prefer that). and, uh, i have got the bug and this first tractor rehab will definitely not be my last. likewise am modifying a wheeled support for the rear to pull it apart. packed dirt "floor" so big fat wheels.
|
|
Don(MI)
Orange Level
Joined: 15 Sep 2009
Location: Michigan
Points: 3887
|
Post Options
Thanks(0)
Quote Reply
Posted: 24 Mar 2012 at 9:50pm |
Yes, the front can swing quick if not blocked properly. Also, don't forget to block the back half very well. Did this to the "C" below, might look like too much for blocking, but was safe. Used 6x6 blocking with the widest spacing we could go.
|
|
Galatians 5:22-24
"I got a pig at home in a pen and corn to feed him on, All I need is a pretty little girl to feed him when I'm gone!"
|
|
CAdon
Orange Level
Joined: 14 Mar 2012
Location: southern CA
Points: 1019
|
Post Options
Thanks(0)
Quote Reply
Posted: 24 Mar 2012 at 10:06pm |
|
the good news is mine has a wide front. still securing evrything tho!
|
|
Eldon (WA)
Orange Level
Joined: 11 Sep 2009
Location: Spokane, WA
Points: 7765
|
Post Options
Thanks(0)
Quote Reply
Posted: 24 Mar 2012 at 10:11pm |
 CAdon wrote: CAdon wrote:
the good news is mine has a wide front. still securing evrything tho! |
I've done the wide fronts with a cherry picker lifting with a bracket drilled to mount on the valve cover bolts. Never blocked the front and it worked fine. With a wide front there really is no place for it to go if you are lifting from the top of the motor.
|
|
ALLIS EXPRESS!
This year:
|
|
CTuckerNWIL
Orange Level

Joined: 11 Sep 2009
Location: NW Illinois
Points: 22825
|
Post Options
Thanks(0)
Quote Reply
Posted: 24 Mar 2012 at 10:56pm |
CAdon wrote:
likewise am modifying a wheeled support for the rear to pull it apart. packed dirt "floor" so big fat wheels. |
I welded K car rear spindle to a piece of channel, bolted a wider piece of channel vertical and added pins on both pieces of channel to run a turnbuckle at a 45 degree angle between them. One of these bolted to each side of my WC frame rails made it nice to work on, roll out of the way and line up with the rearend when I was ready.
|
|
|
|
CAdon
Orange Level
Joined: 14 Mar 2012
Location: southern CA
Points: 1019
|
Post Options
Thanks(0)
Quote Reply
Posted: 24 Mar 2012 at 11:06pm |
yep, charlie... this from the same guy who dunked an engine block & zapped it for a couple of weeks to clean it up (read your other post - got to try that!). the creative ways are the fun ones, huh?!!! using old trailer parts here...
|
|
CTuckerNWIL
Orange Level
Joined: 11 Sep 2009
Location: NW Illinois
Points: 22825
|
Post Options
Thanks(0)
Quote Reply
Posted: 24 Mar 2012 at 11:11pm |
|
Just google "Rust removal by electrolysis" and you can read all about cleaning rust, grease, paint, from old iron without breaking a sweat. Battery charger, a bunch of old lawn mower blades a rubber or plastic container(could be a hole in the ground lined with plastic) and some Arm and Hammer Washing Soda is all you need.
Edited by CTuckerNWIL - 24 Mar 2012 at 11:12pm
|
|
|
|
CAdon
Orange Level
Joined: 14 Mar 2012
Location: southern CA
Points: 1019
|
Post Options
Thanks(0)
Quote Reply
Posted: 25 Mar 2012 at 10:24am |
|
how did we ever get by before the internet?!
|
|
CAdon
Orange Level
Joined: 14 Mar 2012
Location: southern CA
Points: 1019
|
Post Options
Thanks(0)
Quote Reply
Posted: 25 Mar 2012 at 9:35pm |
|
btw pin is still locked up after some prying, banging & much soaking. got rained out of action today but in no real hurry since cleanup of parts & prep for repaint continues indoors. gonna apply heat as soon as the rain stops (likely tomorrow). timid to apply too much force cuz old iron does break... as i've learned the hard way on other projects.
|
|
CAdon
Orange Level
Joined: 14 Mar 2012
Location: southern CA
Points: 1019
|
Post Options
Thanks(0)
Quote Reply
Posted: 26 Mar 2012 at 5:28pm |
|
yahoo! finally popped loose using crowbar forked end as a wedge and large pipe wrench as shim/spacer. no surprise found a nice bead of rust just inside the edge of the socket and matching place on the pin. carefully sanded that smooth and will grease coat when reassembling! uh, just in case i need to split it again...
|
|
52 CA, 41 B and a little B1 oh, yeah... and an 8N ford snuck in there, too.
|
|
EdK
Silver Level

Joined: 12 Sep 2009
Location: Newcastle, CA
Points: 223
|
Post Options
Thanks(0)
Quote Reply
Posted: 26 Mar 2012 at 5:47pm |
|
I did my C with a pickle fork. Worked great!!
|
|