| Author |
 Topic Search Topic Search  Topic Options Topic Options
|
Stevie 
Bronze Level


Joined: 16 Aug 2026
Location: ME
Points: 15
|
 Post Options Post Options
 Thanks(0) Thanks(0)
 Quote Quote  Reply Reply
 Topic: Settle a Steering Clutch Argument Topic: Settle a Steering Clutch Argument
Posted: 16 Aug 2026 at 8:34pm |
Hello all, Tried searching for information on this and only found repair information, no basic mechanical/operator advice. I've read the operator's manual, and it's fairly vague. Here's what I've got: 1962 AC HD6-B (15483) The previous owner claims to have rebuilt the starter and the engine.
I purchased it this week ($4500, plus two batteries) and it was delivered this afternoon. Due to the location it was being stored in (cramped backyard full of vehicles), I didn't have the opportunity to operate it myself before buying it. I took the owner's word for it that the steering clutches work. I forgot to ask about the brakes. When it was loaded on the trailer, he joked with the hauler about it not having brakes to speak of.
After a very frustrating first operation, wherein I learned it goes forward and backward great, but only turns a very small amount when you first get going in reverse, I adjusted the clutch levers (per the manual - 3" of free travel) and attempted to adjust the brakes, with no real success. The band that holds the brakes against the drum(?) has 1/4"+ wiggle on either side. I imagine the brake pads have just disintegrated.
So here's the argument, and the place where you get to instruct a novice operator (first time I've ever used a bulldozer)
The previous owner claims the steering clutches are not worn out on account of two pieces of evidence:
1. The dozer moves in a straight line and, according to him, would not do so if the clutches were worn out. He says it would either only run one track or neither track. 2. The clutches DO actually work, but only under load. (it's true! They do! But cutting your blade into the ground is not a very efficient way to turn, imho)
I need plenty of advice: 1. Should the dozer be turning with the steering clutch lever pulled all the way back with no brake engaged? How long of a turn would that be? 20'? 50'?
2. If the clutches need attention, should I try a solvent bath before pulling them out and attempting a rebuild? 3. Do you need brakes to turn the tractor without the blade under load?
Any other advice is welcome. It's not a real argument and even if I need to rebuild the steering clutches, I still think I got a good deal on the dozer for the amount of care it has been given already.
(10' blade, has the winch. Starts right up every time. Could definitely use some love.)
Edited by Stevie - 16 Aug 2026 at 8:37pm
|
 |
|
Sponsored Links
|
|
|
HD6 Merv
Orange Level Access

Joined: 03 Aug 2010
Location: New Zealand
Points: 518
|
Post Options
Thanks(0)
Quote Reply
Posted: 17 Aug 2026 at 1:54am |
Rule # 1 to me. . . .If you are going to own bulldozers best U have a good amount of mechanical nous. There is always something to fix. And the wrong person in the seat can cause alot of damage fast. Do not take the last statement personally. But ive seen alot of people who claim to know all about bulldozers but very quickly fade away when time comes to fix what they broke. Anyhow back to your machine. HD6 is a excellent little crawler, best in its size in 1960s. Clutchs adjust by shortening adjuster on the pull linkage. Brakes you adjust by removing small cover at back and tightening up bolt till its tight. Then tighten support screw underneath then back both off 1.5 turns. All this is in owners manuel. Going by what u say bands are worn out. And yes u have to have brakes to steer machine. U disengage power to the tracks with each steering clutch. But u need the brakes to do a pivot turn. Yes they will turn with the clutchs only if u are going uphill or towing a load. Remember the clutchs disengage power to each side. Clutchs either drive or they don,t . Engaged and in a straight push or pull they should have enough friction in the plates to stall the tractor engine or spin both tracks. If engines turning and tracks are staionary either master clutch is slipping or both steering clutchs are slipping. Either steering clutch should be able to spin either track without slipping. If clutchs slip and adjustment is correct they need rebuilding; . . .yes spanners. But as i said AC are quite good to work on they had good design and engineering. Have a good read of books and get an understanding of how they work and whats needed to to keep them working. ie oil levels for final drives; gearbox, oil master clutch which it may or may not have ?? Cheers and good luck; fwiw ive got 4 HD6s and 1 cat D4D all of around 1965 build and a earlier D4 7U as treasures to play with
|
|
tits tyres and tracks
they all cost you money
|
|
HD6 Merv
Orange Level Access
Joined: 03 Aug 2010
Location: New Zealand
Points: 518
|
Post Options
Thanks(0)
Quote Reply
Posted: 17 Aug 2026 at 1:57am |
|
Brake bands come out in 3 pieces. Clutchs stay there. But make sure clutchs are disengaging fully and not slipping under load first. If they are ok you only need to reline brakes.
|
|
tits tyres and tracks
they all cost you money
|
|
Stevie
Bronze Level
Joined: 16 Aug 2026
Location: ME
Points: 15
|
Post Options
Thanks(0)
Quote Reply
Posted: 17 Aug 2026 at 4:26am |
All good advice here. I'd say I'm mechanically inclined and have my fair share of experience with wrenching, but I'm definitely lost once you get to transmissions. I grew up in the world of automatics and only tried my hand at fixing one. Manuals I can operate and get the premise of how they operate (in a car), but haven't cracked one open.
As far as slipping, I'm not sure if you mean slipping under load (stopping when it should be going) or slipping when the handle is pulled back (going when it should be stopping). What I can say for sure is this:
When you pilot the dozer at a tree that's just a bit too rooted to knock over, the tracks will dig their way to China until you raise the blade (if it's not already at full height). Once the full length of the tracks make contact with the ground, if the tree doesn't go over and you don't pull the main clutch, the engine will die. That's not to say it doesn't have power; it'll tear a log in half like paper with proper leverage. I haven't moved much earth yet on account of all the trees in the way, but if you're driving straight ahead under no load and pull one steering clutch lever, it will keep heading straight as you please until you come across an obstacle (tree, log, stump), and then that track will stop stock still and the other track will start to try spinning you around whatever the blade has contacted.
I presume that means they're working as designed, but I'm a novice in this realm, so I'll leave that judgement up to the more experienced operators.
|
|
Les Kerf
Orange Level
Joined: 08 May 2020
Location: Idaho
Points: 1891
|
Post Options
Thanks(0)
Quote Reply
Posted: 17 Aug 2026 at 9:18am |
 Stevie wrote: Stevie wrote:
...Once the full length of the tracks make contact with the ground, if the tree doesn't go over and you don't pull the main clutch, the engine will die... |
This tells us that the steering clutches are holding adequately, as well as the main clutch.
Stevie wrote:
... if you're driving straight ahead under no load and pull one steering clutch lever, it will keep heading straight as you please until you come across an obstacle (tree, log, stump), and then that track will stop stock still and the other track will start to try spinning you around whatever the blade has contacted. |
This tells us that the steering clutches do indeed release properly but the brakes are not functioning as they should.
Stevie wrote:
I presume that means they're working as designed, but I'm a novice in this realm, so I'll leave that judgement up to the more experienced operators. |
Judging by the evidence, you presume correctly  I replaced the brakes on my Son-in-law's HD5G a couple of years ago, they are nearly identical to the HD6 units. since you have already attempted to adjust the brakes it sounds like you will need to replace the bands on both sides.
We got the parts from https://www.steeringclutch.com/achd6strcltch.htm
It appears that the earlier models used 2-1/2" wide brake bands and the late models used 4" wide so you will need to do some research before ordering parts. Best wishes!
Edited by Les Kerf - 17 Aug 2026 at 9:19am
|
|
Stevie
Bronze Level
Joined: 16 Aug 2026
Location: ME
Points: 15
|
Post Options
Thanks(0)
Quote Reply
Posted: 17 Aug 2026 at 11:17am |
Fantastic Les Kerf! I had figured as much from what HD6 Merv was saying but I love hearing the confirmation from someone who actually knows this stuff.
Les Kerf wrote:
We got the parts from https://www.steeringclutch.com/achd6strcltch.htm |
An amazing resource. I paid for my tractor on Wednesday and between the manuals and raw data available from this site, I've spent more time with it than sleeping since Wednesday.  I plan to remove the brake bands before ordering any parts so I can assess the condition of all the components and order what I truly need instead of assuming. I have 400' more woods to clear before I make it to my "shop" at the top of the hill though.
|
|
Ray54
Orange Level Access
Joined: 22 Nov 2009
Location: Paso Robles, Ca
Points: 5009
|
Post Options
Thanks(0)
Quote Reply
Posted: 17 Aug 2026 at 12:20pm |
As I read what you have adjusted, you never say you adjusted the brake band. Before taking things apart run the nut back and forth to make sure there is no more adjustment left. I went through this on a Cat D2 I helped a friend with. At first I could get nothing turned the adjustment to loosen the brake. This got the threads unstuck, then was able to turn it in and had very good amount of brake. Of course that might be the last adjustment left. But it worked for today, tomorrow is another day.
Unless you have been around equipment there is no way for you to know things. We old guys forget to give some basic information sometimes. Most all the time you need to apply brake as well as pulling the steering clutch lever. The clutch just stops giving power to the one track, that is why the brake is used to stop the coasting of that track. Depending you may need to push the brake petal really hard. After a bit of operating you will get a feeling for how much brake you need for as short of a turn as you want to make. But to extend the life of the brakes you never apply brake until you pull the lever.
|
|
Les Kerf
Orange Level
Joined: 08 May 2020
Location: Idaho
Points: 1891
|
Post Options
Thanks(0)
Quote Reply
Posted: 17 Aug 2026 at 12:57pm |
Ray54 wrote:
... Before taking things apart run the nut back and forth to make sure there is no more adjustment left. I went through this on a Cat D2 I helped a friend with... |
Good point. I grew up logging with my Dad's D2 and D4 Cats, I always thought they were "The Cat's Meow" and looked down with disdain upon our neighbor's HD5, but now that I have more intimate knowledge of the Allis crawlers I have changed my tune
Ray54 wrote:
Unless you have been around equipment there is no way for you to know things. We old guys forget to give some basic information sometimes. Most all the time you need to apply brake as well as pulling the steering clutch lever... |
And sometimes when going down a steep hill you need to steer the opposite way, which is a bit counter-intuitive and somewhat un-nerving at first. Also, those steel grousers are pretty effective ice skates; you can go sideways down an icy slope REALLY FAST! 
|
|
Stevie
Bronze Level
Joined: 16 Aug 2026
Location: ME
Points: 15
|
Post Options
Thanks(0)
Quote Reply
Posted: 17 Aug 2026 at 1:44pm |
Ray54 wrote:
As I read what you have adjusted, you never say you adjusted the brake band. Before taking things apart run the nut back and forth to make sure there is no more adjustment left. |
Stevie wrote:
and attempted to adjust the brakes |
I could have been more specific, but I suppose the bottom line was that I concluded they were toast. I'll go into detail: I removed the seat and wire brushed away three cups of grime from around the access covers to hopefully avoid filling the chamber with crud. The right adjusting nut appeared to be seized. I didn't want to break out a breaker bar on my first go with this machine so I left it open and went to the left side. The left side spun much more freely, but didn't tighten much, if at all. Having pored over the operator's manual and service manual provided by steeringclutch.com, I suspect the left adjuster may have a damaged or missing pin or fork. Returning to the right adjuster, I found it was still frozen (both clockwise and counter-clockwise), even with more force. I've sheared my share of bolts and decided not to press my luck without opening the cover. As I'm still working my way up the hill, I'm not going to dig into it in the woods if I can avoid it.
As I worked the nut back and forth, I realized the band had a lot of play, then went back and checked the left band and found the same thing. At that point, I had only run the dozer for ten minutes and there was no fixing the brakes today; getting antsy, I closed up the access points, replaced the seat, and set to work.
Ray54 wrote:
We old guys forget to give some basic information sometimes. |
If I had my druthers, I'd have learned from an experienced operator, but I don't know any besides the prior owner so I made it y'all's problem. 
|
|
HD6 Merv
Orange Level Access
Joined: 03 Aug 2010
Location: New Zealand
Points: 518
|
Post Options
Thanks(2)
Quote Reply
Posted: 18 Aug 2026 at 1:09am |
Your going good Stevie If all you have to do is reline brakes all will be good. It will have the standard bands; only last of the HD6G loaders had the wider brake bands. And im told by a man who has one they won,t come out like the normal bands, he had to pull steering clutch out, but you won,t have that issue. Gearboxes in them are only simple straight cut sliding gears. But to check oil level on a 6B there is a bung half way down on LHS of box this is a oil level bung. When you get yourself sorted out and have got brakes out to reline. I would also drop gearbox and final drive oils out and replace with new Sae 50 oil. Also have a look at you master clutch; look under floor plates if its a oil clutch it will have a spin on oil filter on LHS of clutch housing; dipstick for oil clutch should be next to engine oil level dipstick. If it has neither of those it will be a dry master clutch. We were lucky down here at bottom of world in NZ. All HD6B with 6000 engine dealer specd them with long track frame and oil master clutch, some even had the 2 spd reverse gearbox. Mine has all that. HD6B 18631 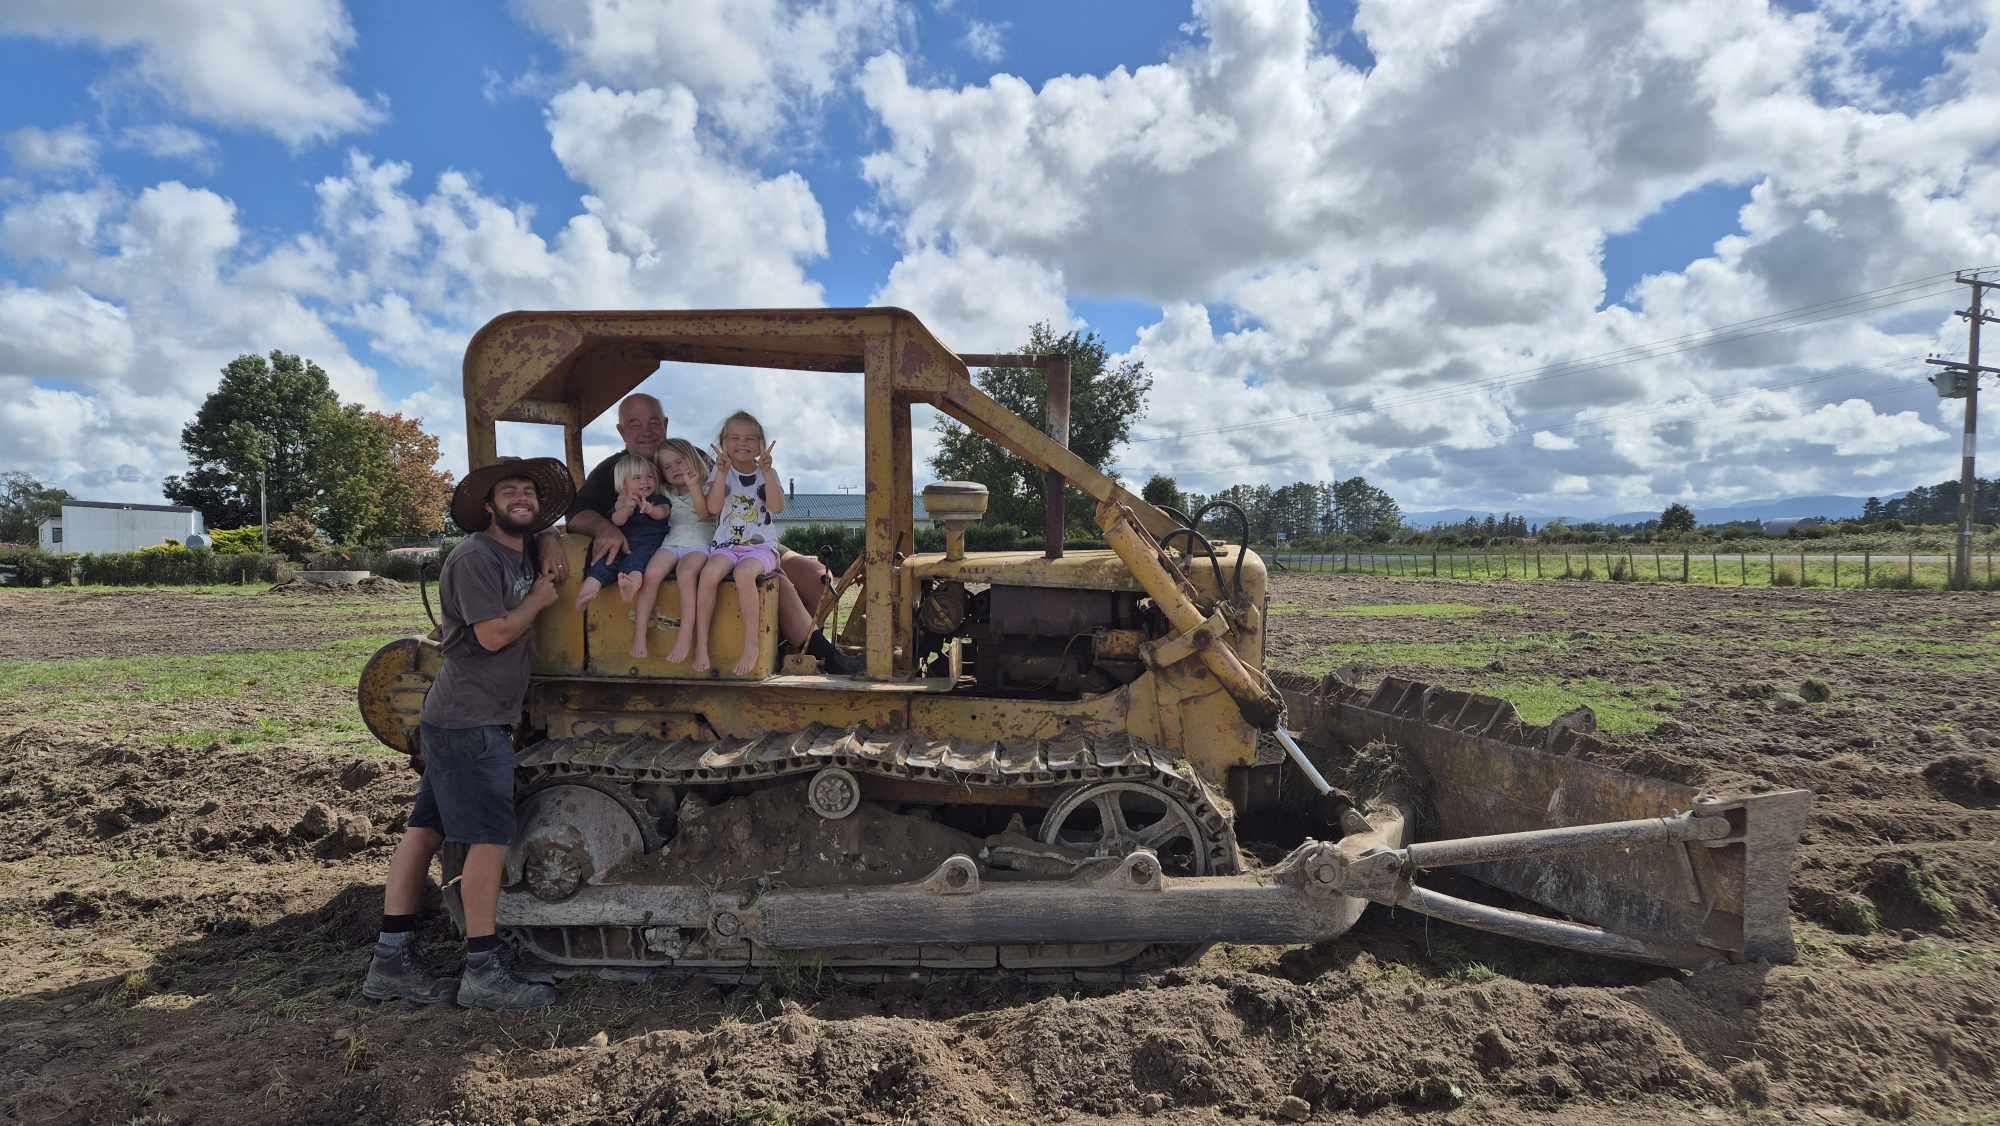 |
|
tits tyres and tracks
they all cost you money
|
|
Ray54
Orange Level Access
Joined: 22 Nov 2009
Location: Paso Robles, Ca
Points: 5009
|
Post Options
Thanks(1)
Quote Reply
Posted: 18 Aug 2026 at 11:46am |
|
Merv that is quit the bunch of helpers you have there.
|
|
Ray54
Orange Level Access
Joined: 22 Nov 2009
Location: Paso Robles, Ca
Points: 5009
|
Post Options
Thanks(0)
Quote Reply
Posted: 18 Aug 2026 at 12:00pm |
Terrible to get old Stevie, I cannot remember what all you can see with the fuel tank off. Before you get to deep make sure there is no adjustment. If you can get to them take the adjusters out and clean the threads up. That will be useful even if you replace the lining. Those old brake linings with asbestos last a lot longer than the new stuff.
Also be careful, I have a 3/8 drive ratchet riding under the brake drum on an HD 5.
Would be glad to come supervise if I was close to you. But bring any questions back here Merv and Les do a good job of explaining.
|
|
Les Kerf
Orange Level
Joined: 08 May 2020
Location: Idaho
Points: 1891
|
Post Options
Thanks(0)
Quote Reply
Posted: 18 Aug 2026 at 3:51pm |
I suspect that Merv has forgotten more about these old crawlers than I will ever know 
|
|
Coke-in-MN
Orange Level Access
Joined: 12 Sep 2009
Location: Afton MN
Points: 42468
|
Post Options
Thanks(0)
Quote Reply
Posted: 19 Aug 2026 at 1:29pm |
|
Had a adjuster nut that was stripped inside, well it would draw tension on band but when working machine and applying brake it would slip out of adjustment with heavy pressure of leverage .
|
|
Life lesson: If you’re being chased by a lion, you’re on a horse, to the left of you is a giraffe and on the right is a unicorn, what do you do? You stop drinking and get off the carousel.
|
|
Stevie
Bronze Level
Joined: 16 Aug 2026
Location: ME
Points: 15
|
Post Options
Thanks(0)
Quote Reply
Posted: 23 Aug 2026 at 4:43pm |
Awful kind offer, much appreciated. Feel free to pop in if you ever wind up nearly to Canada in Maine!  Earlier this week I removed the battery boxes. Or, more accurately, the squared battery rings. No top and bottoms rusted away. Today I finally stole enough time to look into the grease pits. What a mess! Left side: adjuster nut broken in half. The support bolt (underneath the chassis) is sheared off 1/4" long. That's going to be a headache. Right side: adjuster nut is frozen. The pin that holds the band together? Also frozen. Both clutch casings are just FULL (metaphorically full; They're more "caked") of grime. Having read some ideas on clean-out, since I'm not presently attempting to rehab my clutches, it seems the best course may be scraper, scooper, and a big old bottle of simple green. My plan in a beat case scenario: Remove the brake bands, clean them up, inspect them for wear (by which I mean send photos to y'all for review), check the components to get an order list together, and order parts. While I wait for parts to come, clean out the housings and source gasket material (unless someone here knows where to look for that)
|
|
Ray54
Orange Level Access
Joined: 22 Nov 2009
Location: Paso Robles, Ca
Points: 5009
|
Post Options
Thanks(0)
Quote Reply
Posted: 23 Aug 2026 at 6:06pm |
If you can break the muck up maybe a shop vac would suck little hunks up easier than your hand down in there.
If the rivet heads are not wearing a grove in the brake drum you can get some operating time out of them.
Compared to other options, you are somewhat close to Gem Dozer in French speaking Canada. He has been a professional parts dealer. Semi retired at this time. No one has ever had any complaints about him that I have seen. And I frequent Cat, IH, and AC places and he is on all.
I would try him for the little things. But looks like your in USA so I don't know about boarder crossing of old parts.
Also I am in California. Used the US post office abbreviation Ca back when I first started playing Tractor Porn. Finding just how world wide these boards can get, I might need to fix that someday.
|
|
Coke-in-MN
Orange Level Access
Joined: 12 Sep 2009
Location: Afton MN
Points: 42468
|
Post Options
Thanks(0)
Quote Reply
Posted: 23 Aug 2026 at 6:54pm |
|
Brake pins in bands are internally threaded , accessible through pipe plugs in side of case, believe 1/4x20 thread - slide hammer works to remove . I made new ones from SS rod .
Bottom of case has drain hole also with pipe plug threads .
Can be a chore cleaning and hope mice have not nested in cases
|
|
Life lesson: If you’re being chased by a lion, you’re on a horse, to the left of you is a giraffe and on the right is a unicorn, what do you do? You stop drinking and get off the carousel.
|
|
Les Kerf
Orange Level
Joined: 08 May 2020
Location: Idaho
Points: 1891
|
Post Options
Thanks(0)
Quote Reply
Posted: 23 Aug 2026 at 7:03pm |
Ray54 wrote:
If you can break the muck up maybe a shop vac would suck little hunks up easier than your hand down in there... |
X2 on the shop vac. I would try to scrape, chisel, scoop, etc. with whatever improvised tooling such as an old bandsaw blade to be able to flex around the drum. Keeping things dry as long as possible will help with being able vacuum the chunks out. Best wishes!
|
|
gemdozer
Orange Level
Joined: 17 Sep 2009
Points: 1131
|
Post Options
Thanks(0)
Quote Reply
Posted: 24 Aug 2026 at 8:30am |
|
I have some brake band pines and nut adjustement and more
|
|
rickcorder1954
Bronze Level
Joined: 22 Oct 2025
Location: Jonesburg, MO
Points: 22
|
Post Options
Thanks(0)
Quote Reply
Posted: 26 Aug 2026 at 4:25am |
|
IF you need to have the brake bands relined, I can do those for you...just message me on this site and I will get back to you ASAP! Rick
|
|
Stevie
Bronze Level
Joined: 16 Aug 2026
Location: ME
Points: 15
|
Post Options
Thanks(0)
Quote Reply
Posted: 01 Sep 2026 at 9:49am |
|
Just... ugh.
So far I haven't had anything catastrophic happen, but it has been a long uphill battle to get anything to give.
The first brake band top has come out.
On that note, do you remove the bottom band by rotating it around the rear of the drum or the front of the drum? The bottom of my case is full of grease, grime, stringy bits, sticks, and acorn caps (I'm guessing mouse nest), so there's not enough room to rotate it in either direction. I'm working on the gunk removal now.
The linings are in tatters. The rivets are worn flat and the edges of the papery linings are broken or breaking off.
So far:
Two of the pin plugs were frozen and the heads stripped. Got those out.
Both of the drain plugs were frozen, one stripped. Got both of those out.
One of the band supports was frozen. Got it out.
One of the band supports is sheared. Still working on that.
All of the pins are frozen onto the bands, which has been a major pain. I have had to cut one pin into pieces to remove it. Only the left hinge pin remains now.
Edited by Stevie - 01 Sep 2026 at 9:50am
|
|
gemdozer
Orange Level
Joined: 17 Sep 2009
Points: 1131
|
Post Options
Thanks(0)
Quote Reply
Posted: 01 Sep 2026 at 12:45pm |
|
If you have the narrow brake band you could slyde her in center side and she could come out .
|
|
Stevie
Bronze Level
Joined: 16 Aug 2026
Location: ME
Points: 15
|
Post Options
Thanks(0)
Quote Reply
Posted: 02 Sep 2026 at 10:14am |
|
Gemdozer, that's a wise suggestion. Came just a couple hours after I hooked up a ratchet strap to it and forced it out around the drum.
The good news is the bottom one is so rusted I'll need to replace it anyway so the permanent bend/crimp I gave it with the gorillaing won't be an issue.
On the other hand, my partner and I are looking at clean-out options and thinking we may as well "give a mouse a cookie" now that the fuel tank is off and pull the steering clutches to rebuild them.
However, the 3/4" bolt heads don't want to budge on either side of the drum.
I looked through the manual for insight and didn't see anything about reverse threading but thought to check here first to be sure before I break my breaker bar.
I'll admit that this is the first piece of heavy machinery I've worked on and it's giving me a run for my money.
|
|
gemdozer
Orange Level
Joined: 17 Sep 2009
Points: 1131
|
Post Options
Thanks(0)
Quote Reply
Posted: 02 Sep 2026 at 12:27pm |
|
I dismantled maybe 15 HD6 for parts and these bolts was probleme and before too much trouble I was brooken the lock washer with fine punch or a screw driver or try a hammer and chisel to get her move a bit and dont forget to removed a bolt left side and on right until the last one.Sorry for my bad writing am french speaking.
|
|
Stevie
Bronze Level
Joined: 16 Aug 2026
Location: ME
Points: 15
|
Post Options
Thanks(0)
Quote Reply
Posted: 03 Sep 2026 at 7:25am |
|
You're all good! Thank you for the advice, again. Wish I had better access to tools up here...
I did end up breaking my breaker bar, though it was pretty flimsy compared to the replacement I bought. I've managed to get a handful of bolts off the track side. Going to work on the center side until I can't reach any of the bolts, then rotate the track to get at the next set.
|
|
Stevie
Bronze Level
Joined: 16 Aug 2026
Location: ME
Points: 15
|
Post Options
Thanks(0)
Quote Reply
Posted: 06 Sep 2026 at 2:11pm |
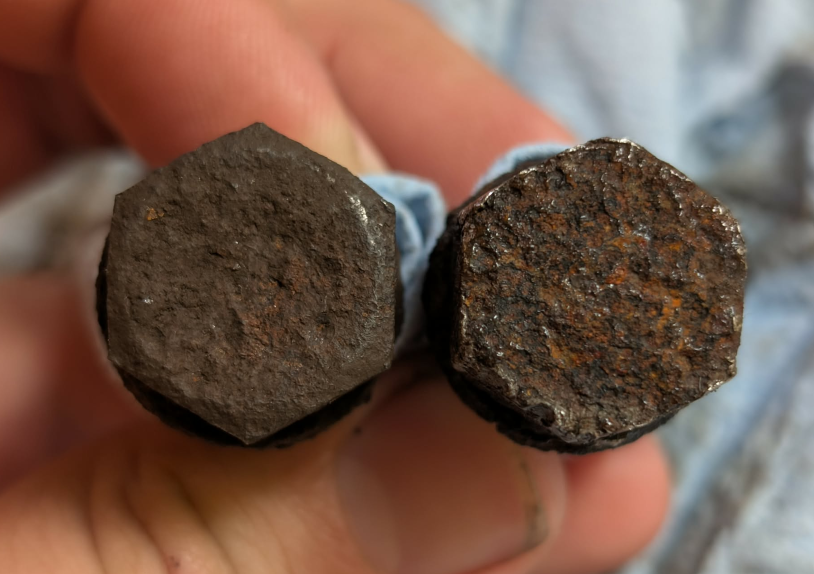
A note here... The bolts towards the center have "smaller" heads than the outer bolts. I have tried a good handful of 3/4" wrenches and accessories on them and each one consistently fails. An 18mm crow's foot just fits on them, though 18mm box ends and sockets don't seem to want to. I've only managed to get one out so far (this has been a major setback) and it's so chewed up from the pipe wrench I ended up resorting to that it's hard to tell if some surface area has simply rusted away over time or... In any case, it's clearly rust-pitted, perhaps more so than the outer bolt I'm comparing it to. Looking at the image, they appear indistinguishable, but the same 3/4" wrench is tight on the left bolt and sloppy on the right. I'm not sure what the best way forward is, besides the obvious "buy new grade 8 bolts to replace them" (RIP my wallet).
|
|
gemdozer
Orange Level
Joined: 17 Sep 2009
Points: 1131
|
Post Options
Thanks(0)
Quote Reply
Posted: 06 Sep 2026 at 4:51pm |
|
Maybe the exowner had repair the stering cluch and reused the better bolts but it could be 20 years ago and the bolts outside drum are 1 3\4 inch and the other side they are 1 inch .
|
|
Stevie
Bronze Level
Joined: 16 Aug 2026
Location: ME
Points: 15
|
Post Options
Thanks(0)
Quote Reply
Posted: 06 Sep 2026 at 6:09pm |
|
Could be, I can't really say for sure.
I'm waiting for a parts cleaning bucket to show up and then I'll dunk them all in and see if any obvious pattern appears.
Pulled out 10 bolts from the center, 8 bolts from the outside. The clutch is free and moves side-to-side and pivots, but is still stuck on that lip and I'm losing daylight. May take one more crack at it before calling it quits for the day.
*Edit 13 minutes later...
I watched 30 seconds of an HD6 clutch removal video where the guy calls out "pull that steering clutch lever back for me" and quite literally ran back to my dozer, pulled back on the lever, and out she came. I've taken a photo of the grime in the case but I'll have to resize it before it will let me post.
Edited by Stevie - 06 Sep 2026 at 6:24pm
|
|
Stevie
Bronze Level
Joined: 16 Aug 2026
Location: ME
Points: 15
|
Post Options
Thanks(0)
Quote Reply
Posted: 07 Sep 2026 at 5:35am |
gemdozer wrote:
Maybe the exowner had repair the stering cluch and reused the better bolts but it could be 20 years ago and the bolts outside drum are 1 3\4 inch and the other side they are 1 inch . |
Wait wait wait... I just re-read this. On my machine, there were 10 bolts on the center side, which were 1 3/4" and what a pain to negotiate. I believe this is the clutch side. On the outer side, the final drive side, also the brake drum, there were 8x 1" bolts. Are you saying those sides were reversed?
|
|
gemdozer
Orange Level
Joined: 17 Sep 2009
Points: 1131
|
Post Options
Thanks(0)
Quote Reply
Posted: 07 Sep 2026 at 8:40am |
|
Sorry I make a mistake for the side bolts
|
|