| Author |
 Topic Search Topic Search  Topic Options Topic Options
|
Les Kerf 
Orange Level

Joined: 08 May 2020
Location: Idaho
Points: 1556
|
 Post Options Post Options
 Thanks(0) Thanks(0)
 Quote Quote  Reply Reply
 Topic: HD5G Final Drive Seal Topic: HD5G Final Drive Seal
Posted: 16 Mar 2022 at 7:31am |
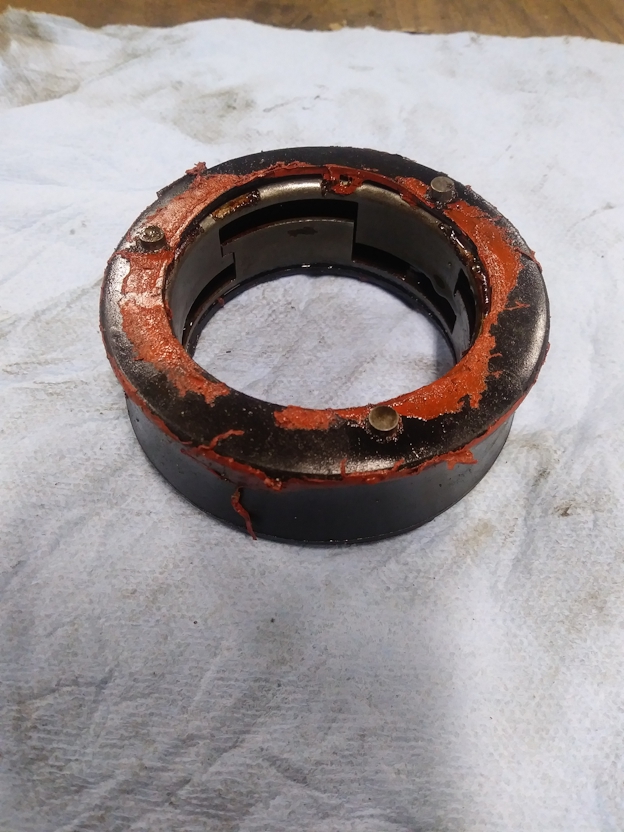
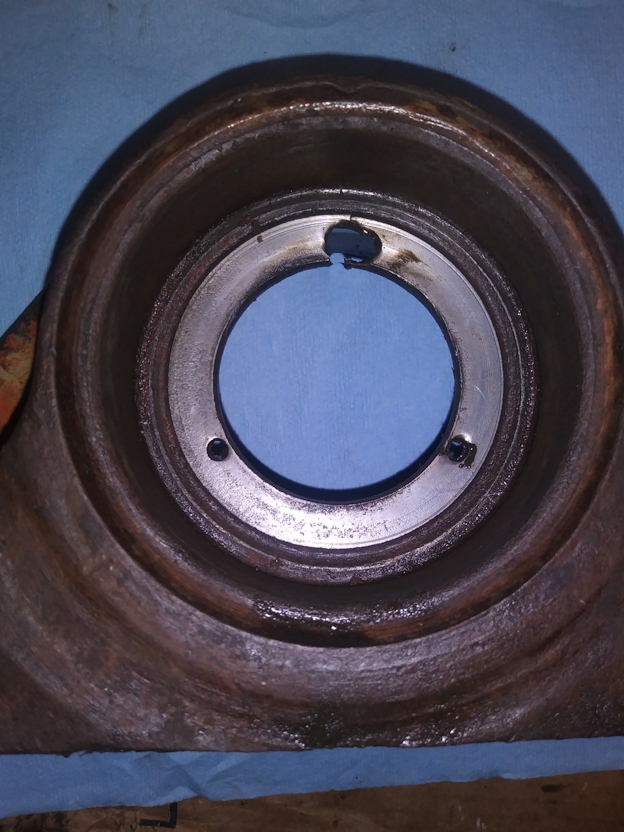
The Previous Owner apparently used the wrong adhesive on the final drive outboard bearing seals. It didn't stay 'stuck'  It appears to be some sort of silicone as it is still somewhat 'rubbery'. The seal surfaces are still good, and the seal could probably be re-used if it could be adequately de-greased to accept a proper adhesive.  Damage to bearing housing: The 'unstuck' seal appears to have rotated in the housing; two of the pins were found on the other side of this bulkhead nestled in the groove behind the bearing. The bearing itself appears to still be serviceable, but I have no idea as to how to salvage the race that is still inside the housing without damaging it. We are in need of a serviceable bearing housing if anyone knows of a source. 
|
 |
|
Sponsored Links
|
|
 |
CAL(KS) 
Orange Level

Joined: 18 Sep 2009
Location: Chapman, KS
Points: 3804
|
 Post Options Post Options
 Thanks(0) Thanks(0)
 Quote Quote  Reply Reply
 Posted: 16 Mar 2022 at 12:06pm Posted: 16 Mar 2022 at 12:06pm |
|
likely general gear in Idaho has that part
|
|
Me -C,U,UC,WC,WD45,190XT,TL-12,145T,HD6G,HD16,HD20
Dad- WD, D17D, D19D, RT100A, 7020, 7080,7580, 2-8550's, 2-S77, HD15
|
 |
gemdozer 
Orange Level

Joined: 17 Sep 2009
Points: 1072
|
 Post Options Post Options
 Thanks(0) Thanks(0)
 Quote Quote  Reply Reply
 Posted: 16 Mar 2022 at 6:46pm Posted: 16 Mar 2022 at 6:46pm |
|
With the good rings seal and ring seal gasket the outboard cage should be oké
|
 |
rcwitzel 
Bronze Level


Joined: 17 Feb 2020
Location: Omaha NE
Points: 16
|
 Post Options Post Options
 Thanks(0) Thanks(0)
 Quote Quote  Reply Reply
 Posted: 16 Mar 2022 at 9:45pm Posted: 16 Mar 2022 at 9:45pm |
|
Les - I have one. PM me if interested. Thanks, Bob.
|
 |
Les Kerf 
Orange Level

Joined: 08 May 2020
Location: Idaho
Points: 1556
|
 Post Options Post Options
 Thanks(0) Thanks(0)
 Quote Quote  Reply Reply
 Posted: 17 Mar 2022 at 9:12am Posted: 17 Mar 2022 at 9:12am |
Update: Having read through 164 pages of posts on the Construction forum I remembered seeing this thread by dadsdozerhd5b https://www.allischalmers.com/forum/hd5-outboard-seals_topic133302_post1101878.html?KW=HD5+seal#1101878He reported having 0.035" gap at the seal faces; I have found ours to be ~0.100" gap. This thing was never even close to being sealed up when it was last assembled. I am not sure which axle we have as I cannot see the splines to get a count.The axle nut is the type having the cup as referenced in my manual as the "Second-Type". I am contemplating making a spacer and gluing it in with epoxy to cover the damaged area and also take up the gap. How much should the seal assembly be compressed to achieve proper sealing?
|
 |
Les Kerf 
Orange Level

Joined: 08 May 2020
Location: Idaho
Points: 1556
|
 Post Options Post Options
 Thanks(0) Thanks(0)
 Quote Quote  Reply Reply
 Posted: 18 Mar 2022 at 11:51am Posted: 18 Mar 2022 at 11:51am |
|
Does anyone know what the actual difference is between the First Type seal (KIT NUMBER 073763) and the Second-Type seal (KIT NUMBER 088665)?
I suspect that the Second-Type is longer to make up for some other difference between the old and the newer. There certainly seems to be a significant tolerance difference as noted by dadsdozerhd5b and myself.
Does anyone know of a source for the production drawings of our machines?
Edited by Les Kerf - 18 Mar 2022 at 11:53am
|
 |
Les Kerf 
Orange Level

Joined: 08 May 2020
Location: Idaho
Points: 1556
|
 Post Options Post Options
 Thanks(0) Thanks(0)
 Quote Quote  Reply Reply
 Posted: 20 Mar 2022 at 5:45am Posted: 20 Mar 2022 at 5:45am |
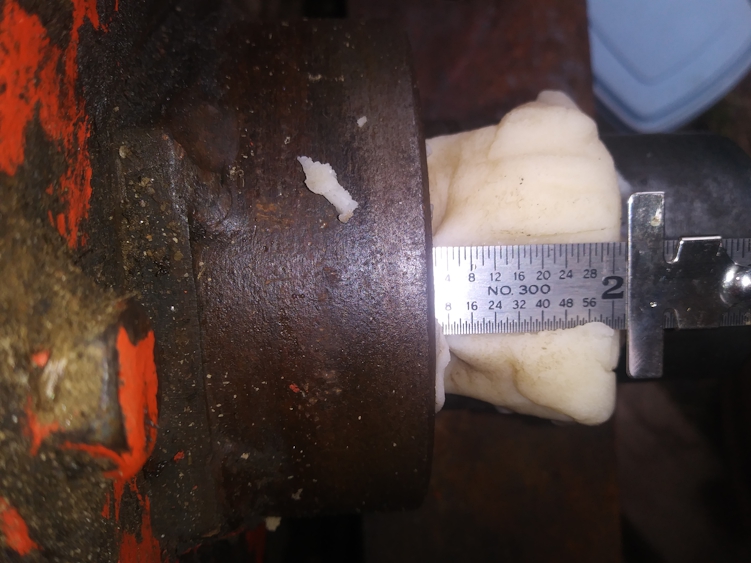
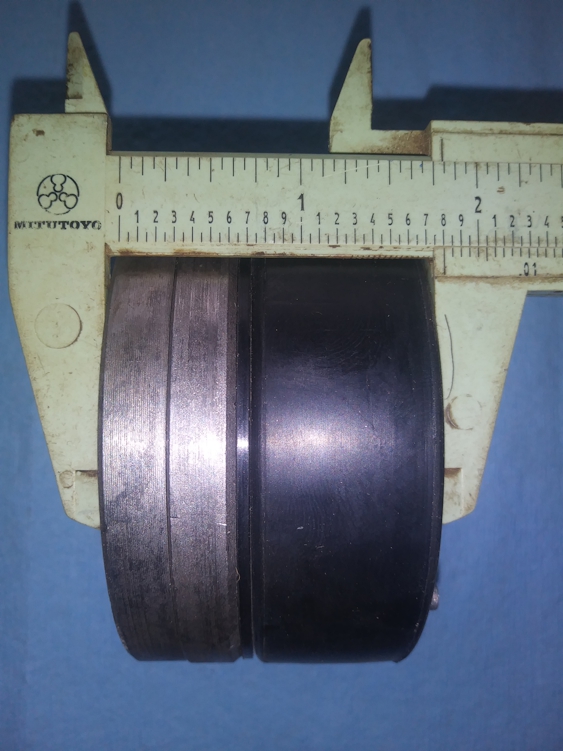
My Daughter mixed up a batch of homemade playdough for me to play with (the grandkids got the remainder when I was done). I stuffed a wad of playdough into the space where the axle seal goes, then set the bearing housing in place to see how much clearance there is. The camera angle isn't quite perfect, but it shows about 2 1/16" (2.06") space that needs to be filled by the seal pack just to take up the space with no compression of the spring assembly  The new seal pack assembly measures just under 1 13/16" (1.8")  That leaves a fat 1/4" of gap before the seals even make contact. The spring assembly can compress ~1/4" before bottoming out, so a 3/8" inch spacer should leave the spring assembly at about mid-range of travel. I need a window in the bearing housing to see where it all fits when everything is bolted down tight. Edit: I believe the gap will be a bit less than stated above after the axle nut is tight. But how much?
Edited by Les Kerf - 20 Mar 2022 at 5:51am
|
 |
DMiller 
Orange Level Access

Joined: 14 Sep 2009
Location: Hermann, Mo
Points: 35262
|
 Post Options Post Options
 Thanks(0) Thanks(0)
 Quote Quote  Reply Reply
 Posted: 20 Mar 2022 at 6:35am Posted: 20 Mar 2022 at 6:35am |
|
The sprocket compresses the seal package as install it
Need to remember that point in your measurements.
There is the specific glue for these still available, from Diving Shops, neoprene cement. Silicones or other materials do not bond well either to the cast or the neoprene rubber seal bellows.
|
 |
DMiller 
Orange Level Access

Joined: 14 Sep 2009
Location: Hermann, Mo
Points: 35262
|
 Post Options Post Options
 Thanks(1) Thanks(1)
 Quote Quote  Reply Reply
 Posted: 20 Mar 2022 at 6:40am Posted: 20 Mar 2022 at 6:40am |
|
The length of the sprocket spline less the tightened gap of spline to the shaft spline where first removed the nut is the depth the back of the sprocket will be relative to the housing. Was a spec in my 7G service manual as to that depth of spline but my manual is gone. If your sprocket had no clearance of end of shaft spline to outer face of sprocket it will not ever tighten up or will compress too far into that seal if make a spacer for behind the nut.
|
 |
Codger 
Orange Level


Joined: 23 Dec 2020
Location: Utopia
Points: 2568
|
 Post Options Post Options
 Thanks(1) Thanks(1)
 Quote Quote  Reply Reply
 Posted: 20 Mar 2022 at 7:18am Posted: 20 Mar 2022 at 7:18am |
If I can add to DMiller's post do use a cement for "Neoprene rubber" and ensure all mating parts are clean and oil free. Solvent, and acetone are your friends here.
I've chased a lot of leaks in years gone by on finals thanks to Permatex, (and the like) silicone usage where a neoprene rated cement was needed.
|
 |
Les Kerf 
Orange Level

Joined: 08 May 2020
Location: Idaho
Points: 1556
|
 Post Options Post Options
 Thanks(0) Thanks(0)
 Quote Quote  Reply Reply
 Posted: 20 Mar 2022 at 9:12am Posted: 20 Mar 2022 at 9:12am |
 DMiller wrote: DMiller wrote:
The sprocket compresses the seal package as install it
Need to remember that point in your measurements.
There is the specific glue for these still available, from Diving Shops, neoprene cement. Silicones or other materials do not bond well either to the cast or the neoprene rubber seal bellows. |
Thank you  This is the outboard seal, sorry about the confusion. I will definitely be using the correct adhesive.
|
 |
Les Kerf 
Orange Level

Joined: 08 May 2020
Location: Idaho
Points: 1556
|
 Post Options Post Options
 Thanks(0) Thanks(0)
 Quote Quote  Reply Reply
 Posted: 15 Jun 2022 at 4:02am Posted: 15 Jun 2022 at 4:02am |
|
UPDATE:
After taking dozens of measurements, making drawings, and much deliberation I ended up by making a 1/4" spacer for the right-hand side and a 3/16" spacer for the left-hand side. I made alignment pins out of drill stock and epoxied the pins and spacers into the housings.
New seals were purchased from General Gear in Boise, Idaho and we then glued them in place using the prescribed neoprene cement made by 3M ( we now have enough of that stuff to last many lifetimes).
It has all been back together for 6+ weeks now and my Son-in-law has put 5-6 operating hours on it with no leaks yet. If it is still good at this time next year I will call it a success.
I thank everyone for their help and input, I would have been lost without this forum for guidance on this project.
|
 |
Codger 
Orange Level


Joined: 23 Dec 2020
Location: Utopia
Points: 2568
|
 Post Options Post Options
 Thanks(0) Thanks(0)
 Quote Quote  Reply Reply
 Posted: 15 Jun 2022 at 6:02am Posted: 15 Jun 2022 at 6:02am |
How close were physical dimensions were the replacement new seal to the removed seal? I can't fathom someone would put something together with that much of a "gap" between squeezing surfaces and attempt to bridge this with silicone.
Appreciate the follow up with the repair.
|
 |
Les Kerf 
Orange Level

Joined: 08 May 2020
Location: Idaho
Points: 1556
|
 Post Options Post Options
 Thanks(0) Thanks(0)
 Quote Quote  Reply Reply
 Posted: 15 Jun 2022 at 9:11am Posted: 15 Jun 2022 at 9:11am |
 Codger wrote: Codger wrote:
How close were physical dimensions were the replacement new seal to the removed seal? I can't fathom someone would put something together with that much of a "gap" between squeezing surfaces and attempt to bridge this with silicone.
Appreciate the follow up with the repair. |
The replacement seals appeared to be identical to the seals which we removed; in fact, the removed seals still appear to be serviceable if given a proper cleaning. There was no evidence of the previous mechanic attempting to bridge the gap with silicone; my hypothesis is that they 'assumed' the parts to be compatible, their choice of adhesive was certainly in error though. I am guessing that the axle/sprocket combination is not original to this machine; the parts manual shows a different seal to be used with the later 20-spline sprocket/axle but the only seals available are for the earlier 6-spline assembly. The parts manual also shows a 'First type outboard bearing arrangement' and a 'Second type outboard bearing arrangement' which are intended to be used with appropriate sprocket/axle combination. Since I did not dismantle the axle/sprocket portion I was unable to see the splines so as to actually count and verify which components we have here. I believe that what we are dealing with is a mis-matched hodge-podge of various and sundry components thrown together in a haphazard manner. Your mileage may vary 
|
 |
gemdozer 
Orange Level

Joined: 17 Sep 2009
Points: 1072
|
 Post Options Post Options
 Thanks(0) Thanks(0)
 Quote Quote  Reply Reply
 Posted: 15 Jun 2022 at 1:39pm Posted: 15 Jun 2022 at 1:39pm |
|
The earley sprocket shaft 6 sleene use boot seal number 049109 and the 20 spleene shaft use 051112 and have some with spring assambly and rings seal in stock and the cage outboard is not the same too.
|
 |
Les Kerf 
Orange Level

Joined: 08 May 2020
Location: Idaho
Points: 1556
|
 Post Options Post Options
 Thanks(0) Thanks(0)
 Quote Quote  Reply Reply
 Posted: 16 Jun 2022 at 7:27am Posted: 16 Jun 2022 at 7:27am |
 gemdozer wrote: gemdozer wrote:
The earley sprocket shaft 6 sleene use boot seal number 049109 and the 20 spleene shaft use 051112 and have some with spring assambly and rings seal in stock and the cage outboard is not the same too. |
@gemdozer: Can you get a measurement of the 051112 seal like I did in the picture that I posted above in this thread and post it here please? No need to take a picture, just the measurement so that we can verify the difference. Thanks for the help 
|
 |
gemdozer 
Orange Level

Joined: 17 Sep 2009
Points: 1072
|
 Post Options Post Options
 Thanks(0) Thanks(0)
 Quote Quote  Reply Reply
 Posted: 16 Jun 2022 at 7:48am Posted: 16 Jun 2022 at 7:48am |
|
I check my boot seal assambly with gasket and 2 rings seal and have 1.802 inch
|
 |
Les Kerf 
Orange Level

Joined: 08 May 2020
Location: Idaho
Points: 1556
|
 Post Options Post Options
 Thanks(0) Thanks(0)
 Quote Quote  Reply Reply
 Posted: 17 Jun 2022 at 9:32am Posted: 17 Jun 2022 at 9:32am |
 gemdozer wrote: gemdozer wrote:
I check my boot seal assambly with gasket and 2 rings seal and have 1.802 inch |
Thank you gemdozer  For all practical purposes your seal assembly is identical to the one I measured. I do know that our machine has the second type of sprocket nut that is used on the later tractors, and I assume (but cannot verify) that the outboard bearing bracket assembly is for the earlier machine. Perhaps that is where the mismatch occurs.
|
 |
gemdozer 
Orange Level

Joined: 17 Sep 2009
Points: 1072
|
 Post Options Post Options
 Thanks(0) Thanks(0)
 Quote Quote  Reply Reply
 Posted: 17 Jun 2022 at 3:25pm Posted: 17 Jun 2022 at 3:25pm |
|
HI These seals are use with the spocket shaft 20 spleenes and the outboard bearing should be change or could be modify
|
 |
Les Kerf 
Orange Level

Joined: 08 May 2020
Location: Idaho
Points: 1556
|
 Post Options Post Options
 Thanks(0) Thanks(0)
 Quote Quote  Reply Reply
 Posted: 26 May 2023 at 11:25am Posted: 26 May 2023 at 11:25am |
 Les Kerf wrote: Les Kerf wrote:
UPDATE: ...
It has all been back together for 6+ weeks now and my Son-in-law has put 5-6 operating hours on it with no leaks yet. If it is still good at this time next year I will call it a success.
I thank everyone for their help and input, I would have been lost without this forum for guidance on this project.
|
Further Update: It has been over a year now and the machine has another ~30+ hours on it, the right side shows no leakage whatsoever but the left side lost ~3 quarts; not perfect but we can certainly live with it at that rate whereas previously it lost pretty much all of the gear lube out of both sides in about a month. I am going to claim a qualified success for now, the left side will have to get quite a bit worse before we would tear it down again.
|
 |
Codger 
Orange Level


Joined: 23 Dec 2020
Location: Utopia
Points: 2568
|
 Post Options Post Options
 Thanks(0) Thanks(0)
 Quote Quote  Reply Reply
 Posted: 26 May 2023 at 11:31am Posted: 26 May 2023 at 11:31am |
 Les Kerf wrote: Les Kerf wrote:
[QUOTE=Les Kerf]UPDATE: ...
I am going to claim a qualified success for now, the left side will have to get quite a bit worse before we would tear it down again.
|
But the environmental damage you are knowingly causing.....
Edited by Codger - 26 May 2023 at 11:56am
|
|
That's All Folks!
|
 |
Les Kerf 
Orange Level

Joined: 08 May 2020
Location: Idaho
Points: 1556
|
 Post Options Post Options
 Thanks(0) Thanks(0)
 Quote Quote  Reply Reply
 Posted: 26 May 2023 at 6:24pm Posted: 26 May 2023 at 6:24pm |
 Codger wrote: Codger wrote:
 Les Kerf wrote: Les Kerf wrote:
[QUOTE=Les Kerf]UPDATE: ...
I am going to claim a qualified success for now, the left side will have to get quite a bit worse before we would tear it down again.
|
But the environmental damage you are knowingly causing.....
|
Three quarts of gear lube in a years time.... meh.
|
 |
Codger 
Orange Level


Joined: 23 Dec 2020
Location: Utopia
Points: 2568
|
 Post Options Post Options
 Thanks(0) Thanks(0)
 Quote Quote  Reply Reply
 Posted: 26 May 2023 at 7:09pm Posted: 26 May 2023 at 7:09pm |
 Les Kerf wrote: Les Kerf wrote:
 Codger wrote: Codger wrote:
 Les Kerf wrote: Les Kerf wrote:
[QUOTE=Les Kerf]UPDATE: ...
I am going to claim a qualified success for now, the left side will have to get quite a bit worse before we would tear it down again.
|
But the environmental damage you are knowingly causing.....
|
Three quarts of gear lube in a years time.... meh.
|
Better than me stabbing a hole into a plastic 55 of waste engine oil in the gravel driveway with the forklift. Had to get another pail to start my tire pile alight. Got to catch the wind when right to not bother the neighbors as they think a little different than I.
|
|
That's All Folks!
|
 |


 Topic Options

 Post Options
 Thanks(0)

 It appears to be some sort of silicone as it is still somewhat 'rubbery'. The seal surfaces are still good, and the seal could probably be re-used if it could be adequately de-greased to accept a proper adhesive.


 DMiller wrote:
