| Author |
 Topic Search Topic Search  Topic Options Topic Options
|
Dozer 
Orange Level

Joined: 16 Aug 2011
Location: SW New York
Points: 689
|
 Post Options Post Options
") Thanks(0) Thanks(0)
 Quote Quote  Reply Reply
 Topic: Like I need another project Topic: Like I need another project
Posted: 18 Aug 2016 at 2:26pm |
I just acquired an HD5B with Garwood angle dozer that had been in the woods uncovered for many years. We dragged it out with the steering clutch levers tied back. The left track was not moving. When we got it to a place where we could work on it, we spent 7 hours trying to get it free. I removed the fuel tank and disconnected the brake band. With the master clutch disengaged and the transmission in gear we attempted to rotate the driveshaft. We pushed and pulled it with another dozer. We even lifted most of the machine by a grouser below center of the sprocket. After we removed the blade and sprocket guard I learned that I could generate as much movement as with any of the previous methods by prying on a sprocket spoke. It was getting dark and we were being pressed to move it. We lifted it by the track with a loader on each side and backed the trailer underneath. We put boards underneath the dead track so we didn't damage the trailer. Now it is really dark and we are all really tired. We knew it wasn't going to come down the trailer ramps because the slightest pull from any direction caused the HD5 to rotate on the trailer. Remove the ramps and pull it quickly. It was a small drop from the beaver tail trailer but the HD5 almost rolled over. When I pulled it with my HD6 the dead track moved correctly. Now the reason for this long story is Next time you have a dead track drop the machine off a trailer. That will fix it. 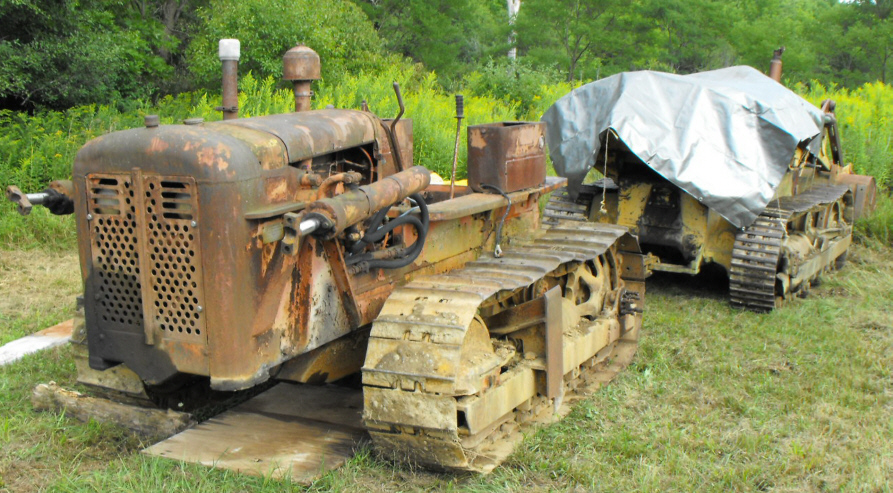 I have had a couple days to work on it and aside from the rust it is in good shape. If anyone has the floor panel with shift lever gate, I need one. The ring and pinion chamber and the transmission didn't have any oil. The motor oil was at the proper level. The exhaust pipe was not covered so I will pull the cylinder head and hope for the best. Today I raised the left track so I can work on the steering clutch. I stopped because now it is raining.
|
 |
|
Sponsored Links
|
|
|
Eric B
Orange Level

Joined: 09 Feb 2012
Location: British Columbi
Points: 1009
|
Post Options
Thanks(0)
Quote Reply
Posted: 18 Aug 2016 at 3:31pm |
You are one courageous guy to go through all that work ...to make more work for yourself  . Let us know when you get it running.
|
|
Currently- WD,WC,3WF's,2 D14's B. Previously- I 600,TL745,200,FL9,FR12,H3,816 LBH. Earth has no sorrow that Heaven cannot heal!
|
|
Dozer
Orange Level
Joined: 16 Aug 2011
Location: SW New York
Points: 689
|
Post Options
Thanks(0)
Quote Reply
Posted: 01 Sep 2016 at 8:08pm |
I have the bad steering clutch side off the ground. The other steering clutch disengaged. I have removed the bolts on the inboard side of the steering clutch. I have (2) portapower cylinders trying to push the clutch pack into the drum. 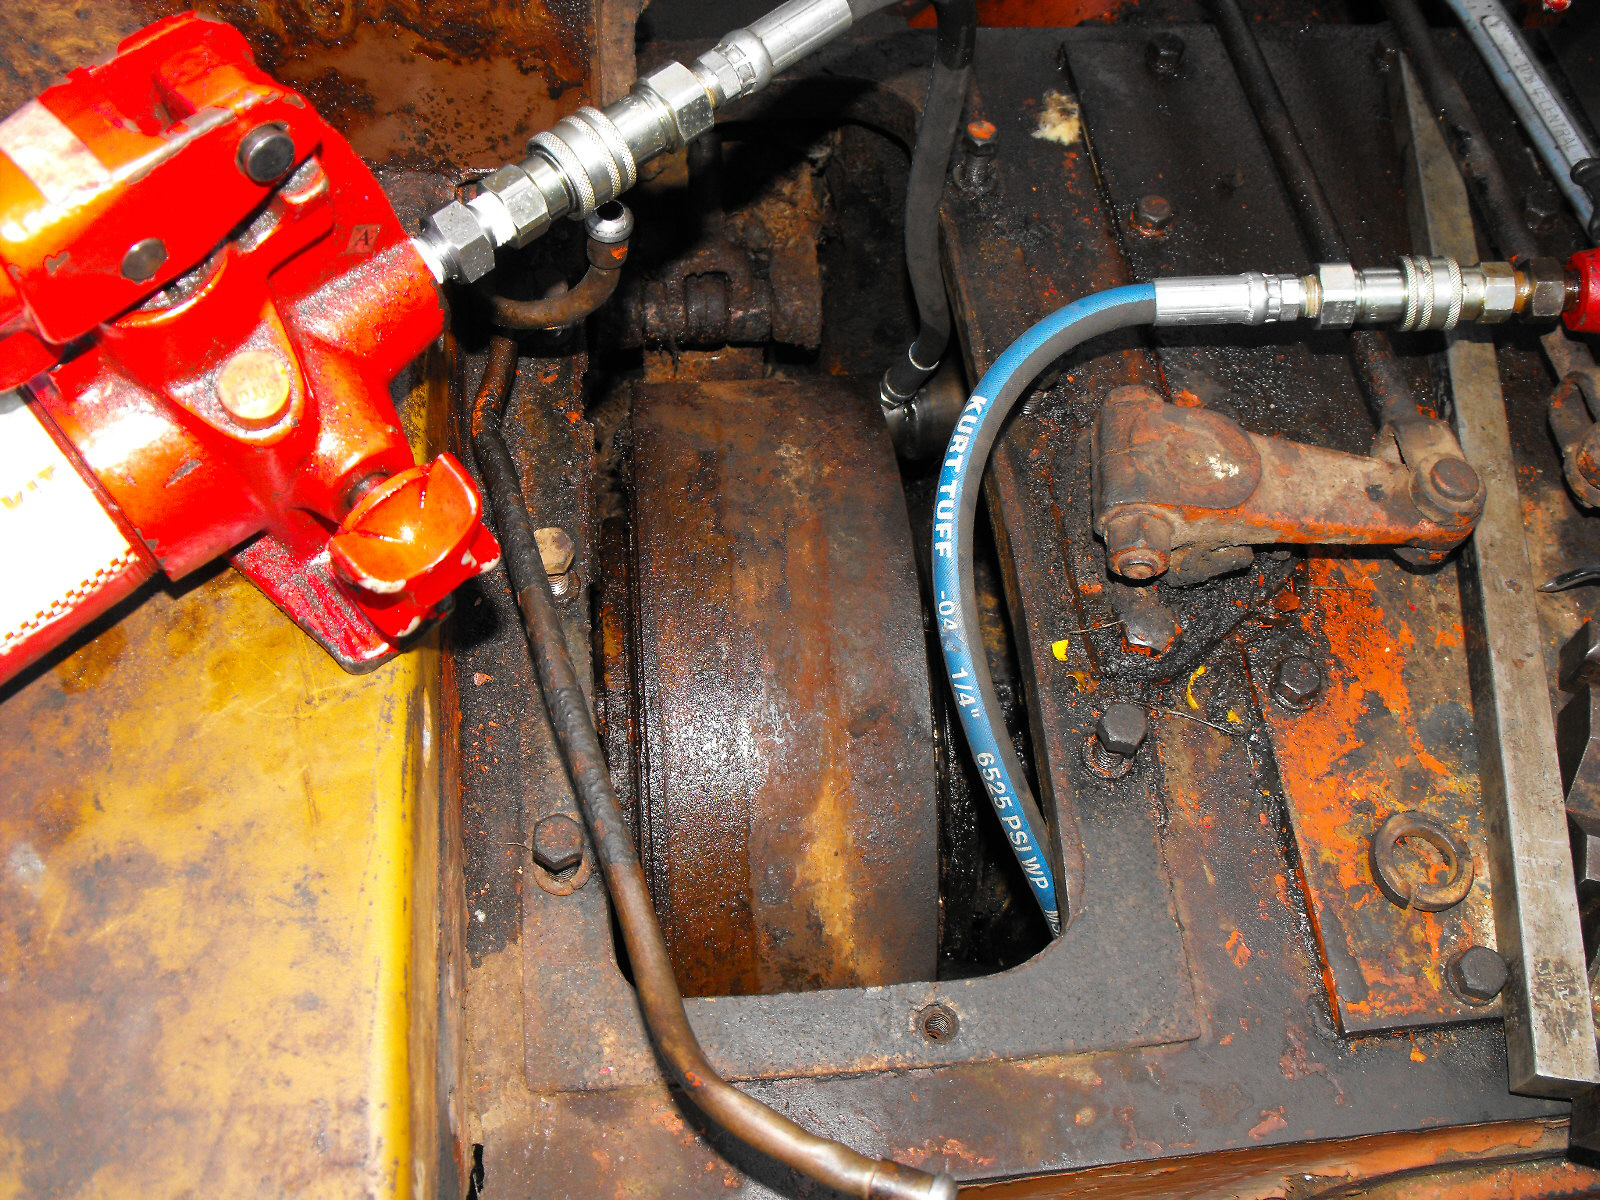 I can easily generate 3000psi with my portapower pumps. At 3000psi each cylinder generates 3680# force. I'm using a pipe extension on the portapower so I'm generating a lot more force. Look at where it says 1/4" on the hose. I do not have the 1/4" required to remove the assembly. Does anyone have any suggestions??? I hate to cut the drum. I learned that the 4 ton and the 10 ton portapower pumps generate the same pressure because they have the same diameter pistons. Nest question: Can I remove the Detroit 2-71 muffler from the cylinder head by grinding the nuts off the muffler?
|
|
donoman
Silver Level

Joined: 18 Feb 2015
Location: New Zealand
Points: 117
|
Post Options
Thanks(0)
Quote Reply
Posted: 02 Sep 2016 at 12:18am |
|
Sometimes as the clutch wear the external splines protrude past the brake drum, the lever needs to be pulled back if possible and the plate tapped around with a heavy screwdriver or drift to bring back into alignment with the drum splines. this can be checked with a mirror and flashlight. the clutch pack needs to be still bolted to the throwout yoke(flange) to release the spring pressure
|
|
Eric B
Orange Level
Joined: 09 Feb 2012
Location: British Columbi
Points: 1009
|
Post Options
Thanks(0)
Quote Reply
Posted: 02 Sep 2016 at 12:29am |
|
Are you talking about the four nuts that hold the muffler flange to the manifold? If you are you can cut them off if they refuse to budge.
|
|
Currently- WD,WC,3WF's,2 D14's B. Previously- I 600,TL745,200,FL9,FR12,H3,816 LBH. Earth has no sorrow that Heaven cannot heal!
|
|
dadsdozerhd5b
Orange Level

Joined: 27 Sep 2009
Location: lansdale pa.
Points: 537
|
Post Options
Thanks(0)
Quote Reply
Posted: 05 Sep 2016 at 8:43pm |
|
THE PICTURE MAY BE DECEIVING BUT IT LOOKS LIKE THERE IS CLEARANCE BETWEEN THE CLUTCH PACK AND THE INPUT FLANGE. THE FLANGES ARE NOT THAT WIDE WHICH IS WHAT YOU NEED TO CLEAR. IF THE PACK MOVED SOME I WOULD TRY TO PULL IT OUT. IF YOU CANNOT GET IT MOVED THE DRUM WILL HAVE TO BE CUT. YOU MAY BE ABLE TO REMOVE THE OTHER SIDE CLUTCH, INPUT FLANGE AND FLANGE RETAINER AND GET THE RING AND PINION TO MOVE OVER A LITTLE TO GIVE MORE CLEARANCE BUT I DONT REMEMBER WHICH SIDE THE RIGN GEAR IS ON. IT MAY ALREADY BE UP AGAINST THE TRANSMISSION PINION. YOU COULE TRY TO ROTATE THE CLUTCH AND PRESS IT AGAIN AND KEEP WORKING IT AROUND TO TRY TO GET IT FREED UP ENOUGH TO MOVE IN ADN GIVE YOU ENOUGH CLEARANCE. ALWAYS A TOUGH DECISION TO CUT THE DRUM OR NOT. GOOD LUCK.
|
|
HD5B, HD5G, (2) FARMALL A's, CUB. DO IT RIGHT THE FIRST TIME, IGNORE THE LAUGHTER. FLANNEL IS ALWAYS IN STYLE.
|
|
Dozer
Orange Level
Joined: 16 Aug 2011
Location: SW New York
Points: 689
|
Post Options
Thanks(0)
Quote Reply
Posted: 08 Sep 2016 at 5:22pm |
I am still trying to push the steering clutch pack into the drum. I can not get the assembly free from the inner and outer flange at the same time. I did manage to get the cylinder head off 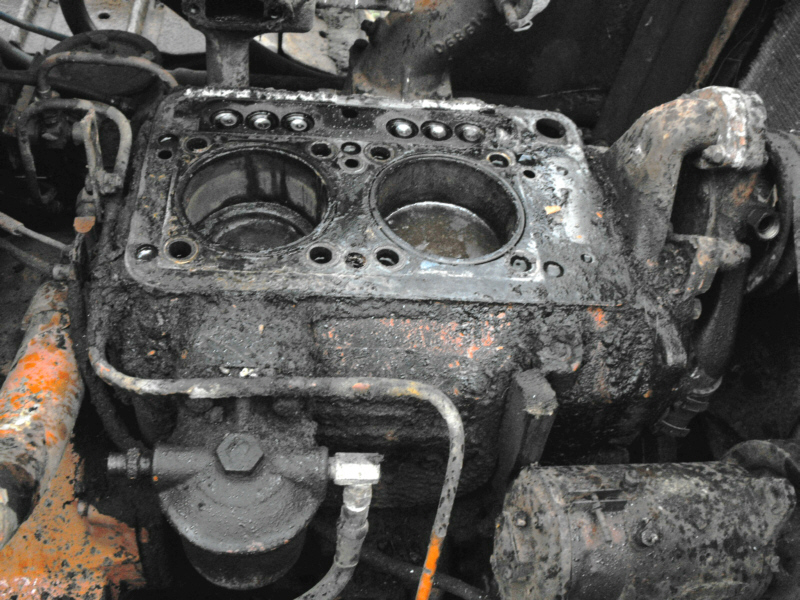 The bore with the water has hard rust. I plan to clean and oil both cylinders. Remove the oil pan and try to rotate the crankshaft so that the front piston travels up. If the piston does not move in the bore maybe I can unseat the sleeve from the block. Suggestions ???
|
|
Eric B
Orange Level
Joined: 09 Feb 2012
Location: British Columbi
Points: 1009
|
Post Options
Thanks(0)
Quote Reply
Posted: 09 Sep 2016 at 12:37am |
You've made good progress on the engine. With serious rust in the liner it's not worth trying to doctor up. If this were my engine with intent of working the machine I would buy new pistons, liners and gaskets. They are very reasonably priced for this engine if you buy parts from the right place. You'll need to clean up the valves and the head (or take to a machine shop) and once the upgrade is done the engine will run like new. I assume the crank will be good if the machine was parked running. New injectors are also very reasonable. You have to dream about the finished product while working on all this tough stuff ...when some of it seems impossible 
|
|
Currently- WD,WC,3WF's,2 D14's B. Previously- I 600,TL745,200,FL9,FR12,H3,816 LBH. Earth has no sorrow that Heaven cannot heal!
|
|
orangeman
Orange Level
Joined: 12 Sep 2009
Points: 1868
|
Post Options
Thanks(0)
Quote Reply
Posted: 10 Sep 2016 at 7:14am |
Lucky for us that Dozer and many others that post here do need another project -
it is very informative and educational to see all the variants of the HD 5/6's that AC offered and the methods developed to make needed repairs. With this post it is interesting how the grill was fashioned to protect the radiator. If possible Dozer - can you post a pic of the entirety of the small hydraulic press that you developed for movement of the steering clutch drum?
Appreciate all the excellent efforts to document the repairs.
Orangeman
|
|
Dozer
Orange Level
Joined: 16 Aug 2011
Location: SW New York
Points: 689
|
Post Options
Thanks(0)
Quote Reply
Posted: 10 Sep 2016 at 6:41pm |
The grill on the Garwood bulldozer is the oil tank for the hydraulic system. It looks like the grill has to come off to get the starter motor out. Can it be tilted down on the rear bolts by removing the (8) front bolts and the cross brace by the radiator? Orangeman 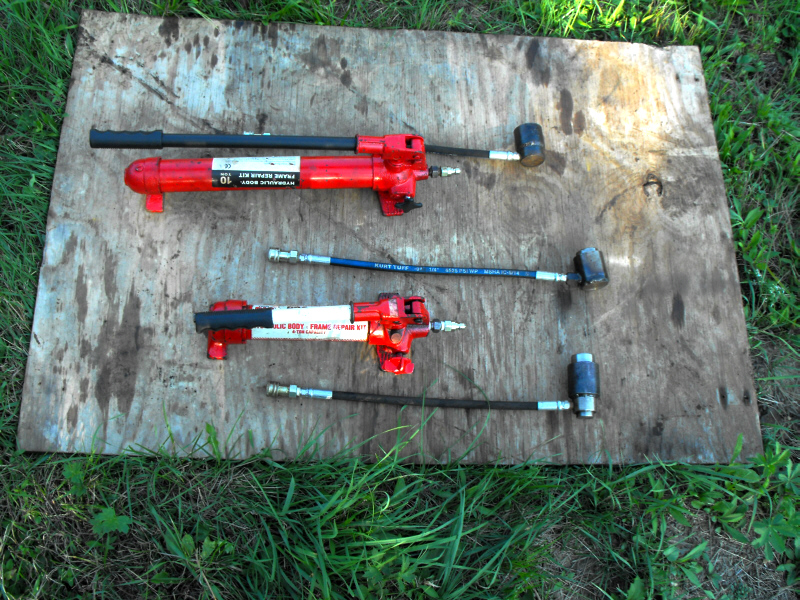 I made several small hydraulic cylinders I use when I work on steering clutches. The 6 ton and 10 ton pumps produce the same pressure. It is easier with the longer handle on the 10 ton pump. I use a pipe extension until I hear the bypass hiss. I'm still hope I can get the clutch pack to move.
|
|
Eric B
Orange Level
Joined: 09 Feb 2012
Location: British Columbi
Points: 1009
|
Post Options
Thanks(0)
Quote Reply
Posted: 11 Sep 2016 at 1:09am |
|
Some very neat tools you have! On that question you have about starter removal...if you don't get any response under this topic I suggest you post a new topic "HD5 starter removal". Any topic that has HD5 in the heading seems to get good input.
|
|
Currently- WD,WC,3WF's,2 D14's B. Previously- I 600,TL745,200,FL9,FR12,H3,816 LBH. Earth has no sorrow that Heaven cannot heal!
|
|
Dozer
Orange Level
Joined: 16 Aug 2011
Location: SW New York
Points: 689
|
Post Options
Thanks(0)
Quote Reply
Posted: 12 Sep 2016 at 3:37pm |
|
I'm working on removing the 2-71 oil pan. I broke my 1 1/4 socket trying to remove the oil pan plug. Removed it with a 3/4 drive socket. I looked at the rods and crankshaft with a fiber optic camera thru the oil pan plug hole. The oil pan gasket is glued on. Normally I would start in a corner with a sharp chisel to pry it loose. My efforts are damaging the oil pan and the block. Suggestions ? I made an adapter to my slide hammer for the oil pan plug thread It still won't move. Help
Can anyone send me a picture from a parts book of the left front fender? It may be different for the Garwood dozer. I want to remove the starter motor hopefully without removing the Garwood hydraulic system. This project is fighting back
|
|
Eric B
Orange Level
Joined: 09 Feb 2012
Location: British Columbi
Points: 1009
|
Post Options
Thanks(0)
Quote Reply
Posted: 12 Sep 2016 at 4:01pm |
|
Put a bit of heat from the bottom to the glue seal along the row of bolts. A propane torch is enough to soften the glue. For deeper pans it helps to whack them from the side with a rubber mallet but that Detroit pan is kind of shallow for that to be effective.
|
|
Currently- WD,WC,3WF's,2 D14's B. Previously- I 600,TL745,200,FL9,FR12,H3,816 LBH. Earth has no sorrow that Heaven cannot heal!
|
|
dadsdozerhd5b
Orange Level
Joined: 27 Sep 2009
Location: lansdale pa.
Points: 537
|
Post Options
Thanks(0)
Quote Reply
Posted: 12 Sep 2016 at 7:15pm |
|
Garwood dozer fronts are hard to get around. should be able to get the starter motor out without removing it. will it come out the bottom? that engine is relatively easy to pull, might be a better option then you can get to everything and clean the dozer properly.
on the steering clutch, I know from the ones I had to cut out that the inner most discs were holding it in place. keep the pressure on the rams and whack the drum with a sledge or air hammer or both to try to loosen the rust. rotate around and repeat. may not hurt to flood the compartment with diesel or penetrant to help loosen it. keep us posted.
|
|
HD5B, HD5G, (2) FARMALL A's, CUB. DO IT RIGHT THE FIRST TIME, IGNORE THE LAUGHTER. FLANNEL IS ALWAYS IN STYLE.
|
|
Dozer
Orange Level
Joined: 16 Aug 2011
Location: SW New York
Points: 689
|
Post Options
Thanks(0)
Quote Reply
Posted: 16 Sep 2016 at 11:41am |
Coke thanks for the PM I have removed the front floor plate so that I can get to the nut holding the fender at the rear. At the front of the fender is one of the two original bolts. X marks the location on the picture.  I can get to the nut but the bolt is under the Garwood hard nose. I understand why mechanics do not put the fender back once removed
|
|
Dozer
Orange Level
Joined: 16 Aug 2011
Location: SW New York
Points: 689
|
Post Options
Thanks(0)
Quote Reply
Posted: 28 Oct 2016 at 5:50pm |
I have been working on removing the steering clutch trying to push the clutch pack into the drum using (3) hydraulic cylinders. I used about 1/2 gallon of "KROIL" and moved the hydraulic cylinders to a new position every few days. I bought another pressure gage and measured the pressure from my porta power while using a pipe extension on the handle. 8,000 psi translates to 14,000# at the hydraulic cylinders. This exceeded the working pressure of the quick disconnects I was using. I broke 2 of them. Today the steering clutch came out.  I had to grind off part of the fender near the battery box to get it out. When it was out I was able to see why it was so difficult and took so long. The trunnion pins on the yoke came out so the fingers on the throughout bearing were not retracting. I was unable to see this while the steering clutch was in place.
|
|
Eric B
Orange Level
Joined: 09 Feb 2012
Location: British Columbi
Points: 1009
|
Post Options
Thanks(0)
Quote Reply
Posted: 28 Oct 2016 at 9:53pm |
Congratulations on your progress! Makes one feel hopeful of getting somewhere with a project.
|
|
Currently- WD,WC,3WF's,2 D14's B. Previously- I 600,TL745,200,FL9,FR12,H3,816 LBH. Earth has no sorrow that Heaven cannot heal!
|
|
JohnCO
Orange Level

Joined: 11 Sep 2009
Location: Niwot Colo
Points: 8992
|
Post Options
Thanks(0)
Quote Reply
Posted: 29 Oct 2016 at 12:40am |
|
Success! Congratulations!
|
|
"If at first you don't succeed, get a bigger hammer"
Allis Express participant
|
|
orangeman
Orange Level
Joined: 12 Sep 2009
Points: 1868
|
Post Options
Thanks(0)
Quote Reply
Posted: 29 Oct 2016 at 5:59am |
Dozer - Excellent progress on the steering clutch. That's a nice carrier you made to pull the clutch - what components comprise the carrier?
Orangeman
|
|
darrel in ND
Orange Level

Joined: 22 Nov 2009
Location: Hebron, ND
Points: 8779
|
Post Options
Thanks(0)
Quote Reply
Posted: 29 Oct 2016 at 6:43am |
|
Man, what a familiar looking project. I started mine 2 years ago and still is not done. Perhaps when you finish yours, and have everything all fresh in your memory, you'd like to do another one. Darrel
|
|
Ray54
Orange Level Access
Joined: 22 Nov 2009
Location: Paso Robles, Ca
Points: 4873
|
Post Options
Thanks(0)
Quote Reply
Posted: 29 Oct 2016 at 12:56pm |
 orangeman wrote: orangeman wrote:
Dozer - Excellent progress on the steering clutch. That's a nice carrier you made to pull the clutch - what components comprise the carrier?
Orangeman |
I have always used the brake band when working on Caterpillar stuff. As that is Cats recommendation in there book. Thanks for all pictures of the process and progress.
|
|
Dozer
Orange Level
Joined: 16 Aug 2011
Location: SW New York
Points: 689
|
Post Options
Thanks(0)
Quote Reply
Posted: 25 Nov 2016 at 4:34pm |
I have been trying to get the steering clutch for almost a month. I tried hitting it with my 8 pound hammer but it wasn't moving. I put it in my arbor press and every few days I would reposition it and push some more. Today the hub and clutch stack came loose from the drum.  Note the spline part of the frictions are in the drum spline. I was pushing on the pressure plate. what was a flat pressure plate is now bent conical. If anyone has a pressure plate p/n 050218 send me a pm
|
|
Eric B
Orange Level
Joined: 09 Feb 2012
Location: British Columbi
Points: 1009
|
Post Options
Thanks(0)
Quote Reply
Posted: 25 Nov 2016 at 6:06pm |
|
Oh boy...there is nothing easy about this job. Hats off for how far you have come!!
|
|
Currently- WD,WC,3WF's,2 D14's B. Previously- I 600,TL745,200,FL9,FR12,H3,816 LBH. Earth has no sorrow that Heaven cannot heal!
|
|
HD6GTOM
Orange Level
Joined: 30 Nov 2009
Location: MADISON CO IA
Points: 6627
|
Post Options
Thanks(0)
Quote Reply
Posted: 25 Nov 2016 at 8:58pm |
|
Don't give up on the old gal. I have owned several HD 6's and sometimes it takes a lot of patience and bad words to get the job done.
|
|
Dozer
Orange Level
Joined: 16 Aug 2011
Location: SW New York
Points: 689
|
Post Options
Thanks(0)
Quote Reply
Posted: 08 Jul 2017 at 6:10pm |
|
The motor stopped with both pistons mid stroke. I put Kroil in the cylinders over the winter. I have been trying to adjust the piston position in the bores using a piece of oak turned to piston diameter and my 8 pound hammer. broke the oak, pistons still at mid stroke. Took both rod caps off, good oil, bearings look very good. Advise please. Should I open the air box and remove the blower to lubricate the pistons thru the air holes?
It took me over an hour to remove the con rod cotter pins because the crank was in a bad position. I don't like cotter pins.
|
|
gemdozer
Orange Level
Joined: 17 Sep 2009
Points: 1074
|
Post Options
Thanks(0)
Quote Reply
Posted: 08 Jul 2017 at 6:46pm |
|
Yes it could help and in mind time the blower bearings are maybe freese too
|
|
dustydoo
Bronze Level

Joined: 22 Jan 2014
Location: erie pa
Points: 91
|
Post Options
Thanks(0)
Quote Reply
Posted: 08 Jul 2017 at 8:04pm |
|
I was recently doing some body work on one of my pickups. I went to the local autobody supply shop to get some supplies ! I found a rust remover and though I would try it ! Granted this a lot lighter material but I would have no problem trying this on a cast iron engine myself ! This is not the type of stuff that Tractor supply sells . Or that turns rust black ,it is an acid that actually ate the rust ??? I found I have a lot less sheet metal than I thought I had !!!
|
|
Eric B
Orange Level
Joined: 09 Feb 2012
Location: British Columbi
Points: 1009
|
Post Options
Thanks(0)
Quote Reply
Posted: 09 Jul 2017 at 10:04pm |
|
I would just pull pistons and liners out together, you're going to have to buy new ones to put in anyway. To make it easier just weld an eyelet or whatever inside the liner to be able to pull them up. Those liners can be in there really hard before they budge. On an old engine like that it can take an enormous amount of force to make them let go. Being that you are a smart machinist you can make a puller to lift them out.
|
|
Currently- WD,WC,3WF's,2 D14's B. Previously- I 600,TL745,200,FL9,FR12,H3,816 LBH. Earth has no sorrow that Heaven cannot heal!
|
|
DMiller
Orange Level Access
Joined: 14 Sep 2009
Location: Hermann, Mo
Points: 35678
|
Post Options
Thanks(0)
Quote Reply
Posted: 10 Jul 2017 at 5:17am |
|
We used a spring loaded handle to lock into the air intake ports to use the pistons to drive the sleeves out. With rods unbolted should be easy enough to jack them out as are dry sleeves. When you replace them there are different sizes, the sleeves will need to be hone fitted to the block for a snug slip fit. Too tight will seize, too loose will rip them apart at the intake ports. Used to be able to get Std., .001, .005 and .010 oversize sleeves, then there was a secondary sizing of light or heavy as to any of these where each had a Detroit sizing stamp placed high or low or mid-position on the sleeve. Had to use a Sunnen style hone for accuracy, a deglazing hone will not cut square top to bottom.
|
|
Dozer
Orange Level
Joined: 16 Aug 2011
Location: SW New York
Points: 689
|
Post Options
Thanks(0)
Quote Reply
Posted: 21 Oct 2017 at 6:15pm |
I brought the Garwood angle blade home today  This blade is going to need a lot of work. There is a crack in the blade that allowed water to get trapped between 2 layers of the structure. Notice the bulge in the next picture. Any suggestions as to how to bend it back? I do not think my largest hammer is going to do it. 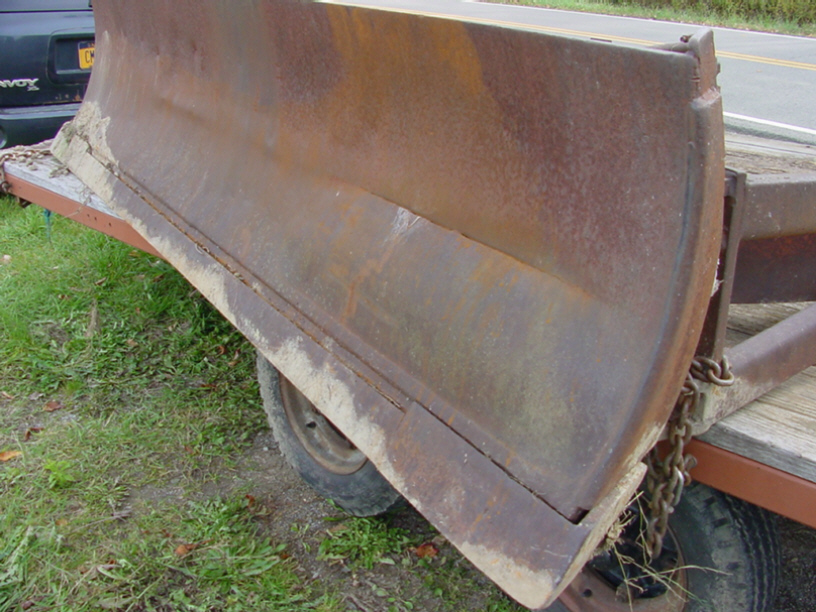
|
|


