| Author |
 Topic Search Topic Search  Topic Options Topic Options
|
Don(MI) 
Orange Level


Joined: 15 Sep 2009
Location: Michigan
Points: 3860
|
 Post Options Post Options
") Thanks(0) Thanks(0)
") Quote Quote  Reply Reply
 Topic: Correct install of oil pan gasket (pics) Topic: Correct install of oil pan gasket (pics)
Posted: 18 Jan 2011 at 7:01pm |
Alright, broke into the oil pan tonight on the WD and got more questions (sorry, it just dosen't stop from me, I know! But I want to do this the right way).
Alright, first off, is it OK to use permatex- Form-a-gasket on both sides of the oil pan gasket?
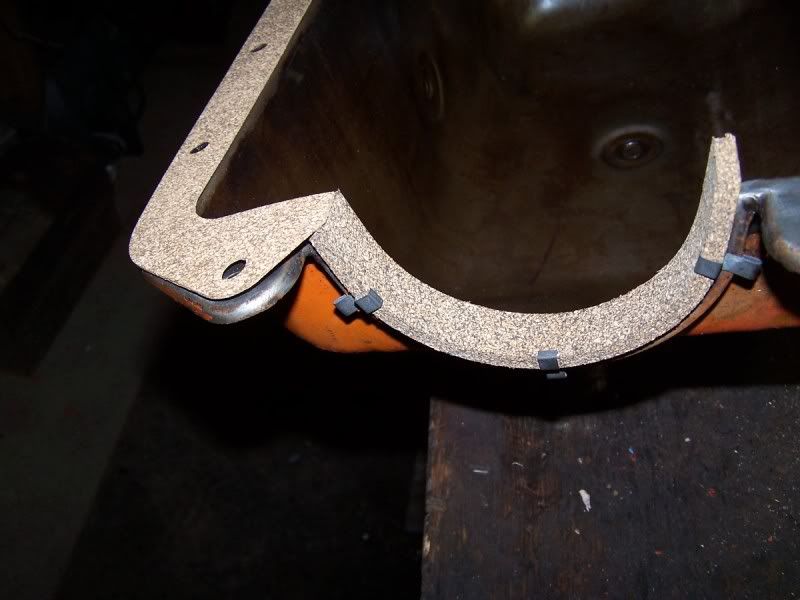
2nd, Which is the correct way to install the arch gaskets to meet the side gaskets? See below...
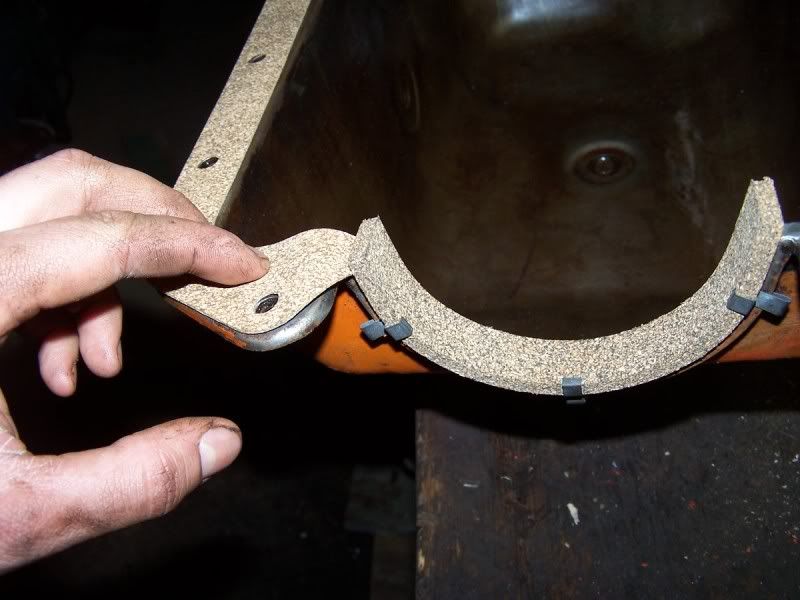
3rd, What are the small cardboard "L" pieces for? I want to put them on the right way, and have no clue how they go on there!
Thanks for your help, any other pointers are appreciated!!
Also, I stopped into the local Carquest store to buy permatex. I was on the phone, and the first thing the manager said to me was, "Hey bud, you know we don't stock Persian orange #1 on the shelf right?"
I am beginning to think they know me better than I thought! haha
|
 |
|
Sponsored Links
|
|
|
CTuckerNWIL
Orange Level

Joined: 11 Sep 2009
Location: NW Illinois
Points: 22824
|
Post Options
Thanks(0)
Quote Reply
Posted: 18 Jan 2011 at 8:20pm |
|
Forget the permatex formagasket. Use a high-tack on the pan. The first picture is right and the cardboard cut-outs look like the rear seal gasket.
|
|
|
|
dannyraddatz
Orange Level
Joined: 12 Sep 2009
Location: Plainfield, Ill
Points: 848
|
Post Options
Thanks(0)
Quote Reply
Posted: 18 Jan 2011 at 8:33pm |
Don,
I used a very small amount of permatex black, as warned by friends too much and it may wind up in your motor and I had my engine out on a stand upside down. the part you questioned was listed as Gasket, rear cranksaft bearing cap.
Danny
|
|
Danny Raddatz
|
|
Butch(OH)
Orange Level
Joined: 11 Sep 2009
Location: Lucerne Ohio
Points: 3837
|
Post Options
Thanks(0)
Quote Reply
Posted: 18 Jan 2011 at 8:38pm |
|
First take all the gaskets off the pan and lay it rail down on a flat surface like a good welding bench and check the rails for flatness, Bet ya a pop you have to knock them down flat. I use a hammer and block of hardwood held tight against the pan sides. Once nearly flat check the areas close to the holes for being pulled up due to prior over tightening and if needed knock those areas flat with a big punch. I use a piece of 1" or so shafting or a long 3/4 bolt will do hitting the threaded end and using the head for a large punch. You can also clamp a shaft or large punch in a vise and hold the pan rail on top of it and knock the holes down flat. Any way you choose to do it it must be done. Once you have the holes flat check the entire rail again on a flat surface and adjust if needed. NOW you are ready to mess with the gaskets, LOL. Picture 1 is the correct way to assemble the gaskets. You need a small bead of #2 under the junction of the two. The "L" shaped gaskets go under the rear main caps IF they are shimmed up (The major source of leaks blammed on rear seals and pan gaskets in my experiance is these missing) If the rear main cap is not shimmed throw them away and use a small bead of silicone sealer under the cap as the gaskets can hold the cap up increasing the clearances. Remove the rear main cap and take a look, easy to see how oil can go bewteen the cap and block and out on the ground and where it needs to be sealed up.. Stick the side gaskets to the pan using contact cement. Do not use silicone on cork gaskets as it causes them to move around when you tighten things up making a mess of things. When the gaskets are installed and ready to replace the pan you should see only gaskets, no sealer. Then go to the block and find the area where the side gaskets meet the ends and in those four corners put a 1/4" bead of #2 and put the pan on, now you will be able to remove it without screwing up the gaskets and it wont leaka drop. Thats how I do'em
|
|
CTuckerNWIL
Orange Level
Joined: 11 Sep 2009
Location: NW Illinois
Points: 22824
|
Post Options
Thanks(0)
Quote Reply
Posted: 18 Jan 2011 at 10:35pm |
|
Good description Butch. I don't know why but when i read permatex form a gasket, i heard silicone gasket sealer in my head. Sorry about that guys. I think it's the CRS taking over.
|
|
|
|
Don(MI)
Orange Level
Joined: 15 Sep 2009
Location: Michigan
Points: 3860
|
Post Options
Thanks(0)
Quote Reply
Posted: 19 Jan 2011 at 5:05am |
Butch, that is an awesome explaination thanks! Thanks for taking the time everyone.
Alright, without looking at the tractor right now, I still am not sure if I understand how the "L" gasket would help the rear main. I know it does have shims from the last time I looked. Seems like I could only put 2 "L" gaskets on the back, but I must not be thinking about this correctly. Also, butch, whats #2 sealant?
Thanks! Don
|
|
dannyraddatz
Orange Level
Joined: 12 Sep 2009
Location: Plainfield, Ill
Points: 848
|
Post Options
Thanks(0)
Quote Reply
Posted: 19 Jan 2011 at 5:39am |
Don,
The small paper like gaskets go under the bearing cap on the block, so you would have to unbolt the cap. here is your answer on the number 2 question.
Danny
|
|
Danny Raddatz
|
|
nella(Pa)
Orange Level Access
Joined: 11 Sep 2009
Location: Allentown, Pa.
Points: 3117
|
Post Options
Thanks(0)
Quote Reply
Posted: 19 Jan 2011 at 7:18am |
|
The little gaskets go under the rear main bearing cap, some mechanics don't know and throw them away and then have an oil leak at the rear of the oil pan. I put the permatex #2 on ALL of the metal surfaces, even the ones under the rear main bearing cap, cheap insurance aganist an oil leak that you don't want. Don't put two much #2 on so that it runs out. Don't over tighten the bolts. The thick cork gaskets will be compressed when you tighten the oil pan, don't cut them off. Butch gave a very good discription on how to prepare the oil pan. Like Don said, Indian Head Gasket Shellac is a very good sealant also.
Edited by nella(Pa) - 19 Jan 2011 at 11:49am
|
|
DonDittmar
Orange Level

Joined: 15 Sep 2009
Location: MIllersburg, MI
Points: 2513
|
Post Options
Thanks(0)
Quote Reply
Posted: 19 Jan 2011 at 7:33am |
I always use Indian Head Gasket Shellac on cork gaskets, avalaible at most auto parts stores.
|
|
Experience is a fancy name for past mistakes. "Great moments are born from great opportunity"
1968 D15D,1962 D19D
Also 1965 Cub Loboy and 1958 JD 720 Diesel Pony Start
|
|
GBACBFan
Orange Level
Joined: 11 Sep 2009
Location: Green Bay WI
Points: 2662
|
Post Options
Thanks(0)
Quote Reply
Posted: 19 Jan 2011 at 10:14am |
|
Don, can you tell me what function the shellac performs with cork gaskets? TIA
|
|
"The trouble with quotes on the Internet is that you can never know if they
are genuine." - Mark Twain
|
|
JW in MO
Orange Level

Joined: 16 Feb 2010
Location: South KC Area
Points: 2660
|
Post Options
Thanks(0)
Quote Reply
Posted: 19 Jan 2011 at 10:40am |
|
This is a sad day for me, I had a different set of instructions with 2 of Butch's steps left out. My motor was out and upside down on the stand, now it is installed, bolts are not completely tight but after motor started noticed a couple of leaks. Sometimes I ask the right questions but get the almost correct answer, but sometimes I'm not smart enough to ask the question. Thanks Butch, this is one of those, print and archive!!!
|
|
Maximum use of available resources!
|
|
Don(MI)
Orange Level
Joined: 15 Sep 2009
Location: Michigan
Points: 3860
|
Post Options
Thanks(0)
Quote Reply
Posted: 19 Jan 2011 at 11:09am |
|
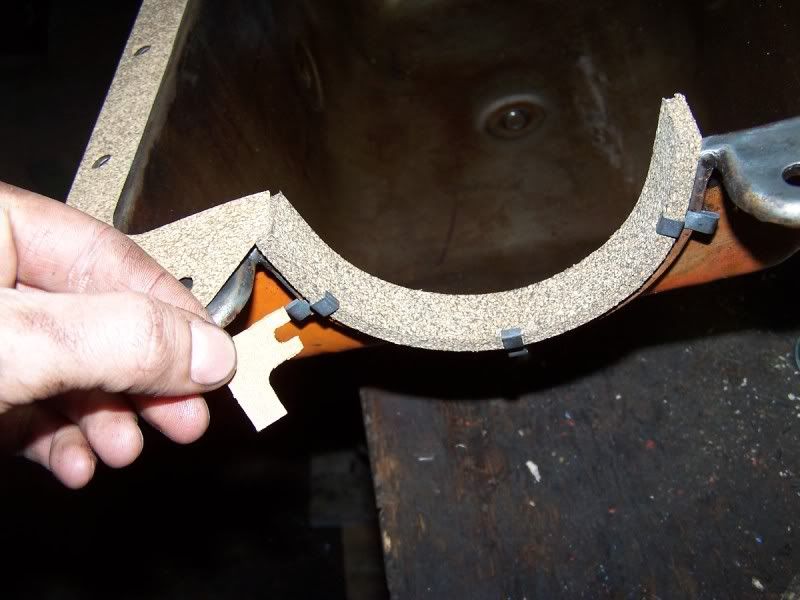
Does anyone know why 4 "L" gaskets are provided in the kit? Does the front cap get 2 gaskets just like the back cap?
|
|
Larry(OH)
Orange Level
Joined: 11 Sep 2009
Location: Shreve Ohio
Points: 1577
|
Post Options
Thanks(0)
Quote Reply
Posted: 19 Jan 2011 at 11:32am |
|
Also, a guy from Fletcher showed me to put the end gaskets in a round can the would be the same diameter of the end of the pan and leave them there until needed. This makes the install go a little easier since it will make it want to hold "round"
|
|
'40 WC puller,'50 WD puller,'50 M puller '65 770 Ollie
*ALLIS EXPRESS contact*
I can explain it to you, BUT I cannot understand it for you!!
|
|
pirlbeck
Silver Level

Joined: 01 Dec 2009
Location: West Central IA
Points: 229
|
Post Options
Thanks(0)
Quote Reply
Posted: 19 Jan 2011 at 8:37pm |
") Don(MI) wrote: Don(MI) wrote:
Does anyone know why 4 "L" gaskets are provided in the kit? Does the front cap get 2 gaskets just like the back cap? |
The "L" gaskets should be two different sizes. Engines prior to a D17 had a narrower rear main seal in them, D17's and later use the one with the wider slot in the "L" gasket.
|
|
jimm
Bronze Level


Joined: 31 Oct 2011
Location: bellingham wa
Points: 9
|
Post Options
Thanks(0)
Quote Reply
Posted: 27 Nov 2011 at 1:08pm |
|
I have replaced the oil pan seal and picture #1 with curved seal butting up under pan gasket is correct...did have to trim flush...one question i have for anyone ..the rear felt oil seals is also sitting in the groove with about an 1/8" above cap..,,cut flush? this i the 2 piece fellt half circle gasket with a neoprene center...any ideas..? don't want to leak
|
|
jimm
Bronze Level
Joined: 31 Oct 2011
Location: bellingham wa
Points: 9
|
Post Options
Thanks(0)
Quote Reply
Posted: 27 Nov 2011 at 1:13pm |
|
Second note on curved gaskets...,i didn not trim cmpletely flush ..left about 1/8 " it sounds like i should have left it uncut...sits about a 1/4 " high that way...is that ok?
|
|
SenseiCrusher
Silver Level
Joined: 20 Sep 2011
Points: 124
|
Post Options
Thanks(0)
Quote Reply
Posted: 27 Nov 2011 at 1:59pm |
Should have seen this thread earlier. Just put on the oil pan on my D17 Series 1 two hours ago. I trimmed the heavy thick end corks flush and used a couple cans that fitted well and placed an old cam shaft in them to load the end corks. I don't have those cool looking metal clips to register the end corks. Didnt use the "L" gaskets didnt know what they were. Used Black Permatex RTV all over like when I have done automotive engine builds. I should be able to check for leaks next week when I fire it up. Sigh.
It was also a 4 try install since I had to fish the pan over around and under steering and such crap, stupid gasket design.
I really wish they would sell a one piece oil pan gasket like they do with automotive pans.
Where do you get thoise cool pan gasket clips?
|
|
Orange Blood
Orange Level

Joined: 29 Nov 2010
Location: ColoradoSprings
Points: 4053
|
Post Options
Thanks(0)
Quote Reply
Posted: 27 Nov 2011 at 2:36pm |
|
If you cut them, they shrink, and then you have a real mess
|
|
Still in use:
HD7 WC C CA WD 2-WD45 WD45LP WD45D D14 3-D17 D17LP 2-D19D D19LP 190XTD 190XTLP 720 D21 220 7020 7030 7040 7045 3-7060
Projects: 3-U UC 2-G 2-B 2-C CA 7-WC RC WDLP WF D14 D21 210 7045 N7
|
|
Don(MO)
Orange Level
Joined: 12 Sep 2009
Location: Bates City MO.
Points: 6862
|
Post Options
Thanks(0)
Quote Reply
Posted: 27 Nov 2011 at 3:36pm |
The pan gasket clip # from AGCO is 70229117.
Like the guys said don't cut the gaskets off.
Don
Edited by Don(MO) - 29 Nov 2011 at 6:34am
|
|
3 WD45's with power steering,G,D15 fork lift,D19, W-Speed Patrol, "A" Gleaner with a 330 corn head,"66" combine,roto-baler, and lots of Snap Coupler implements to make them work for their keep.
|
|
SenseiCrusher
Silver Level
Joined: 20 Sep 2011
Points: 124
|
Post Options
Thanks(0)
Quote Reply
Posted: 27 Nov 2011 at 4:50pm |
|
Too late.
|
|
SenseiCrusher
Silver Level
Joined: 20 Sep 2011
Points: 124
|
Post Options
Thanks(0)
Quote Reply
Posted: 27 Nov 2011 at 4:58pm |
Something that has 6 to 8 pieces and is a piece of crap and could be one piece is very irritating. I dont see how the end cork heavy pieces could shrink over 1/4 inch but OK. Also you (I could not) could never install them at full length I tired. Thank God for Permatex.
Edited by SenseiCrusher - 27 Nov 2011 at 5:06pm
|
|
Don(MI)
Orange Level
Joined: 15 Sep 2009
Location: Michigan
Points: 3860
|
Post Options
Thanks(0)
Quote Reply
Posted: 27 Nov 2011 at 5:33pm |
That reply from butch, should be printed and put somewhere safe for every allis owner.
That WD I did the pan gasket on, does NOT leak!
Thanks!
|
|
Galatians 5:22-24
"I got a pig at home in a pen and corn to feed him on, All I need is a pretty little girl to feed him when I'm gone!"
|
|
Orange Blood
Orange Level
Joined: 29 Nov 2010
Location: ColoradoSprings
Points: 4053
|
Post Options
Thanks(0)
Quote Reply
Posted: 27 Nov 2011 at 5:45pm |
|
Actuallly when I did my first 226 motor many moons ago, I thought the same thing, just a cutting error on the part of the gasket maker, or it was extra on purpose, and you were suppose to cut it to length, boy was I wrong, that motor leaked like a sieve, and guess what, when I got it apart, it was....you guessed it.. a 1/4" short.
|
|
Still in use:
HD7 WC C CA WD 2-WD45 WD45LP WD45D D14 3-D17 D17LP 2-D19D D19LP 190XTD 190XTLP 720 D21 220 7020 7030 7040 7045 3-7060
Projects: 3-U UC 2-G 2-B 2-C CA 7-WC RC WDLP WF D14 D21 210 7045 N7
|
|
Don(MI)
Orange Level
Joined: 15 Sep 2009
Location: Michigan
Points: 3860
|
Post Options
Thanks(0)
Quote Reply
Posted: 27 Nov 2011 at 5:54pm |
Yup, when we cut them short, and the gasket actually wraps around the crankcaps, it shrinks with the torque from the pan bolts, creating that 1/4" gap.
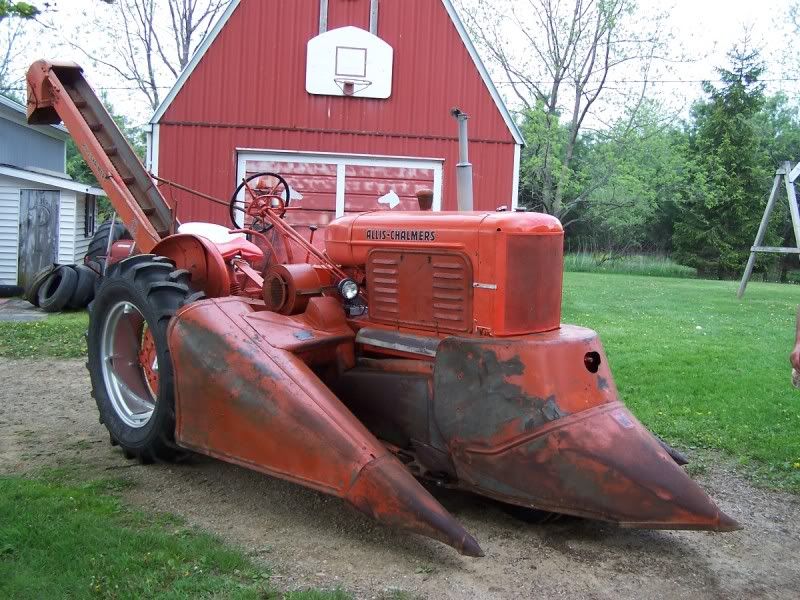
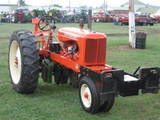
Here is that WD today...
|
|
Galatians 5:22-24
"I got a pig at home in a pen and corn to feed him on, All I need is a pretty little girl to feed him when I'm gone!"
|
|
AllisFreak MN
Orange Level Access
Joined: 07 Dec 2009
Location: Minnesota
Points: 1584
|
Post Options
Thanks(0)
Quote Reply
Posted: 27 Nov 2011 at 7:07pm |
|
Man those look cool with a mounted picker.
|
|
'49 A-C WD, '51 A-C WD, '63 A-C D17 Series III, 1968 A-C One-Seventy, '82 A-C 6060, '75 A-C 7040, A-C #3 sickle mower, 2 A-C 701 wagons, '78 Gleaner M2
|
|
SenseiCrusher
Silver Level
Joined: 20 Sep 2011
Points: 124
|
Post Options
Thanks(0)
Quote Reply
Posted: 27 Nov 2011 at 7:29pm |
|
That is art.
|
|
DougS
Orange Level

Joined: 03 Nov 2011
Location: Iowa
Points: 2490
|
Post Options
Thanks(0)
Quote Reply
Posted: 27 Nov 2011 at 7:47pm |
If you haven't put the oil pan back on yet, buy a sheet of cork and cut a new piece. Leave it about as long as the old piece originally was.
|
|
jimm
Bronze Level
Joined: 31 Oct 2011
Location: bellingham wa
Points: 9
|
Post Options
Thanks(0)
Quote Reply
Posted: 27 Nov 2011 at 8:49pm |
|
thanks for all the info...have an extra set ..will install and leave long...
|
|
DonDittmar
Orange Level
Joined: 15 Sep 2009
Location: MIllersburg, MI
Points: 2513
|
Post Options
Thanks(0)
Quote Reply
Posted: 28 Nov 2011 at 8:50am |
GBACBFan wrote:
Don, can you tell me what function the shellac performs with cork gaskets? TIA |
Same thing is Hi Tack really, just something to stick in place.
Only reason I use it is because thats all they had back then no silicone or anything like that....if it worked back then it should work now
|
|
Experience is a fancy name for past mistakes. "Great moments are born from great opportunity"
1968 D15D,1962 D19D
Also 1965 Cub Loboy and 1958 JD 720 Diesel Pony Start
|
|
SteveM C/IL
Orange Level Access
Joined: 12 Sep 2009
Location: Shelbyville IL
Points: 8566
|
Post Options
Thanks(0)
Quote Reply
Posted: 28 Nov 2011 at 9:12am |
|
Indian head sticks it in place.Hi tack lets it slide around.
|
|