| Author |
 Topic Search Topic Search  Topic Options Topic Options
|
DSeries4 
Orange Level


Joined: 12 Sep 2009
Location: Ontario, Canada
Points: 7714
|
 Post Options Post Options
 Thanks(0) Thanks(0)
 Quote Quote  Reply Reply
 Topic: D15 Frame rails Topic: D15 Frame rails
Posted: 26 Apr 2026 at 9:35am |
What in the world is going on? I have removed and reinstalled frame rails hundreds of times without any problems. With this D15 diesel, I am stumped!
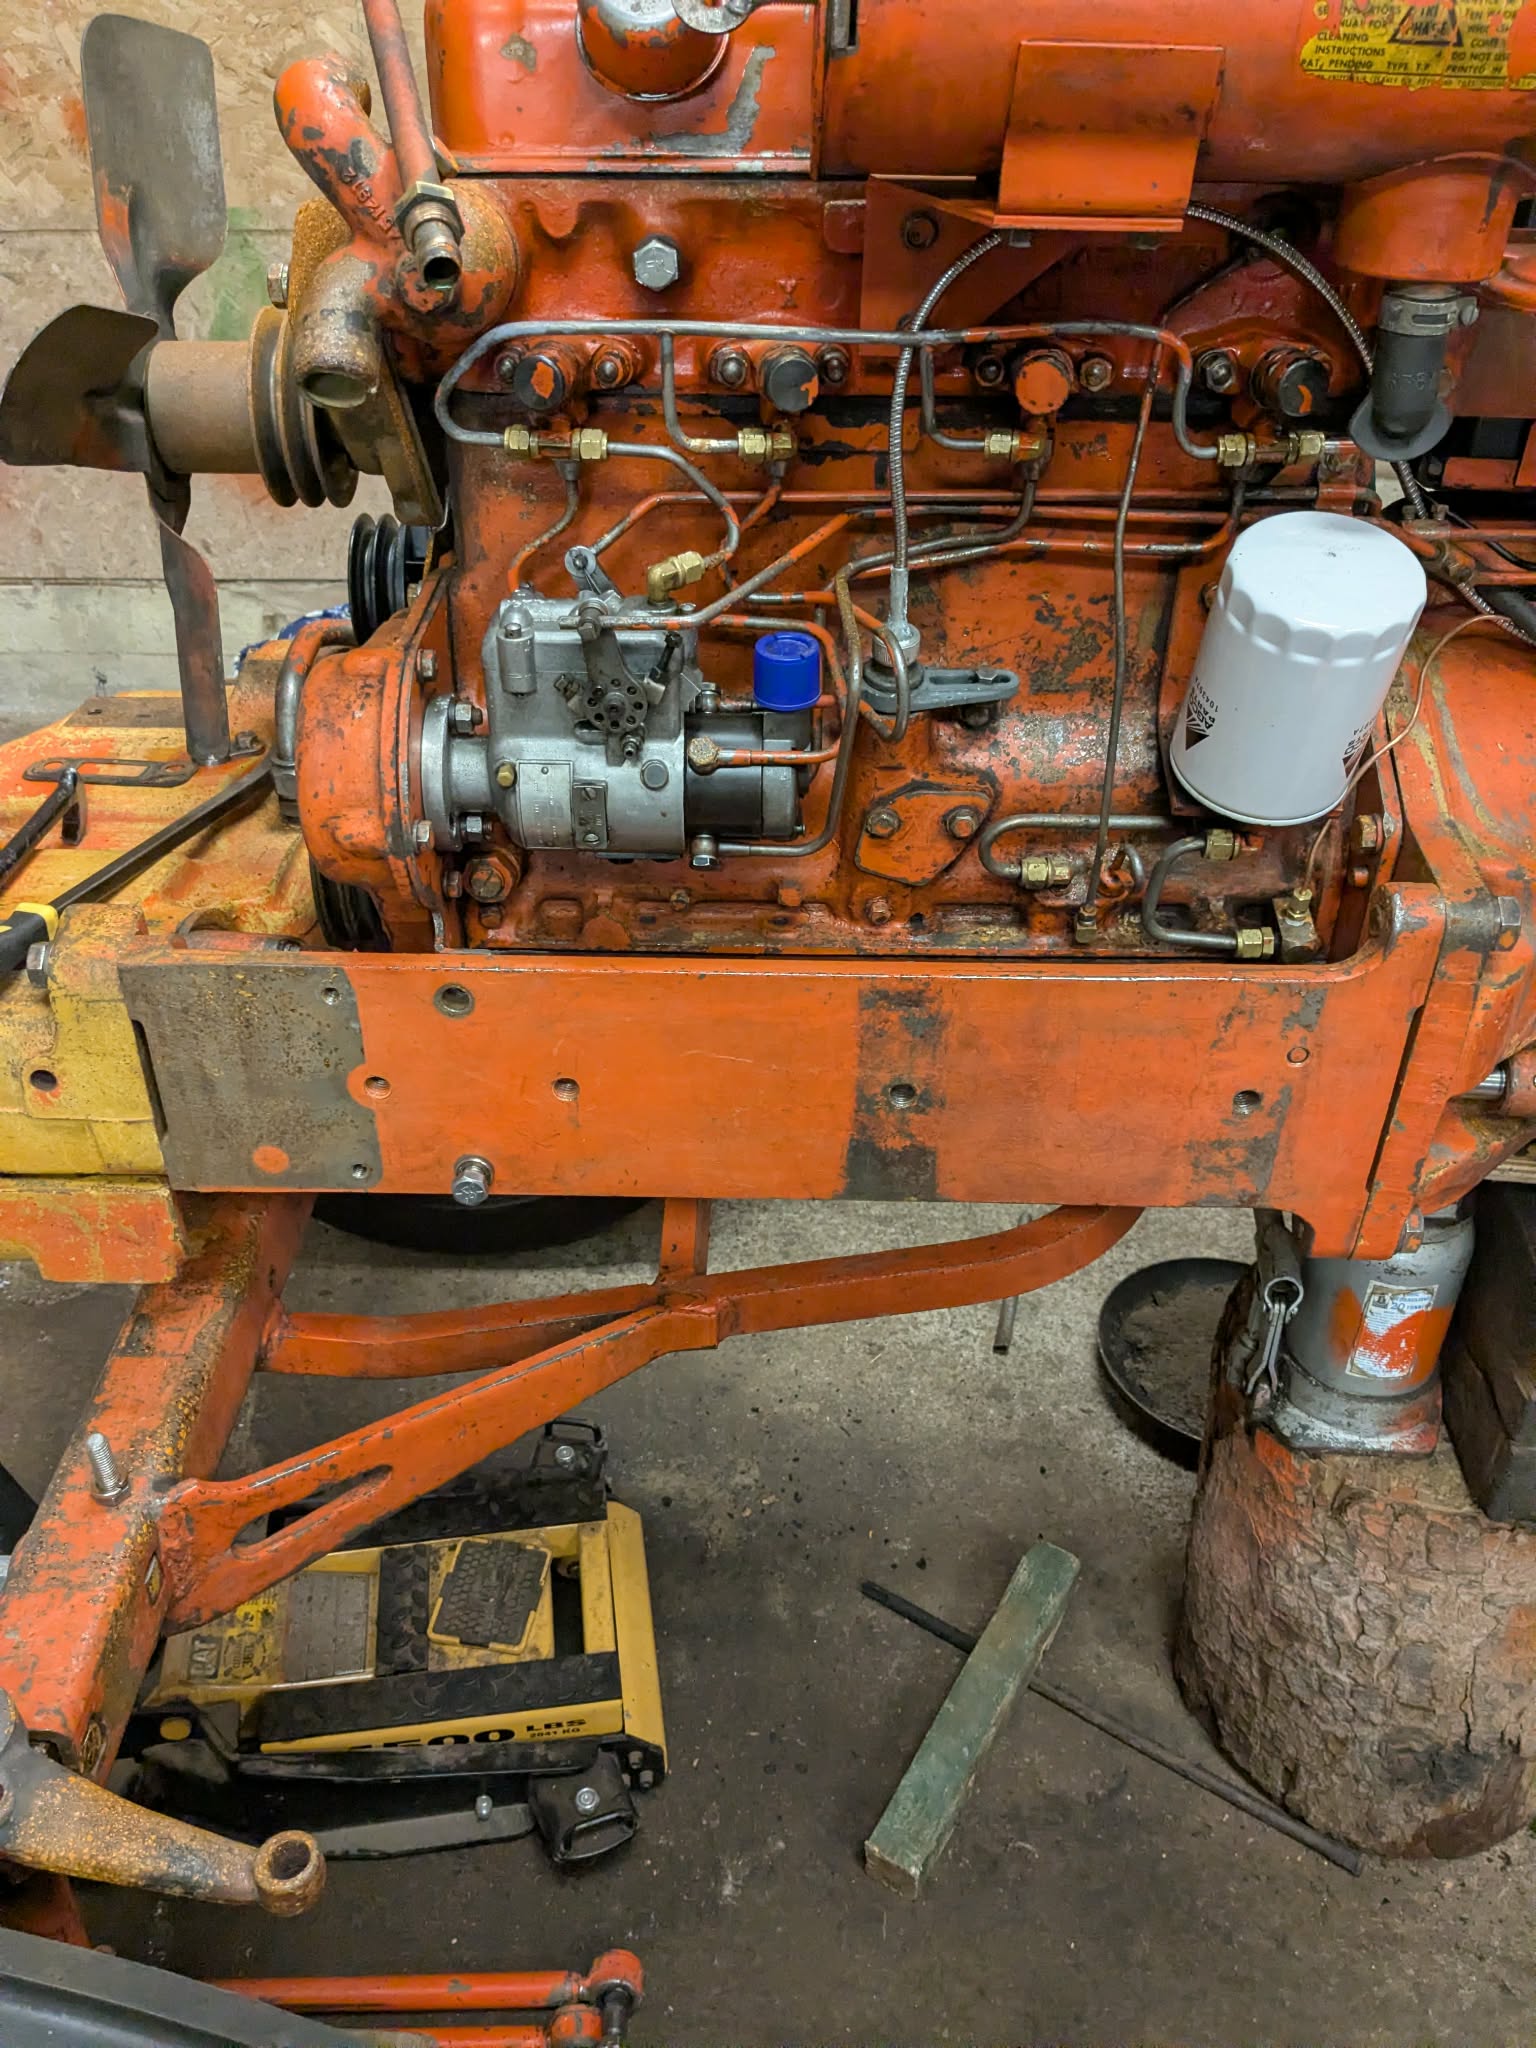
Took the front end off to get the axle pivot replaced and a new bushing in the casting, put in a new steering shaft, as well as a good cleaning for the front of the engine. I snugged up all the bolts on the front cover - maybe 1/4 turn at most. Didn't do anything else. I am now putting the front end back together and the frame rails are being impossible to work with!
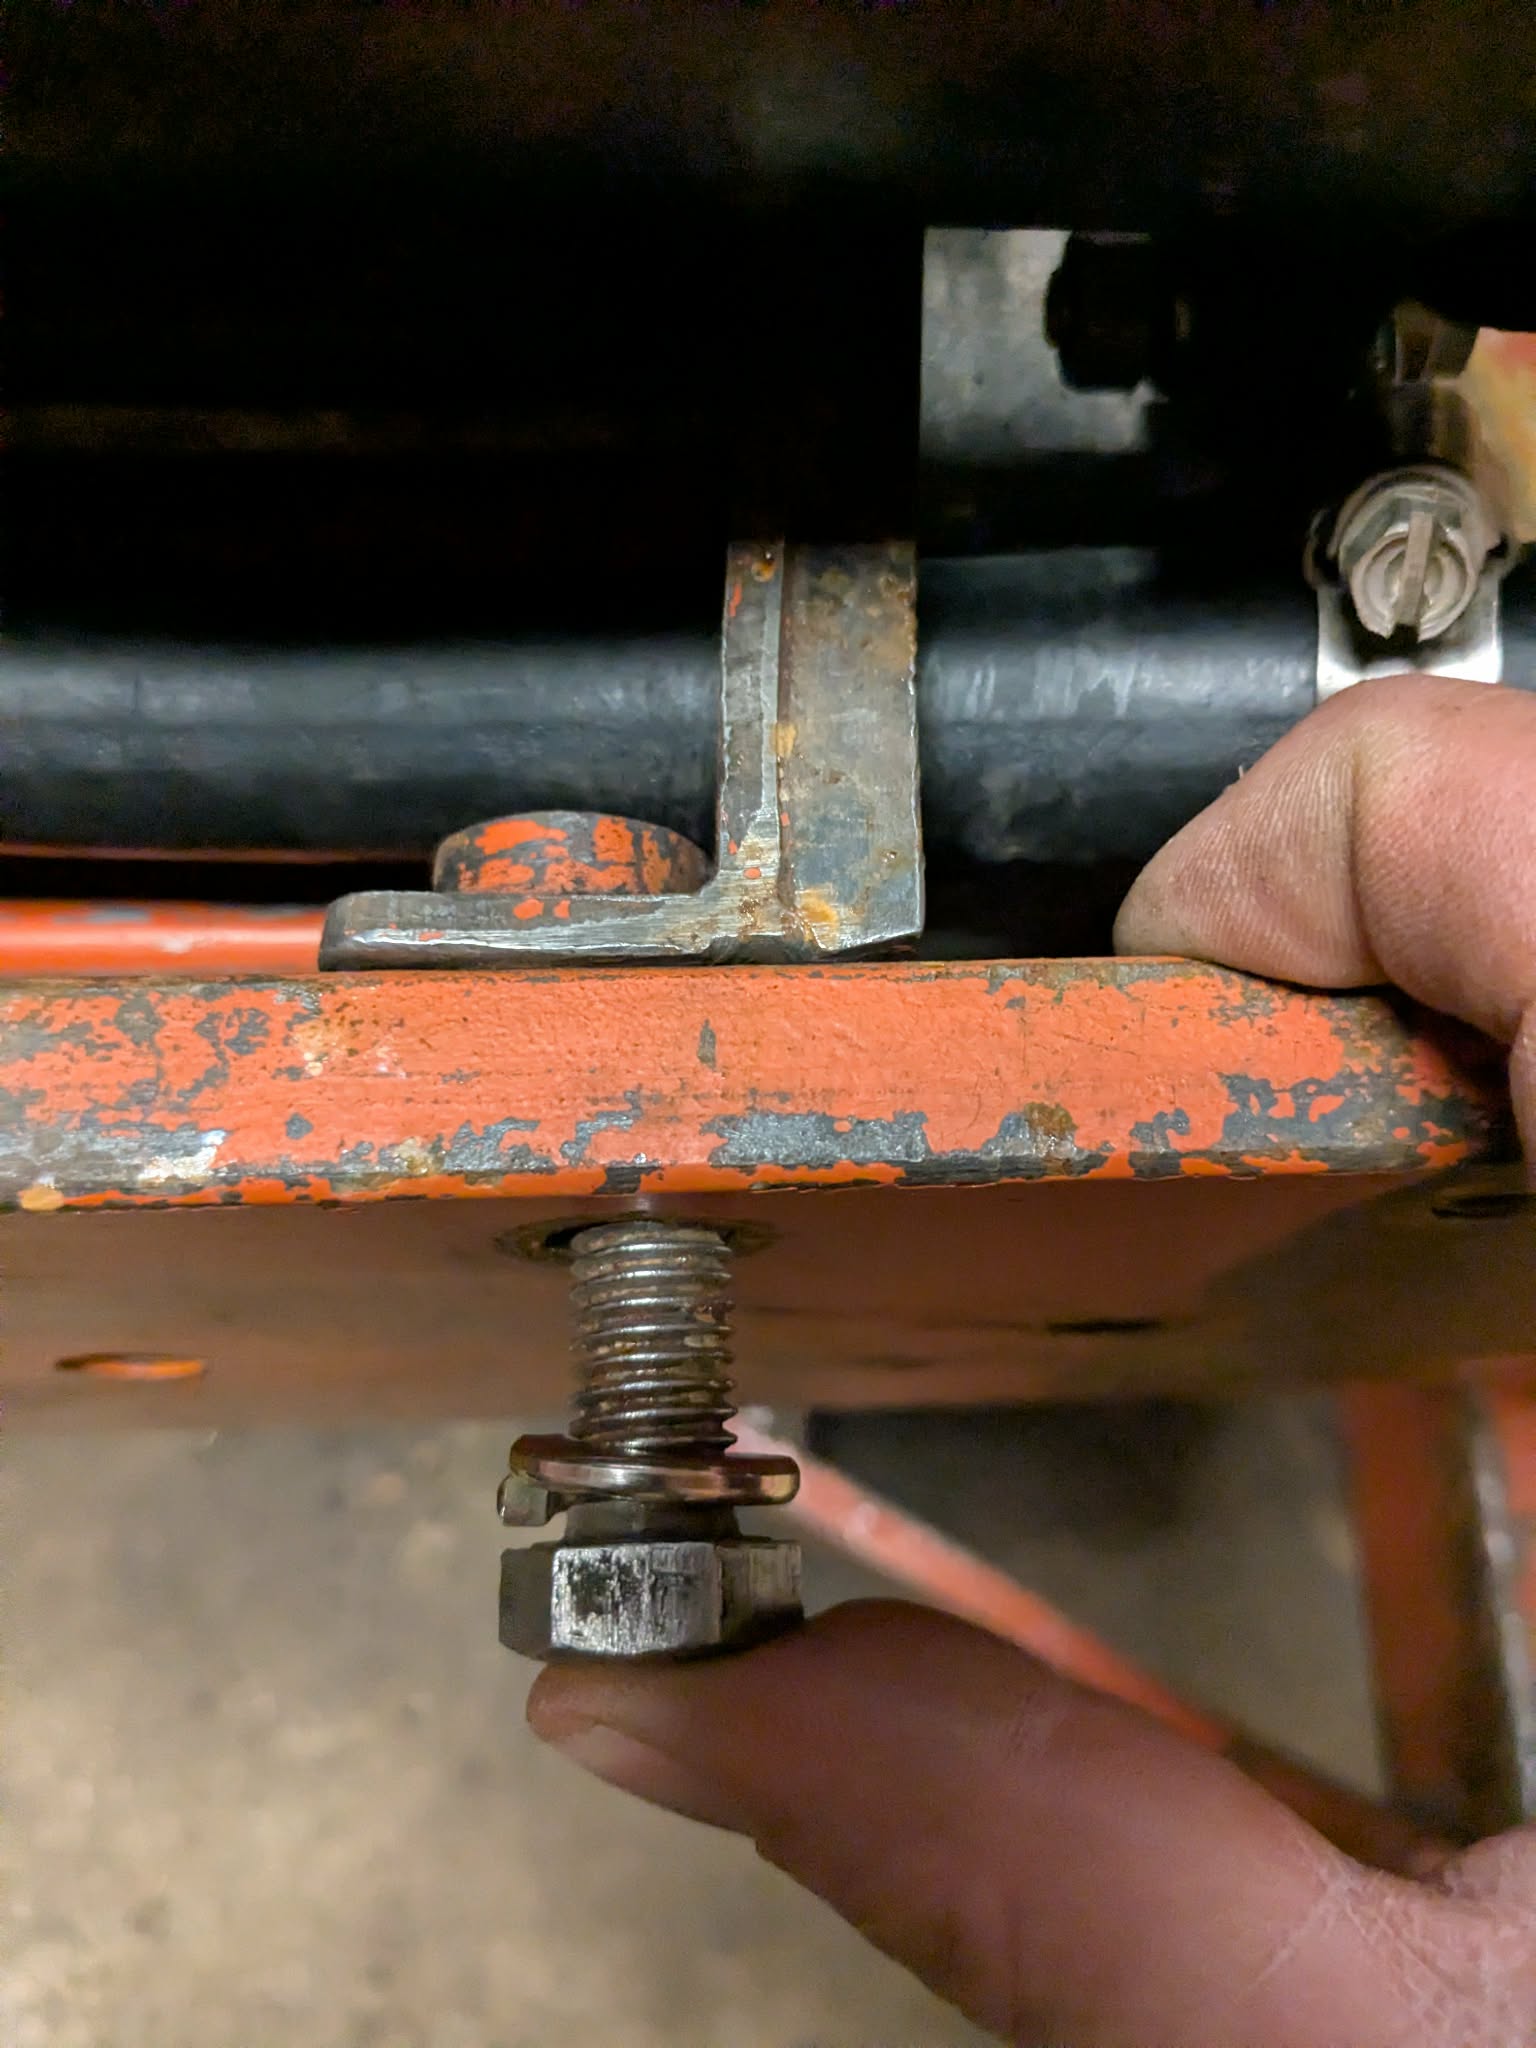
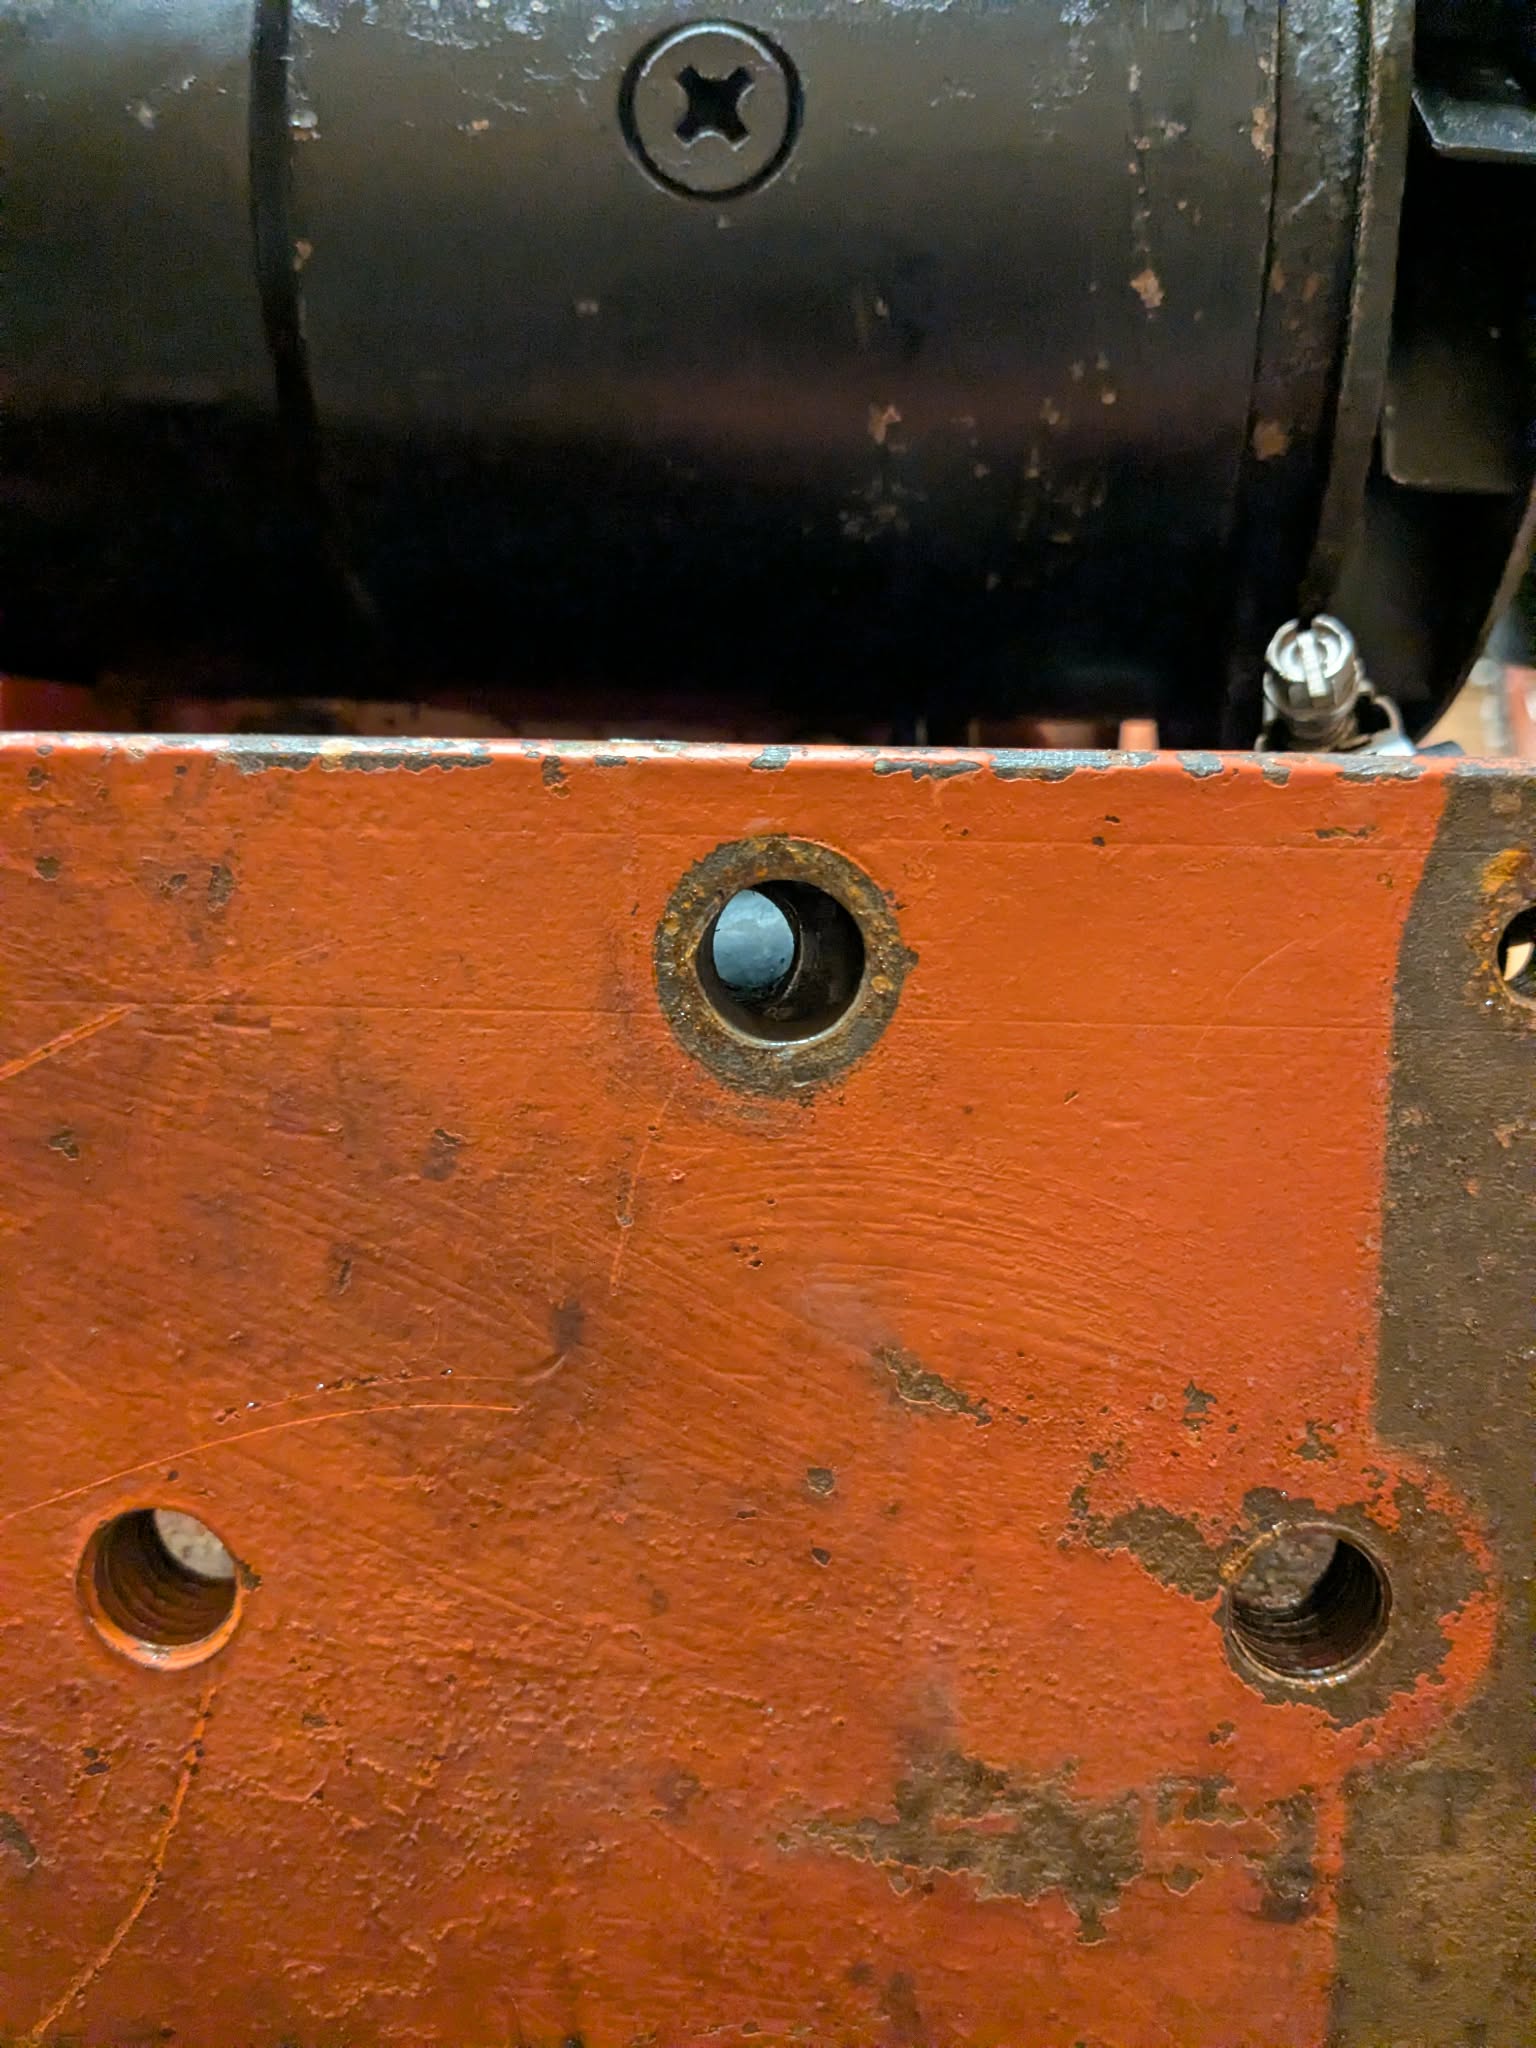
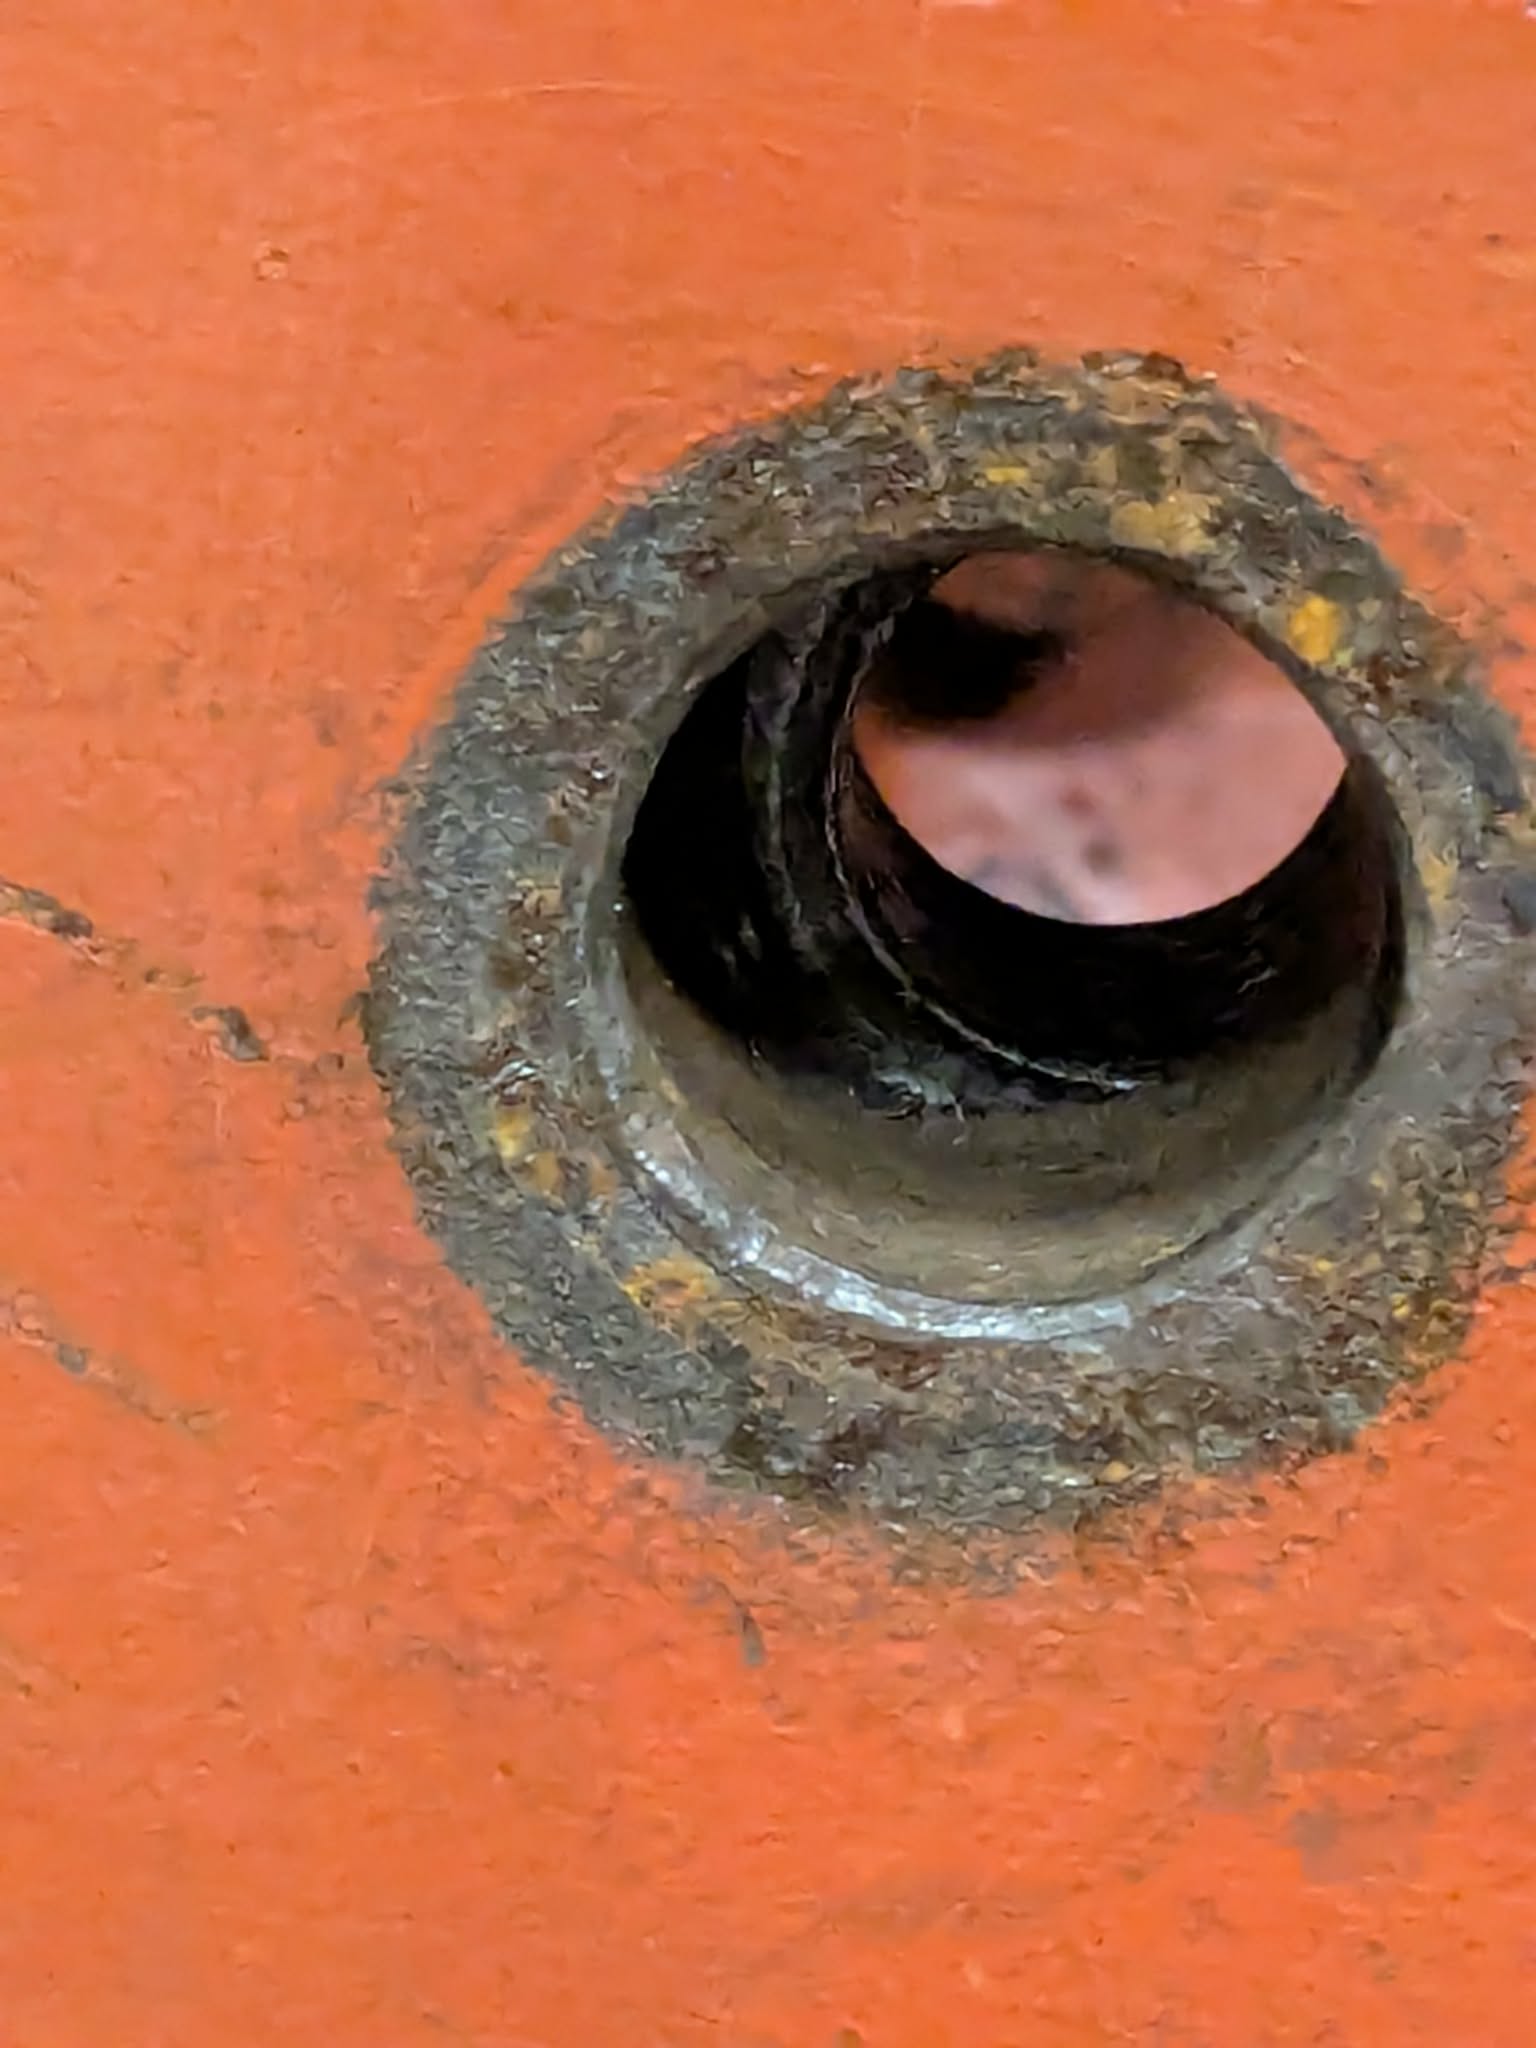
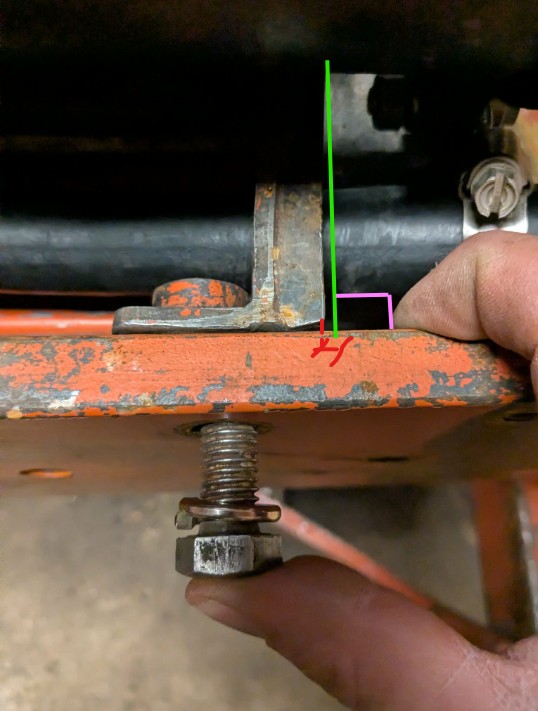
The side frame rail bolts at the front of the engine are not lining up - the holes on the engine's front cover plate approximately 1/8" off where they should be. They need to go further to the front of the tractor to line up - both sides are like that! These are the same frame rails that the tractor was born with, and I have them on the same side as they were before I took them off. Everything else lines up perfectly, except the side bolts. How can this be???
|
|
'49 G, '54 WD45, '55 CA, '56 WD45D, '57 WD45, '58 D14, '59 D14, '60 D14, '63 D15D, '66 D15II, '66 D21II, '67 D17IV, '67 D17IVD, '67 190XTD, '73 620, '76 185, '77 175, '84 8030, '85 6080
|
 |
|
Sponsored Links
|
|
|
AC720Man
Orange Level

Joined: 10 Oct 2016
Location: Shenandoah, Va
Points: 5690
|
Post Options
Thanks(0)
Quote Reply
Posted: 26 Apr 2026 at 2:00pm |
|
And your positive you have the same rail on the Correct side?
|
|
1968 B-208, 1976 720 (2 of them)Danco brush hog, single bottom plow,52" snow thrower, belly mower,rear tine tiller, rear blade, front blade, 57"sickle bar,1983 917 hydro, 1968 7hp sno-bee, 1968 190XTD
|
|
Model 70
Bronze Level

Joined: 09 Jan 2021
Location: Minnesota
Points: 169
|
Post Options
Thanks(0)
Quote Reply
Posted: 26 Apr 2026 at 3:10pm |
|
I just ran into the same issue on my D15 series 2 gas. I just loosened the front 4 bolts on the timing cover then installed the side bolts and then retightened the bolts on the timing cover.
|
|
Model 70
Bronze Level
Joined: 09 Jan 2021
Location: Minnesota
Points: 169
|
Post Options
Thanks(0)
Quote Reply
Posted: 26 Apr 2026 at 3:11pm |
|
Maybe the diesel mounts differently?
|
|
DSeries4
Orange Level
Joined: 12 Sep 2009
Location: Ontario, Canada
Points: 7714
|
Post Options
Thanks(0)
Quote Reply
Posted: 26 Apr 2026 at 3:45pm |
 AC720Man wrote: AC720Man wrote:
And your positive you have the same rail on the Correct side? |
Yes. Had them switched before and it was worse. I referred to my "before" pictures as well.
|
|
'49 G, '54 WD45, '55 CA, '56 WD45D, '57 WD45, '58 D14, '59 D14, '60 D14, '63 D15D, '66 D15II, '66 D21II, '67 D17IV, '67 D17IVD, '67 190XTD, '73 620, '76 185, '77 175, '84 8030, '85 6080
|
|
DrAllis
Orange Level Access
Joined: 12 Sep 2009
Points: 23484
|
Post Options
Thanks(0)
Quote Reply
Posted: 26 Apr 2026 at 4:25pm |
|
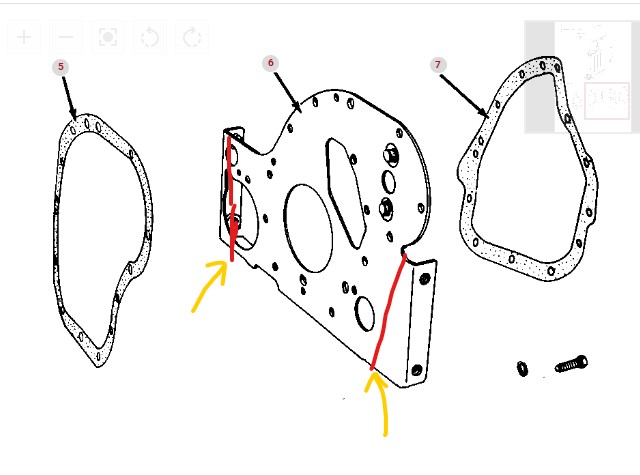
The thing I don't like about this scenario is, on the left side the front engine mount is the front plate of the engine, correct ??? Flexing of that front engine plate can cause the injection pump to seize !!! Not saying it will, but it CAN. I have had loader tractors suffer that fate from loaders that hang on the side frames only and if something causes a twist to that side frame, the engine front plate flexes and the injection pump to seize.
|
|
DSeries4
Orange Level
Joined: 12 Sep 2009
Location: Ontario, Canada
Points: 7714
|
Post Options
Thanks(0)
Quote Reply
Posted: 27 Apr 2026 at 2:58pm |
DrAllis wrote:
The thing I don't like about this scenario is, on the left side the front engine mount is the front plate of the engine, correct ??? Flexing of that front engine plate can cause the injection pump to seize !!! Not saying it will, but it CAN. I have had loader tractors suffer that fate from loaders that hang on the side frames only and if something causes a twist to that side frame, the engine front plate flexes and the injection pump to seize. |
My thought was to bend the plate such that the holes would line up with the frame rails. I am reconsidering now. Given this information, do you have any suggestions to solve my issue? I am still trying to figure how they got that far out of whack...
I did have the pump off to put new umbrella seals in, but I don't think that would have caused any problems - it's off on the right side as well.
|
|
'49 G, '54 WD45, '55 CA, '56 WD45D, '57 WD45, '58 D14, '59 D14, '60 D14, '63 D15D, '66 D15II, '66 D21II, '67 D17IV, '67 D17IVD, '67 190XTD, '73 620, '76 185, '77 175, '84 8030, '85 6080
|
|
DanielW
Silver Level

Joined: 19 Sep 2022
Location: Ontario
Points: 387
|
Post Options
Thanks(0)
Quote Reply
Posted: 27 Apr 2026 at 3:33pm |
The front cover plate arm looks like it may have seen some rework in the past, and still looks like it might be slightly bent toward the rear. Wouldn't take much of a bend over the length to put it off by 1/8" at the frame rails. I'd guess something happened with a previous owner that they got bent a little backwards and they just had some residual stress/pressure against the edge of the hole. Your plan of bending the cover plate arms back a smidge would be what I'd do. Or else die-ground the frame rail holes a little slotted. I wouldn't want to put it together as-is with all that residual stress/force in there. It' probably be fine, but might as well be sure.
Edited by DanielW - 27 Apr 2026 at 3:36pm
|
|
DrAllis
Orange Level Access
Joined: 12 Sep 2009
Points: 23484
|
Post Options
Thanks(0)
Quote Reply
Posted: 27 Apr 2026 at 3:51pm |
|
I can't explain it. I guess you have three choices. #1. Take a die grinder with a 3/8" bit and open up the holes in the front plate enough to get your bolts inserted. Do in chassis so you know when you can jam a bolt in the holes. You could also go to a 12MM bolt (gr8) with hard flat washers on both sides and lock nuts. #2. Take each side frame to a machine shop and mill off .100" off the flat end where it fits to the bellhousing. Remember then your sheet metal will need a little love to make up for that .100". #3. Move the engine ahead .100" to .125" at each mounting bolt by using a hard flat washer. I'd then have to go around the crack with RTV to keep dirt from getting in. Clutch free-play will probably need adjusting. I don't like any of these but bending that front engine plate ain't an option for me.
|
|
AC720Man
Orange Level
Joined: 10 Oct 2016
Location: Shenandoah, Va
Points: 5690
|
Post Options
Thanks(0)
Quote Reply
Posted: 27 Apr 2026 at 10:21pm |
|
Just a thought, would supporting the front of the engine with a jack make any difference?
|
|
1968 B-208, 1976 720 (2 of them)Danco brush hog, single bottom plow,52" snow thrower, belly mower,rear tine tiller, rear blade, front blade, 57"sickle bar,1983 917 hydro, 1968 7hp sno-bee, 1968 190XTD
|
|
Ed (Ont)
Orange Level

Joined: 08 Nov 2009
Location: New Lowell, Ont
Points: 1657
|
Post Options
Thanks(0)
Quote Reply
Posted: 28 Apr 2026 at 9:40am |
|
Wow!! Seems almost unbelievable. Have you found anything yet?
|
|
DanielW
Silver Level
Joined: 19 Sep 2022
Location: Ontario
Points: 387
|
Post Options
Thanks(0)
Quote Reply
Posted: 28 Apr 2026 at 12:04pm |
I definitely wouldn't want to just force the bend temporarily while you thread the bolts in then let it go - if you did that it'd be putting a pile of residual stress through that front cover for the rest of eternity. Which may not do any damage, but isn't going to do anything any favours. But as long as you bend it appropriately such that it stays in the new (correct) position before you bolt it up, it's not going to be putting any pressure on anything. You'd certainly not want to just start reefing on it to bend it - you'd want to use the O/A torch with a suitable tip to provide a hot, yet narrow bead to heat along something like these lines before bending then make sure it holds its position upon cooling.
But if it were mine, I'd probably just grab the die-grinder and a large carbide burr and slot the frame rails a little. Not going to make any difference nor be at all noticeable.
That pic showing the right-side of that plate certainly looks like it's seen some not-so-factory re-work at some point. Looks like someone may have welded new ears on there then touched up with a grinder and added a gusset along the front to give it some rigidity. Definitely not a formed plate from a brake, which I'm 98% sure is how they were from the factory.
|
|
TedN
Silver Level
Joined: 30 Apr 2025
Location: Central WA
Points: 356
|
Post Options
Thanks(0)
Quote Reply
Posted: 28 Apr 2026 at 1:02pm |
|
Assuming it was together with the same parts before it should bolt back together. Was it not lined up before, making those bolts difficult to remove? I would think you would notice that when it came apart. Have you tried loosening the front cover bolts that you snugged up? I think I would try that, this might be a prior repair that wasn't done correctly. I can easily imagine someone getting to this same issue at some time in the past and deciding the fix was to loosen up everything on the front of the engine, put the bolts in, and retighten everything.
Ted
|
|
190XTD seriesIII, 190XTD seriesI, maroon belly 7000, 7030, 7045, D14, 190XTD series??? project(or maybe parts)
|
|
Ed (Ont)
Orange Level
Joined: 08 Nov 2009
Location: New Lowell, Ont
Points: 1657
|
Post Options
Thanks(0)
Quote Reply
Posted: 28 Apr 2026 at 1:04pm |
|
Can you loosen the rear to give some play or is that a dowel pin at the rear? If you could get all started then tighten each a little at a time till tight. But no doubt even you could them all started there would be a fair bit of stress somewhere!!!
|
|
DSeries4
Orange Level
Joined: 12 Sep 2009
Location: Ontario, Canada
Points: 7714
|
Post Options
Thanks(0)
Quote Reply
Posted: 28 Apr 2026 at 2:45pm |
TedN wrote:
Assuming it was together with the same parts before it should bolt back together. Was it not lined up before, making those bolts difficult to remove? I would think you would notice that when it came apart. Have you tried loosening the front cover bolts that you snugged up? I think I would try that, this might be a prior repair that wasn't done correctly. I can easily imagine someone getting to this same issue at some time in the past and deciding the fix was to loosen up everything on the front of the engine, put the bolts in, and retighten everything.
Ted |
It was all together with all the same parts (on the same side). I took it apart in November and don't recall any issues removing the bolts. Did many tractors many times before, but this is a first for me...
|
|
'49 G, '54 WD45, '55 CA, '56 WD45D, '57 WD45, '58 D14, '59 D14, '60 D14, '63 D15D, '66 D15II, '66 D21II, '67 D17IV, '67 D17IVD, '67 190XTD, '73 620, '76 185, '77 175, '84 8030, '85 6080
|
|
Kenny L.
Orange Level Access

Joined: 12 Sep 2009
Location: NEIOWA
Points: 1429
|
Post Options
Thanks(0)
Quote Reply
Posted: 28 Apr 2026 at 3:54pm |
|
Dseries4, I had the same thing happen to me when I pull the powers steering off to relace seal and remove the side rail to clean up the engine and the rail for the life of me, I never figure what I did to have one side not line up and I know I didn't get the rail on the wrong side because I laid them on the floor by the back tires, I end up drill the hole and using a lock nut on the bolt, so you're not the only one.
|
|
TramwayGuy
Orange Level Access
Joined: 19 Jan 2010
Location: Northern NY
Points: 11967
|
Post Options
Thanks(0)
Quote Reply
Posted: 28 Apr 2026 at 4:37pm |
|
“..But as long as you bend it appropriately such that it stays in the new (correct) position before you bolt it up, it's not going to be putting any pressure on anything. You'd certainly not want to just start reefing on it to bend it -”
That approach makes the most sense to me.
|
|
Calvin Schmidt
Orange Level

Joined: 11 Sep 2009
Location: Ontario Can.
Points: 4590
|
Post Options
Thanks(0)
Quote Reply
Posted: 28 Apr 2026 at 5:02pm |
|
While you had the side rails off, How did you support the front of the engine. Could the rear plate have flexed or bent slightly from supporting the the engine weight?
|
|
Nothing is impossible if it is properly financed
|
|
DSeries4
Orange Level
Joined: 12 Sep 2009
Location: Ontario, Canada
Points: 7714
|
Post Options
Thanks(0)
Quote Reply
Posted: 29 Apr 2026 at 2:49pm |
Calvin Schmidt wrote:
While you had the side rails off, How did you support the front of the engine. Could the rear plate have flexed or bent slightly from supporting the the engine weight? |
I did not have the front of the engine supported, so it is not out of the realm of possibility, but I do not see any gap at the top of the adapter plate. The holes at the front do not look like they are sitting lower - just further back. However, it is worth putting a jack under the crank shaft pulley and lift it up a bit so see of that makes any difference.
|
|
'49 G, '54 WD45, '55 CA, '56 WD45D, '57 WD45, '58 D14, '59 D14, '60 D14, '63 D15D, '66 D15II, '66 D21II, '67 D17IV, '67 D17IVD, '67 190XTD, '73 620, '76 185, '77 175, '84 8030, '85 6080
|
|
DiyDave
Orange Level Access

Joined: 11 Sep 2009
Location: Gambrills, MD
Points: 56010
|
Post Options
Thanks(0)
Quote Reply
Posted: 29 Apr 2026 at 3:29pm |
Another approach that may work, with limited machine tooling. Drill the frame holes out a couple sizes bigger. Then make eccentric bushings on a small lathe. This would avoid the guesswork of bending, and some of the other alignment issues mentioned above. Depends on if you have a small lathe available, to make the bushings... 
|
|
Source: Babylon Bee. Sponsored by BRAWNDO, its got what you need!
|
|
SteveM C/IL
Orange Level Access
Joined: 12 Sep 2009
Location: Shelbyville IL
Points: 9196
|
Post Options
Thanks(0)
Quote Reply
Posted: 29 Apr 2026 at 8:50pm |
|
Get a tapered ream and make the hole fit.
|
|
DSeries4
Orange Level
Joined: 12 Sep 2009
Location: Ontario, Canada
Points: 7714
|
Post Options
Thanks(0)
Quote Reply
Posted: 05 Jul 2026 at 9:31am |
Still haven't resolved the issue - haven't looked at it recently. Just wondering if I can unbolt the engine from the torque tube and slide the engine forward to bolt up the frame rails to the front plate, then retighten the engine bolts to the torque tube?
If that doesn't work, would it be worth removing the front plate to check that it is straight?
I don't really want to grind out the holes in the frame rails.
Thanks again for the feedback
|
|
'49 G, '54 WD45, '55 CA, '56 WD45D, '57 WD45, '58 D14, '59 D14, '60 D14, '63 D15D, '66 D15II, '66 D21II, '67 D17IV, '67 D17IVD, '67 190XTD, '73 620, '76 185, '77 175, '84 8030, '85 6080
|
|
HudCo
Orange Level

Joined: 29 Jan 2013
Location: Plymouth Utah
Points: 4224
|
Post Options
Thanks(0)
Quote Reply
Posted: 05 Jul 2026 at 11:16am |
|
the other side broke or cracked my d17d was betwwen the block and steering cylinder couldnt see it until the front end was off
|
|
Les Kerf
Orange Level
Joined: 08 May 2020
Location: Idaho
Points: 1891
|
Post Options
Thanks(0)
Quote Reply
Posted: 05 Jul 2026 at 12:10pm |
I have never so much as touched a D15, let alone removed a frame rail from one.
That said, I do have 'some' experience (30+ years) of aligning heavy sawmill equipment. The first rule is: EVERYTHING is a spring! And at the risk of quoting Captain Obvious, something in there has been sprung (sprang?) and the metal has now assumed a new static resting position.
The critical factor is to get it bolted back together without inducing any stress on the engine; if wallering out the holes with a die grinder accomplishes that, then so be it. Anything that attempts to force things into place is just asking for trouble IMHO.
Best wishes 
|
|
AC720Man
Orange Level
Joined: 10 Oct 2016
Location: Shenandoah, Va
Points: 5690
|
Post Options
Thanks(0)
Quote Reply
Posted: 05 Jul 2026 at 8:13pm |
|
I’ve been watching this thread in disbelief. I always document with pictures before I disassemble something. Notate anything’s that doesn’t look correct. What would cause something not to align back up? Something has changed, something is causing it not to align back up. Drilling new holes is not the answer, that changes the geometry of the way it was before. Find out what caused it and correct it. Just my 2 cents
|
|
1968 B-208, 1976 720 (2 of them)Danco brush hog, single bottom plow,52" snow thrower, belly mower,rear tine tiller, rear blade, front blade, 57"sickle bar,1983 917 hydro, 1968 7hp sno-bee, 1968 190XTD
|
|