| Author |
 Topic Search Topic Search  Topic Options Topic Options
|
CAL(KS) 
Orange Level

Joined: 18 Sep 2009
Location: Chapman, KS
Points: 3804
|
 Post Options Post Options
 Thanks(0) Thanks(0)
 Quote Quote  Reply Reply
 Posted: 10 Jan 2020 at 7:13am Posted: 10 Jan 2020 at 7:13am |
 DMiller wrote: DMiller wrote:
Cannot pull pistons from bottom, pulled as a Set with sleeves and installed same manner. Sleeves are loaded from bottom outside engine. |
yes thank you for clarifying, i should have elaborated
|
|
Me -C,U,UC,WC,WD45,190XT,TL-12,145T,HD6G,HD16,HD20
Dad- WD, D17D, D19D, RT100A, 7020, 7080,7580, 2-8550's, 2-S77, HD15
|
 |
|
Sponsored Links
|
|
 |
DMiller 
Orange Level Access

Joined: 14 Sep 2009
Location: Hermann, Mo
Points: 35255
|
 Post Options Post Options
 Thanks(0) Thanks(0)
 Quote Quote  Reply Reply
 Posted: 10 Jan 2020 at 7:19am Posted: 10 Jan 2020 at 7:19am |
|
Dependent on if Trunk type or Cross Head pistons as to parts lists.
|
 |
gemdozer 
Orange Level

Joined: 17 Sep 2009
Points: 1072
|
 Post Options Post Options
 Thanks(0) Thanks(0)
 Quote Quote  Reply Reply
 Posted: 10 Jan 2020 at 8:32am Posted: 10 Jan 2020 at 8:32am |
|
Did you removed the fuel pump if the coupling or the shaft is't brooked.
|
 |
WaltDevore 
Bronze Level


Joined: 03 Jan 2020
Location: IdahoSprings CO
Points: 143
|
 Post Options Post Options
 Thanks(0) Thanks(0)
 Quote Quote  Reply Reply
 Posted: 17 Jan 2020 at 8:59pm Posted: 17 Jan 2020 at 8:59pm |
|
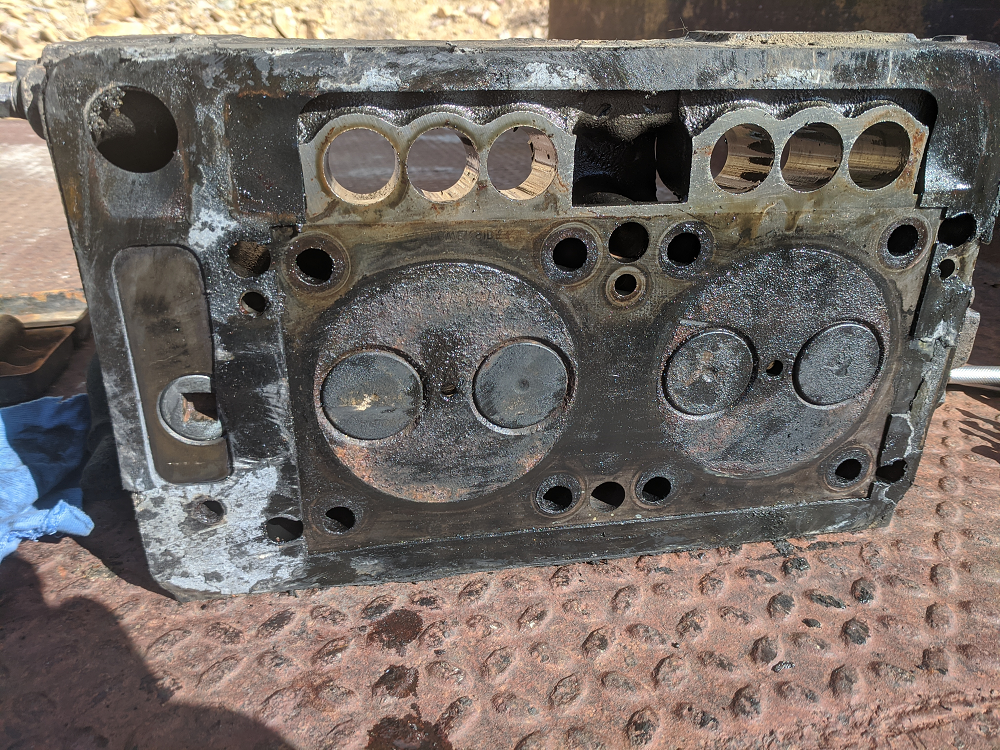
I'm ready to pull the head. Is there any trick to get it loose? It doesn't seem too big and heavy to manage it manually. I can't find any point of purchase to work a long crowbar. Recommendations? Thanks
|
 |
DMiller 
Orange Level Access

Joined: 14 Sep 2009
Location: Hermann, Mo
Points: 35255
|
 Post Options Post Options
 Thanks(0) Thanks(0)
 Quote Quote  Reply Reply
 Posted: 18 Jan 2020 at 6:01am Posted: 18 Jan 2020 at 6:01am |
|
Try NOT to pry Under the head, just get it loose then lift it off the studs with a small hoist or a tractor using bolt holes on the top. These have no true Head Gasket, the block and head are a machined fit up with seal rings. The studs will need to be in place to reset the head so as not to shift it across these seal rings.
|
 |
gemdozer 
Orange Level

Joined: 17 Sep 2009
Points: 1072
|
 Post Options Post Options
 Thanks(0) Thanks(0)
 Quote Quote  Reply Reply
 Posted: 18 Jan 2020 at 6:02am Posted: 18 Jan 2020 at 6:02am |
|
I am't sure if the water pump have to be removed with speacer plate to pull the head off and not sure too if the 2 long bolts from blower are bolted in block or in head
|
 |
WaltDevore 
Bronze Level


Joined: 03 Jan 2020
Location: IdahoSprings CO
Points: 143
|
 Post Options Post Options
 Thanks(0) Thanks(0)
 Quote Quote  Reply Reply
 Posted: 25 Jan 2020 at 5:01pm Posted: 25 Jan 2020 at 5:01pm |
It may be above freezing for the first time in a while tomorrow. With my limited resources, I've devised this rig to pull the head off. Do you see any obvious absurditi 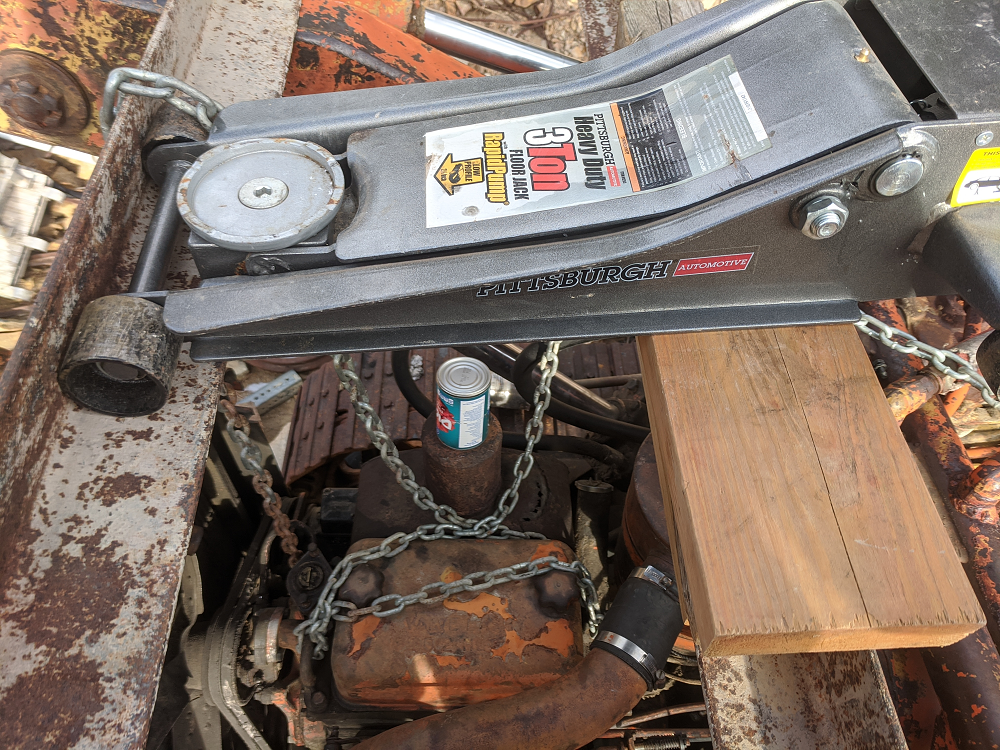 es I'm missing?
|
 |
WaltDevore 
Bronze Level


Joined: 03 Jan 2020
Location: IdahoSprings CO
Points: 143
|
 Post Options Post Options
 Thanks(0) Thanks(0)
 Quote Quote  Reply Reply
 Posted: 25 Jan 2020 at 5:03pm Posted: 25 Jan 2020 at 5:03pm |
|
I'll put the chain on the back of the lift circle closest to the handle. The pull won't be perfectly vertical. Just hope to break loose without breaking anything.
|
 |
DiyDave 
Orange Level Access


Joined: 11 Sep 2009
Location: Gambrills, MD
Points: 54943
|
 Post Options Post Options
 Thanks(0) Thanks(0)
 Quote Quote  Reply Reply
 Posted: 25 Jan 2020 at 6:05pm Posted: 25 Jan 2020 at 6:05pm |
If you have everything on the head that holds it to the block removed, take #2 piston, and re-assemble it, with a piece of something like carpet, or a circle of wood, on top. Put the old bearing halves in, around the crank, and turn the crank, to pop the head off... 
Edited by DiyDave - 25 Jan 2020 at 6:08pm
|
|
Source: Babylon Bee. Sponsored by BRAWNDO, its got what you need!
|
 |
DiyDave 
Orange Level Access


Joined: 11 Sep 2009
Location: Gambrills, MD
Points: 54943
|
 Post Options Post Options
 Thanks(0) Thanks(0)
 Quote Quote  Reply Reply
 Posted: 25 Jan 2020 at 6:12pm Posted: 25 Jan 2020 at 6:12pm |
[QUOTE=DiyDave]If you have everything on the head that holds it to the block removed, take #2 piston, and re-assemble it, with a piece of something like carpet, or a circle of wood, on top. Put the old bearing halves in, around the crank, and turn the crank, to pop the head off...  [QUOTE]
Whoops, didn't remember that you don't have the pistons out. Do you have an injector out? If so, feed a length of rope, down the injector hole, to do the same thing as I said earlier, above!  |
|
Source: Babylon Bee. Sponsored by BRAWNDO, its got what you need!
|
 |
WaltDevore 
Bronze Level


Joined: 03 Jan 2020
Location: IdahoSprings CO
Points: 143
|
 Post Options Post Options
 Thanks(0) Thanks(0)
 Quote Quote  Reply Reply
 Posted: 25 Jan 2020 at 7:21pm Posted: 25 Jan 2020 at 7:21pm |
|
I do have the injectors out. That is an amazing idea. Thanks!!
|
 |
Coke-in-MN 
Orange Level Access

Joined: 12 Sep 2009
Location: Afton MN
Points: 42186
|
 Post Options Post Options
 Thanks(0) Thanks(0)
 Quote Quote  Reply Reply
 Posted: 25 Jan 2020 at 10:16pm Posted: 25 Jan 2020 at 10:16pm |
Head should come off easily without all this monkey business . Injector tube is copper and flared at end into head - the hole through is not large enough to pass much through . IF all the bolts are removed head should be able to be lifted - looks like you have the lift rings on head secured to your lifting device , next get a soft blow hammer and tap on head . Now pistons and liners come out from top , pistons can be removed with liners intact yet in block - liners are shimmed into block to get a proud dimension from top of block face of about .005 . With all the crusty crud in the bottom of the blower housing - evidently the drain hole on bottom of housing is closed off - it's a 1/4" threaded hole in bottom of the housing and it MUST be open to allow drainage .
Edited by Coke-in-MN - 25 Jan 2020 at 10:18pm
|
|
Life lesson: If you’re being chased by a lion, you’re on a horse, to the left of you is a giraffe and on the right is a unicorn, what do you do? You stop drinking and get off the carousel.
|
 |
WaltDevore 
Bronze Level


Joined: 03 Jan 2020
Location: IdahoSprings CO
Points: 143
|
 Post Options Post Options
 Thanks(0) Thanks(0)
 Quote Quote  Reply Reply
 Posted: 26 Jan 2020 at 12:13pm Posted: 26 Jan 2020 at 12:13pm |
|
Thanks for that. I'm off to see what happens. I sure appreciate the tips as I go. I pray the beast will rise again.
|
 |
gemdozer 
Orange Level

Joined: 17 Sep 2009
Points: 1072
|
 Post Options Post Options
 Thanks(0) Thanks(0)
 Quote Quote  Reply Reply
 Posted: 26 Jan 2020 at 12:23pm Posted: 26 Jan 2020 at 12:23pm |
|
I am not sure but you need to removed the water pump and oil cooler for removed the head
|
 |
WaltDevore 
Bronze Level


Joined: 03 Jan 2020
Location: IdahoSprings CO
Points: 143
|
 Post Options Post Options
 Thanks(0) Thanks(0)
 Quote Quote  Reply Reply
 Posted: 26 Jan 2020 at 3:16pm Posted: 26 Jan 2020 at 3:16pm |
|
|
 |
WaltDevore 
Bronze Level


Joined: 03 Jan 2020
Location: IdahoSprings CO
Points: 143
|
 Post Options Post Options
 Thanks(0) Thanks(0)
 Quote Quote  Reply Reply
 Posted: 26 Jan 2020 at 3:17pm Posted: 26 Jan 2020 at 3:17pm |
|
|
 |
WaltDevore 
Bronze Level


Joined: 03 Jan 2020
Location: IdahoSprings CO
Points: 143
|
 Post Options Post Options
 Thanks(0) Thanks(0)
 Quote Quote  Reply Reply
 Posted: 26 Jan 2020 at 3:20pm Posted: 26 Jan 2020 at 3:20pm |
|
|
 |
NomoreJohnDeere 
Silver Level

Joined: 24 Jul 2017
Location: Missouri Ozarks
Points: 308
|
 Post Options Post Options
 Thanks(0) Thanks(0)
 Quote Quote  Reply Reply
 Posted: 26 Jan 2020 at 3:32pm Posted: 26 Jan 2020 at 3:32pm |
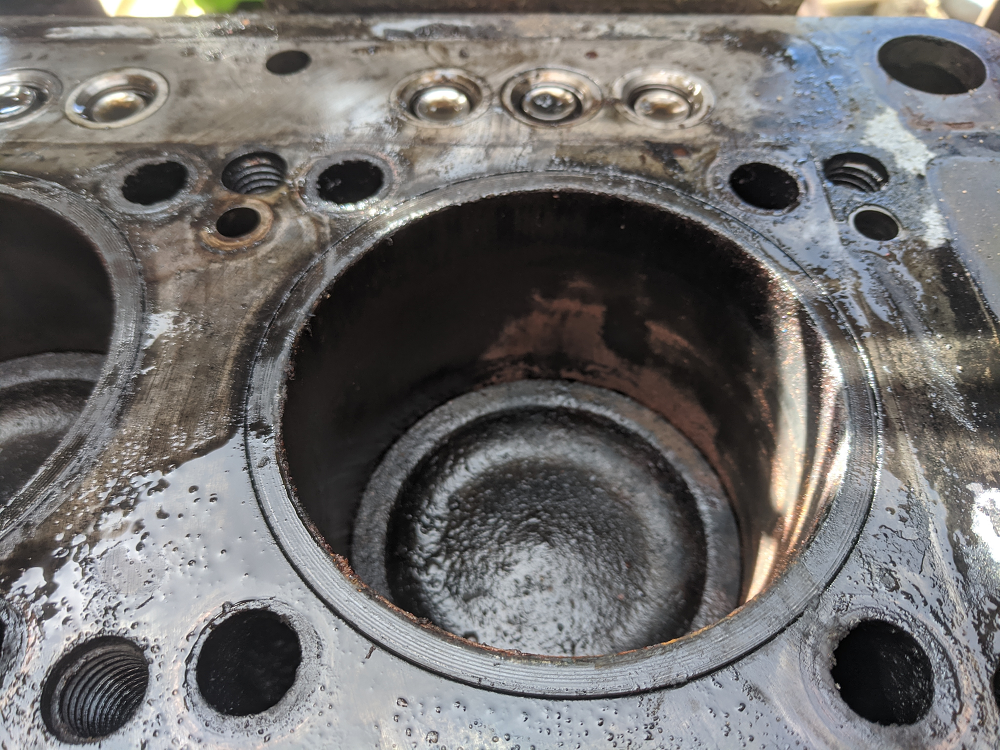
tolerances determine that Hows the crosshatch?
|
|
HD3
|
 |
DMiller 
Orange Level Access

Joined: 14 Sep 2009
Location: Hermann, Mo
Points: 35255
|
 Post Options Post Options
 Thanks(0) Thanks(0)
 Quote Quote  Reply Reply
 Posted: 26 Jan 2020 at 3:36pm Posted: 26 Jan 2020 at 3:36pm |
|
Cannot see it for the Red Rust!! Rings will be stuck if not scrubbed raw.
|
 |
WaltDevore 
Bronze Level


Joined: 03 Jan 2020
Location: IdahoSprings CO
Points: 143
|
 Post Options Post Options
 Thanks(0) Thanks(0)
 Quote Quote  Reply Reply
 Posted: 26 Jan 2020 at 3:38pm Posted: 26 Jan 2020 at 3:38pm |
|
Is cross hatch the hone on the cylinder wall? I guess I should get each piston to its bottom and see what it looks like. I should clean it up with some oil and check it then? The exhaust stems as seen through the ports are rusted. I'll try to do this now. Need to charge up my battery.
|
 |
WaltDevore 
Bronze Level


Joined: 03 Jan 2020
Location: IdahoSprings CO
Points: 143
|
 Post Options Post Options
 Thanks(0) Thanks(0)
 Quote Quote  Reply Reply
 Posted: 26 Jan 2020 at 4:39pm Posted: 26 Jan 2020 at 4:39pm |
|
The liners feel pitted in areas. At this moment it seems a valve job, liners, and rings. Any guess as to the bucks that involves? Thanks
|
 |
DMiller 
Orange Level Access

Joined: 14 Sep 2009
Location: Hermann, Mo
Points: 35255
|
 Post Options Post Options
 Thanks(1) Thanks(1)
 Quote Quote  Reply Reply
 Posted: 26 Jan 2020 at 6:17pm Posted: 26 Jan 2020 at 6:17pm |
|
Google Detroit 71 Series Cylinder Kits. Gonna be in the $200 Each hole range.
|
 |
WaltDevore 
Bronze Level


Joined: 03 Jan 2020
Location: IdahoSprings CO
Points: 143
|
 Post Options Post Options
 Thanks(0) Thanks(0)
 Quote Quote  Reply Reply
 Posted: 29 Jan 2020 at 11:37am Posted: 29 Jan 2020 at 11:37am |
|
I have not tended to the fuel pump yet. I'm unclear as to its operation. Seems it operates down in the block. Will it disassemble straight forward and reveal its condition? Can't see how anything could have happened to it but for some reason it's not pumping. I will check that next. Thanks!
|
 |
DMiller 
Orange Level Access

Joined: 14 Sep 2009
Location: Hermann, Mo
Points: 35255
|
 Post Options Post Options
 Thanks(0) Thanks(0)
 Quote Quote  Reply Reply
 Posted: 29 Jan 2020 at 12:35pm Posted: 29 Jan 2020 at 12:35pm |
|
They are a pretty simple PDP Gear Pump with check valves to keep flowing forward. Feed thru to a restrictor fitting at end of head on the back to tank line.
|
 |
Ray54 
Orange Level Access

Joined: 22 Nov 2009
Location: Paso Robles, Ca
Points: 4831
|
 Post Options Post Options
 Thanks(0) Thanks(0)
 Quote Quote  Reply Reply
 Posted: 30 Jan 2020 at 11:22am Posted: 30 Jan 2020 at 11:22am |
|
If there is question about the pump replace it. It has been 20 years but I think $35. Went through much hasle because it was not the experts idea to replace. It is out in the open 2 fuel lines and 2 bolts.
|
 |
jerbob 
Orange Level


Joined: 07 Aug 2017
Location: Michigan
Points: 961
|
 Post Options Post Options
 Thanks(0) Thanks(0)
 Quote Quote  Reply Reply
 Posted: 31 Jan 2020 at 8:57am Posted: 31 Jan 2020 at 8:57am |
 WaltDevore wrote: WaltDevore wrote:
I appreciate the encouragement. How miraculous to resurrect. Back to my idler, is it possible to replace the front idler without splitting the track? The track comes off so easily running it. I can't quite get it off so far with the side jacked up. I'd hope to put the new idler on with the adjuster all the way back and use a chain hooked to the track and forward tilt to pull track over new idler. Is that too optimistic?
|
Good luck on your project Walt and welcome to the forum. These folks have the advice and answers. AS to your track idler, I was able to pull my track adjuster, yoke and then idler assembly on my HD16. I used a 20 ton porta power to push the idler and yoke as far forward as possible and they allowed me just enough room to pull the adjuster rod out at the rear of the assembly. Once that was out, I pulled the yoke and was able to jack up the tractor enough to free up the idler. Was a hot mess of a project as I was learning as I was going but I did not have to split the track. Also the comment as to the wear on the rails is very valid. Mine are adjusted almost to the very front of the rails so I had enough stretch to be make it all work.
|
|
HD16DC, Bobcat 863 Turbo, Oliver 1855, John Deere 855,
|
 |
jerbob 
Orange Level


Joined: 07 Aug 2017
Location: Michigan
Points: 961
|
 Post Options Post Options
 Thanks(0) Thanks(0)
 Quote Quote  Reply Reply
 Posted: 31 Jan 2020 at 9:03am Posted: 31 Jan 2020 at 9:03am |
|
|
|
HD16DC, Bobcat 863 Turbo, Oliver 1855, John Deere 855,
|
 |


 Topic Options

 Post Options
 Thanks(0)

 DMiller wrote:

 es I'm missing?
