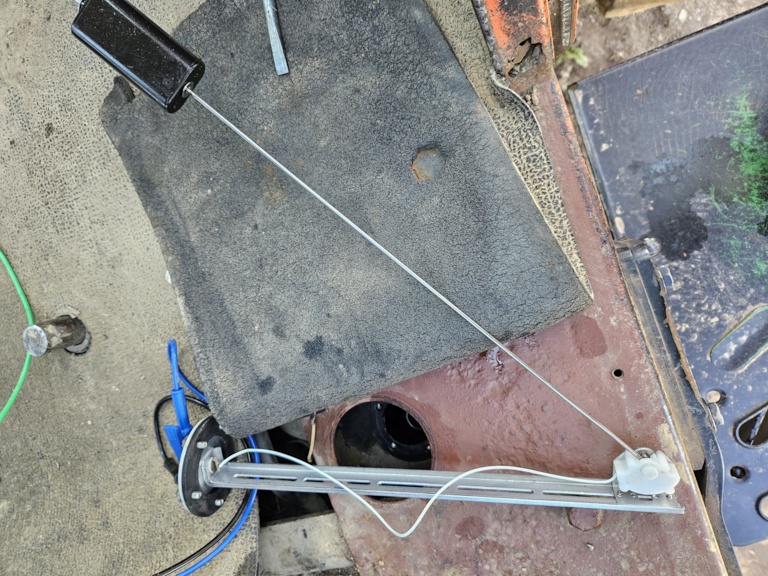
This is a long sordid tale but the details matter to me. I have gotten a solution to work on the empty end. The lack of accuracy on empty and full is a combination of factors. First, the rail that holds the sensor is too short to read empty correctly. I cut the rail about 1/3 from the end and spliced an aluminum flat stock piece to lower the sensor. The limiting factor on lowering it is the wire length. They give you some play so I lowered until I ran out of wire. After doing this, when turning on the key, the gauge read below empty but at least the needle moved when the key was on. Prior to lowering, the needle didn't move with key on.
The next thing I did was put a slight bend into the steel rod attached to the float. After doing research, you don't want to bend the rod any more than necessary. If you do, then your full reading will not be correct. However, if I lowered the sensor anymore, I would have had to splice the wire. This bend now got my needle to hit the empty mark on the gauge when key turned on. I don't know exactly how much fuel I had in the tank because the old gauge didn't work. I dipped a rod into the tank from the fuel sending hole and I had about 2 inches of fuel. So, I am guessing I had about 5 gallons of fuel but I could have 6 or 7 gallons. I just don't know without draining the tank. This wouldn't really be empty but better than having a 1/4 of tank under the previous empty reading.
I believe the tanks hold about 68 gallons. I then proceeded to put about 30 gallons of fuel into the tank. This put my gauge at 5/8 of a tank. If I had about 5-7 gallons to begin with and I added 30 then over half would be correct although 5/8 is probably a little on the high side. Close enough though for my desire to get a better empty and half reading. Those are critical for knowing when I need more fuel.
If you read my beginning post, I did a test with the sending unit out of the tank and hooked up to the gauge with test wires thereby eliminating all of the tractor wires and ground wire issues. On my test, empty took the movement of the float quite a while before it registered anything on the gauge. Also, full never caused the gauge needle to achieve making it to the absolute full mark. So, once I put another 25 gallons in the tank, the needle did the same thing. Never hit the absolute full mark on the gauge. So, I believe the resistance of the sensor does not match the requirements of the gauge. Otherwise, absolute full should hit the full needle mark when done outside of the tank. According to the Fuel Gauge Ohm readings specs included in the box, 10 Ohms is Empty and 88 Ohms is Full. The gauge is not getting 88 Ohms when the float shows full is my guess. I might need to add a resistor in the 2-10 Ohm range to get that needle to get to Full. This same resistor might cause my empty to be a better reading. If empty only needs 10 Ohms, it couldn't be more than 2-5 Ohms. I can test this theory by measuring the resistance with a multimeter as the float moves through the range. I ran out of time to do this. Now that the fuel is completely full, I will have to take the sending unit out of the tank and do the resistance measurement. I may have to "bend" back the float arm to original position, if I get the ohms targeted correctly. Also, "Full" may never be correct since I lowered the sensor. This means it will achieve full, long before it is full.
I also tested my readings using the test jumpers and the tractor wire and both agreed so I know the tractor wiring is good.
I don't know if my sending unit is different than another sending unit. It is possible that my sensor would not have the same readings from the same manufacturer at the various levels in the tank. I tend to think there is only one manufacturer of the sending units being sold by all of the various dealers so they should be similar. If the original sending unit is still in the tank, my guess is that it would not work with these new gauges. To keep both empty and full to be correct, I think adjusting the ohms with a resistor is probably more correct instead of cutting the rail and extending. I can always try this once I get the resistance amount figured out.
I have spent way too much time on this and I am not done! This all started because I had to remove the shields to fix the clutch cable which exposed the gauges! Good news is I think my documentation trail will help anyone else trying to fix the fuel gauge and sending units. If I get resistors to fix this, I will post what size and where I got them.
By the way, this is a combination Temp/Fuel gauge. I will have another post on the Temp Gauge findings coming too. While the fuel gauge is something I wanted to fix, I really wanted to fix the Temp Gauge before I fixed the Fuel Gauge. Baling hay in the summer time causes the engine to get quite hot and a critical engine function. You can run out of fuel and cause no problems, but an overheated engine is a major engine issue. More to come there.


 Topic Options

 Post Options
") Thanks(0)
Thanks(0)