| Author |
 Topic Search Topic Search  Topic Options Topic Options
|
DPKII 
Bronze Level


Joined: 08 Mar 2023
Location: Texas
Points: 70
|
 Post Options Post Options
") Thanks(1) Thanks(1)
 Quote Quote  Reply Reply
 Topic: 190 Preservation Topic: 190 Preservation
Posted: 31 Oct 2023 at 11:46am |
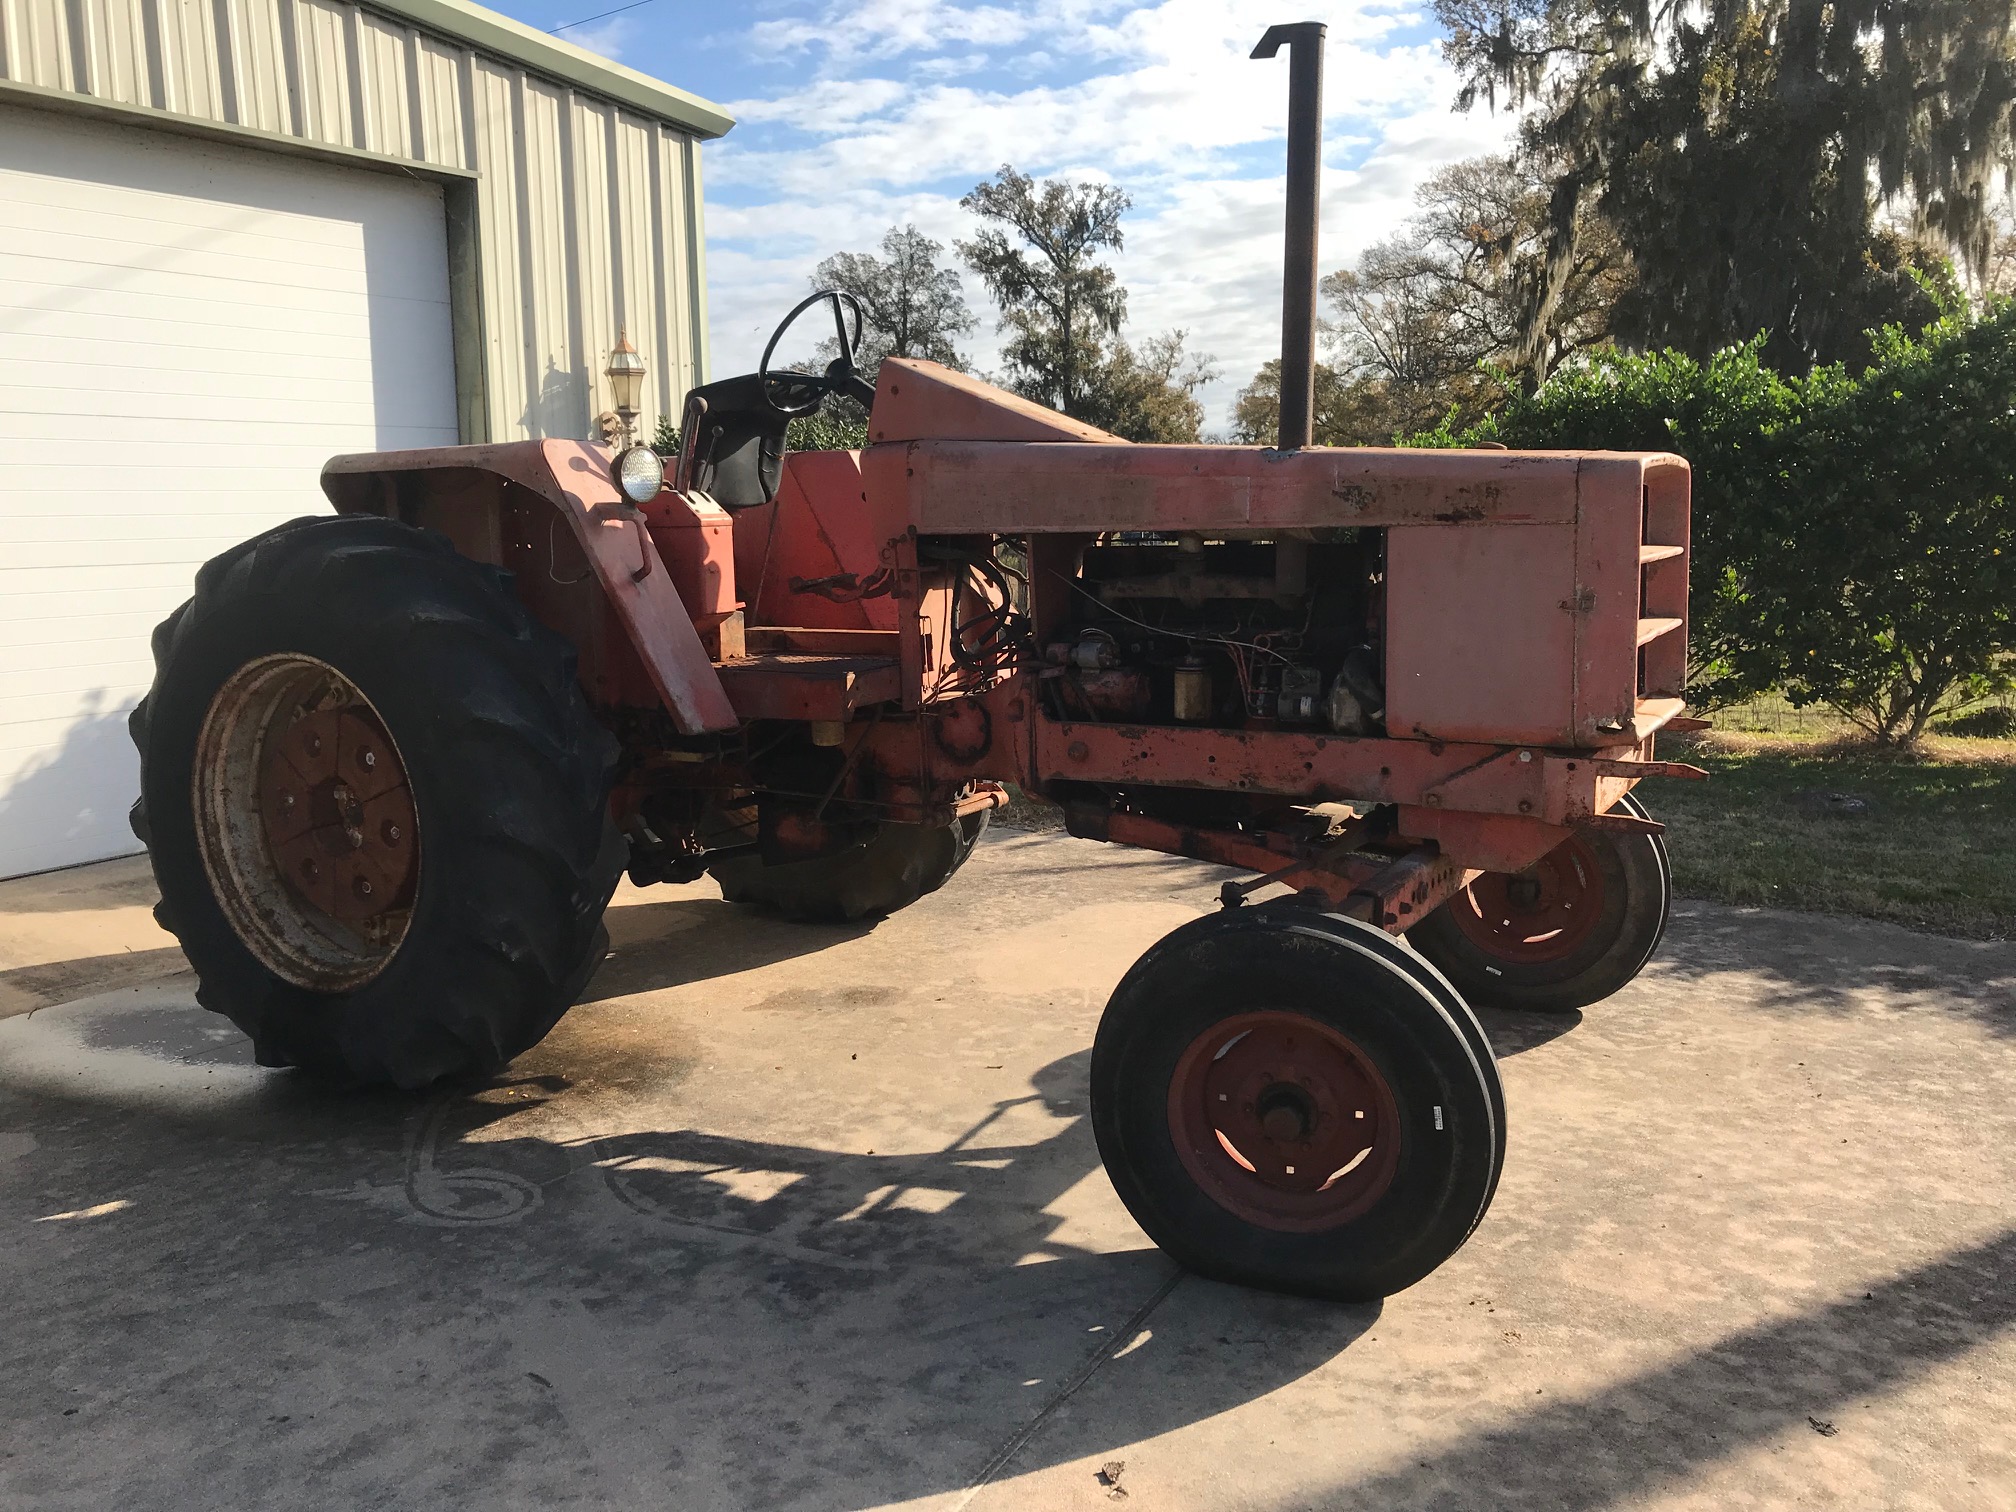
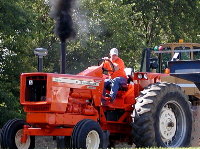
I am in the process of preserving my 190. It is a fairly early model at serial #1129D. I say preserving, not restoration because I do not plan to strip the entire tractor down. My plan is to repair rusted sheet metal, clean, and paint the tractor. Mechanically everything functions without issues.
The 190 was purchased new by my grandpa in 1964 from a dealer in Rosenburg TX. I have an earlier post asking about the front mounted toolbar that came with the tractor.
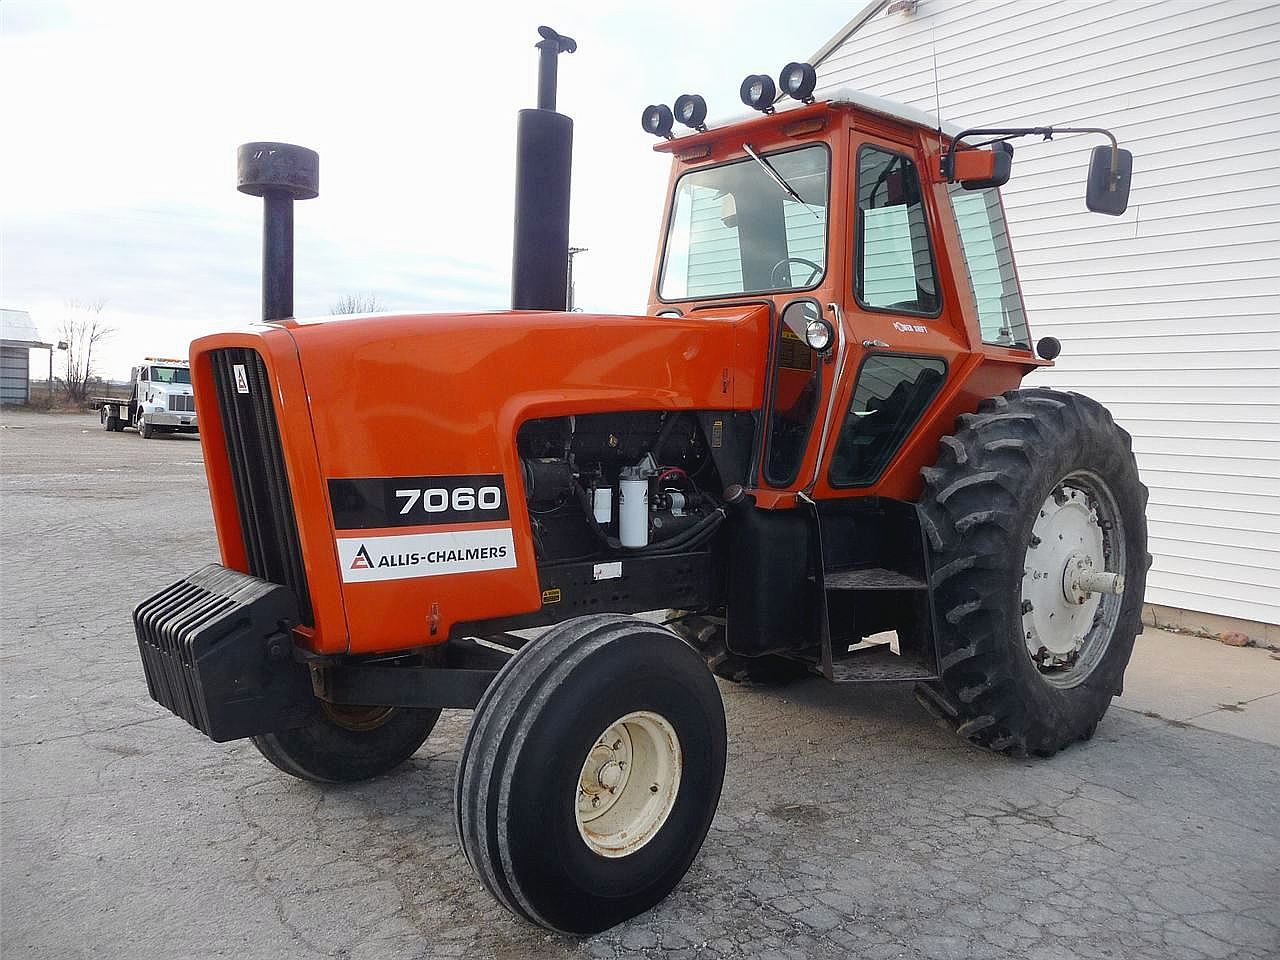
Below is a picture from a couple years ago when I replaced the rubber. I did not take a recent picture when I started the preservation. When this picture was taken the front tires were new and right rear leaking. Rears were replaced after this picture.
If there is interest I will continue to post progress on the tractor as I work on it. Just let me know.
Thanks, David
|
 |
|
Sponsored Links
|
|
|
plummerscarin
Orange Level Access

Joined: 22 Jun 2015
Location: ia
Points: 3988
|
Post Options
Thanks(0)
Quote Reply
Posted: 31 Oct 2023 at 12:34pm |
|
I think most enjoy the photos and steps one takes to keep these machines operating. I have two projects going myself. One is a total tear down and the other is a keep it working to avoid becoming scrap. I say keep ‘‘em coming
|
|
Ben (MI)
Orange Level
Joined: 02 Jun 2010
Location: SW Lower MI
Points: 769
|
Post Options
Thanks(0)
Quote Reply
Posted: 31 Oct 2023 at 4:04pm |
|
A great piece of family history. Please keep the updates coming.
|
|
Part time farming with a 1980 7060 and 1984 F3 hydro.
|
|
Leadoff
Silver Level


Joined: 14 Oct 2016
Location: Calgary
Points: 294
|
Post Options
Thanks(0)
Quote Reply
Posted: 31 Oct 2023 at 5:10pm |
DPKII
Great looking 190 after all these years. Please keep us posted on your progress
Good luck with your project
|
|
1963 D17D Series III. 1965 D15 Series II. 1965 D17 Series IV. 1975 185. 1978 716H. 1979 716H. 1965 780 Harvester/1R&DC. 1957 Model 73 SC 4 Furrow Plow
|
|
RedHeeler79
Silver Level
Joined: 09 Sep 2023
Location: NE Kansas
Points: 204
|
Post Options
Thanks(0)
Quote Reply
Posted: 31 Oct 2023 at 7:35pm |
|
Yep, progress pics are always fun to look at. Looks like a good project you have going there!
|
|
DrAllis
Orange Level Access
Joined: 12 Sep 2009
Points: 22149
|
Post Options
Thanks(0)
Quote Reply
Posted: 31 Oct 2023 at 11:12pm |
|
It goes to show that with some care and only 77 non-turbocharged HP, the driveline was adequate, where the "XT" version just destroyed everything behind the engine on prior to 9001 serial number chassis. Fix her up !!!
|
|
DPKII
Bronze Level
Joined: 08 Mar 2023
Location: Texas
Points: 70
|
Post Options
Thanks(0)
Quote Reply
Posted: 01 Nov 2023 at 9:19am |
Thanks for the interest! The 190 was always my favorite tractor of all the classic non-cab models I have driven over the years. My uncles ran all green and working for them in high school and afterwards I drove different John Deere models. Was not impressed with the 4020 compared to the 190 but loved when they got 4840s.
Grandpa started with Farmall Super Cs and still had one left that he "gave" to me when I was about 6 years old. It was still used sporadically and I had permission to drive it when ever I wanted. It had a weak battery and if it didn't start on the first couple turns - no go. I got it started most times and used it as a toy riding all over the farm. The working tractors at that time were two diesel D17s and the 190. Grandpa had had a gas D17 earlier but traded it in. At that time Grandpa farmed mainly hay and my job was pulling a rake with a D17. I drove the fastest of the 2 of course. For some reason it made about a 100rpm more than the other. Every summer from me being about 6 years old I raked hay for Grandpa. I was too small to reach the foot clutch or brake without sliding off the seat but the power director made it easy. He passed when I was in junior high school and Dad and my uncle took over the hay business for Grandma in their spare time. I did most of the cutting and baling with the 190 through junior high and high school.
For 77 hp the 190 pulled very well! Used it for pulling an offset disk and light tandem in the hay fields. As a kid I worked it very hard. Dad said run in 3rd gear on the offset but once I was alone I was shifting up as high as it would pull. Many hours with black smoke rolling out the pipe. Ran it in 6th gear on the haybine with lots of clover leaf turns to the left. Brakes were always bad so it was very hard on the front end. Broke the front right spindle once and both sides of the front end rear pivot frame at different times.
At one time Grandpa loaned the 190 to a friend with the offset and he broke a bull gear. I remember it getting loaded up and taken back to the dealer for repair. It still has the small axels but I suspect they are the new hardened version.
I typically don't take pictures of projects until I am finished for some reason, but for this one I will do my best to document and post.
Thanks,
David |
|
DrAllis
Orange Level Access
Joined: 12 Sep 2009
Points: 22149
|
Post Options
Thanks(0)
Quote Reply
Posted: 01 Nov 2023 at 9:31am |
|
It would be interesting to compare your engine s/n (2D-xxxx) to the chassis s/n and see how close they are together. As time went on, there were always more engines built than tractors because they were used in other applications.
|
|
DPKII
Bronze Level
Joined: 08 Mar 2023
Location: Texas
Points: 70
|
Post Options
Thanks(0)
Quote Reply
Posted: 01 Nov 2023 at 9:48am |
Dr. Alllis,
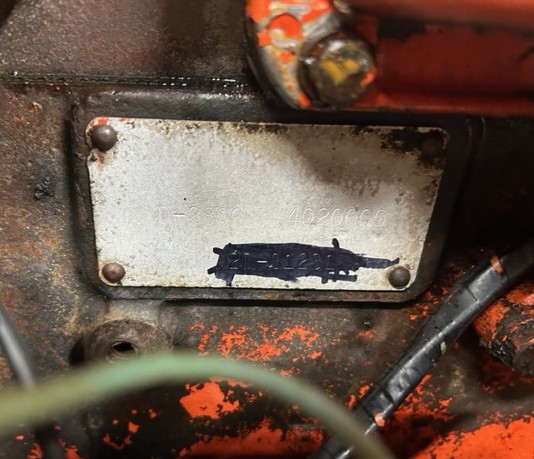
I will look this evening. The data plate is still on the engine but no color left on it. I will see if I can read the stamping on it.
Thanks, David
|
|
DPKII
Bronze Level
Joined: 08 Mar 2023
Location: Texas
Points: 70
|
Post Options
Thanks(0)
Quote Reply
Posted: 01 Nov 2023 at 3:21pm |
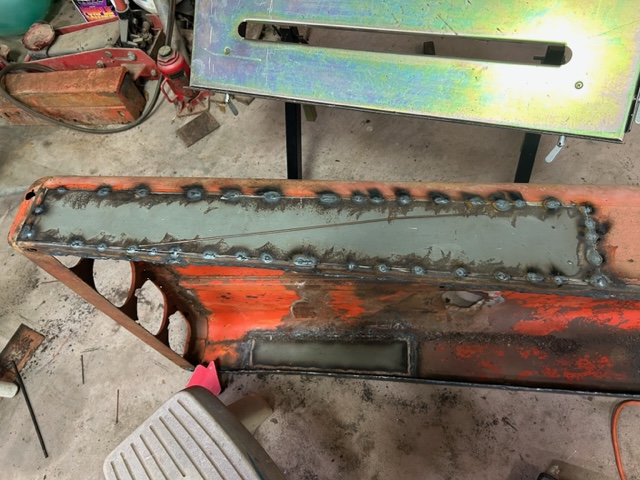
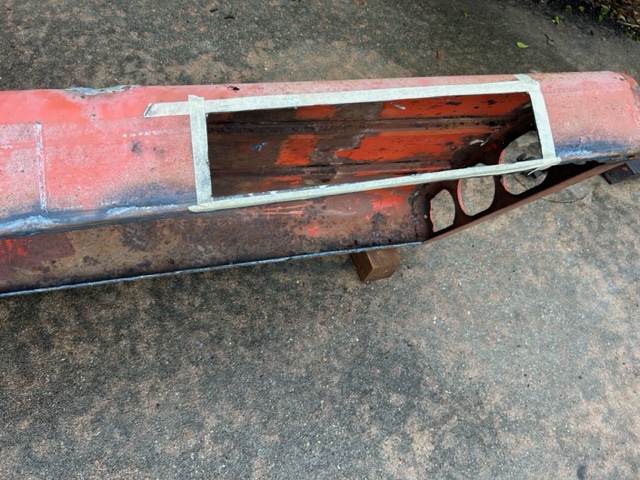
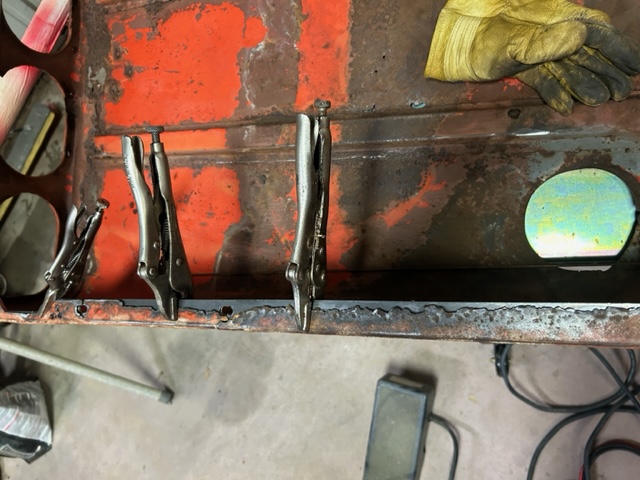
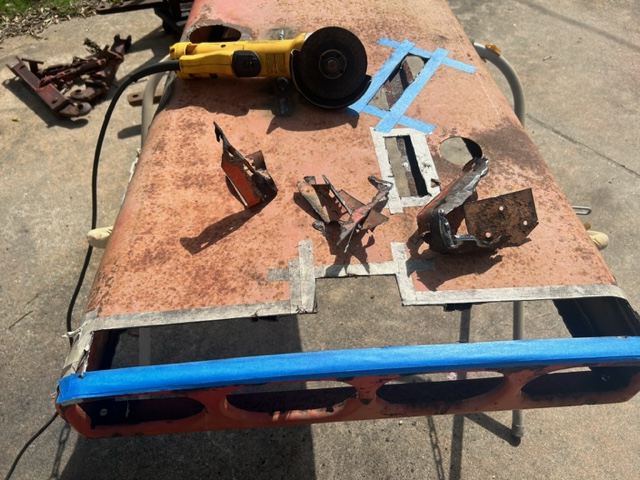
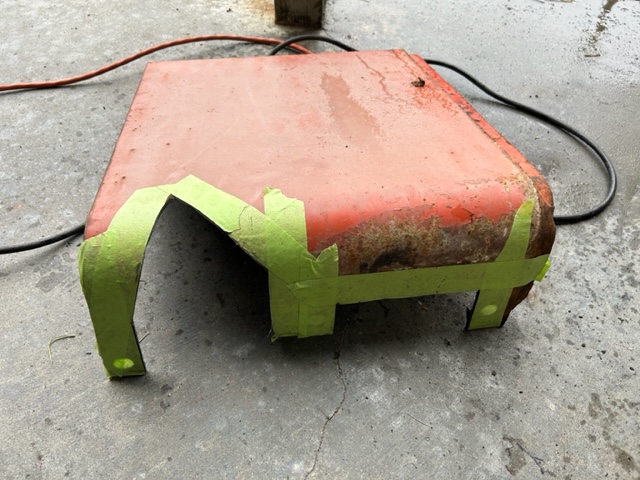
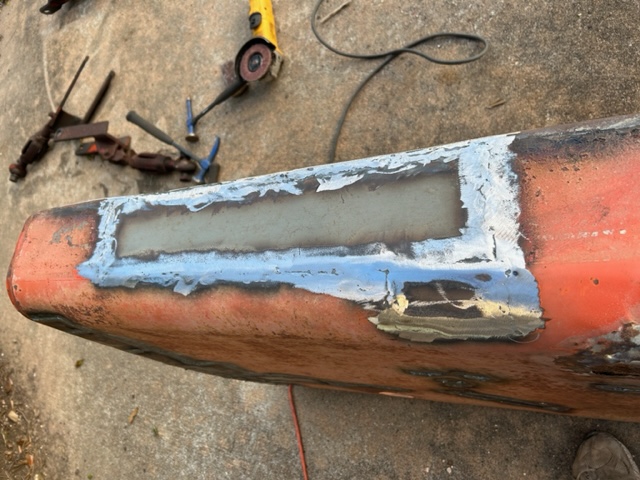
Here are some pictures of the hood with the new pieces tacked in. Im not the best welder but I think it will work ok. I didn't take any pictures of the fully welded piece yet.
|
|
DrAllis
Orange Level Access
Joined: 12 Sep 2009
Points: 22149
|
Post Options
Thanks(0)
Quote Reply
Posted: 01 Nov 2023 at 7:13pm |
|
I hope you're good at body work. I would have looked for a better used hood with the salvage yards I have around me.
|
|
plummerscarin
Orange Level Access
Joined: 22 Jun 2015
Location: ia
Points: 3988
|
Post Options
Thanks(0)
Quote Reply
Posted: 02 Nov 2023 at 5:54am |
|
That is ambitious. Those large flat panels will require extreme care to avoid warping. Good luck
|
|
DPKII
Bronze Level
Joined: 08 Mar 2023
Location: Texas
Points: 70
|
Post Options
Thanks(0)
Quote Reply
Posted: 02 Nov 2023 at 8:12am |
Yes, I would love to have another hood and front grill. Unfortunately there are no salvage yards down here. We are about 50 miles from the coast and the climate is not kind to equipment. The 190 sat outside all but the last 6 years or so and for about 10 years it was barely run. I now have a place to keep it in an open ended building at least. Also, there were not nearly as many Allis Chalmers tractors down here as up north. I see a D17 around here every once in a while, and we still have one of Grandpa's but not any 190s.
I am doing my best to keep the warping down. Fingers crossed....
David
|
|
IBWD MIke
Orange Level

Joined: 08 Apr 2012
Location: Newton Ia.
Points: 4136
|
Post Options
Thanks(0)
Quote Reply
Posted: 02 Nov 2023 at 8:21am |
|
Colfax tractor in Iowa will ship, might give them a call; 515-674-3001.
|
|
DPKII
Bronze Level
Joined: 08 Mar 2023
Location: Texas
Points: 70
|
Post Options
Thanks(0)
Quote Reply
Posted: 02 Nov 2023 at 8:23am |
I checked the engine data plate yesterday evening. If I am reading everything correctly. The tractor is number 129 off the line and the engine is number 1231 (2D01231).
|
|
Lynn Marshall
Orange Level Access
Joined: 13 Sep 2009
Location: Dana, Iowa
Points: 2427
|
Post Options
Thanks(0)
Quote Reply
Posted: 02 Nov 2023 at 8:26am |
|
I've got a nice pair of the side tins for sale, if interested.
|
|
DrAllis
Orange Level Access
Joined: 12 Sep 2009
Points: 22149
|
Post Options
Thanks(0)
Quote Reply
Posted: 02 Nov 2023 at 8:30am |
|
Engine s/n's start at 1001, so it's pretty close, isn't it ??
|
|
DPKII
Bronze Level
Joined: 08 Mar 2023
Location: Texas
Points: 70
|
Post Options
Thanks(0)
Quote Reply
Posted: 02 Nov 2023 at 9:03am |
Yes pretty close I think. The tractor is 190 1129D and engine at 2D-01231 would put them 102 units apart.
Lynn thank you for the offer of the side tins. I have the pair that goes with my 190. They just have not been on the tractor in years. I think they are in pretty good shape other than a little metal fatigue around some of the corner bolt holes. The tins survived better than the rest of the sheet metal because every time Grandpa and Dad would pull the hood to replace muffler, pipe, ect. the side panels never got reinstalled. I liked them on the tractor and put them on a couple times back in the day but the panels have been stored inside for the past 20 years. If mine dont work out I will surely let you know...
Thanks, David
|
|
DPKII
Bronze Level
Joined: 08 Mar 2023
Location: Texas
Points: 70
|
Post Options
Thanks(0)
Quote Reply
Posted: 02 Nov 2023 at 9:06am |
Mike, thanks for the phone number. If my hood doesn't work out to my satisfaction I will give them a call.
Thanks again, David
|
|
injpumpEd
Orange Level Access
Joined: 13 Sep 2009
Location: Walnut IL
Points: 5123
|
Post Options
Thanks(0)
Quote Reply
Posted: 02 Nov 2023 at 9:11am |
|
Seeing this takes me back to my childhood in the 70's in the rio grande valley, the climate there is not kind to anything. We had a 190D Dad bought new in 70 and in just a few years it was already rusting through the hood, muffler rotted, charging and starting systems always giving fits! Man I don't miss that salty humidity! Sheet metal for these are readily available.
|
|
210 "too hot to farm" puller, part of the "insane pumpkin posse". Owner of Guenther Heritage Diesel, specializing in fuel injection systems on heritage era tractors. stock rebuilds to all out pullers!
|
|
AC7060IL
Orange Level
Joined: 19 Aug 2012
Location: central IL
Points: 3580
|
Post Options
Thanks(0)
Quote Reply
Posted: 02 Nov 2023 at 3:45pm |
DPK11, try to spot weld your 190's sheet metal with your Heliarc welder. That is how Allis-Chalmers built them at their factory in 1964. Spot welds don't create excessive heat in sheet metal like a weld. So a spot weld usually will not warp the metal? Your Heliarc welder was popular during WWII era. It's spot weld capability improved our US airplanes build factory's previous riveting methods. Heliarc means it initially used Helium as a shield gas. Hence the name.
Here is a youtube link to a 2.5 minute video that demonstrates how to do that with a tig welder. fyi: There is no audio in the spot weld video, just captions.
Edit: Looking more closely at your previous photos that contain welds, makes me think you're inserting new sheet metal and butt welding old to new? If that's correct, try this technique of spot welding a butt joint by placing an additional "backing sheet metal strip" from behind (opposite/out of site) the new&old pieces. In your 190's hood case, maybe use a backing sheet that is 1-1.5" wider than new insert? That way it adds strength across both seams & will make this technique a little easier. The backing will add some more weight to the hood, but only you'll know its there. Assuming you're using 18-20 gauge sheet metal, then not much weight added. If you're using thicker like 16 gauge, just try to spot weld butt joint without any backing.
So if using a backing, place all 3 pieces of sheet metal in place(new butted to old/ laying over backing) spot weld the 3 pieces over the butt seam. Then add additional spot welds on each surface pieces (old) (new) to their backing piece about an inch either side of the butt seam.
Here's another video "walking the cup" that shows tig 101 for beginners. It covers tig welding methods for thicker metal stock. Dude in the video does a great job of informing & demonstrating a tig's potential. You know you got one cool Heliarc welder - right?
Congratulations on owning, preserving a very cool AC 190 tractor. Thanks for sharing your journey & history stories.
Edited by AC7060IL - 02 Nov 2023 at 4:09pm
|
|
DPKII
Bronze Level
Joined: 08 Mar 2023
Location: Texas
Points: 70
|
Post Options
Thanks(0)
Quote Reply
Posted: 03 Nov 2023 at 8:03am |
Ed,
Its been a long while but I have been down to the Rio Grande valley a few times. As you confirmed the the south wind and humidity off the gulf plus the intense summer heat is really bad for anything sitting outside. You can clean up a piece of metal and it will rust overnight if you don't oil or paint it. From your bio it looks like you are the man to contact when I need injector pump work? I like your avatar! That must be your 200?
AC 7060, Thanks for the tips. Yes on the side panels I am butt welding the new metal in. I think it is either 16 or 18 gauge for the panels and the strips for the mounting holes on the bottom lip is 1/8". I will try the backing and spot weld method on the top sheet metal. So far it is coming out ok. The welder is fairly new to me. I got it a couple years ago. I happened to see it on Craigs List and picked it up from a really nice guy in College Station TX. He owns a company that makes all the brass signs, emblems, paper weights ect for Texas A&M university. He had purchased the welder new for a project but had no more need for it. I got a smoking good deal on the welder. He was asking $550 which was a great deal but when I handed him the cash he handed me $50 bucks back. I had a lincoln square wave 175 before that I now gave to my brother. I am no expert, but I do enjoy Tig welding more than any other process that I have tried.
Thanks, David
|
|
injpumpEd
Orange Level Access
Joined: 13 Sep 2009
Location: Walnut IL
Points: 5123
|
Post Options
Thanks(0)
Quote Reply
Posted: 03 Nov 2023 at 8:27am |
|
It is a 10 year old pic of my 210 puller lol! It has changed a little since then. I do run my own small fuel injection and turbo shop, yes. I have done some work for quite a few members on this board. I do work on all brands of tractor fuel systems though. Glad youre resurecting the 190, the one dad bought new in 70 was the first tractor I drove at the age of 7, so 190's are kinda special to me, plus kinda rare compared to the popularity of the 190XT's, which we also had and we had lots of trouble with it, so it got traded for a new 7000 lol! I often wonder if any of our old tractors are still around anywhere, but likely not due to that rough environment down there.
|
|
210 "too hot to farm" puller, part of the "insane pumpkin posse". Owner of Guenther Heritage Diesel, specializing in fuel injection systems on heritage era tractors. stock rebuilds to all out pullers!
|
|
AC7060IL
Orange Level
Joined: 19 Aug 2012
Location: central IL
Points: 3580
|
Post Options
Thanks(0)
Quote Reply
Posted: 03 Nov 2023 at 10:46am |
 DPKII wrote: DPKII wrote:
Ed,
Its been a long while but I have been down to the Rio Grande valley a few times. As you confirmed the the south wind and humidity off the gulf plus the intense summer heat is really bad for anything sitting outside. You can clean up a piece of metal and it will rust overnight if you don't oil or paint it. From your bio it looks like you are the man to contact when I need injector pump work? I like your avatar! That must be your 200?
AC 7060, Thanks for the tips. Yes on the side panels I am butt welding the new metal in. I think it is either 16 or 18 gauge for the panels and the strips for the mounting holes on the bottom lip is 1/8". I will try the backing and spot weld method on the top sheet metal. So far it is coming out ok. The welder is fairly new to me. I got it a couple years ago. I happened to see it on Craigs List and picked it up from a really nice guy in College Station TX. He owns a company that makes all the brass signs, emblems, paper weights ect for Texas A&M university. He had purchased the welder new for a project but had no more need for it. I got a smoking good deal on the welder. He was asking $550 which was a great deal but when I handed him the cash he handed me $50 bucks back. I had a lincoln square wave 175 before that I now gave to my brother. I am no expert, but I do enjoy Tig welding more than any other process that I have tried.
Thanks, David |
If your environment is salty humid as your describe, then you may
not want to use any backing panels as I mentioned earlier. To that end,
my guess is that the OEM riveted support members under your 190's hood
have somewhat more rust than areas not supported? If that is the case,
then using a backing panel may only increase their area's surfaces for
accumulated humidity to create more rust. Just keep spot or butt welding
new pieces into hood as you've already done. Maybe try to "stitch"
butts by doing consecutive spot welds along the butt seam, instead of
welding seam. Remember, excessive heat is your enemy on sheet metal.
By the way, awesome purchase price on the Heliarc. |
|
DPKII
Bronze Level
Joined: 08 Mar 2023
Location: Texas
Points: 70
|
Post Options
Thanks(0)
Quote Reply
Posted: 03 Nov 2023 at 4:06pm |
AC7060,
Yes definitely more rust on the sheet metal over the hat channels and front frame assembly.
I will keep doing the butt welding and plan to try and pour some rust treatment down the hat channels form the underside. Watched the videos you suggested which led me down a rabbit hole on tig welding. Learned I have not been paying nearly enough attention to the tungston shape, cleanliness etc.
thanks, David
|
|
DPKII
Bronze Level
Joined: 08 Mar 2023
Location: Texas
Points: 70
|
Post Options
Thanks(0)
Quote Reply
Posted: 06 Nov 2023 at 8:11am |
  More progress on the hood this weekend. After over 35 hours into it I have pretty much all the welding done. Hit it with grinder and I am satisfied that its going to look ok when done. I had a few warps here and there but a little work with body hammer and dolly and they came out pretty good. Gave me a chance to use the hammer and dolly set that I have had for years and never used. Actually purchased it years ago with the 190 in mind. I plan to try the aluminum reinforced filler on the weld seams and low spots.
David
|
|
DPKII
Bronze Level
Joined: 08 Mar 2023
Location: Texas
Points: 70
|
Post Options
Thanks(0)
Quote Reply
Posted: 13 Nov 2023 at 12:49pm |
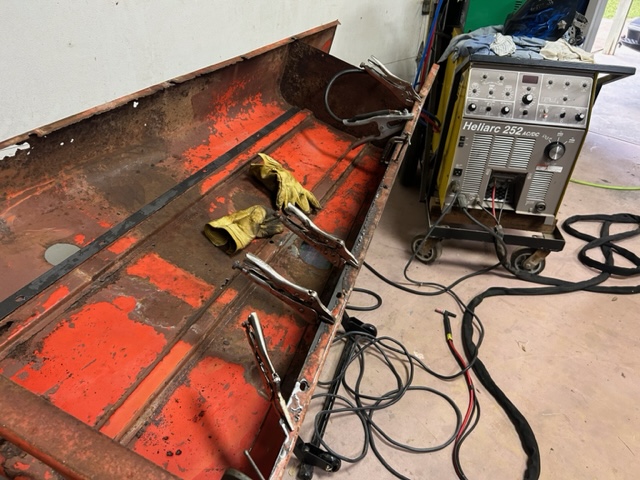
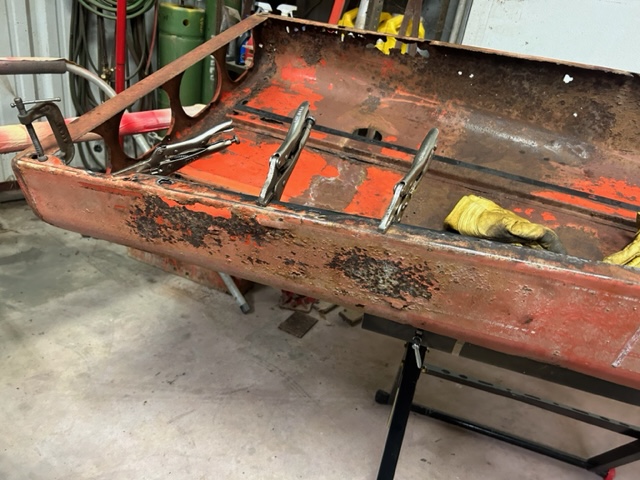
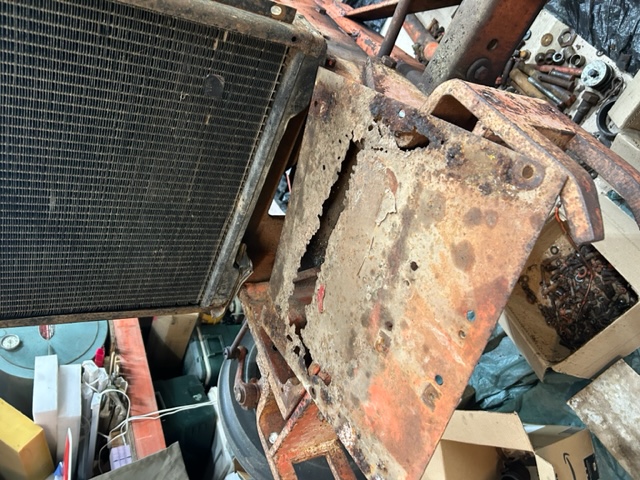
Made more progress. Pulled the side panels and plate under radiator. Pictures show badly rusted over the years. I made a new bottom plate and have begun welding up new metal in the side panel radiator mounts.
|
|
AC7060IL
Orange Level
Joined: 19 Aug 2012
Location: central IL
Points: 3580
|
Post Options
Thanks(0)
Quote Reply
Posted: 13 Nov 2023 at 1:53pm |
DPKII wrote:
AC7060,
Yes definitely more rust on the sheet metal over the hat channels and front frame assembly.
I will keep doing the butt welding and plan to try and pour some rust treatment down the hat channels form the underside. Watched the videos you suggested which led me down a rabbit hole on tig welding. Learned I have not been paying nearly enough attention to the tungston shape, cleanliness etc.
thanks, David
|
You're welcome. Yes, the tig video guy does a good job highlighting pertinent items. You've done a good job on the 190's hood restoration. When I initially viewed your previous under hood photos before your restoration, my first thought was your 190 had trashed its engine water pump at some point & during that process, perhaps the engine fan blew leaking coolant across the bottom of it's hood, making it rust quicker? But then I guess your 190's engine fan just sucking/blowing your Gulf humid salty air non-stop across hood might do the same, probably even worse? Thanks for sharing your work. Please keep updating.
|
|
DPKII
Bronze Level
Joined: 08 Mar 2023
Location: Texas
Points: 70
|
Post Options
Thanks(0)
Quote Reply
Posted: 13 Nov 2023 at 2:37pm |
AC7060,
You are correct on all points. The water pump has failed multiple times over the life of the tractor. And it was run with a leaking water pump front seal more than once to finish a job. Coolant (antifreeze) is supposed to be a rush inhibitor but my guess is that the fan spraying under the hood, then drying over time and possibly softening paint accelerated the rust in those areas. The pattern of rust underneath definitely suggests that. Thanks for the compliment on the hood. My welds have improved through this process. That is about par for me. I do this type of work so infrequently that I forget most of what I learned before doing it again!
David
|
|
DPKII
Bronze Level
Joined: 08 Mar 2023
Location: Texas
Points: 70
|
Post Options
Thanks(0)
Quote Reply
Posted: 01 Dec 2023 at 11:11am |
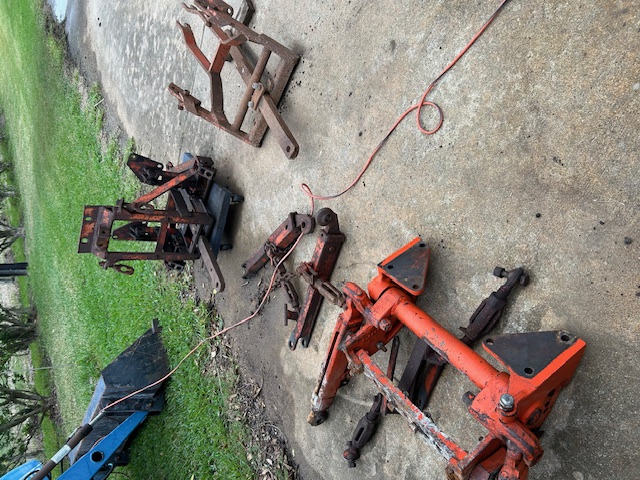 A tale of 3 hitches. I am still making progress on the 190. Most of the welding is done but I still have lots of work to do to smooth everything out. After the suggestion of salvage yards, I did some searching and found a yard with a 190XT only 2.5 hours from me. Pictures online looked awesome and the tach only shows 3559 hours. Found out it was a tractor salvaged via the TERP program. It looked very good in the pictures but unfortunately all the sheet metal, and engine was long gone. TERP requires knocking holes in the block and cutting the frames. Sad to see such a nice tractor destroyed. All that was left was torque tube back. I did get the 3 point hitch assembly, hydro valve stack, power director valve, and steering motor. My 190 has the snap coupler system and grandpa installed the 3 point adapter in the picture. The adapter was pretty wonky and not very stable. It looks like it was designed to swing with the spring on the snap coupler so the traction booster would function with it. When he was row cropping I remember grandpa having problems with too much side to side play so Dad tried welding the unit solid and adding mounting bolts up top. This didn't work all that well and only stripped out the treads and broke bolts for the top mount. More bracing was added which only broke again. Grandpa quit row cropping and did all hay and only used the drawbar from about 1980 on. I use the 190 mainly for box blading and 3 point shredder. My plan is to install the 3 point unit and hopefully still use the snap coupler drawbar. I am not sure if I will hook up the traction booster linkage to the 3 point or not. The traction booster and depth limit levers have been frozen in the full down position as long as I can remember. Also the spring block is installed on the coupler disabling the traction booster. My plan is to see what I can make work again and go from there.
|
|