| Author |
|
structures 
Silver Level

Joined: 28 Feb 2011
Location: Beggs, OK
Points: 331
|
 Post Options Post Options
") Thanks(0) Thanks(0)
 Quote Quote  Reply Reply
 Posted: 02 Jan 2015 at 6:25pm Posted: 02 Jan 2015 at 6:25pm |
 Sugarmaker wrote: Sugarmaker wrote:
Robert,
I have enough trouble trying to get near stock. I applaud you for doing custom work.
Post a picture of the truck too.
Regards,
Chris
|
The truck is a long story. Lots of pics over here: Structures 65 Chevy
JayIN wrote:
The hardest part is just getting started. |
Couldn't have said it better myself!
|
|
|
 |
|
Sponsored Links
|
|
|
Sugarmaker
Orange Level


Joined: 12 Jul 2013
Location: Albion PA
Points: 8168
|
Post Options
Thanks(0)
Quote Reply
Posted: 02 Jan 2015 at 6:09pm |
|
Robert,
I have enough trouble trying to get near stock. I applaud you for doing custom work.
Post a picture of the truck too.
Regards,
Chris
|
|
D17 1958 (NFE), WD45 1954 (NFE), WD 1952 (NFE), WD 1950 (WFE), Allis F-40 forklift, Allis CA, Allis D14, Ford Jubilee, Many IH Cub Cadets, 32 Ford Dump, 65 Comet.
|
|
structures
Silver Level
Joined: 28 Feb 2011
Location: Beggs, OK
Points: 331
|
Post Options
Thanks(0)
Quote Reply
Posted: 02 Jan 2015 at 6:05pm |
|
Hey Chris. Yeah 1year into it... Hope 2015 yields more progress! I'm gonna set the radiator issue aside until I get the tractor rolling on 4 wheels. That's true about changing one thing and creating more issues. I got a '65 Chevy truck I'm restoring wish I hadn't done so much customizing!
|
|
|
|
Sugarmaker
Orange Level
Joined: 12 Jul 2013
Location: Albion PA
Points: 8168
|
Post Options
Thanks(0)
Quote Reply
Posted: 02 Jan 2015 at 8:05am |
|
Robert,
Found this thread again! Sorry I have been busy.
I think your coming up on a one year anniversary? Your doing a good job on your Dads tractor restoration! All your fabrication work looks good. (I like to fab things) I can say that these tractors are a lot of work. Use this forum to keep yourself motivated. Take lots of pictures and post them. Its a good break for you and helps show your progress!
We are here for support! The folks on the Allis Forum really did help me a lot as I worked on the WD projects this past year too.
Looks like your finding a lot of the same issues I had. The work on the rims looks very good. I also use a electrolysis tank/s. But did not have one big enough for the rear rims. So I had those blasted, then started the repairs. 6 rims to make 4:) Great that you have a sandblaster too!
On that radiator fit issue. I think I would look at modifying the casting too. But before that, is there anything else that is going to be a issue? Old man Casbohm says "you change one thing and five other things may need changed"!
One thing repaired/restored at a time and you will get there!
That rear rim with the POR black looks awesome. I will remember that!
Regards,
Chris
|
|
D17 1958 (NFE), WD45 1954 (NFE), WD 1952 (NFE), WD 1950 (WFE), Allis F-40 forklift, Allis CA, Allis D14, Ford Jubilee, Many IH Cub Cadets, 32 Ford Dump, 65 Comet.
|
|
structures
Silver Level
Joined: 28 Feb 2011
Location: Beggs, OK
Points: 331
|
Post Options
Thanks(0)
Quote Reply
Posted: 01 Jan 2015 at 10:41pm |
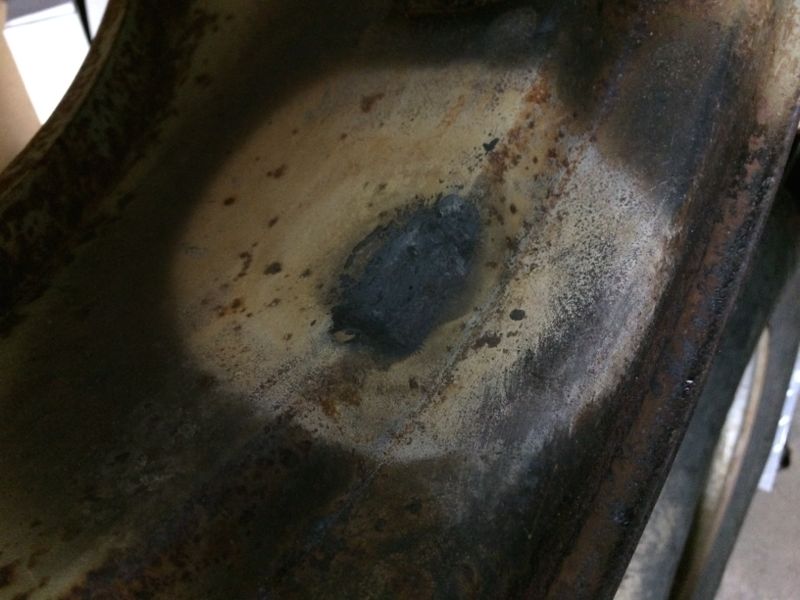
Had some time off for the holidays and s pent a little time sand blasting and I also dipped a rim in an electrolysis bath. It helps cut down on the sandblasting time. Hopefully I'll put some paint down soon. The first pic shows where I hammered a flat into the repaired rear rim for the schrader valve.
Edited by structures - 01 Jan 2015 at 10:41pm
|
|
|
|
JayIN
Orange Level

Joined: 18 Dec 2009
Location: SE/IN
Points: 1982
|
Post Options
Thanks(0)
Quote Reply
Posted: 10 Dec 2014 at 4:45am |
|
Nice! Its not that hard to fix the wheels. The hardest part is just getting started. You are saving my favorite tractor. Wish Ida kept mine!
|
|
sometimes I walk out to my shop and look around and think "Who's the idiot that owns this place?"
|
|
structures
Silver Level
Joined: 28 Feb 2011
Location: Beggs, OK
Points: 331
|
Post Options
Thanks(0)
Quote Reply
Posted: 09 Dec 2014 at 9:55pm |
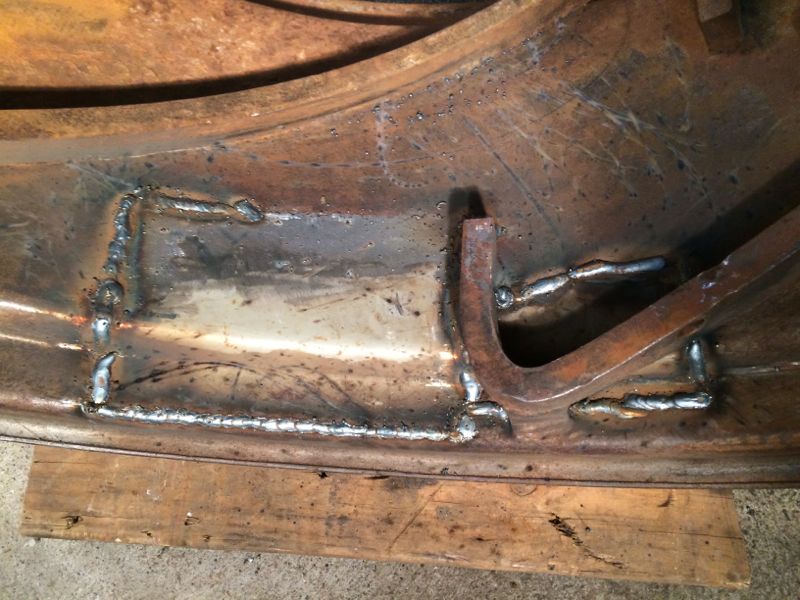
Trying to do a little bit each night. weld, grind, grind, grind... weld, grind, grind, grind... 
I had pretty good penetration with the backside welds but I went ahead and welded the inner side of the rim patches. Trying to not use any filler.
|
|
|
|
Fourced
Silver Level
Joined: 11 May 2013
Location: West Michigan
Points: 56
|
Post Options
Thanks(0)
Quote Reply
Posted: 08 Dec 2014 at 11:31am |
|
I got mine from Reliable Aftermarket Parts INC on E-bay. I am now fighting with them because they will not refund $60 in shipping charges, the auction says it will fit, it won't. I don't think that is my fault.(rant over)
I returned it because the hood would not fit correctly with everything stretched out to fit the bottom tank.
Edited by Fourced - 08 Dec 2014 at 11:36am
|
|
DiyDave
Orange Level Access

Joined: 11 Sep 2009
Location: Gambrills, MD
Points: 50660
|
Post Options
Thanks(0)
Quote Reply
Posted: 08 Dec 2014 at 4:58am |
|
Simple solution might be to grind some off the casting where it hits the tank. I re-used the tanks on my original, just had it re-cored, to avoid this problem. Still cost about $450...
|
|
JGAnderson
Bronze Level


Joined: 07 Dec 2014
Location: Indiana
Points: 4
|
Post Options
Thanks(0)
Quote Reply
Posted: 08 Dec 2014 at 3:53am |
Nice project... I woke up my dads series ii D15 just this fall. Had sat in a pole barn for the last 5 or 6 years at least. Going to use it to push snow this winter, then start tearing it down this next spring. I am taking plenty of notes on what you're doing! 
|
|
63 D-15 series ii
|
|
structures
Silver Level
Joined: 28 Feb 2011
Location: Beggs, OK
Points: 331
|
Post Options
Thanks(0)
Quote Reply
Posted: 07 Dec 2014 at 11:08pm |
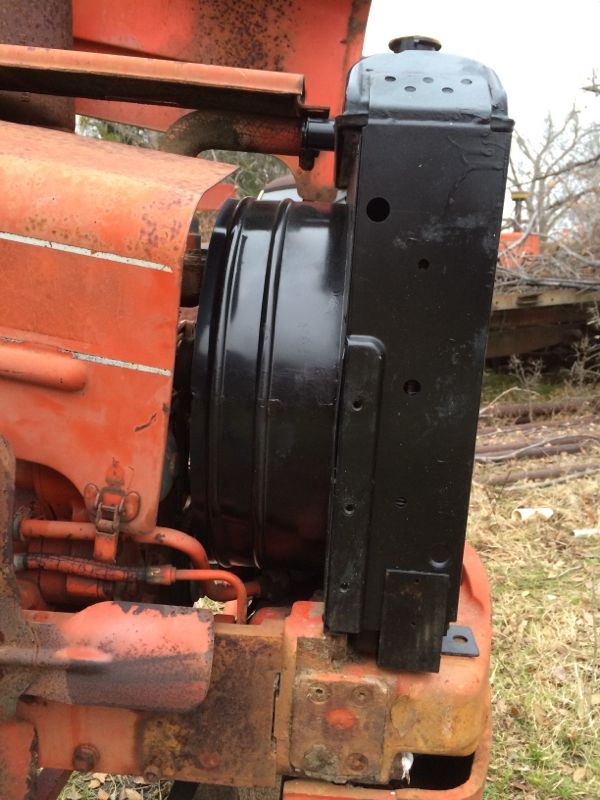
Fourced wrote:
Double check the bottom tank on that radiator, I bought an aftermarket and the bottom tank was about 1" thicker front to back than the Stock one. The mounting holes won't line up because the tank hits.
|
Yeah you're right. The tank is hitting the power steering casting. I might be able to work the tank in to clear the casting though.
|
|
|
|
Clay
Orange Level

Joined: 11 Sep 2009
Location: Udall, Kansas
Points: 8856
|
Post Options
Thanks(0)
Quote Reply
Posted: 07 Dec 2014 at 12:36pm |
|
Looks very good. I would suggest grit blasting the rough areas and applying some good quality epoxy to smooth out any low spots.
After the epoxy has set, sand blast the entire wheel. Prime and paint.
|
|
Fourced
Silver Level
Joined: 11 May 2013
Location: West Michigan
Points: 56
|
Post Options
Thanks(0)
Quote Reply
Posted: 07 Dec 2014 at 11:24am |
|
Double check the bottom tank on that radiator, I bought an aftermarket and the bottom tank was about 1" thicker front to back than the Stock one. The mounting holes won't line up because the tank hits.
Edited by Fourced - 07 Dec 2014 at 11:27am
|
|
structures
Silver Level
Joined: 28 Feb 2011
Location: Beggs, OK
Points: 331
|
Post Options
Thanks(0)
Quote Reply
Posted: 07 Dec 2014 at 10:03am |
Guys appreciate the comments! Thank you.
Was able to get the patches in.
|
|
|
|
EricPA
Orange Level
Joined: 13 Sep 2009
Location: Watsontown,PA.
Points: 2578
|
Post Options
Thanks(0)
Quote Reply
Posted: 02 Dec 2014 at 8:05pm |
|
very nice
|
|
Life is tough,but it's tougher when you're stupid. - John Wayne
|
|
WD45
Orange Level

Joined: 20 Sep 2009
Location: STAYNER,ONTARIO
Points: 930
|
Post Options
Thanks(0)
Quote Reply
Posted: 02 Dec 2014 at 7:24pm |
|
Recommend taking the head off then soak each cylinder. (used diesel and paint thinner 50/50) .Check the head that all valves are free. Put the tractor in gear and rock it back and forth to get engine to turn over. Good luck. Have freed up a three Allis engines.
|
|
Fred Dunlop, G,B,CA, WC,WF, 3 WD45`s,gas, diesel and LP,U,D10 series III, D12,D14,D15 SERIES II,D17 Series IV in Gas and Diesel ,D19 GAS and D21,170 185,210 ,220 an I-600 8070 fwd, 716H and 1920H
|
|
Steve Wilkens
Orange Level
Joined: 12 Sep 2009
Location: Ceresco, Michig
Points: 447
|
Post Options
Thanks(0)
Quote Reply
Posted: 02 Dec 2014 at 5:29pm |
|
oh, be sure to pull the plugs out
|
|
Steve Wilkens
Orange Level
Joined: 12 Sep 2009
Location: Ceresco, Michig
Points: 447
|
Post Options
Thanks(0)
Quote Reply
Posted: 02 Dec 2014 at 5:29pm |
|
Like all the guys said, it is family, you can save her. Do talk to dad and ask why it was parked, might save you a lot of time. An old trick for freeing stuck engines. Block up a rear wheel and fasten a 2x4 to it so that the long end is as high as you can comfortably hang weights. Soak the cylinders with brake fluid and go about your business. When you notice the weights on the ground the engine is free.
|
|
Sugarmaker
Orange Level
Joined: 12 Jul 2013
Location: Albion PA
Points: 8168
|
Post Options
Thanks(0)
Quote Reply
Posted: 02 Dec 2014 at 2:05pm |
DanC911 wrote:
I just dumped too much money and time into a Cub Cadet that was my dads. Using it brings back great memories of working with him. Well worth the investment. Take your time and do it right and you will have a memorial to your father that you can use every day.
Good luck |
Dan, Did the same on a 147 Cub Cadet a couple years ago. I think they might cost as much as a big tractor to restore:) Regards, Chris
|
|
D17 1958 (NFE), WD45 1954 (NFE), WD 1952 (NFE), WD 1950 (WFE), Allis F-40 forklift, Allis CA, Allis D14, Ford Jubilee, Many IH Cub Cadets, 32 Ford Dump, 65 Comet.
|
|
DanC911
Orange Level
Joined: 22 Jul 2014
Location: CT, USA
Points: 598
|
Post Options
Thanks(0)
Quote Reply
Posted: 02 Dec 2014 at 12:06pm |
I just dumped too much money and time into a Cub Cadet that was my dads. Using it brings back great memories of working with him. Well worth the investment. Take your time and do it right and you will have a memorial to your father that you can use every day.
Good luck
|
|
1950 WD, 1955 B, 66 Jacobsen Chief-O-Matic, 68 Simplicity 2110, 77 IH Cub Cadet 1450 w/front loader
|
|
Sugarmaker
Orange Level
Joined: 12 Jul 2013
Location: Albion PA
Points: 8168
|
Post Options
Thanks(0)
Quote Reply
Posted: 02 Dec 2014 at 10:19am |
|
Nice work on the rims, and rad re-build too. The 15 is coming along!
Similar work as I did on a WD this summer. Your doing a good job! No easy way to do this stuff unless you buy new or have someone else do the work:)
I did find a trick to get those pesky snap rings off the pins in the eccentrics. I tried the two screwdrivers with limited success. I started a drywall screw right at the joint of the snap ring. Allowed it to travel a little side ways and it pulled the snap ring out enough that a screwdriver could snap it off. (this was on new snap rings that I have to remove to coat with never seize:))
Maybe this will spur me to get back on the WD project!
Regards,
Chris
|
|
D17 1958 (NFE), WD45 1954 (NFE), WD 1952 (NFE), WD 1950 (WFE), Allis F-40 forklift, Allis CA, Allis D14, Ford Jubilee, Many IH Cub Cadets, 32 Ford Dump, 65 Comet.
|
|
JohnCO
Orange Level

Joined: 11 Sep 2009
Location: Niwot Colo
Points: 8992
|
Post Options
Thanks(0)
Quote Reply
Posted: 01 Dec 2014 at 2:20am |
|
Getting there! Looks good so far.
It was in the 50's at 7:30 Sunday morning, 20's by 9am. You might be getting a bit colder before you get warmer.
|
|
"If at first you don't succeed, get a bigger hammer"
Allis Express participant
|
|
structures
Silver Level
Joined: 28 Feb 2011
Location: Beggs, OK
Points: 331
|
Post Options
Thanks(0)
Quote Reply
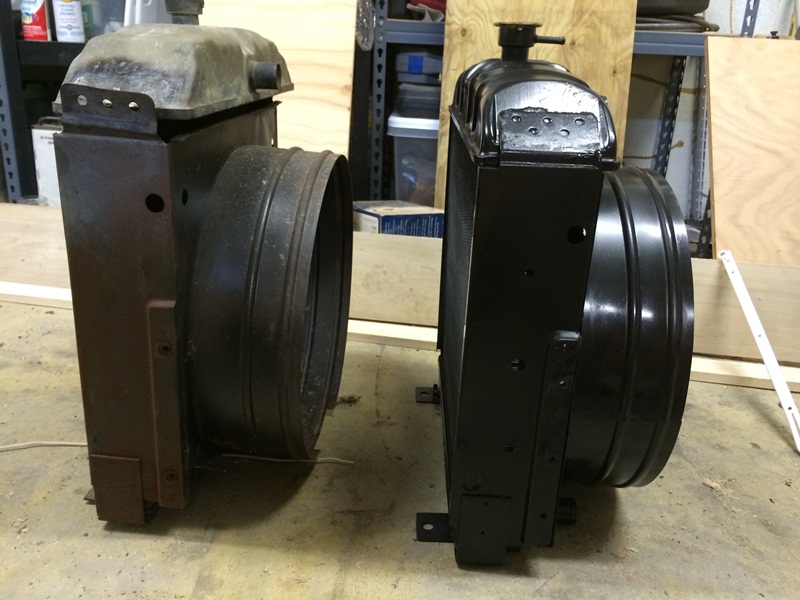
Posted: 30 Nov 2014 at 11:02pm |
Did a little work this evening. Started cutting on another rim. Should clean up pretty well. It was 65deg F when I started cutting by dusk it was 45deg F!
DSeries4 wrote:
You are making great progress. But that new rad appears to have a shorter tank to me. Neck height looks the same, but a shorter tank could cause big trouble when trying to fit the sheet metal.
|
thanks man! I think the new radiator looks short because the other one is not fully seated in its frame.
|
|
|
|
DSeries4
Orange Level

Joined: 12 Sep 2009
Location: Ontario, Canada
Points: 7206
|
Post Options
Thanks(0)
Quote Reply
Posted: 25 Aug 2014 at 10:28pm |
|
You are making great progress. But that new rad appears to have a shorter tank to me. Neck height looks the same, but a shorter tank could cause big trouble when trying to fit the sheet metal.
|
|
'49 G, '54 WD45, '55 CA, '56 WD45D, '57 WD45, '58 D14, '59 D14, '60 D14, '61 D15D, '66 D15II, '66 D21II, '67 D17IV, '67 D17IVD, '67 190XTD, '73 620, '76 185, '77 175, '84 8030, '85 6080
|
|
structures
Silver Level
Joined: 28 Feb 2011
Location: Beggs, OK
Points: 331
|
Post Options
Thanks(0)
Quote Reply
Posted: 25 Aug 2014 at 9:13am |
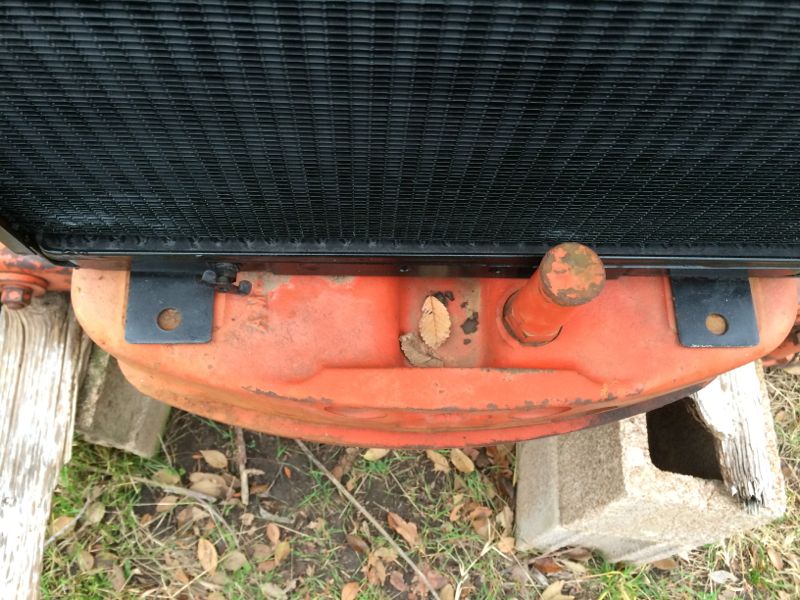
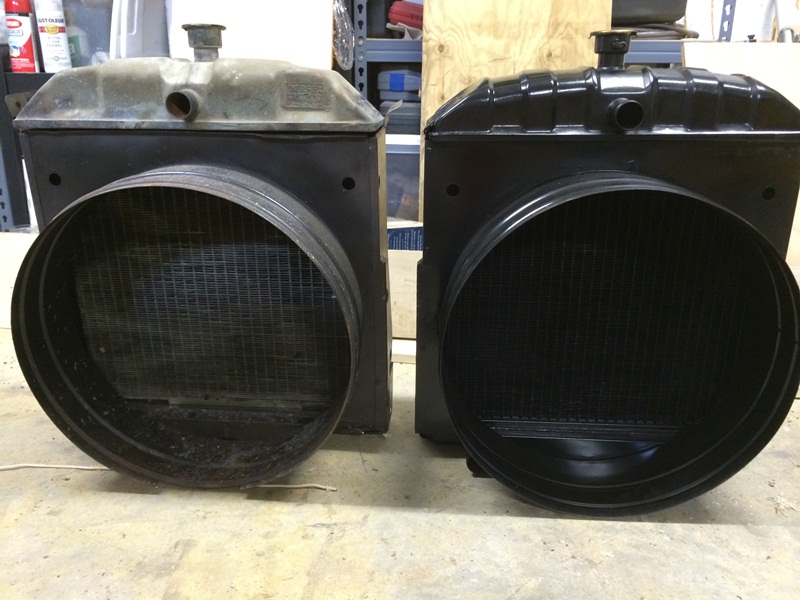
Good morning a little update.
Picked up a radiator. It's fairly close to the original. Same overall dimensions, copper, looks like it has some additional mounting nuts, probably for other years. Tanks are little different.
Also worked on an already pretty good rim. It was a mix between sandblasting and electrolysis. I'd recommend electrolysis first and then sand blast the rim. By the time the rim was in the bath for 24 hours the heavy rust was gone and the remaining rust just brushed off.
This is my 80 gallon pool I made. Set the miter saw to 22.5 degrees and start cutting short pieces. It's roughly 32" wide. I used a 4 mil plastic drop cloth. 80 gallons water with about 4 cups washing soda (sodium carbonate). Their is (6) 3/8" to 1/2 Dia rebar sticks around the perimeter and 2 in the middle. The rebar is wired together with copper wire. The electrolysis is definitely line of sight so the rust has to "see" the rebar anodes. Hook up the neg to the rim and the positive to the anode rebar. My 12 volt battery charger was showing almost 10 amps. This is my second rim. I doubled my rebar count and it boosted my amp draw.
24 hours later!
The rust can be wire brushed off pretty easily. I chose to throw it in the blast cabinet. I used por 15 on the outside of the rim. Marine clean, metal ready (with a wash down), and 2 coats por 15. I brushed this on. It's actually not too bad looking. It has brush strokes at first but they thin out before it dries. The 2nd coat went on about 2 hours after the first.
For the inside of the rim I used PPG epoxy primer.
I missed pictures of the body work. The rim was pretty rough by the valve stem. I welded in a little patch and used evercoat to fill the pits. I thought I took pics of that but I guess I didn't.
Edited by structures - 25 Aug 2014 at 6:16pm
|
|
|
|
structures
Silver Level
Joined: 28 Feb 2011
Location: Beggs, OK
Points: 331
|
Post Options
Thanks(0)
Quote Reply
Posted: 22 Jul 2014 at 7:55am |
|
definitely want to stay original.
|
|
|
|
desertjoe
Orange Level Access
Joined: 23 Sep 2013
Location: New mexico
Points: 13361
|
Post Options
Thanks(0)
Quote Reply
Posted: 21 Jul 2014 at 10:42pm |
|
Hey Structures,,,I'm goin to be following your project also..looking good,,. I have a D15 II LP and working on it as much as the hot weather will let me,,,,.
I am close to being ready to paint the tin, hopefully in a week or so.
On your radiator, are you wanting to stay original?
|
|
desertjoe
Orange Level Access
Joined: 23 Sep 2013
Location: New mexico
Points: 13361
|
Post Options
Thanks(0)
Quote Reply
Posted: 21 Jul 2014 at 10:24pm |
|
Hey TimNearFortWorth,,,I sure would like to see pics of your Series II LP,,,,?
Edited by desertjoe - 21 Jul 2014 at 10:34pm
|
|
structures
Silver Level
Joined: 28 Feb 2011
Location: Beggs, OK
Points: 331
|
Post Options
Thanks(0)
Quote Reply
Posted: 21 Jul 2014 at 9:48pm |
|
Yeah. I was going to have it recored. He thought he'd have $400 in it, and figured I'd better get a new one... I don't know. Maybe I'll take it somewhere else. It's pretty rough. I wish I could find out more about the new ones. I asked a seller. They said the new ones have copper cores...
|
|
|
|
DSeries4
Orange Level
Joined: 12 Sep 2009
Location: Ontario, Canada
Points: 7206
|
Post Options
Thanks(0)
Quote Reply
Posted: 21 Jul 2014 at 9:36pm |
|
I think at lot of the new rads are made overseas and are not very good quality. Your rad shop should be able to recore it for you. That is the path I would take.
|
|
'49 G, '54 WD45, '55 CA, '56 WD45D, '57 WD45, '58 D14, '59 D14, '60 D14, '61 D15D, '66 D15II, '66 D21II, '67 D17IV, '67 D17IVD, '67 190XTD, '73 620, '76 185, '77 175, '84 8030, '85 6080
|
|


 Topic Options