| Author |
|
structures 
Silver Level

Joined: 28 Feb 2011
Location: Beggs, OK
Points: 331
|
 Post Options Post Options
") Thanks(0) Thanks(0)
 Quote Quote  Reply Reply
 Posted: 21 Jul 2014 at 8:11am Posted: 21 Jul 2014 at 8:11am |
Bad news on the radiator. I guess all the heat from taking it apart and putting it back together broke out some weak points in the core. The radiator shop tested it last week before putting it back together and it had a lot of pin holes in it.
I've seen some new radiators listed online so I'll probably go that route.
|
|
|
 |
|
Sponsored Links
|
|
|
structures
Silver Level
Joined: 28 Feb 2011
Location: Beggs, OK
Points: 331
|
Post Options
Thanks(0)
Quote Reply
Posted: 18 Apr 2014 at 9:30pm |
Thanks. I have a 40x40 econoline cabinet I picked up from a shop going out of business some years back. I use alum oxide.
I'm hoping to put a loader on it one day as well.
Edited by structures - 23 Apr 2014 at 9:33pm
|
|
|
|
JOHN N/IL
Orange Level

Joined: 11 Sep 2009
Points: 584
|
Post Options
Thanks(0)
Quote Reply
Posted: 17 Apr 2014 at 8:10pm |
|
I forgot to ask are you using a sandblaster to get the old crap off or what,sure came out nice on the shroud.
|
|
D-15IIG65,D-17IVG67,D-17D58,620
|
|
JOHN N/IL
Orange Level
Joined: 11 Sep 2009
Points: 584
|
Post Options
Thanks(0)
Quote Reply
Posted: 17 Apr 2014 at 8:08pm |
|
Great job Robert that is some nice work your doing there,yoy will have a super nice 15 when your done,thanks for all the nice photos,good luck,i just got off of my 1511 loading 6 loads of manure,besides the odor I just love this tractor.Keep up the great work and it will be done in no time.John
|
|
D-15IIG65,D-17IVG67,D-17D58,620
|
|
structures
Silver Level
Joined: 28 Feb 2011
Location: Beggs, OK
Points: 331
|
Post Options
Thanks(0)
Quote Reply
Posted: 17 Apr 2014 at 6:33pm |
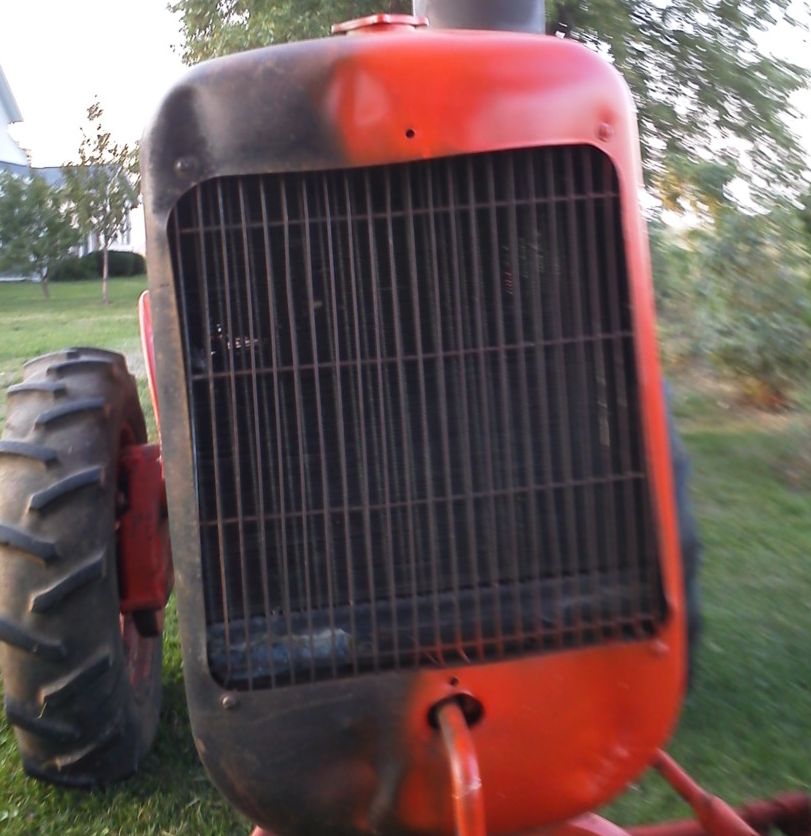
Good idea Dave thanks. I shot the radiator frame with epoxy primer and then dropped the radiator assy off at the rad shop to have it cleaned and reassembled. 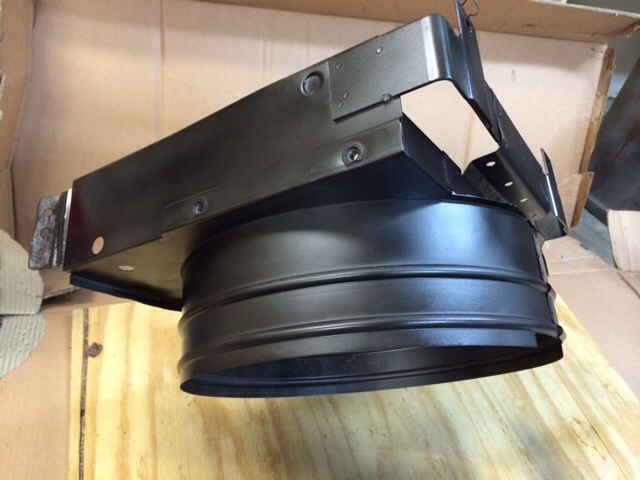
|
|
|
|
DiyDave
Orange Level Access

Joined: 11 Sep 2009
Location: Gambrills, MD
Points: 50660
|
Post Options
Thanks(0)
Quote Reply
Posted: 13 Apr 2014 at 7:36pm |
|
apply neversieze compound to 'em, now that you have the eccentrics free...
|
|
structures
Silver Level
Joined: 28 Feb 2011
Location: Beggs, OK
Points: 331
|
Post Options
Thanks(0)
Quote Reply
Posted: 13 Apr 2014 at 9:05am |
Thanks Ray.
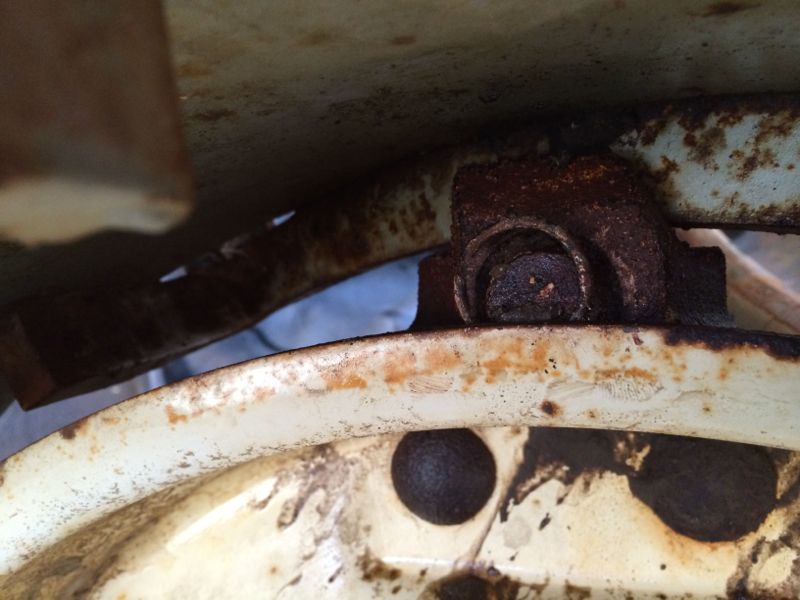
Had success with the eccentrics (thanks to some helpful posts!). Used a sledge hammer and a block of wood on the wheel center's edge. One smack and rotate to opposite corners (in between the eccentrics). Didn't take too much swing either. Also didn't damage the center.
I was able to press the cam bolts out of the castings too. Two gave me a lot of trouble. A torch probably would have been helpful here but I don't have one.
Got 4 of these rims. Hopefully I can make at least two when I'm done.
|
|
|
|
Rltool
Orange Level
Joined: 17 Jun 2013
Location: Middleville ,MI
Points: 1819
|
Post Options
Thanks(0)
Quote Reply
Posted: 09 Apr 2014 at 5:32am |
|
I just found this post. Great restore project! Your doing a great job fabing up parts. When your done you won't regret taking the extra time to do things right. I'm currently finishing up a WD project. If the eccentrics are like the WDs. Some people have suggested putting them in a vise and using heat on the casting. Might try an air hammer on pins. That has worked well for me. Lots of penetrating oil & air to get "any" loose debris out of there. Keep up the good work. Great post.
Ray W.
|
|
structures
Silver Level
Joined: 28 Feb 2011
Location: Beggs, OK
Points: 331
|
Post Options
Thanks(0)
Quote Reply
Posted: 08 Apr 2014 at 10:29pm |
Working on a few areas.
Trying to take the wheels apart but having a hard time with the eccentrics. I was able to remove the 8 carriage bolts that mount to the center wheel. Also able to remove a couple of snap rings from the back side but I can't seem to get much else to budge. I used a drift punch from the back side to try and drive the shaft out or at least free something up. Also a large break over on the hex bolt but nothing.
The snap rings aren't too hard to remove. 2 screw drivers. I use 1 to wedge one half the snap ring and the other to work the other half over the pin. The 8 carriage bolts have been removed but I snapped the picture before hand.
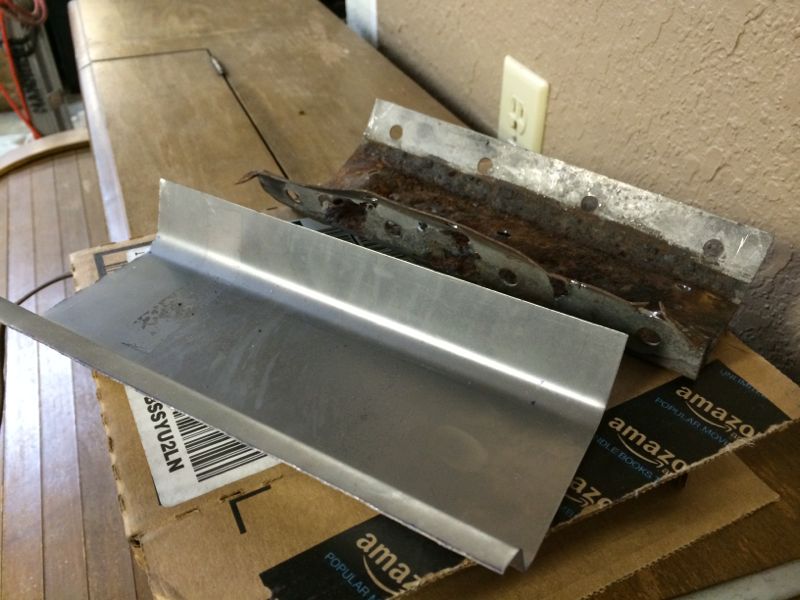
Also had the radiator disassembled so I could do some work on it. The lower part of the frame was pretty heavily rusted. I spliced in a new section of the frame and bent up a new lower mount bracket too.
Edited by structures - 08 Apr 2014 at 10:34pm
|
|
|
|
Sugarmaker
Orange Level

Joined: 12 Jul 2013
Location: Albion PA
Points: 8168
|
Post Options
Thanks(0)
Quote Reply
Posted: 02 Feb 2014 at 3:24pm |
|
Structures,
Keep up the good work. There are so many parts on these and at this stage some will need more attention than others. Looks like you enjoy the work your doing. You will probably meet a lot of new friends along the way as you get the spare parts you need to bring it back to working order.
Thanks for posting the pictures too.
Regards,
Chris
|
|
D17 1958 (NFE), WD45 1954 (NFE), WD 1952 (NFE), WD 1950 (WFE), Allis F-40 forklift, Allis CA, Allis D14, Ford Jubilee, Many IH Cub Cadets, 32 Ford Dump, 65 Comet.
|
|
SHAMELESS
Orange Level

Joined: 13 Sep 2009
Location: EAST NE
Points: 29486
|
Post Options
Thanks(0)
Quote Reply
Posted: 01 Feb 2014 at 9:03pm |
|
you have a lot there, a lot more than what some people start with, that is a very do-able restoration! and like the others said...it's "family"! keep us posted and with pics, we all like seeing the pics of labor/love!
|
|
JayIN
Orange Level

Joined: 18 Dec 2009
Location: SE/IN
Points: 1982
|
Post Options
Thanks(0)
Quote Reply
Posted: 01 Feb 2014 at 3:59pm |
|
I am enjoying this!
|
|
sometimes I walk out to my shop and look around and think "Who's the idiot that owns this place?"
|
|
sandman2234
Orange Level
Joined: 21 Feb 2013
Location: Jax
Points: 2547
|
Post Options
Thanks(0)
Quote Reply
Posted: 01 Feb 2014 at 9:26am |
|
Take your time, don't force anything, and keep after it. As DaveKamp said, you can address several functions at a time, but don't get overwhelmed with the whole project. If you get in over your head, go back to just a single piece until you get that part done. When you get stuck on a part, add penetrating oil and move to something else.
Nice project, great pictures, keep it up, we are all behind you for the long haul.
David from jax
|
|
A proud member of the Allis Express movement!
Northeast Florida
|
|
structures
Silver Level
Joined: 28 Feb 2011
Location: Beggs, OK
Points: 331
|
Post Options
Thanks(0)
Quote Reply
Posted: 01 Feb 2014 at 9:09am |
Worked on the cleaner last night too. I got the nut off but twisted the supports up, so I started remaking them.
|
|
|
|
structures
Silver Level
Joined: 28 Feb 2011
Location: Beggs, OK
Points: 331
|
Post Options
Thanks(0)
Quote Reply
Posted: 01 Feb 2014 at 9:04am |
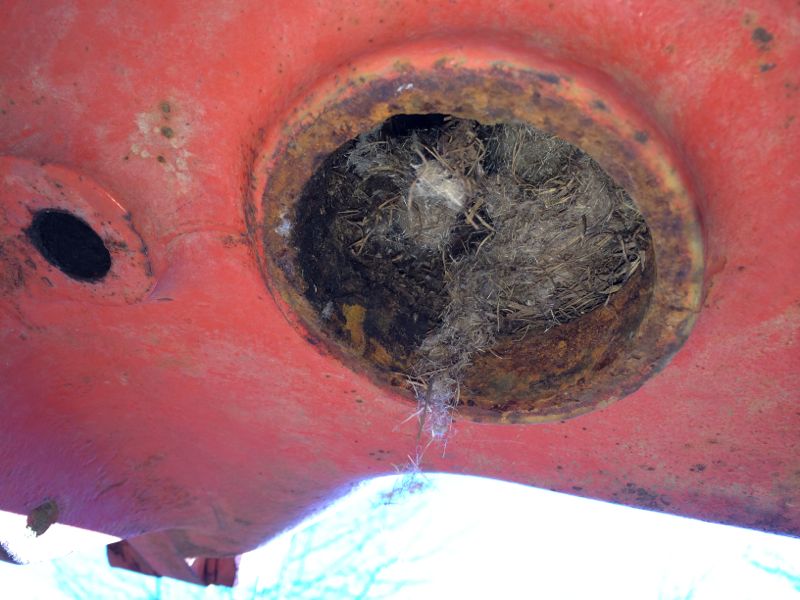
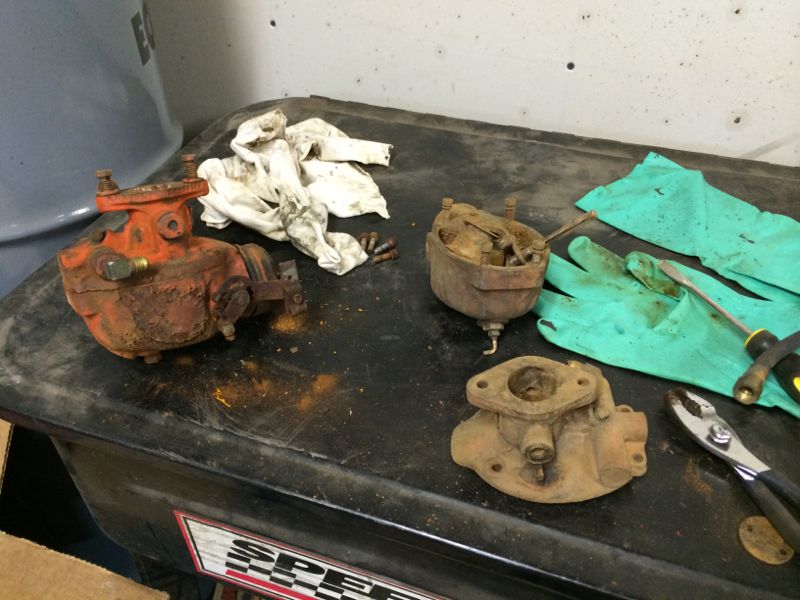
Took the radiator in and had it tested. It was good. The tank is still with the radiator shop trying to get the varnish out. I also met up with a fellow board member here who made me a deal on a carb, hub, axle, and front wheel. So I broke the hub down to rebuild and also was rebuilding the carb.
I took the inspection plate off the bottom to find a nice rat's nest.
The original carb on the left and the replacement carb on the right both are a TSX-869.
Definitely some pressure on those floats.
Cleaned up the hub
|
|
|
|
DSeries4
Orange Level

Joined: 12 Sep 2009
Location: Ontario, Canada
Points: 7206
|
Post Options
Thanks(0)
Quote Reply
Posted: 12 Jan 2014 at 9:34pm |
|
You mentioned difficulty getting the wing nut off the air cleaner. No wonder! I do not see any penetrating oil on there anywhere! For something sitting outside that long, you should be oiling the hell out of every nut and bolt. It will make your life much easier.
Don't be in such a hurry to get that engine loose. Let the oil do its thing. When you see it dripping out the bottom of the engine, keep oiling it! I had to soak my D14 engine for over 3 months - that was just to take it apart (not try to get loose).
|
|
'49 G, '54 WD45, '55 CA, '56 WD45D, '57 WD45, '58 D14, '59 D14, '60 D14, '61 D15D, '66 D15II, '66 D21II, '67 D17IV, '67 D17IVD, '67 190XTD, '73 620, '76 185, '77 175, '84 8030, '85 6080
|
|
cottonpatch
Silver Level
Joined: 17 Nov 2010
Location: VIRGINIA
Points: 285
|
Post Options
Thanks(0)
Quote Reply
Posted: 12 Jan 2014 at 8:45pm |
|
Walter, I got the same setup on my 15 II, new titans on the rear and new firestones on the front. With the rubber and all we've done to her, I hate to admit what I have in that little tractor. She sure runs sweet now.
|
|
'52 CA, '61 D10 II, ‘61 D15, '66 D15II, '63 D17D III, ‘69 170, '73 185 Crop Hustler, '79 185, '79 7000, '77 7040
|
|
Walter(MO)
Bronze Level


Joined: 26 Dec 2009
Location: Warrenton, MO
Points: 127
|
Post Options
Thanks(0)
Quote Reply
Posted: 12 Jan 2014 at 7:29pm |
|
When you get the tractor restored you probably will be looking at a new set of rubber. Two years ago I put new firestones on the fronts and new 14.9 x 26 Titans on the rear. Best investment I made because I feed two big bales every other day with my D15 II.
|
|
B26240
Orange Level
Joined: 21 Nov 2009
Location: mn
Points: 3860
|
Post Options
Thanks(0)
Quote Reply
Posted: 12 Jan 2014 at 6:19pm |
|
The series II D15 is the one we all want in that size tractor !! plus it's your Dads -- WOW I'm with Dave Kamp and anyone else who says you should take the engine apart, yes 2K may seem like a lot of money but after you fix it right it will last your life time. When you get her all fixed from one end to the other you will have way more than it will sell for but thats the way this hobby goes. Keep us posted !! Mark
|
|
DiyDave
Orange Level Access
Joined: 11 Sep 2009
Location: Gambrills, MD
Points: 50660
|
Post Options
Thanks(0)
Quote Reply
Posted: 12 Jan 2014 at 5:29pm |
|
I'll add one thing. Take pictures of how it looks coming apart, and mark every component for order and direction, and take pics of the marks, too. Them cell phone cameras are mighty handy in the shop!
|
|
cottonpatch
Silver Level
Joined: 17 Nov 2010
Location: VIRGINIA
Points: 285
|
Post Options
Thanks(0)
Quote Reply
Posted: 12 Jan 2014 at 5:15pm |
I just did a 66 D15 II engine, full engine kit, magnaflux head and block, new cam bearings, head reworked with new valves, springs, keeper, oil pump rebuilt with new vanes and springs. Total parts and machine shop bill exceeded $2K. Rick in MO did the clutch, pressure plate and new throwout bearing => $220 shipped. I hope this may give you an idea of capital outlay. :)
|
|
'52 CA, '61 D10 II, ‘61 D15, '66 D15II, '63 D17D III, ‘69 170, '73 185 Crop Hustler, '79 185, '79 7000, '77 7040
|
|
DaveKamp
Orange Level Access
Joined: 12 Apr 2010
Location: LeClaire, Ia
Points: 5644
|
Post Options
Thanks(1)
Quote Reply
Posted: 12 Jan 2014 at 11:52am |
First of all- it's a project with family history, therefore, it has connected soul. Next, it's fairly complete, and doesn't appear to have any blazingly expensive-looking defects... i.e., I don't see any cracks in major castings. Cracked float bowl suggests that moisture may have gotten into the carb and froze it. That muffler type has a weakness, in that the upper side can rot through and allow rain to funnel into the engine, so you may be in for some hard work. I agree with Tim on this one- personally would NOT bother putting a wrench on the crank or soaking this one, because removal of the engine inevitably within the progress path of that tractor... it WILL happen, because you need to get into everything else as well. If you bite the bullet NOW, it will save you substantial heartache later. I'd get the tractor into the shop, on stands, pull it down, and as you do, make a first-check assessment of each component, and take good notes. Get the engine out, yank the head and pan, and figure out just how serious it is. Do same for clutch, power director, transmission, rearend, brakes, and final drives. There's gonna be water, oil glop, and plenty of mice and mud-wasp mess to clear out. Once you have it torn down, make a list of every part that needs to be replaced, and every component that needs to be refurbished, then methodically go through each section. You may find that some serious housekeeping and some new gaskets and seals will help some things, and you may find elsewhere clues to the reason it was 'parked'. But that's not all- the act of being parked for one reason, often subjects your patient to other conditions and forces which can render the machine at-risk for future damage if proper attention isn't taken prior to running it again. Frequently, the unforseen problem turns out to be caused by extended damage that would have been averted if a thorough cleanout and inspection had been performed. Once you've had it open enough to check EVERYTHING out, you can determine the scope of what you'll have to invest (both time and money), and know what kinds of things you'll need to acquire. When searching for parts, it's best to carry a list of ALL that you need, because 1) find many of the parts you need at the same source, and 2) will save you trips later and 3) correct parts on hand, allow you to tackle three or four different facets of the project in a given allotment of shop time. You won't be stalled by the lack of 1 engine item, because you can apply your remaining shop time to say... reassembling the final drives. Once you have a good grasp for the whole machine, make your decision to either pursue, or just clean and slap it back together for future attention... whatever your economics holds. If you don't, what will most likley happen, is that an unforseen problem will bring progress to a halt, and force you to roll it back out into the field, and leave it lay in pieces. 
|
|
Ten Amendments, Ten Commandments, and one Golden Rule solve most every problem. Citrus hand-cleaner with Pumice does the rest.
|
|
Sugarmaker
Orange Level
Joined: 12 Jul 2013
Location: Albion PA
Points: 8168
|
Post Options
Thanks(1)
Quote Reply
Posted: 12 Jan 2014 at 11:14am |
|
Structures,
I dont post here much but your D15 project tractor caught my attention. Nice if you can still talk to your Dad about this tractor. I always liked the look of these D series tractors. Relative of mine had the D17 version. And I recently drooled over a D14 narrow front end tractor close by with a disassembled engine. Owner wants $1000 for it. Anyway I think these family tractors are great projects. I currently have my dad's WD in the garage torn down to the engine and castings. Not planning to rebuild the engine as it ran very well and was owned and overhauled by my Uncle for 30 years.
I hope your restoration work goes well on the D15. Very nice looking tractor. You have taken good pictures as you started into this. Keep up the good work.
Regards,
Chris
Edited by Sugarmaker - 12 Jan 2014 at 11:15am
|
|
JayIN
Orange Level
Joined: 18 Dec 2009
Location: SE/IN
Points: 1982
|
Post Options
Thanks(0)
Quote Reply
Posted: 12 Jan 2014 at 10:31am |
|
Interesting,,......... keep it up!
|
|
sometimes I walk out to my shop and look around and think "Who's the idiot that owns this place?"
|
|
structures
Silver Level
Joined: 28 Feb 2011
Location: Beggs, OK
Points: 331
|
Post Options
Thanks(0)
Quote Reply
Posted: 12 Jan 2014 at 10:04am |
Guys thanks for the comments. It's appreciated. Right now I'm just trying to get it running. I soaked the cylinders in pb blaster yesterday and put a spanner wrench on the front pulley with no luck. I did get some parts off for cleaning. The tank actually didn't look too bad. Although it was full of varnish. The air cleaner on the other hand I'm having trouble with. I broke the ears off the wing nut for the paper element, so I guess I'll be trying something else.
fuel gauge wasn't too bad. Need to clean it up.
Here's a shot in the tank from the fuel gauge hole. A little piece of the cork stuck in the varnish when I pulled the gauge out
The air cleaner is giving me some trouble. I threaded a bolt in the end for some leverage, but that just left me breaking the wing nut!
|
|
|
|
TimNearFortWorth
Orange Level

Joined: 12 Dec 2009
Points: 2014
|
Post Options
Thanks(1)
Quote Reply
Posted: 06 Jan 2014 at 9:37am |
I would first have a good chat with your dad concerning why he really parked it, then seriously consider rebuilding the engine. Was it a gear jumper, and how bad? If it has sat outside for years, I would not be inclined to "soak" it and try to pull it around in an attempt to break it free.
Open air cleaner housing, cracked carb, questionable anti-freeze and mud dobbers gettin into every nook and cranny (can relate as we deal with them in N. TX) ..........
160 engines take a tad bit more funds for a proper rebuild when compared to a 138/149 engine but you will be glad you did as the risk of tearing up parts like connecting rods at a minimum by forcing it will hit your wallet even harder.
I have three SII units and love them; a factory 3-pt. with 6 bolt fronts and factory spool valves, a gas SC and a propane SC and they are a great size unit in the 46-47hp range.
Just wish they had two-way hydraulics and the lower pressure system but hey, plenty of WD/WD45 attachments still out there and they are great behind the D15II. Love mine on the SC blades as you can do plenty of work with it.
That factory top link bracket is getting a bit rare and it looks like yours can be straightened, plus it has been quite some time since I have seen such a nice original battery tray on any D15 Series. If you pull the engine, address the PS fittings as you will wish you did once you get her back running; most leaked and it is near impossible to access the fittings unless you pull the front bolster and remove the engine side rails.
Ray's Allis Parts in Beattie, KS (785-353-2392) always seems to have plenty of D-Series parts and he has helped me with numerous goodies for mine so parts are out there.
Good units and still my favorite A-C.
|
|
BV
Silver Level
Joined: 12 Sep 2009
Location: Bono Arkansas
Points: 480
|
Post Options
Thanks(0)
Quote Reply
Posted: 05 Jan 2014 at 3:20pm |
|
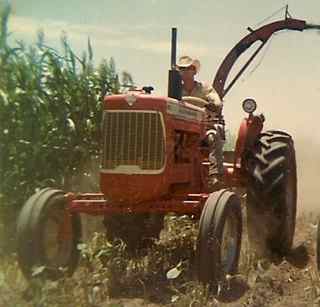
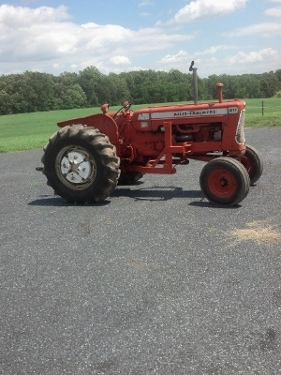
Get her running I have 2 of the Series II 15's and they are handy little tractors, I also like D-10 's and the CA's.
|
|
JayIN
Orange Level
Joined: 18 Dec 2009
Location: SE/IN
Points: 1982
|
Post Options
Thanks(0)
Quote Reply
Posted: 05 Jan 2014 at 12:13pm |
|
D17 should have 28" rim. D15 26". I had a 15II. I put Combine tires and wheels on it. A GREAT TRACTOR! I want another one.
|
|
sometimes I walk out to my shop and look around and think "Who's the idiot that owns this place?"
|
|
Josh Day
Orange Level
Joined: 29 Nov 2010
Location: Indiana
Points: 3427
|
Post Options
Thanks(0)
Quote Reply
Posted: 04 Jan 2014 at 7:04pm |
|
Like Dip and tiger said, only one dads tractor. Good luck!
|
|
AC's 75' 7040, 64' D-17S4, 55'WD-45, 54' WD-45, 53' WD-45, 53' WD, 52' CA, 36' WC. IH 656. Deere's 38' A, and 47' A
|
|
Froggieo
Silver Level
Joined: 09 Jul 2013
Location: Wabash, IN
Points: 54
|
Post Options
Thanks(0)
Quote Reply
Posted: 04 Jan 2014 at 6:35pm |
|
I bought Grandpas 1937 WC, it was rusted and had a cracked block. I gave $1,000 which was too much but it was Grandpas and I wanted it.
|
|


 Topic Options