| Author |
 Topic Search Topic Search  Topic Options Topic Options
|
theropod 
Orange Level


Joined: 28 Sep 2017
Location: Arkansas USA
Points: 217
|
 Post Options Post Options
") Thanks(0) Thanks(0)
 Quote Quote  Reply Reply
 Topic: B Valve Train Issue Topic: B Valve Train Issue
Posted: 21 Nov 2017 at 4:23pm |
 Pulled the valve cover on my B today and found this. I am not a mechanical genius but I know this is not good. At least 3 other tappets are impacting the valve spring top caps. My question is should I (can I) pull the rocker arm assembly and take my die grinder to the tappets without ruining them? It appears they need less than 1/16" to clear. I also got the old tractor to start and run today after going back through the old carb again. The run time was longer, maybe 2-3 minutes, but it did the exact same thing as last time. It ran smooth and rattle/smoke free and then just shut off like the ignition had been cut, but I am still getting sparks on the plugs. I fear the old carb has major issues that are invisible. All the passages are open, the float neither floods nor starves. I have a clear hose attached to the the inlet and when the engine was running the gas level slowly dropped. So, I broke down and bought a brand new carb, which was NOT cheap.
Edited by theropod - 21 Nov 2017 at 7:38pm
|
|
Put the bunny back in the box!
1938 B, 1977 Yanmar YM2200
No private messages:
use email:
theropod AT yahoo DOT com
|
 |
|
Sponsored Links
|
|
|
theropod
Orange Level
Joined: 28 Sep 2017
Location: Arkansas USA
Points: 217
|
Post Options
Thanks(0)
Quote Reply
Posted: 21 Nov 2017 at 6:53pm |
|
After talking to my father-in-law he mentioned getting the head rebuilt by a local auto shop. Apparently they recut the seats and ground the valves. This allowed the valve stems to ride higher than stock and now the spring caps and rockers touch. Luckily he only ran the tractor for about 100 hours before putting it in his barn and buying a tractor with a starter. Unless someone thinks it’s a bad idea my plan to grind away the rockers to regain clearance is on.
|
|
Put the bunny back in the box!
1938 B, 1977 Yanmar YM2200
No private messages:
use email:
theropod AT yahoo DOT com
|
|
rustydollar
Orange Level
Joined: 07 Aug 2017
Location: Manitoba
Points: 456
|
Post Options
Thanks(0)
Quote Reply
Posted: 21 Nov 2017 at 7:25pm |
From your picture it looks like the valve adjusters are broken off. Can you post a picture showing the full length of the valve train. Below is a model B cylinder head. 
|
|
theropod
Orange Level
Joined: 28 Sep 2017
Location: Arkansas USA
Points: 217
|
Post Options
Thanks(0)
Quote Reply
Posted: 21 Nov 2017 at 7:35pm |
I will get a picture of the adjusters tomorrow, but they are intact. Checked each one to make sure that wasn’t the issue. They seem to have the proper clearance too.
|
|
Put the bunny back in the box!
1938 B, 1977 Yanmar YM2200
No private messages:
use email:
theropod AT yahoo DOT com
|
|
rustydollar
Orange Level
Joined: 07 Aug 2017
Location: Manitoba
Points: 456
|
Post Options
Thanks(0)
Quote Reply
Posted: 21 Nov 2017 at 7:44pm |
 theropod wrote: theropod wrote:
I will get a picture of the adjusters tomorrow, but they are intact. Checked each one to make sure that wasn’t the issue. They seem to have the proper clearance too.
|
Picture would be good, On some small engines valve adjustment is accomplished by removing material from the valve stem. But your B model cylinder head should have adjusters as shown in the picture I uploaded.
|
|
littlemarv
Orange Level
Joined: 10 Jun 2013
Location: Wisconsin
Points: 1826
|
Post Options
Thanks(0)
Quote Reply
Posted: 21 Nov 2017 at 7:54pm |
Maybe the valve stems wore in to the rocker arms so much they are starting to hit. The rocker arms are not centered over the valve stems for whatever reason. A picture would help here, I will look and see if I can find one. I took a set of rocker arms in and had the radius's (radii?) reground, they come out as good as new. If you take the rocker shaft off, loosen all four nuts evenly. The rocker shaft is hollow, and breaks easily, if it isn't broken already.
|
|
The mechanic always wins.
B91131, WC23065, WD89101, CA29479, B1, Early B10, HB212, 416H
|
|
theropod
Orange Level
Joined: 28 Sep 2017
Location: Arkansas USA
Points: 217
|
Post Options
Thanks(0)
Quote Reply
Posted: 21 Nov 2017 at 7:55pm |
rustydollar wrote:
theropod wrote:
I will get a picture of the adjusters tomorrow, but they are intact. Checked each one to make sure that wasn’t the issue. They seem to have the proper clearance too.
|
Picture would be good,
On some small engines valve adjustment is accomplished by removing material from the valve stem. But your B model cylinder head should have adjusters as shown in the picture I uploaded.
|
It does have the slotted bolt for a flat blade screwdriver with locking nuts like every solid lifter engine I have ever seen. Let me get some daylight to work with.
|
|
Put the bunny back in the box!
1938 B, 1977 Yanmar YM2200
No private messages:
use email:
theropod AT yahoo DOT com
|
|
littlemarv
Orange Level
Joined: 10 Jun 2013
Location: Wisconsin
Points: 1826
|
Post Options
Thanks(0)
Quote Reply
Posted: 21 Nov 2017 at 8:01pm |
Here's what they look like after machining. I don't have a before picture, but you will see the wear if you take the rockers off. Not sure if it pertains to what you are doing, but its food for thought.
|
|
The mechanic always wins.
B91131, WC23065, WD89101, CA29479, B1, Early B10, HB212, 416H
|
|
HoughMade
Orange Level

Joined: 22 Sep 2017
Location: Valparaiso, IN
Points: 691
|
Post Options
Thanks(0)
Quote Reply
Posted: 21 Nov 2017 at 8:11pm |
rustydollar wrote:
From your picture it looks like the valve adjusters are broken off. Can you post a picture showing the full length of the valve train... |
His pic is of the valve end, not the adjuster end...so no adjusters. That explanation about the valves seat re-cutting makes sense. If the rockers and shaft are in good condition, I don't see why a little grinding wouldn't solve this. Also, the rockers on my B aren't perfectly centered over the valve stems and it runs fine. Did your new carb solve the problem? Mine would have to disintegrate before I spent that much money on a new one.
Edited by HoughMade - 21 Nov 2017 at 8:13pm
|
|
1951 B
|
|
littlemarv
Orange Level
Joined: 10 Jun 2013
Location: Wisconsin
Points: 1826
|
Post Options
Thanks(0)
Quote Reply
Posted: 21 Nov 2017 at 8:13pm |
|
They are all offset. I only mentioned it because if they had full rocker to stem contact, it would wear better.
|
|
The mechanic always wins.
B91131, WC23065, WD89101, CA29479, B1, Early B10, HB212, 416H
|
|
rustydollar
Orange Level
Joined: 07 Aug 2017
Location: Manitoba
Points: 456
|
Post Options
Thanks(0)
Quote Reply
Posted: 21 Nov 2017 at 10:39pm |
HoughMade wrote:
rustydollar wrote:
From your picture it looks like the valve adjusters are broken off. Can you post a picture showing the full length of the valve train... |
His pic is of the valve end, not the adjuster end...so no adjusters.
That explanation about the valves seat re-cutting makes sense. If the rockers and shaft are in good condition, I don't see why a little grinding wouldn't solve this. Also, the rockers on my B aren't perfectly centered over the valve stems and it runs fine.
Did your new carb solve the problem? Mine would have to disintegrate before I spent that much money on a new one. |
Thanks for clearing that up, i don't think the shop should have removed material form the button which almost looks like it could be replaceable. Find an old Chevy stove bolt engine to rob the buttons from the rockers. I've ground a few valve seats and resurfaced valves, if the valve head after grinding sunk into the head that deep the shop should have replaced the valves. Next time that head goes to the shop for a regrind have them install stellite seats along with new valves and guides. I've used the thin wall bronze guides, the kit comes with a drill reamer combo, a driver to install the guide and a knurling tool to seat the guide and a cut off tool to trim the top of the guide off. The optional kit had a cutter to size the outside diameter of the guide to accept teflon seals. The thin wall bronze guides are easy to install, the kits is manufacture by K-Line. The kit would be a good club purchase. http://www.cylinderheadsupply.com/valve-guide-liners-installation-kits.html 
Edited by rustydollar - 21 Nov 2017 at 10:47pm
|
|
Dick L
Orange Level
Joined: 12 Sep 2009
Location: Edon Ohio
Points: 5082
|
Post Options
Thanks(1)
Quote Reply
Posted: 22 Nov 2017 at 6:26am |
My fix to this would be to shim under the four stands. When I mill .150 off a head I add that amount under the stands. The head in this picture does not have the shims. I could not find a close up picture of a shimmed stand. Checking the amount of adjustment you have will tell you if you can shim under the stands. Your picture is not an angle to see for sure but it does look like the valve stem above the keepers are short. Without knowing what was all done to the head it would really need measured to be sure. 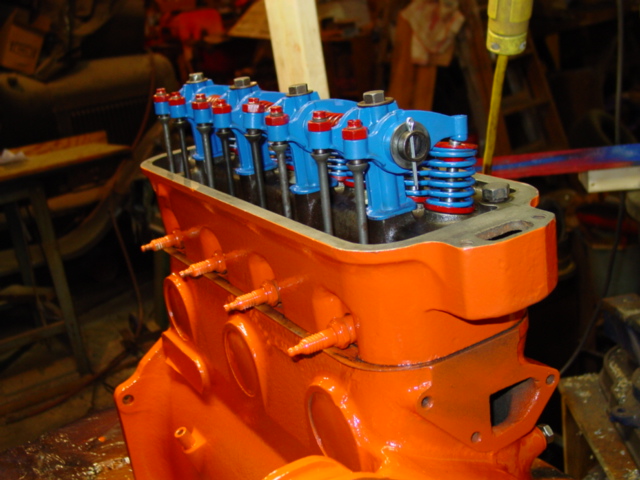 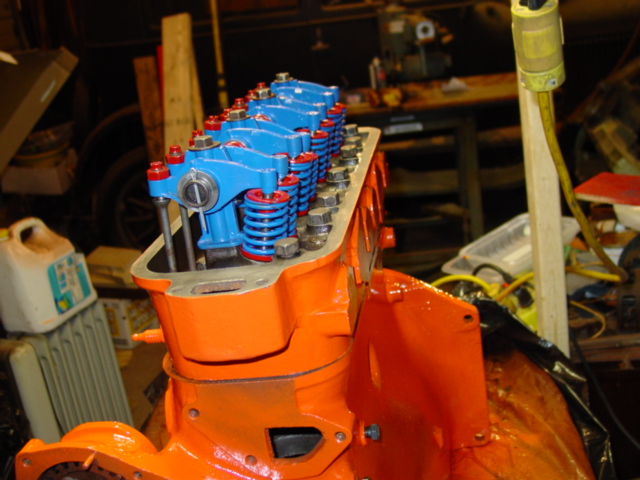 You pads look good. 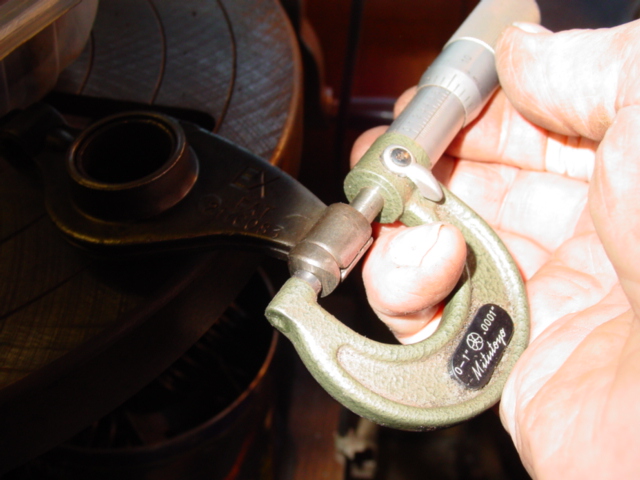
|
|
theropod
Orange Level
Joined: 28 Sep 2017
Location: Arkansas USA
Points: 217
|
Post Options
Thanks(0)
Quote Reply
Posted: 22 Nov 2017 at 6:52am |
HoughMade wrote:
rustydollar wrote:
From your picture it looks like the valve adjusters are broken off. Can you post a picture showing the full length of the valve train... |
His pic is of the valve end, not the adjuster end...so no adjusters.
That explanation about the valves seat re-cutting makes sense. If the rockers and shaft are in good condition, I don't see why a little grinding wouldn't solve this. Also, the rockers on my B aren't perfectly centered over the valve stems and it runs fine.
Did your new carb solve the problem? Mine would have to disintegrate before I spent that much money on a new one. |
I won’t know about the carb for a few days as it is being shipped from California to Arkansas. During the last disassembly I coated the inside of the float bowl with JB Weld in an attempt to seal the crackS, which failed as gas was dripping from the thing from at least two places not involving gaskets. Trust me this old carb has had it. It is losing vacuum somehow and I am done messing with it. I ain’t made of money, but I want a tractor that will start when asked. A new/rebuilt mag is also going to happen as the battery and coil currently employed is Jerry rigging at its finest. Along with new rear rims and tires. It’s like any other restoration. I will have far more invested in the old B than it is worth when I am done. This is a labor of love, and we all know the silly things we do for love.
From what I can see the valve stem and rocker contact points are as they are supposed to be. The engine hasn’t run much since it had a complete rebuild. The plan is to get out this morning and get pictures of the entire rocker assembly from a couple angles, pull the thing and do some careful grinding with my Dremel. I am also going to drain the 30+ year old oil out. I had hoped to get the block warmed up, but a couple days dripping should get that tar-like goop out just as well. I have zero confidence that there is any lubrication left in that junk. I may refill the crankcase with diesel and spin the devil out of it and drain that too.
|
|
Put the bunny back in the box!
1938 B, 1977 Yanmar YM2200
No private messages:
use email:
theropod AT yahoo DOT com
|
|
theropod
Orange Level
Joined: 28 Sep 2017
Location: Arkansas USA
Points: 217
|
Post Options
Thanks(0)
Quote Reply
Posted: 22 Nov 2017 at 7:12am |
Dick L wrote:
My fix to this would be to shim under the four stands. When I mill .150 off a head I add that amount under the stands. The head in this picture does not have the shims. I could not find a close up picture of a shimmed stand. Checking the amount of adjustment you have will tell you if you can shim under the stands. Your picture is not an angle to see for sure but it does look like the valve stem above the keepers are short. Without knowing what was all done to the head it would really need measured to be sure.
You pads look good.
|
Images removed
That is one sharp looking rocker assembly! Wow!!
Ya gotta remember that the rebuild was done sometime back about 1962-63, and my father-in-law isn’t a master mechanic. He was the senior lineman for Southwestern Bell. The shop that did the head work wasn’t a tractor shop and just tightened up the combustion sealing. Since the shop didn’t have the engine, and probably never saw a B head before or after this one I can live with the recessed valves. As long as the tractor ran without killing mosquitoes he was happy. Yes, shimming up the rocker stand is the proper method, and there is adjustment room for this solution. I don’t know if the head was decked or not. I just think some careful grinding will give me the clearance needed. If the grinding doesn’t work I will look for the shims to get the rocker/valve stem setting correct.
|
|
Put the bunny back in the box!
1938 B, 1977 Yanmar YM2200
No private messages:
use email:
theropod AT yahoo DOT com
|
|
Dick L
Orange Level
Joined: 12 Sep 2009
Location: Edon Ohio
Points: 5082
|
Post Options
Thanks(0)
Quote Reply
Posted: 22 Nov 2017 at 8:45am |
|
I have a tool shop so made the shims out of flat stock and ground on the surface grinder. I am sure you can find flat washers the same thickness that could be slipped under the stands with out removing the total assembly. The shims would be faster and easier than grinding. Grinding would do it.
A lot of the stands I have removed were broken. Stands for the B thru CA are all the same height. I have stands from other make engines that look almost the same with the same shaft that are taller and shorter. That is another possible cause if there was a broken stand and all were replaced with slightly shorter ones. Sinking the valves that deep is hard for me seeing being done. Stranger things have been done though.
Edited by Dick L - 22 Nov 2017 at 8:45am
|
|
Gerald J.
Orange Level
Joined: 12 Sep 2009
Location: Hamilton Co, IA
Points: 5636
|
Post Options
Thanks(1)
Quote Reply
Posted: 22 Nov 2017 at 9:04am |
|
|
|
Leon n/c AR.
Bronze Level


Joined: 19 Mar 2013
Location: Heber Springs A
Points: 167
|
Post Options
Thanks(0)
Quote Reply
Posted: 22 Nov 2017 at 9:04am |
|
The washers or shims like Dick L said would be best route to go-with the arm hitting like that you can cause a keeper to come out , then the valve will be on top of piston. Not good. Leon
|
|
rustydollar
Orange Level
Joined: 07 Aug 2017
Location: Manitoba
Points: 456
|
Post Options
Thanks(0)
Quote Reply
Posted: 22 Nov 2017 at 9:30am |
HoughMade wrote:
rustydollar wrote:
From your picture it looks like the valve adjusters are broken off. Can you post a picture showing the full length of the valve train... |
His pic is of the valve end, not the adjuster end...so no adjusters.
That explanation about the valves seat re-cutting makes sense. If the rockers and shaft are in good condition, I don't see why a little grinding wouldn't solve this. Also, the rockers on my B aren't perfectly centered over the valve stems and it runs fine.
Did your new carb solve the problem? Mine would have to disintegrate before I spent that much money on a new one. |
We all have the same resources of Leno's garage at our local technical schools and colleges most of which will take on outside jobs as teaching aids. To replace an disintegrated part Jay has his team scan the part using 3D technology then from the data collected from the scan then a 3D printer prints out plastic pattern of the part which is sent to the foundry. It's an interesting world we live in. [TUBE]7ZrJsrTT4EA[/TUBE]
Edited by rustydollar - 22 Nov 2017 at 11:11am
|
|
HoughMade
Orange Level
Joined: 22 Sep 2017
Location: Valparaiso, IN
Points: 691
|
Post Options
Thanks(0)
Quote Reply
Posted: 22 Nov 2017 at 10:36am |
littlemarv wrote:
They are all offset. I only mentioned it because if they had full rocker to stem contact, it would wear better. |
Is it possible to adjust the rocker spacing to center them on the valves?
|
|
1951 B
|
|
Dick L
Orange Level
Joined: 12 Sep 2009
Location: Edon Ohio
Points: 5082
|
Post Options
Thanks(1)
Quote Reply
Posted: 22 Nov 2017 at 11:13am |
|
Not the space. I adjusted every complete head and rocker arm assembly by clamping the rocker in a vice and bending it to make full contact on the valve stem. It takes a little time to assemble and disassemble until you get them all centered over the valve stem. I never took a rocker assembly off that all the rocker arms was centered on the stems. It must not have been a concern when built new.
|
|
HoughMade
Orange Level
Joined: 22 Sep 2017
Location: Valparaiso, IN
Points: 691
|
Post Options
Thanks(0)
Quote Reply
Posted: 22 Nov 2017 at 11:39am |
|
Thanks for the info. Next time I have occasion to dig into the valve train, I may have to do that.
|
|
1951 B
|
|
steve(ill)
Orange Level Access

Joined: 11 Sep 2009
Location: illinois
Points: 77648
|
Post Options
Thanks(0)
Quote Reply
Posted: 22 Nov 2017 at 11:52am |
|
theropod - Dicks fix with the shims under the holders is a good idea... That being said, I don't see much trouble with a slight dremel grinding on the underside of the rocker to get a few thousands clearance.. Don't know if all 8 are needing that, or only a couple.
|
|
Like them all, but love the "B"s.
|
|
theropod
Orange Level
Joined: 28 Sep 2017
Location: Arkansas USA
Points: 217
|
Post Options
Thanks(0)
Quote Reply
Posted: 22 Nov 2017 at 12:20pm |
Sigh, Well laddies and germs I dug into things, and what I found
was not good. Aside from the issues with the rockers impacting the
valve spring caps I found a bent push rod. The intake on number three
has a distinct bend, and that alerts me to a stuck, or sticking, valve. I
don't think my father-in-law would have put it back together like this. I am amazed it ran at all. Maybe I can straighten it out with gentle vice clamping. I wish it hadn't ever started! Read on.  On top of the bent push rod bad news I drained the old oil and was shocked to find that clear water ran out for 5 or 6 seconds before the tar-like glop that passed for oil came out. There was well over a quart of water in the crankcase. There hasn't been any coolant fluid of any kind in it for many many years as a bad water pump prohibited that. I think this was years and years of condensation adding up. I feel like such an idiot for even attempting to make it run with that in the crankcase. I should have drained the old oil and WATER before even attempting to get it to start and run. I hope I have not scored the lower end, but knowing my luck I have. I may be looking at a fresh rebuild now. I am amazed that the engine hasn't seized with that water in there. I have poured 1.5 gallons of diesel in it and cranked it over under I am wore out. I will let that sit in there for a couple days and drain it out and see what it looks like. I may put my small Weber Kettle BBQ under the oil pan and get the block nice and hot and give it another cranking session before draining the diesel. I am so disgusted with myself right now.Below is a wide angle shot of the entire rocker assembly. A little crud but no obvious issues aside from the rockers banging into the valve spring caps and the bent push rod. I am not going to set in grinding on those rockers, and will look into shims to raise the rocker assembly. I may pull the oil pan and take a look at the lower end before going much further with anything. I know that is a serious chore, but I am determined to make this old B right again. I just hadn't planned on these sorts of issues, as I was under the impression that the engine was tight. 
|
|
Put the bunny back in the box!
1938 B, 1977 Yanmar YM2200
No private messages:
use email:
theropod AT yahoo DOT com
|
|
HoughMade
Orange Level
Joined: 22 Sep 2017
Location: Valparaiso, IN
Points: 691
|
Post Options
Thanks(0)
Quote Reply
Posted: 22 Nov 2017 at 12:34pm |
The truth of the matter is, as water floats on oil, and the oil pickup is at the bottom of the sump, you may not have circulated much, if any water. If it wasn't seized...which is wasn't, then maybe there's no harm. In fact, I'd think that it is less likely to be damaged from what you did than not. Any issue you find is likely preexisting.
As for the water, it may be condensation, but it may do well to get the cooling system water tight, fill it and pressurize it and inspect with the oil pan off to see if there is any seepage.
By way of encouragement, I just got a B that was my Dad's running and running well after sitting for several years. A cylinder had rusted due to sitting in a humid barn basement with the exhaust valve open on that cylinder. I did not have to do a complete rebuild. These things can be challenging, but if you are committed, you can get good results.
|
|
1951 B
|
|
theropod
Orange Level
Joined: 28 Sep 2017
Location: Arkansas USA
Points: 217
|
Post Options
Thanks(0)
Quote Reply
Posted: 22 Nov 2017 at 12:47pm |
HoughMade wrote:
The truth of the matter is, as water floats on oil, and the oil pickup is at the bottom of the sump, you may not have circulated much, if any water. If it wasn't seized...which is wasn't, then maybe there's no harm. In fact, I'd think that it is less likely to be damaged from what you did than not. Any issue you find is likely preexisting.
As for the water, it may be condensation, but it may do well to get the cooling system water tight, fill it and pressurize it and inspect with the oil pan off to see if there is any seepage.
By way of encouragement, I just got a B that was my Dad's running and running well after sitting for several years. A cylinder had rusted due to sitting in a humid barn basement with the exhaust valve open on that cylinder. I did not have to do a complete rebuild. These things can be challenging, but if you are committed, you can get good results. |
Are you sure about the water floating on oil? I have never known that to be the case. The water was on the bottom as it came out well before any oil upon draining. At any rate the water wasn't mixed with the resulting grey froth typical of a blown head gasket. There hasn't been any coolant liquid of any kind in it for years and years. I am almost positive this is entirely a condensation issue. Oh, I'm a stubborn type and even if I need to rebuild the engine I will. In for a penny and all that. Yes, the oil pan is probably going to come off anyway. I don't have the radiator mounted right now, or even a belt to the water pump. I had hoped to get it to start and run before attacking that set of issues.
|
|
Put the bunny back in the box!
1938 B, 1977 Yanmar YM2200
No private messages:
use email:
theropod AT yahoo DOT com
|
|
HoughMade
Orange Level
Joined: 22 Sep 2017
Location: Valparaiso, IN
Points: 691
|
Post Options
Thanks(0)
Quote Reply
Posted: 22 Nov 2017 at 12:50pm |
|
No, you're right, I had that backwards. I guess optimism got in the way of clear thinking. I maintain that if it is still turning over easily, there may not be any new damage. If it started tightening up, well....
Edited by HoughMade - 22 Nov 2017 at 12:56pm
|
|
1951 B
|
|
Dick L
Orange Level
Joined: 12 Sep 2009
Location: Edon Ohio
Points: 5082
|
Post Options
Thanks(0)
Quote Reply
Posted: 22 Nov 2017 at 1:41pm |
|
Looking at your adjustors I am sure you need to shim the stands. The adjusters are all the way up. When everything is in spec they should be about half way on the threads. A compression check will tell you if you have a valve sticking open and with the assembly off you can push down on each valve to see if they are sticking closed. Did you by any chance check the gap between the rocker arm pad and the valve stem? You can straighten push rods. Roll it on a flat board and tap the high side until you do not have a gap in the center when rolling it.
|
|
Dick L
Orange Level
Joined: 12 Sep 2009
Location: Edon Ohio
Points: 5082
|
Post Options
Thanks(1)
Quote Reply
Posted: 22 Nov 2017 at 1:55pm |
If you look at a rocker arm you will notice that the pad is farther from the center of the shaft that from the adjuster to the center of the shaft. When the adjusters are that far up and the valve not being pushed open the distance the valve can be pushed down is less as the cam lobe comes up. This can effect the high rpm under load. Not sure it makes a difference in your case if your not going for a hot rod. 
|
|
drobCA
Orange Level

Joined: 20 Jun 2017
Location: Perris, CA
Points: 292
|
Post Options
Thanks(0)
Quote Reply
Posted: 22 Nov 2017 at 2:12pm |
theropod - #1 - thanks for getting Dick L interested!  he is always a great source of practical, not-in-any-manual ways to get things done. I'm learning plenty from this thread. #2 - is it possible that water got into the oil pan before it was "parked"? seems an awful lot of water for condensation.
|
|
3 Ford 8N's I loan to neighbors, but the '52CA, '41B and little B1 I do not.
|
|
steve(ill)
Orange Level Access
Joined: 11 Sep 2009
Location: illinois
Points: 77648
|
Post Options
Thanks(0)
Quote Reply
Posted: 22 Nov 2017 at 2:16pm |
theropod----- your on the right track. Several problems you have found, but nothing to be overly concerned with. LIke many here, I have had motors that looked 10 x worse and brought them back to life. If it cranks over nice, and has good compression....... I would fill the water side and see if you have any leaks around the liners... and look at the freeze plugs in the head , under that rocker arm. Fix the top end, flush good, and maybe you wont need much else.. If it holds water, and gets new oil, and has compression, you may be back in business !!
forgot about your stuck valve... put penetrant on the stem and tap on the top with a small hammer. It should BOUNCE up and down, not stick....... maybe it has been that way for years, maybe it got small corrosion on it and bent the pushrod when you first cranked it ? I have seen stems loosen up by tapping and spraying penetrant on them.
Edited by steve(ill) - 22 Nov 2017 at 2:19pm
|
|
Like them all, but love the "B"s.
|
|


