| Author |
 Topic Search Topic Search  Topic Options Topic Options
|
Jacob (WI,ND) 
Orange Level


Joined: 11 Sep 2009
Location: Kenmare, ND
Points: 1244
|
 Post Options Post Options
") Thanks(0) Thanks(0)
") Quote Quote  Reply Reply
 Posted: 18 Aug 2018 at 5:30pm Posted: 18 Aug 2018 at 5:30pm |
I then cleaned up all the parts for the water pump. We got the big torch out and got the set screws loose from the new impeller I also got from Norm along with the new shaft. We don't know why they were so stuck, but they sure were.
I was going to just put the pump together with the worn out water packing bushings and fix it better down the road, but Dad convinced me to try to find some new bushings and do it now. So it is basically ready to final assemble, just waiting on new bushings. So that is on hold for the time being.
Pics of this:
|
|
Jacob Swanson
1920 6-12; 1925,1926 20-35 longfenders; 1925,1926 15-25's; 1927,1929 20-35 shortfenders; C; B's; IB; WC's; WD; WD45
|
 |
|
Sponsored Links
|
|
|
Jacob (WI,ND)
Orange Level
Joined: 11 Sep 2009
Location: Kenmare, ND
Points: 1244
|
Post Options
Thanks(0)
Quote Reply
Posted: 18 Aug 2018 at 5:24pm |
We then worked on the air cleaner a bit more. Got the new paper filter that I got from Norm installed in the main housing, though it was a bit short so we put a layer of self sticking foam gasket material around the top and bottom side to seal against the rough cast housing better, and that solved the problem.
The ring that the glass jar screws into in the bottom tin canister was in poor shape. After studying it a bit, Dad and I came to the conclusion it is just a canning jar lid soldered into the tin housing. So we warmed it up with the propane torch to melt the solder, and pulled it out. We then put a new canning jar lid in and soldered it in place. Problem solved.
The inside of the tin housing is still dirty, so we put it in a pail of diesel to soak and clean, but once cleaned out, the air cleaner can go back together and back one the tractor.
pics of this:
|
|
Jacob Swanson
1920 6-12; 1925,1926 20-35 longfenders; 1925,1926 15-25's; 1927,1929 20-35 shortfenders; C; B's; IB; WC's; WD; WD45
|
|
Jacob (WI,ND)
Orange Level
Joined: 11 Sep 2009
Location: Kenmare, ND
Points: 1244
|
Post Options
Thanks(0)
Quote Reply
Posted: 18 Aug 2018 at 5:07pm |
Hi all,
Boy has it been a busy summer, with all the tractor shows to attend, and new rusty junk to run after and drag home. I have not had much tractor working time, but I did manage to get a few things done my last couple of trips home to WI.
Figured I should update this tread a bit. Not sure if anyone is even following it any more, it has gotten so drug out.
I figured out a plan to clean out the oil tube that mounts along side the block, that feeds the oil lines for the tractor from the oil pump. Dad and I figured if we could get a brush down the length of the tube would be best, to make sure there was no rust, crust, gunk blocking oil passages. But there is no access for such a thing. So what we did was drill out the rear end of the tube, then tapped it for a pipe plug. We then got down the length of the tube with a gun cleaning kit and got it squeaky clean. When done, insert pipe plug and when on the tractor it is hidden by the clutch housing and tube mounting bracket.
I ended up having to take the torch and heat up the tube and straighten it out some so it would line up with all three oil ports, as well as the main port from the oil pump in the oil pan. Nothing is ever easy with these old tractors, but that is part of the fun and games.
Note that the oil lines have different restrictions on the fittings for different locations. This may help someone down the road, so I made a little note for future reference.
Here are photos of this:
We then turned our attention to finishing up the oil filter canister conversion. This was mostly done, and I may have mentioned this in the past? Just had to drill some holes in the center tube, and make a new o-ring for the canister to seal up to the housing. We went to Napa and the great guy behind the counter (he knows we are old tractor guys, and likes the challenge of what we might ask for when we come in, LOL!) Found us a square O-ring *just* about the right size. It was a hair too big in OD. So we took it home and made up a quick jig on the disc sander and sanded it down a touch. One vintage metal coffee can to slip the O-ring around (already taken off can in pic) sand a bit, Perfect fit!
For future reference it is a 1125 Napa filter.
Here are some pics of this:
|
|
Jacob Swanson
1920 6-12; 1925,1926 20-35 longfenders; 1925,1926 15-25's; 1927,1929 20-35 shortfenders; C; B's; IB; WC's; WD; WD45
|
|
Jacob (WI,ND)
Orange Level
Joined: 11 Sep 2009
Location: Kenmare, ND
Points: 1244
|
Post Options
Thanks(0)
Quote Reply
Posted: 27 Mar 2018 at 9:34pm |
 AndrewGubbels wrote: AndrewGubbels wrote:
it sure is looking good! I see just a couple of small pieces that look to be from nebraska at one time! I cant wait to see the finished tractor! They take so much time to finish!
Andy
|
Thanks Andy, yeah the exhaust manifold and throttle quadrant cleaned up nicely, and worked out beautifully. I know I got a few other things from you, but those were the two harder ones to find, thanks again! You and me both want to see this thing done, I knew it would not just fall together over night, but it sure is taking longer than I expected. When life happens, a year can slip by with out even noticing. SO many things to do, so little time...
|
|
Jacob Swanson
1920 6-12; 1925,1926 20-35 longfenders; 1925,1926 15-25's; 1927,1929 20-35 shortfenders; C; B's; IB; WC's; WD; WD45
|
|
AndrewGubbels
Orange Level
Joined: 12 Sep 2009
Location: nebraska
Points: 1486
|
Post Options
Thanks(0)
Quote Reply
Posted: 27 Mar 2018 at 12:08am |
|
it sure is looking good! I see just a couple of small pieces that look to be from nebraska at one time! I cant wait to see the finished tractor! They take so much time to finish!
Andy
|
|
Andrew Gubbels
Gubbels Restoration
|
|
Jacob (WI,ND)
Orange Level
Joined: 11 Sep 2009
Location: Kenmare, ND
Points: 1244
|
Post Options
Thanks(0)
Quote Reply
Posted: 25 Mar 2018 at 10:04pm |
There, wow, I took WAY too much time this weekend to transfer my pics from my old Photobucket account to my Google Photos account. I have placed all my pics from this tractor project in an album, and I will continue to add to that album as I progress.
I also spent the time to go though this entire thread and update and edit the photos and links to my Google Photos page. So all links should be good now.
As far as I can see, the only drawback is that I can not embed the pics directly in threads, but I can put in links to the pics.
As for an actual update, I really have not made any progress in a long time. I did end up taking the heads back off of the tractor to check that I had the valves in the correct places. The only difference between the new exhaust and intake valves is the Exhaust have a small S on the center of the head. After I had gotten the heads all back on I had realized I was not confident I had checked the valves were in the correct places. So after sleeping on it a long while, I decided to take them back off to be sure. Ends up, I did have them all right, all along!
I also wanted to rework the manifold holes and studs a bit too, as I was not 100% happy with how everything went together. It all probably would have been fine, but I wanted to be 100% sure about it. So I have drilled the manifold stud holes out a bit and tweaked some of the studs a touch to get everything to line up better with no stress on anything.
I also wanted to seal up where the rocker arm shafts go through the ends of the heads, to prevent oil leaks. This was recommended to me and I'd prefer as few leaks as possible. Next tractor I may have these machined to put an O ring on them to seal it up.
So once the rocker arm shafts get a finger full of sealant on them the heads and manifolds can go BACK on the tractor again. And then I'll be back to where I was. I swear, the next 20-35 will be much easier, this one is my learning curve 
But bedsides that, I've been working on house remodel stuff, and barn addition stuff. Gotta have a place to put all these tractors, hopefully we'll get that wrapped up this spring/summer. Been picking away on it this last fall and through the winter. So the few times I've been home in the last year I've been working on that instead of tractors.
|
|
Jacob Swanson
1920 6-12; 1925,1926 20-35 longfenders; 1925,1926 15-25's; 1927,1929 20-35 shortfenders; C; B's; IB; WC's; WD; WD45
|
|
HD6GTOM
Orange Level

Joined: 30 Nov 2009
Location: MADISON CO IA
Points: 6627
|
Post Options
Thanks(1)
Quote Reply
Posted: 14 Jan 2017 at 3:43pm |
|
Jacobe. We have been wondering about your project. Thank you for the updates. Looking good
|
|
Jacob (WI,ND)
Orange Level
Joined: 11 Sep 2009
Location: Kenmare, ND
Points: 1244
|
Post Options
Thanks(0)
Quote Reply
Posted: 14 Jan 2017 at 2:03pm |
It was well below zero when I was out in the barn putting everything together, so I didn't stop for many pictures. One must bundle up and work fast to get anything done in these temps. I was determined to get this done though! A few trip to warm up by the wood stove in the cabin were made that day. It is surprising how much you can do with gloves on when it's that cold, even though it sure is inconvenient. One must bundle up and work fast to get anything done in these temps. I was determined to get this done though! A few trip to warm up by the wood stove in the cabin were made that day. It is surprising how much you can do with gloves on when it's that cold, even though it sure is inconvenient.
https://photos.google.com/share/AF1QipMw-W2_yghlqdtaQTxKWwnjA2jQPZ4rec8kTtiRGnDvSvFkHie9t4jmlkD6DbqUew/photo/AF1QipP7oE0kolOksAq4fD-NNQ6U3C3g0Fm7sMNVo8Pp?key=b1kyNl92RG81NVRZeDZ0OHNpYWxYTFNsb0JxVzB3
https://photos.google.com/share/AF1QipMw-W2_yghlqdtaQTxKWwnjA2jQPZ4rec8kTtiRGnDvSvFkHie9t4jmlkD6DbqUew/photo/AF1QipPk1PdSAx0pg4f4o8RDSLkDHrtNQITvnm7AlQu2?key=b1kyNl92RG81NVRZeDZ0OHNpYWxYTFNsb0JxVzB3
Heads torqued down to block. I did 60 lbs on the head nuts, except for the center one which is only 40 lbs because the block is very thin in this area and easy to break something. These are the numbers that were suggested to me from others that have done these tractors. There are no service manuals for these old AC's.
I forgot to mention that before I torqued down the heads I first placed everything on the block, then the manifolds on the heads and snugged them up by hand, then once everything was lined up good, the heads were torqued down in increments, then the manifolds were torqued down to the heads last. This way the manifolds and heads are in line and there is no unneeded stress on the manifold or head ears, so hopefully nothing will break.
I torqued the manifolds to 25 lbs.
I then placed the carb back on the tractor which has previously been rebuilt. I then put a few of the linkages back on the tractor for the carb, and looked at a few more details that will have to be addressed. By then I had spent enough time in the cold, time to go home!
I guess that is about it for now. Sure is a long road to bring one of these beauties back to life. But we made a huge step in the right direction getting these things done!
Edited by Jacob (WI,ND) - 25 Mar 2018 at 9:52pm
|
|
Jacob Swanson
1920 6-12; 1925,1926 20-35 longfenders; 1925,1926 15-25's; 1927,1929 20-35 shortfenders; C; B's; IB; WC's; WD; WD45
|
|
Jacob (WI,ND)
Orange Level
Joined: 11 Sep 2009
Location: Kenmare, ND
Points: 1244
|
Post Options
Thanks(0)
Quote Reply
Posted: 14 Jan 2017 at 2:01pm |
So with my manifold cleaned up and the heads ready, I set it all up on the workbench (in the garage with heat ) to dry fit everything to make sure everything was right and mated up good before I brought them out the barn to put on the tractor. ) to dry fit everything to make sure everything was right and mated up good before I brought them out the barn to put on the tractor.
Everything seemed to be good, so I took it all back apart and loaded everything up in the truck to head to the barn.
Edited by Jacob (WI,ND) - 25 Mar 2018 at 9:50pm
|
|
Jacob Swanson
1920 6-12; 1925,1926 20-35 longfenders; 1925,1926 15-25's; 1927,1929 20-35 shortfenders; C; B's; IB; WC's; WD; WD45
|
|
Jacob (WI,ND)
Orange Level
Joined: 11 Sep 2009
Location: Kenmare, ND
Points: 1244
|
Post Options
Thanks(0)
Quote Reply
Posted: 14 Jan 2017 at 2:00pm |
So this past summer I got a good used exhaust manifold which was great. It just needed to be fly cut to clean up the ports where it meets the head as they were a bit pitted and ugly like they usually are. No big deal, I usually just take things like this to our local NAPA and they take care of the machining for me as we don't have the proper equipment to tackle this yet.But do to unfortunate circumstances they no longer do the machining in house and have to send it down to Rice lake WI NAPA to be done. Again, normally this would not be a problem, but this trip I was under a time crunch and didn't plan ahead enough to have this done and get it back in time to get the heads put back on the tractor. I really wanted to get this assembly done this trip, so I improvised. How hard could it be to get this manifold trued up myself?I brainstormed and came up with a plan. First step was to mount the manifold to a piece of large angle iron. After laying out and drilling some holes in the angle iron, and coming up with some spacers and bolts to fasten the manifold to the angle, I had the manifold sitting square with the world.
https://photos.google.com/share/AF1QipMw-W2_yghlqdtaQTxKWwnjA2jQPZ4rec8kTtiRGnDvSvFkHie9t4jmlkD6DbqUew/photo/AF1QipP2M2Ay9L4O1R3iNKKWo5urnPxn-bR77OCo6NSl?key=b1kyNl92RG81NVRZeDZ0OHNpYWxYTFNsb0JxVzB3
I fabbed up a jig to clamp to the table saw fence, which would give the bottom edge of the angle iron something to ride against straight and square with the sanding disc I had placed in the table saw. This is a metal disc that you put a self adhesive sanding disc on to use the table saw like a disc sander. Normally used for woodworking, but I break the rules.  I did have to chase all over town to find the correct sanding discs made for sanding metal. I did have to chase all over town to find the correct sanding discs made for sanding metal.
https://photos.google.com/share/AF1QipMw-W2_yghlqdtaQTxKWwnjA2jQPZ4rec8kTtiRGnDvSvFkHie9t4jmlkD6DbqUew/photo/AF1QipPfhMh26mJRcCwemc7XFVdf-dFq5gqhGgdV-edF?key=b1kyNl92RG81NVRZeDZ0OHNpYWxYTFNsb0JxVzB3
So then with light passes back and forth I sanded the ports all smooth and true. With the fence jig carefully set in in small increments more and more could be taken off of the manifold until it was all trued up.
Here is the final product.
https://photos.google.com/share/AF1QipMw-W2_yghlqdtaQTxKWwnjA2jQPZ4rec8kTtiRGnDvSvFkHie9t4jmlkD6DbqUew/photo/AF1QipMJ4UTo2wLTVtphdj2fTSmu8ztevd8qacMlDi4O?key=b1kyNl92RG81NVRZeDZ0OHNpYWxYTFNsb0JxVzB3
Took me entirely too long to get it all figured out and to work good, (as I tried another attempt first, but that did not work so I won't even tell you about it). But in the end it worked good, and I didn't have to send it out to be done.
Would have been more enjoyable to do if the garage the table saw is in were not 0 degrees in though. Stupid winter.
Edited by Jacob (WI,ND) - 25 Mar 2018 at 9:48pm
|
|
Jacob Swanson
1920 6-12; 1925,1926 20-35 longfenders; 1925,1926 15-25's; 1927,1929 20-35 shortfenders; C; B's; IB; WC's; WD; WD45
|
|
Jacob (WI,ND)
Orange Level
Joined: 11 Sep 2009
Location: Kenmare, ND
Points: 1244
|
Post Options
Thanks(0)
Quote Reply
Posted: 14 Jan 2017 at 1:57pm |
SO, while I was home over the holidays, my goal was to finally get the heads and manifolds bolted back onto the block of my '27! Sounds easy enough, but sure fought me every step of the way it seemed.The first thing I did was order up the new studs and nuts I needed for all of this from McMaster Carr. While I was waiting for them to arrive I went back to the valve spring clips that we talked about previously in this thread. I went the route that Phil suggested and took everything back apart, put the clip on the valve stem and reassembled the spring and keeper and then took a small screwdriver and slid the clip up into the grove.Talk about a pain in the ass! You can't see what you are doing so it is mainly a hope that everything is right and it is in the groove well. Next tractor I do I will make sure the valves are machined correctly or will drill my own hole for a cotter pin like they had originally! Something so simple really makes the process frustrating! But once this was done I focused on getting other things ready. They also fought me.... But once this was done I focused on getting other things ready. They also fought me....
|
|
Jacob Swanson
1920 6-12; 1925,1926 20-35 longfenders; 1925,1926 15-25's; 1927,1929 20-35 shortfenders; C; B's; IB; WC's; WD; WD45
|
|
Jacob (WI,ND)
Orange Level
Joined: 11 Sep 2009
Location: Kenmare, ND
Points: 1244
|
Post Options
Thanks(0)
Quote Reply
Posted: 14 Jan 2017 at 1:56pm |
Another note I'm not sure in which of my threads to post is this, so I'll put it here.By accident I stumbled upon this bit of info. The water manifolds for shortfender 20-35's and longfenders are different in height. Haven't pulled out the tape measure yet, but am thinking the difference comes into play on the different radiators and where there upper neck is located?
https://photos.google.com/share/AF1QipMw-W2_yghlqdtaQTxKWwnjA2jQPZ4rec8kTtiRGnDvSvFkHie9t4jmlkD6DbqUew/photo/AF1QipPgCJvbmFI0cirtOJJWaJEk5ldUpzxwYgCwMe8-?key=b1kyNl92RG81NVRZeDZ0OHNpYWxYTFNsb0JxVzB3
Just thought it was an interesting difference and worth noting.
Edited by Jacob (WI,ND) - 25 Mar 2018 at 9:45pm
|
|
Jacob Swanson
1920 6-12; 1925,1926 20-35 longfenders; 1925,1926 15-25's; 1927,1929 20-35 shortfenders; C; B's; IB; WC's; WD; WD45
|
|
Jacob (WI,ND)
Orange Level
Joined: 11 Sep 2009
Location: Kenmare, ND
Points: 1244
|
Post Options
Thanks(0)
Quote Reply
Posted: 14 Jan 2017 at 1:52pm |
WOW has it been too long since I've updated this post! I spent a bunch of the summer chasing after my other old 20-35's and getting them home, so progress on the '27 suffered. But I just took a few pics off of my phone and uploaded them to my Photobucket, so I will try to play catch up with this post a bit.I believe I mentioned in the past that I was converting the original oil filter to use a modern canister type filter to replace the original spring and sock setup. While I was home over the holidays I snapped a couple of pics of what we did to convert the original housing.
Edited by Jacob (WI,ND) - 25 Mar 2018 at 9:43pm
|
|
Jacob Swanson
1920 6-12; 1925,1926 20-35 longfenders; 1925,1926 15-25's; 1927,1929 20-35 shortfenders; C; B's; IB; WC's; WD; WD45
|
|
Jacob (WI,ND)
Orange Level
Joined: 11 Sep 2009
Location: Kenmare, ND
Points: 1244
|
Post Options
Thanks(0)
Quote Reply
Posted: 18 Aug 2016 at 7:15pm |
Looks like a very good starting point Brendan! Much more complete than what I began with. Be sure to keep us updated on your progress, I love looking at these old beauties. 
|
|
Jacob Swanson
1920 6-12; 1925,1926 20-35 longfenders; 1925,1926 15-25's; 1927,1929 20-35 shortfenders; C; B's; IB; WC's; WD; WD45
|
|
Brendan (AB)
Bronze Level

Joined: 19 Sep 2013
Location: Alberta
Points: 41
|
Post Options
Thanks(1)
Quote Reply
Posted: 18 Aug 2016 at 12:09am |
Here is a picture of my '27 when I got it a few of years ago. The engine was stuck, and I have since got it loose, but one of the sleeves is cracked. I think I should have something usable in one of my parts tractors. Beyond that, I haven't done much to it yet. Thanks for the offer of advice, I may have to take you up on that at some point! Glad you were able to get the spring made for the pawl on the throttle lever. And as far as where to get piano wire, I think that McMaster Carr sells it.
Edited by Brendan (AB) - 18 Aug 2016 at 12:14am
|
|
Sugarmaker
Orange Level

Joined: 12 Jul 2013
Location: Albion PA
Points: 8168
|
Post Options
Thanks(0)
Quote Reply
Posted: 13 Aug 2016 at 8:48pm |
|
Very nice to see your project being assembled!
Regards,
Chris
|
|
D17 1958 (NFE), WD45 1954 (NFE), WD 1952 (NFE), WD 1950 (WFE), Allis F-40 forklift, Allis CA, Allis D14, Ford Jubilee, Many IH Cub Cadets, 32 Ford Dump, 65 Comet.
|
|
JayIN
Orange Level

Joined: 18 Dec 2009
Location: SE/IN
Points: 1982
|
Post Options
Thanks(1)
Quote Reply
Posted: 13 Aug 2016 at 7:35pm |
|
WOW! I am continually impressed! What great work ethic! I will last another 80 years EASILY!!!!!
|
|
sometimes I walk out to my shop and look around and think "Who's the idiot that owns this place?"
|
|
Jacob (WI,ND)
Orange Level
Joined: 11 Sep 2009
Location: Kenmare, ND
Points: 1244
|
Post Options
Thanks(0)
Quote Reply
Posted: 13 Aug 2016 at 12:52pm |
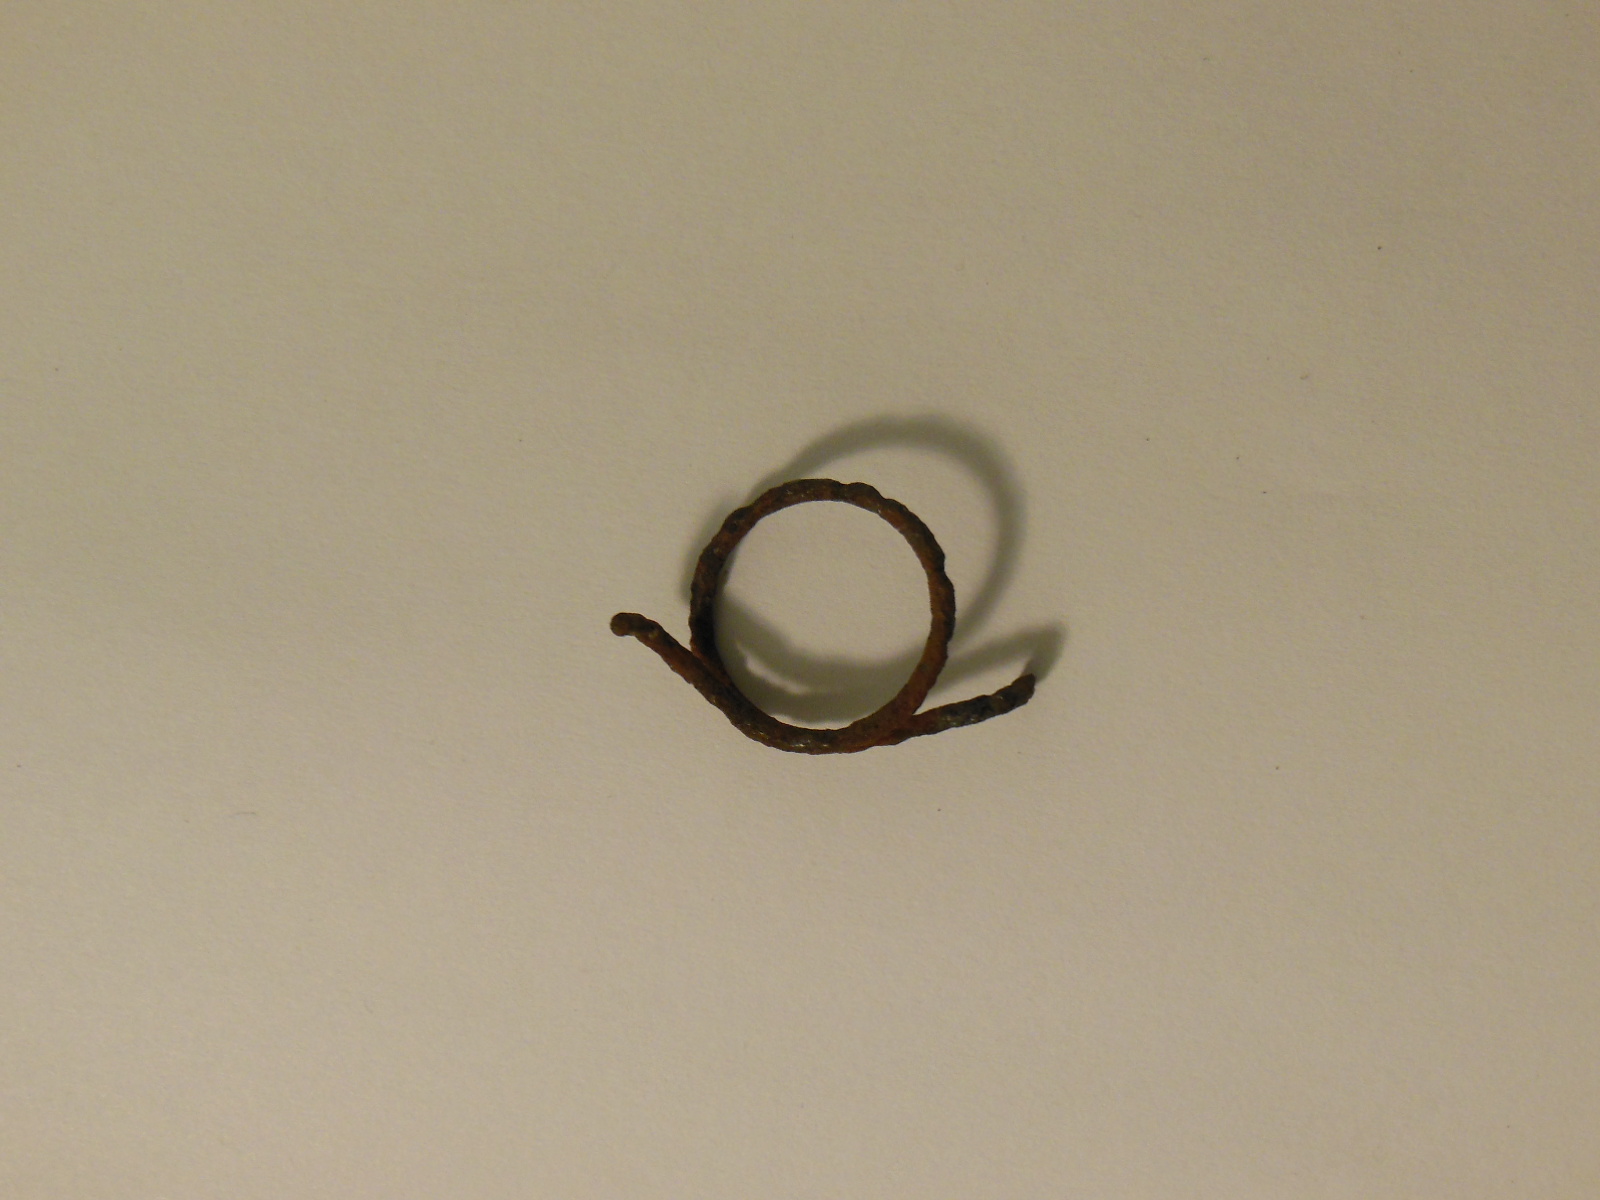
It took a couple (OK maybe several ) attempts, but I got a spring made up. I ended up digging through my junk drawer and found some misc springs from who knows what. Took one with about that 11/16" ID and about the correct thickness wire, and got after it with my pliers. I ended up making it with a little less of a "loop" from end to end to get the right tension on the flipper, but it works good now! PS- starting with a spring "wound" the right way helps, don't ask....  The true test will be to see how it works when on the tractor in operation, but if nothing else I'll make a new one slightly different. Thanks again for the quick reply! One more thing checked off the list of things to do  |
|
Jacob Swanson
1920 6-12; 1925,1926 20-35 longfenders; 1925,1926 15-25's; 1927,1929 20-35 shortfenders; C; B's; IB; WC's; WD; WD45
|
|
Jacob (WI,ND)
Orange Level
Joined: 11 Sep 2009
Location: Kenmare, ND
Points: 1244
|
Post Options
Thanks(0)
Quote Reply
Posted: 13 Aug 2016 at 11:05am |
Thanks Brendan! That is EXACTLY what I was looking for, now I just need to find something to make it out of. I've heard piano wire works good for this sort of think, but don't know where to find any of that?
I'd love to see some pics of your tractor and hear a little more about it Brendan, and if I can be of any assistance just holler.
Same goes for you Terry.
Yeah Phil, I've run into a couple springs like this, where looking at them too hard would snap them 
Thanks again everyone for the encouragement, advice, help, and compliments along the way! Really shows how the AC bunch really is a family |
|
Jacob Swanson
1920 6-12; 1925,1926 20-35 longfenders; 1925,1926 15-25's; 1927,1929 20-35 shortfenders; C; B's; IB; WC's; WD; WD45
|
|
Alberta Phil
Orange Level

Joined: 13 Sep 2009
Location: Alberta, Canada
Points: 3657
|
Post Options
Thanks(0)
Quote Reply
Posted: 13 Aug 2016 at 9:19am |
|
Good for a pattern, Brendan, but I wouldn't want to put much torque on that particular spring! LOL Looks like an easy one to make.
Have you made much progress on your '27?
Edited by Alberta Phil - 13 Aug 2016 at 9:20am
|
|
Brendan (AB)
Bronze Level
Joined: 19 Sep 2013
Location: Alberta
Points: 41
|
Post Options
Thanks(1)
Quote Reply
Posted: 13 Aug 2016 at 12:43am |
Hi Jacob,
Thanks for posting all of the information on your restoration. I have a 1927 20-35 also, which I hope to restore one day.
Here are some of pictures of my spring. It's badly pitted, but shows what it should look like. The inside diameter is about 11/16". Hope that helps!
|
|
truckerfarmer
Orange Level Access

Joined: 26 Jan 2013
Location: Watertown, SD
Points: 3183
|
Post Options
Thanks(0)
Quote Reply
Posted: 12 Aug 2016 at 11:21pm |
|
Terry,was that you I saw headed east on 212 with it this morning? I was at Prairie Stop putting on gas to head to Peever to get Dad's WD cultivator. Must have been the day to haul Orange today.
|
|
Looking at the past to see the future.
'53 WD, '53 WD45, WD snap coupler field cultivator, #53 plow,'53 HD5B dozer
Duct tape.... Can't fix stupidity. But will muffle the sound of it!
|
|
orange
Bronze Level
Joined: 09 Apr 2011
Location: watertown s d
Points: 140
|
Post Options
Thanks(0)
Quote Reply
Posted: 12 Aug 2016 at 9:21am |
|
Jacob I also have just purchased a 20-35 1927 s. n. 9766 lot of work on mine to do also nothing like yours. I live in Watertown .s. d. Maybe will meet up sometime .
Terry
|
|
AC7060IL
Orange Level
Joined: 19 Aug 2012
Location: central IL
Points: 3212
|
Post Options
Thanks(0)
Quote Reply
Posted: 12 Aug 2016 at 9:15am |
|
GO Jacob! You are doing an awesome job!!
I read your entire post, for the first time today. Your dedication is amazing. The casting repair that involved brazing in two spacers then machining it, was most interesting.
|
|
HD6GTOM
Orange Level
Joined: 30 Nov 2009
Location: MADISON CO IA
Points: 6627
|
Post Options
Thanks(0)
Quote Reply
Posted: 12 Aug 2016 at 8:35am |
|
Dog gone good work Jacob Looks like you are making excellent progress.
|
|
Jacob (WI,ND)
Orange Level
Joined: 11 Sep 2009
Location: Kenmare, ND
Points: 1244
|
Post Options
Thanks(1)
Quote Reply
Posted: 11 Aug 2016 at 8:15pm |
Well, all the work we got done a while ago balances out the utter lack of progress lately. I've been busy with other things lately it seems, but I have a couple little things to report. I ordered up the new clutch lining material, and Dad got the clutch shoes relined a while ago. They are still not put in the tractor, but are ready to go.
We also got a bushing installed in the mid pan and the rear pivot point for the front axle all put together. Everything is nice and tight like it should be now.
I met up with some forum members at Hutch a few weeks back, and got the rest of the parts I should need to complete this tractor. One of which, and the hardest to find, was the throttle quadrant. I got that all taken apart and cleaned up and working properly and put back together.
The only thing I need to do is find/make a spring for the flipper on the lever.
Does anyone have a good pic of what it should be originally? I figure it must circle around a couple times and have an end in each hole, but want to get it right.
Other than that, not much has been happening. Not looking good to have it going for our local show in mid Sep unfortunately...
Edited by Jacob (WI,ND) - 25 Mar 2018 at 9:38pm
|
|
Jacob Swanson
1920 6-12; 1925,1926 20-35 longfenders; 1925,1926 15-25's; 1927,1929 20-35 shortfenders; C; B's; IB; WC's; WD; WD45
|
|
HD6GTOM
Orange Level
Joined: 30 Nov 2009
Location: MADISON CO IA
Points: 6627
|
Post Options
Thanks(1)
Quote Reply
Posted: 12 Jun 2016 at 11:08pm |
|
I went over the whole post again tonight, man keep up the good work looking REAL good
|
|
Thad in AR.
Orange Level Access

Joined: 12 Sep 2009
Location: Arkansas
Points: 9287
|
Post Options
Thanks(1)
Quote Reply
Posted: 12 Jun 2016 at 8:50pm |
|
It looks like you guys made good use of time. I'm very impressed. Again thanks for taking time to take pics and share with us.
|
|
Jacob (WI,ND)
Orange Level
Joined: 11 Sep 2009
Location: Kenmare, ND
Points: 1244
|
Post Options
Thanks(0)
Quote Reply
Posted: 12 Jun 2016 at 8:38pm |
Things went a lot smoother once we got to the woods. With the D15 moving the engine around was a piece of cake. Picked it up, pulled the trailer ahead, and brought the engine into the barn. Fortunately it was mostly done raining by then.
https://photos.google.com/share/AF1QipMw-W2_yghlqdtaQTxKWwnjA2jQPZ4rec8kTtiRGnDvSvFkHie9t4jmlkD6DbqUew/photo/AF1QipPg7j9bFYmsPG_wyTEDhqJqsokHZ3ycf-xILyvV?key=b1kyNl92RG81NVRZeDZ0OHNpYWxYTFNsb0JxVzB3
Putting the engine back into the tractor!
https://photos.google.com/share/AF1QipMw-W2_yghlqdtaQTxKWwnjA2jQPZ4rec8kTtiRGnDvSvFkHie9t4jmlkD6DbqUew/photo/AF1QipOFFnWUz-fEuDb8KmNU_4206Z0jBRfB6CGqGWNv?key=b1kyNl92RG81NVRZeDZ0OHNpYWxYTFNsb0JxVzB3
Being down in the sand, working on rusty old iron, does life get any better?!
Then, with the engine in, some of the other assemblies I had previously finished could go back on the tractor. The fan assembly was put on, the front crank pulley was put on, the heads were just set on for now. The front axle was put back on, and once I gather up a few more pieces from some friends I can get the front wheels put back on and it can sit on its own feet for the first time since I got it! https://photos.google.com/share/AF1QipMw-W2_yghlqdtaQTxKWwnjA2jQPZ4rec8kTtiRGnDvSvFkHie9t4jmlkD6DbqUew/photo/AF1QipOJidbx02SVrJFTilgy2ynPgZw1HhG51ZRYUGIV?key=b1kyNl92RG81NVRZeDZ0OHNpYWxYTFNsb0JxVzB3
Edited by Jacob (WI,ND) - 25 Mar 2018 at 9:33pm
|
|
Jacob Swanson
1920 6-12; 1925,1926 20-35 longfenders; 1925,1926 15-25's; 1927,1929 20-35 shortfenders; C; B's; IB; WC's; WD; WD45
|
|
Jacob (WI,ND)
Orange Level
Joined: 11 Sep 2009
Location: Kenmare, ND
Points: 1244
|
Post Options
Thanks(0)
Quote Reply
Posted: 12 Jun 2016 at 8:35pm |
Then the oil pan could go back on the engine, along with the oil pickup screen cover.
Edited by Jacob (WI,ND) - 25 Mar 2018 at 9:29pm
|
|
Jacob Swanson
1920 6-12; 1925,1926 20-35 longfenders; 1925,1926 15-25's; 1927,1929 20-35 shortfenders; C; B's; IB; WC's; WD; WD45
|
|